Database in Excel means gathering and arranging information on individuals, products, demands, transactions, etc. In this Excel tutorial, you will learn to create different types of database(s) in Excel. The five most used & common types of Excel database templates (including- library, student, and employee) are also attached.
We made a UserForm named Data Entry. We’re inserting information for a particular client named “Mino” in an Excel worksheet with a data entry form.

What is Database in Excel?
The database is an effective tool for gathering and arranging information. Databases may include data on individuals, products, demands, transactions, and more. Many databases begin as a list in a spreadsheet or document-editing application. Some types of databases are Client databases, Student databases, Employee databases, and so on. Once the list gets longer, redundancies and inconsistencies may begin. Once these issues arise, it is a good idea to move the data to a database management system (DBMS), like Microsoft Access.
What Are the Differences Between Database & Excel?
Excel and Databases share several different key aspects, such as structure, capabilities, and purpose:
- An Excel spreadsheet application used for calculations, data organization, and simple database management, a Database is explicitly designed for storing, retrieving, and managing larger amounts of structured data.
- Excel organizes data in spreadsheets (rows and columns), making it suitable for smaller datasets. It’s file-based and stores data in a single file. On the other hand, the database uses tables, rows, and columns within a structured framework (e.g., SQL databases) to manage vast amounts of interconnected data. It’s often server-based and allows multiple users to access it simultaneously.
- Excel works well for small to medium-sized datasets but may experience performance issues with larger data due to memory and processing limitations. The dataset scales efficiently to handle massive volumes of data without significant performance degradation since it is designed for efficient data storage and retrieval.
- Excel has limited security features and is prone to human errors and accidental modifications. The dataset allows for user permissions and access controls to ensure data security.
- Excel is typically used by individuals or small teams. Sharing Excel files might lead to version control issues. The dataset is designed for collaborative work among organizations, teams, and groups.
- Excel offers robust calculation and visualization tools suitable for fundamental data analysis and reporting. However, the dataset often integrates with other applications for various purposes.
How to Create a Basic Database in Excel
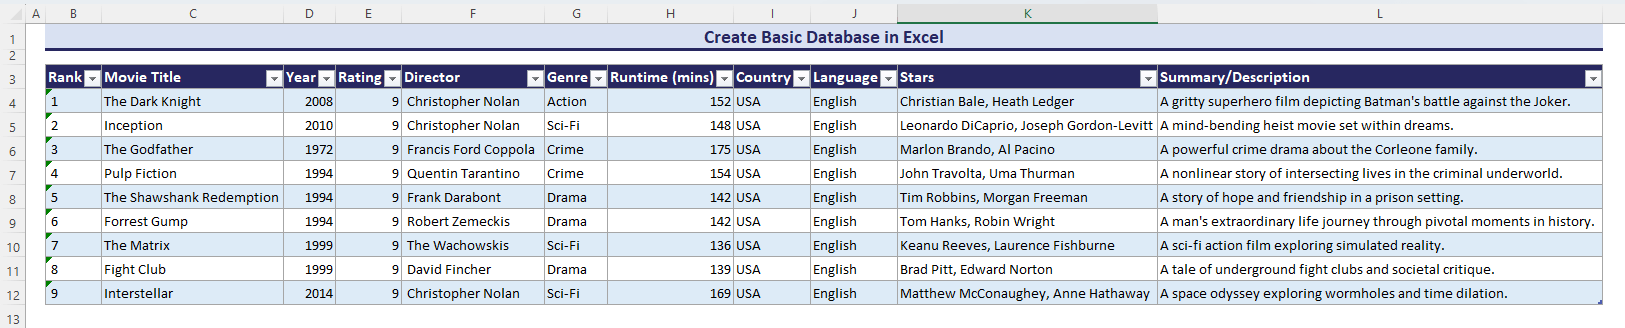
You will learn to create a basic database in Excel. A basic database typically refers to a set of organized data into tables, often with ranges. It stores individual records. We will create a database of all the best top 10 movies according to the IMDB list. The basic database will contain information on Rank, Movie Title, Year, Rating, Director, Genre, Runtime, Category, Language, Stars, and Summary.
- Open an Excel workbook and go to a worksheet.
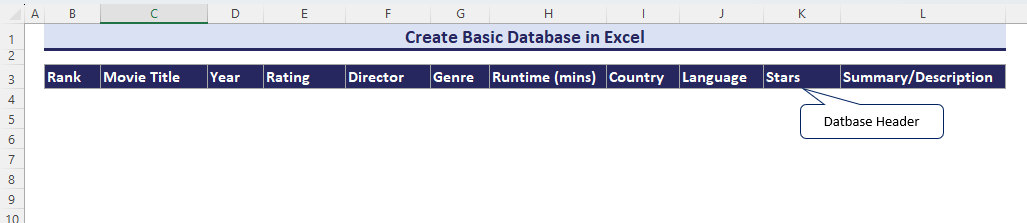
- Insert header for the database.
Click here to enlarge the image
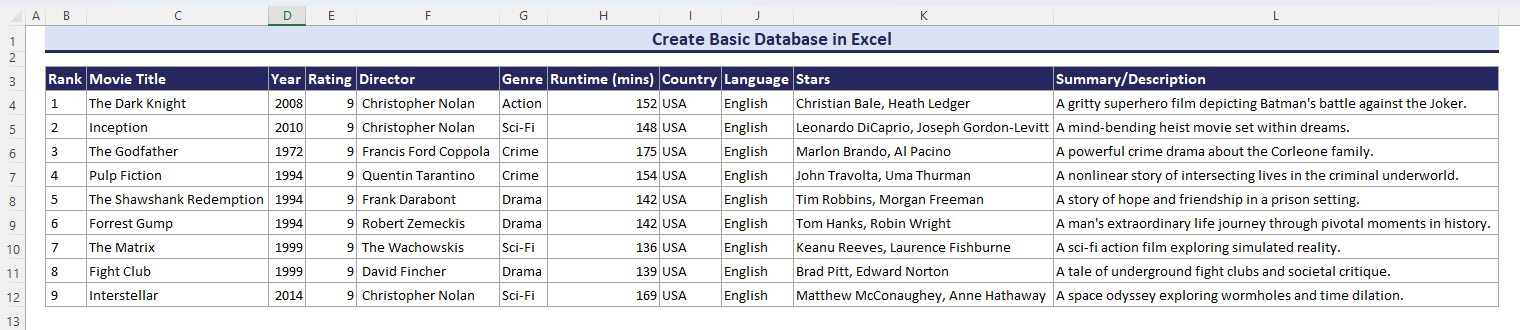
- Add data one by one.
Click here to enlarge the image
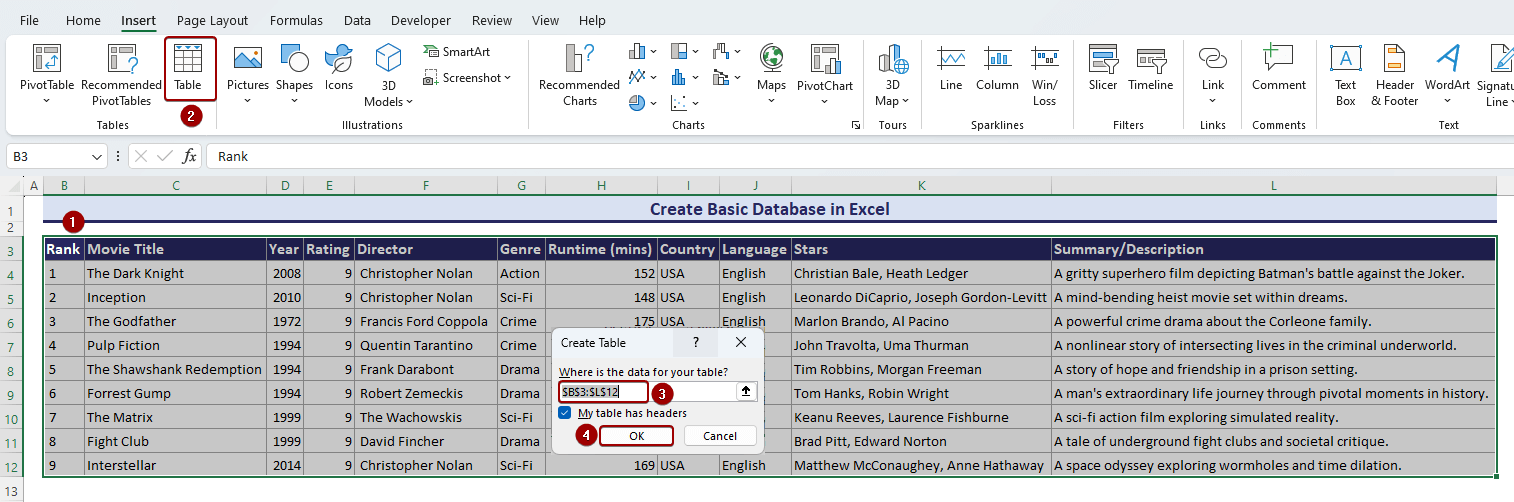
- After that, select B3:L12 and select Table A Create Table dialog box will appear. You will notice that the dataset range is already in the input field.
- Then check My Table has headers => OK.
Click here to enlarge the image
The range will be converted into an Excel Table.
Click here to enlarge the image
- Adding additional data in the 13th row connects to the table automatically.
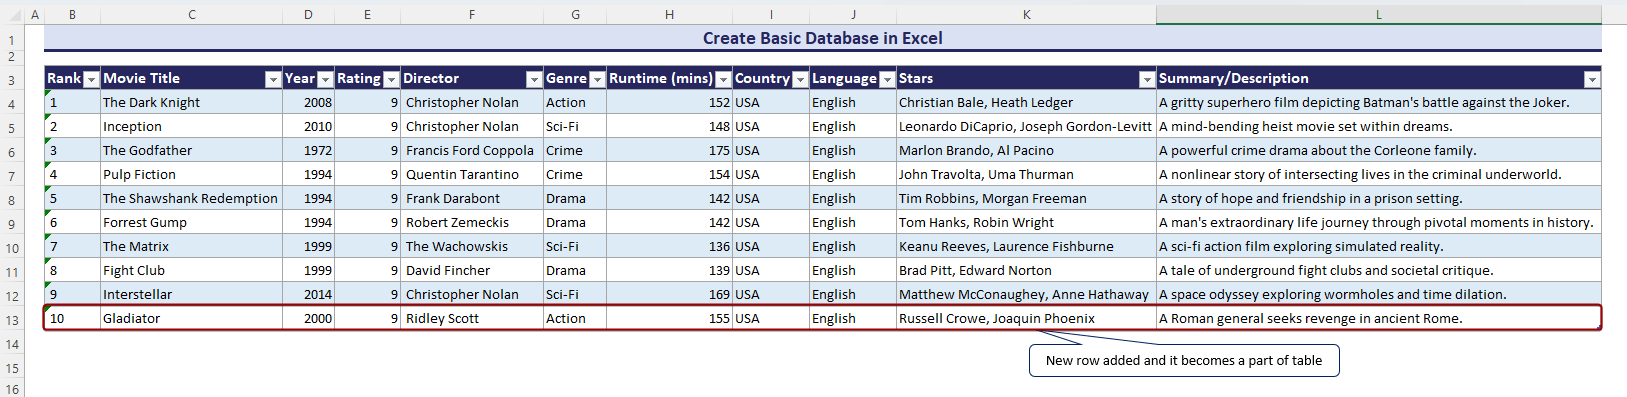
Click here to enlarge the image
How to Make a Searchable Database in Excel
We will show you how to make a searchable database in Excel using the Filter tool, FILTER function, and drop-down list. By selecting the criteria, you can get any information according to your wish. We will apply several approaches to show you data for the drama genre.
Using Basic Filter Tool
The Filter tool is the most convenient and basic tool for making a searchable database.
- Select B5:L5 range and then click as follows: Home => Sort & Filter => Filter.
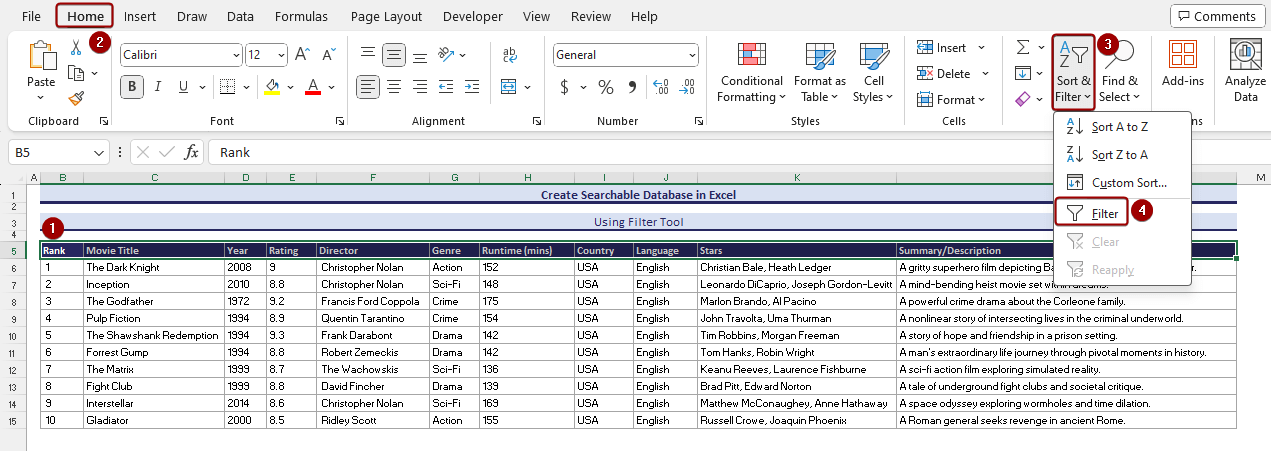
Click here to enlarge the image
- You will get a Filter drop-down. Click as follows: Filter drop-down => Check Drama => OK.
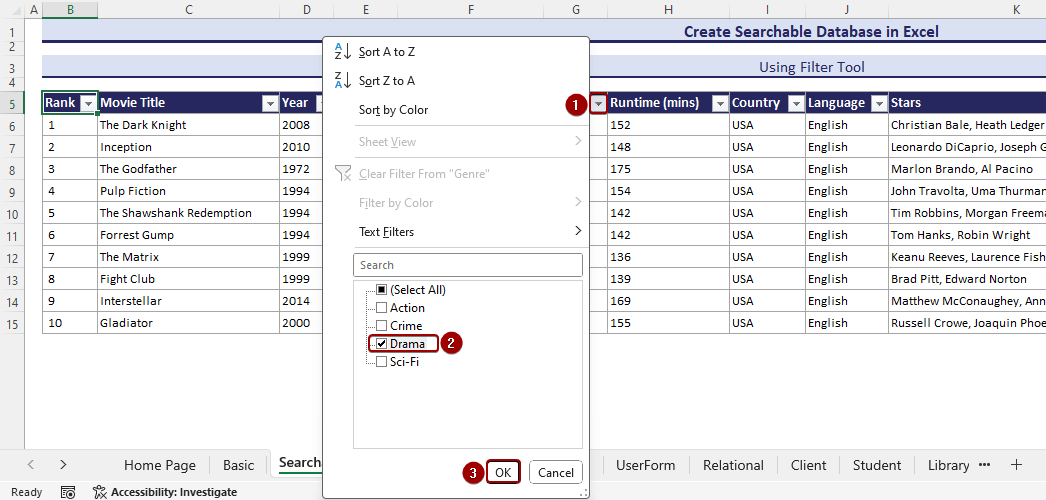
Click here to enlarge the image
- You will be able to gather data for Drama genre hiding another two genres.

Click here to enlarge the image
Applying FILTER Function
The FILTER function is also applicable for making a searchable database in Excel. The FILTER function replicates the use of the Filter tool.
- Using the FILTER formula in the B18 cell, you will get a filtered database for the Drama genre.
=FILTER(B6:L15, G6:G15="Drama")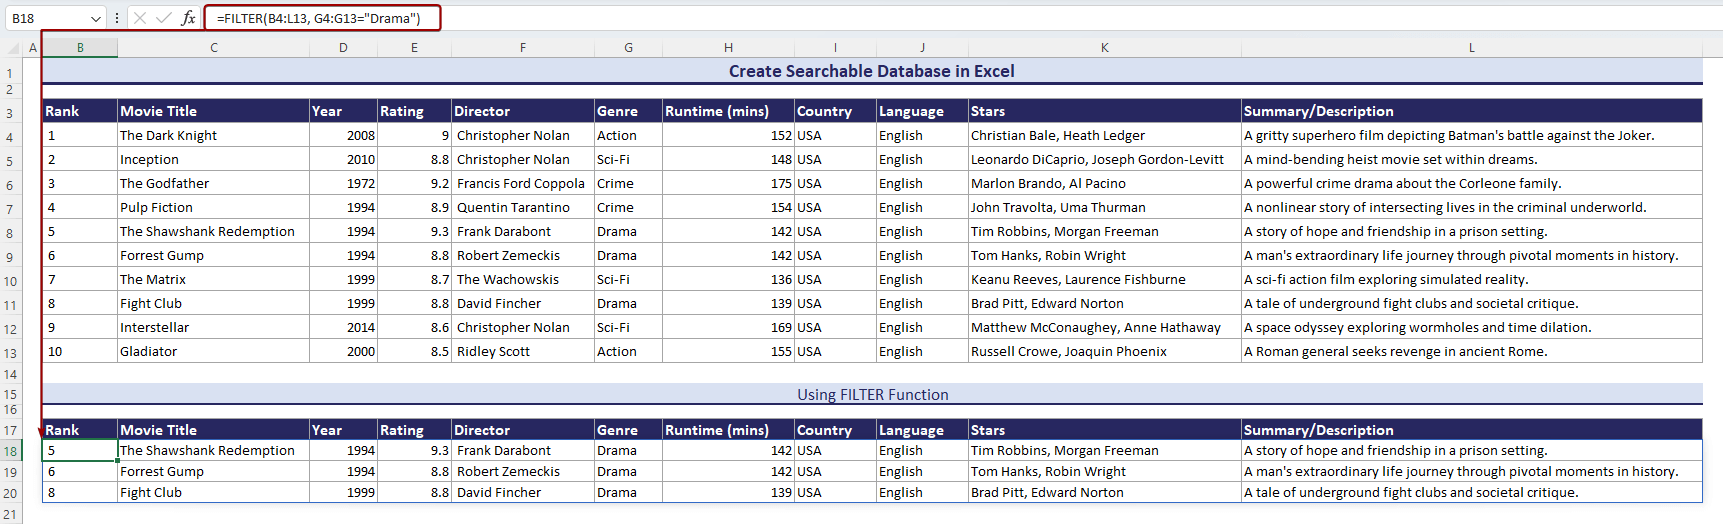
Click here to enlarge the image
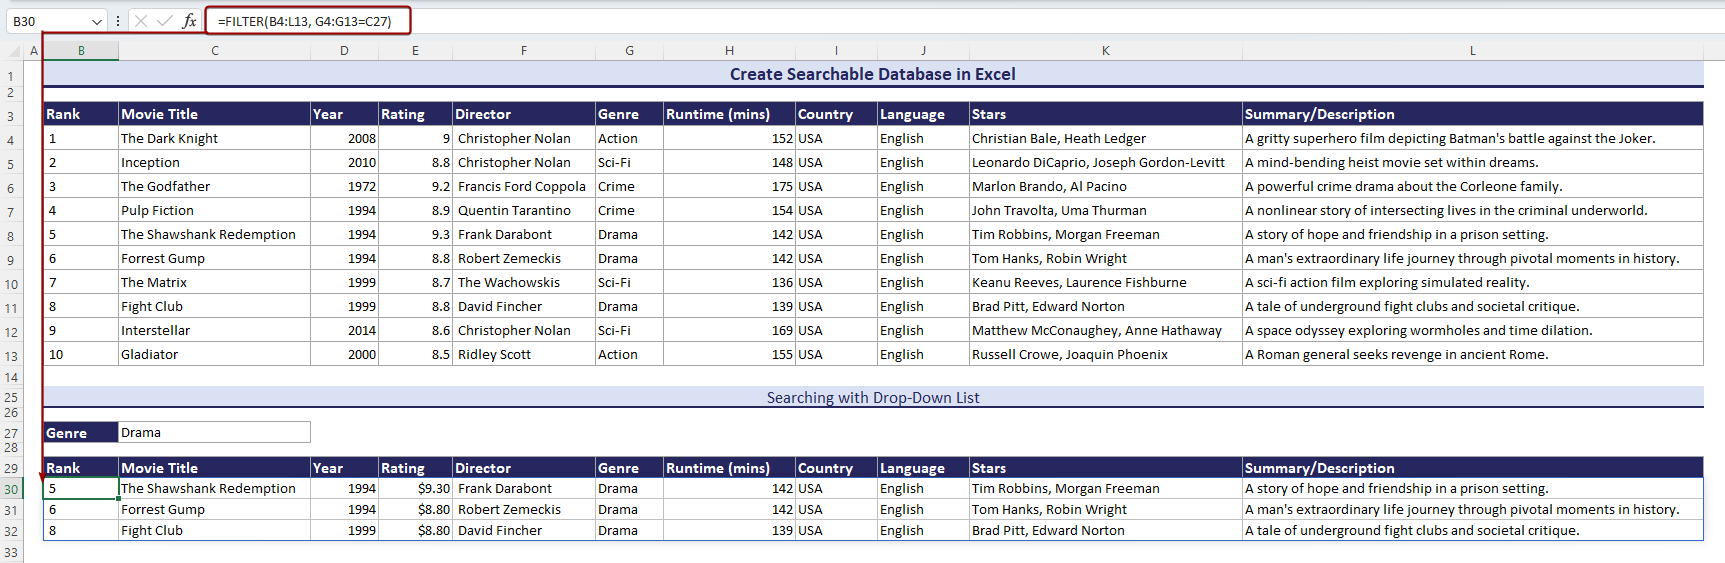
Creating Drop-down List
You can also make a drop-down list with the Data Validation tool to create a searchable database in Excel. Select a genre with a drop-down list and the database will be filtered automatically.
- Insert the following FILTER formula in the B30 cell.
=FILTER(B6:L15, G6:G15=C29)- You will be allowed to gather a filtered database of the Action genre by selecting from the drop-down list.
Click here to enlarge the image
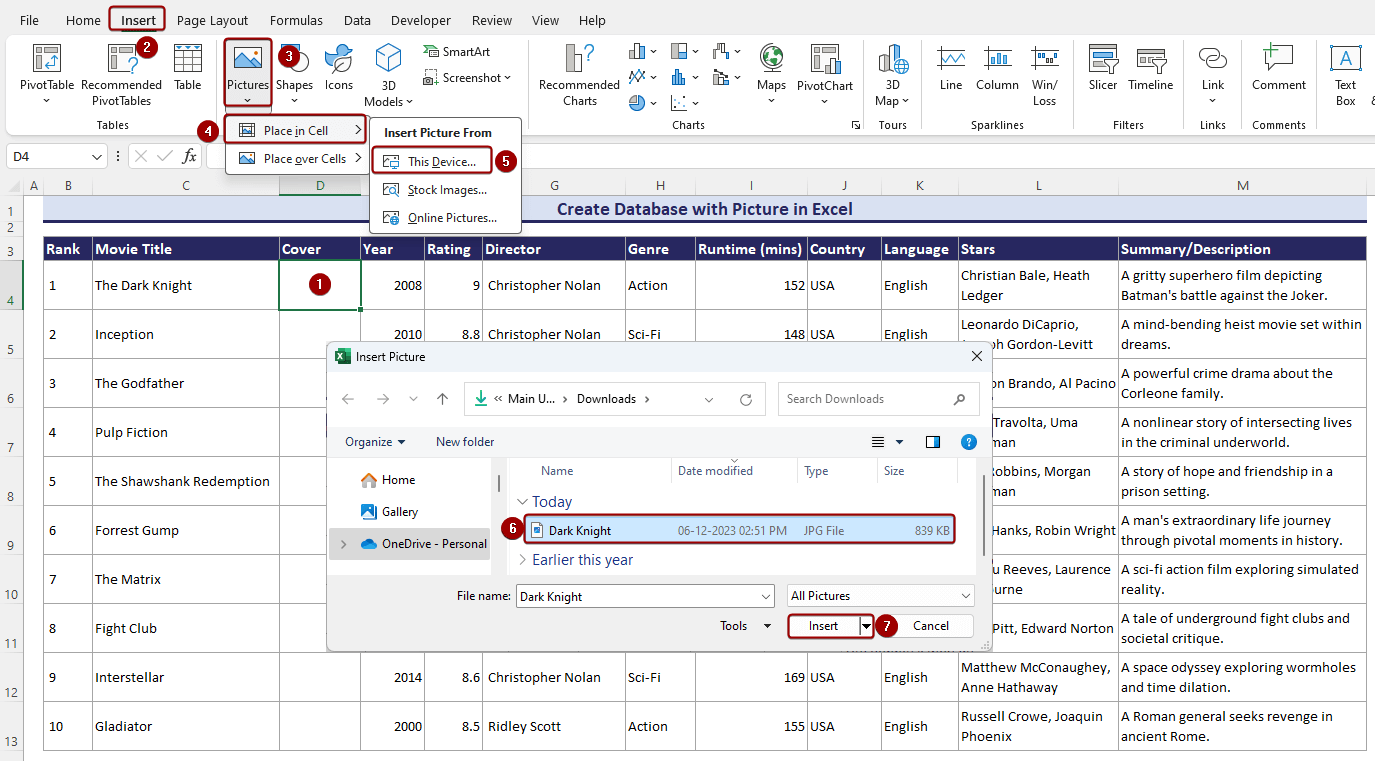
How to Create a Database with Pictures in Excel
Now we will create a database including images in Excel with the Picture command. The picture is inevitable in a database in case of identification and recognition. Insert movie covers for every Movie Title in a separate column.
- Select D4 cell and click as follows: Insert => Pictures => Place in Cell => This Device.
- An Insert Picture dialog box will show up.
- Select your image, such as Dark Knight => Insert.
Click here to enlarge the image
- You will see the inserted image in cell D4 as follows.

Click here to enlarge the image
- You can add all the covers for movies similarly.
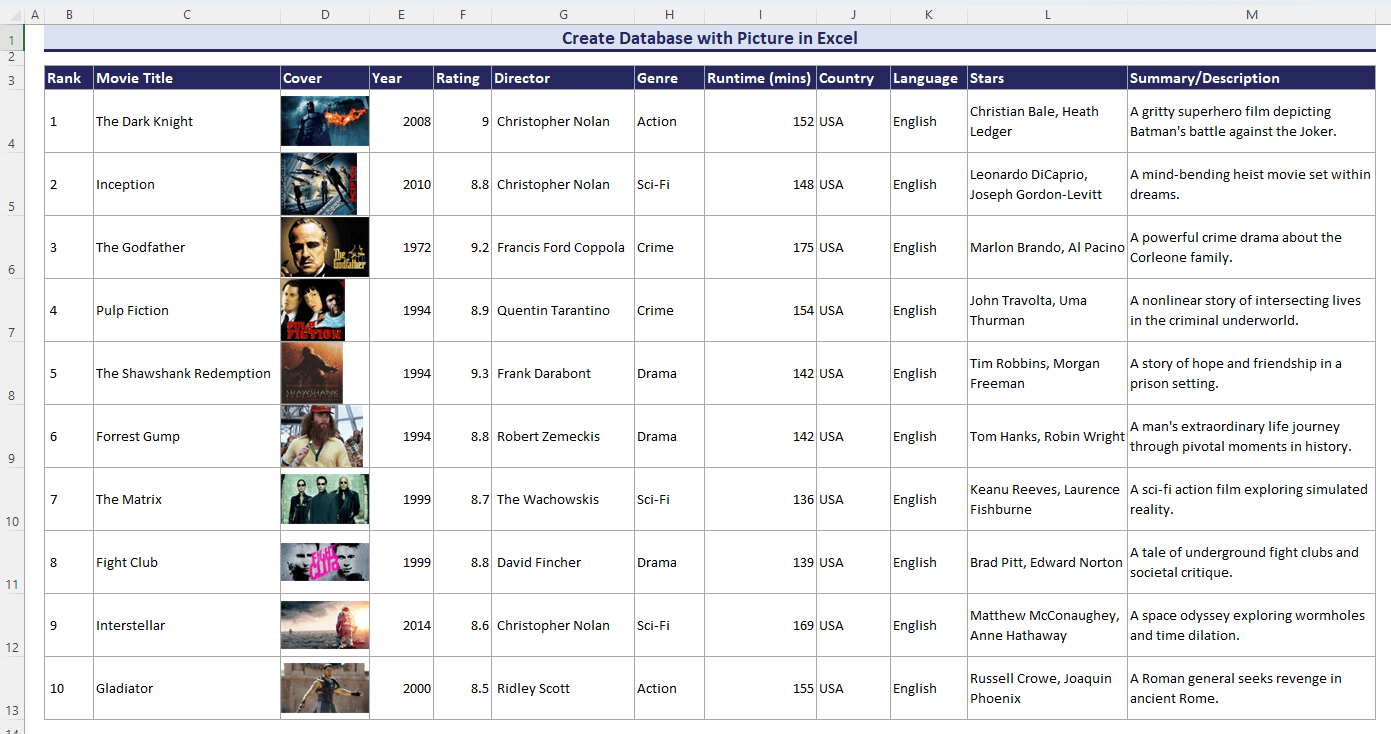
Click here to enlarge the image
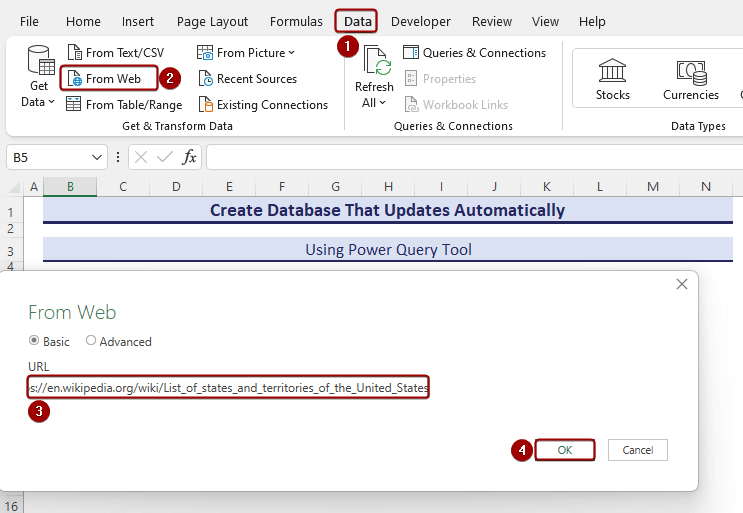
How to Create a Database That Updates Automatically in Excel
In this segment, we will show you how to create a database that updates automatically in Excel. Use Excel’s Power Query tool. Import the List of states and territories of the United States from Wikipedia.
- Go to Data => From Web => insert URL => OK.
- An Access Web Content dialog box will appear.
- Since we are using a link to Wikipedia, you will get the https://en.wikipedia.org/ link in the Select which level to apply these settings to field.
- Click the Connect command.

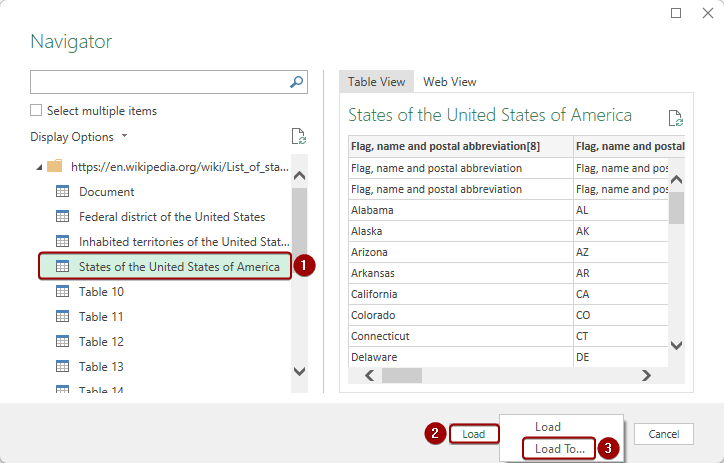
- A Navigator dialog box appears.
- Select States of the United States of America table => Load => Load To.
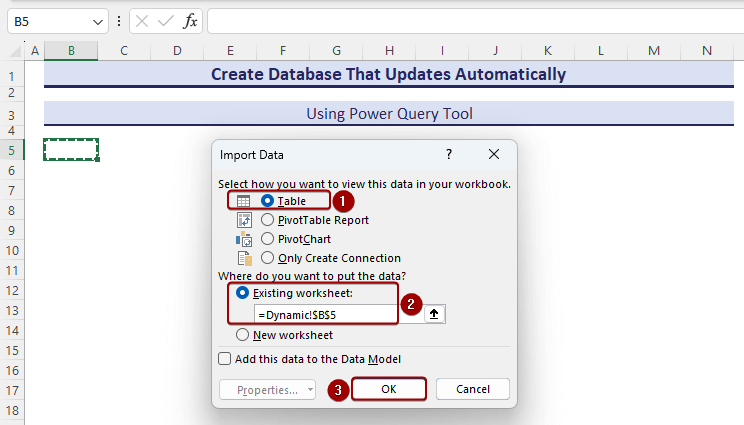
- An Import Data dialog box will show up.
- Select Table => Existing worksheet => select B5 cell => OK.
- All the data will be gathered in Table format from the website.
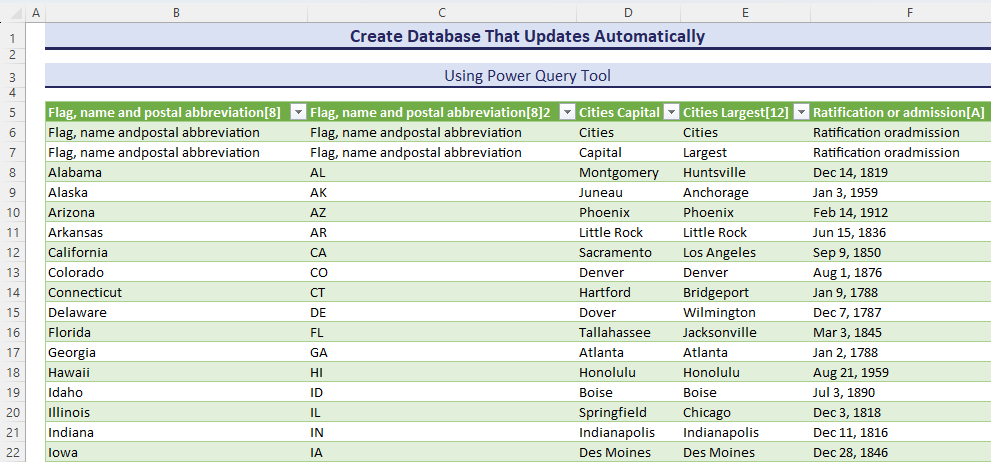
Click here to enlarge the image
We will update data after every 60 minutes. So we must refresh the table.
- Go to Data => Refresh All drop-down => Connection Properties.
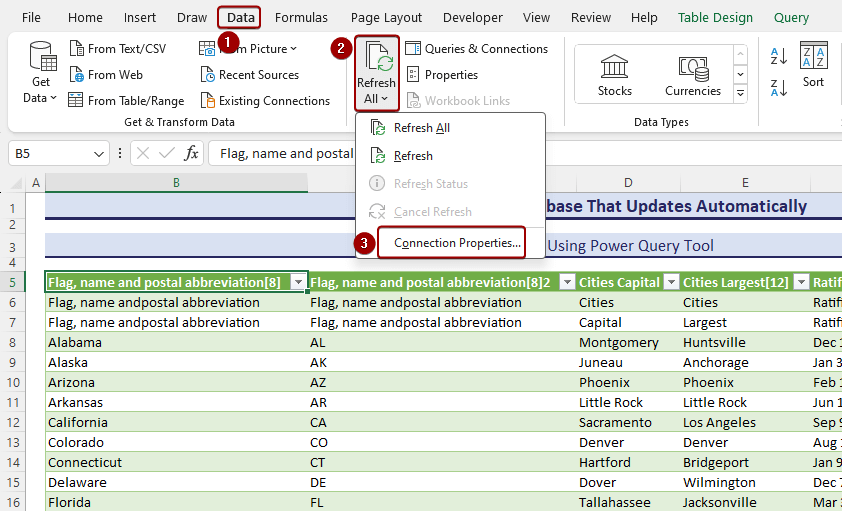
- A Query Properties dialog box will appear.
- Check Refresh every 60 minutes => OK.

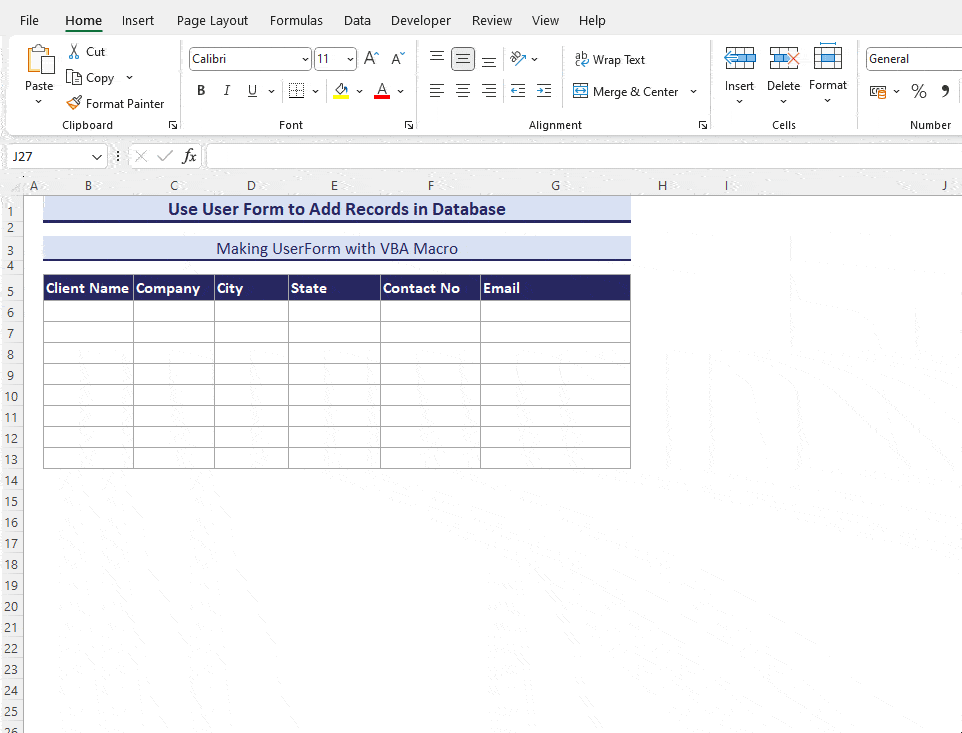
How to Use User Form to Add Records in the Database
Unlike previous methods, we will enter records to create a database in Excel by creating a form, specifically UserForm. UserForm requires VBA skills. If you are an amateur in VBA, don’t worry. We will guide you, dictating every step clearly.
- Click Developer => Visual Basic.
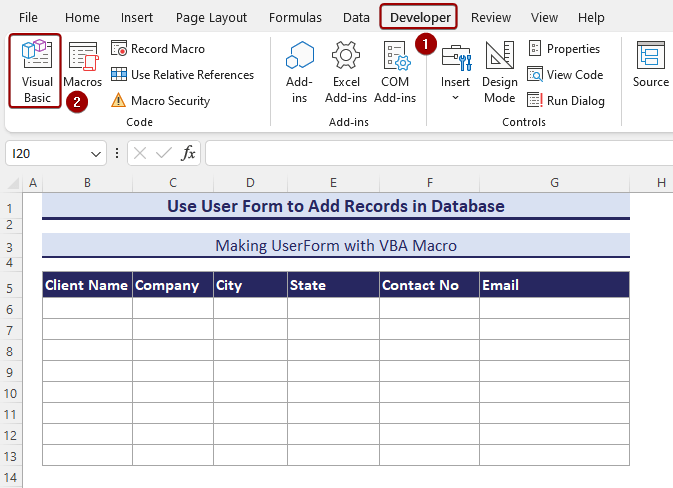
- The Visual Basic for Applications dialog box will appear.
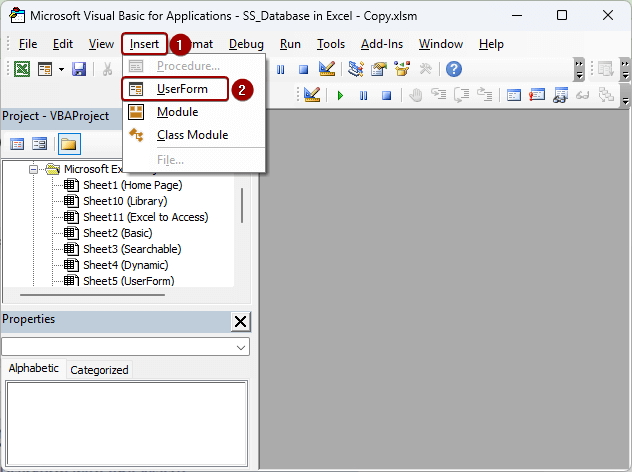
- Click: Insert => UserForm.
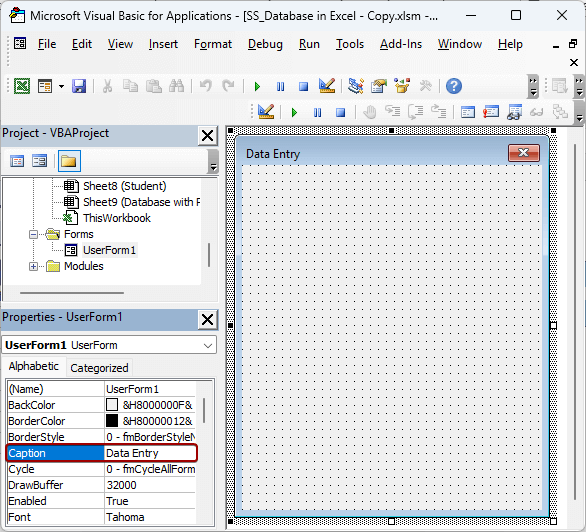
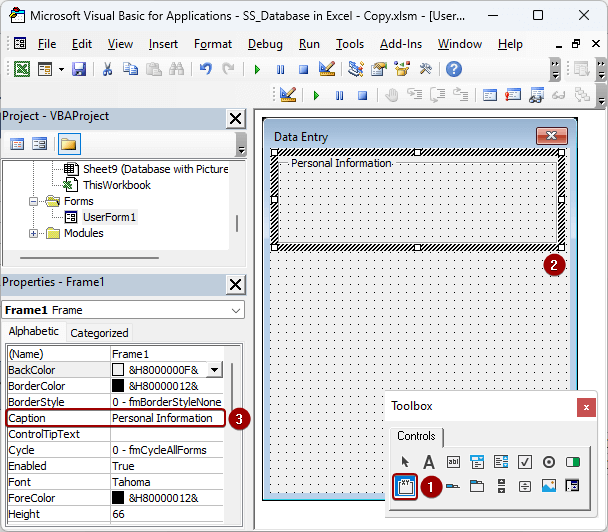
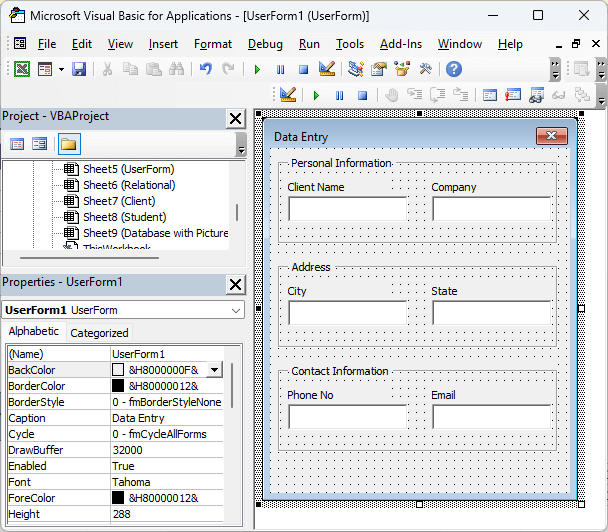
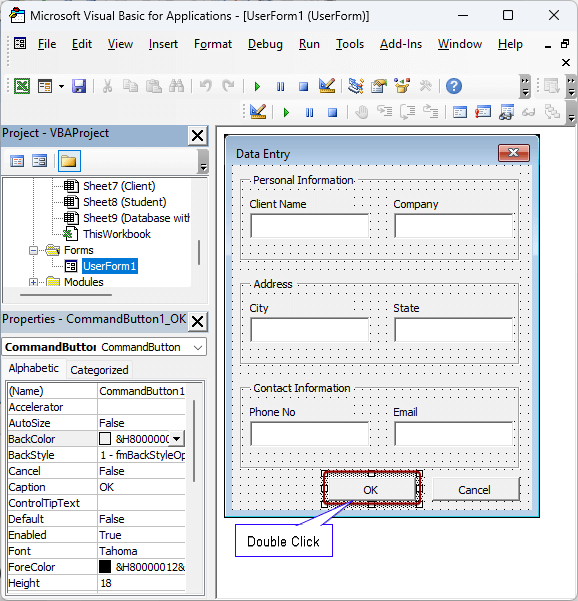
- You will get a UserForm to design. Change and write the caption Data Entry.
- Add a frame and name it Personal Information from the Caption field.
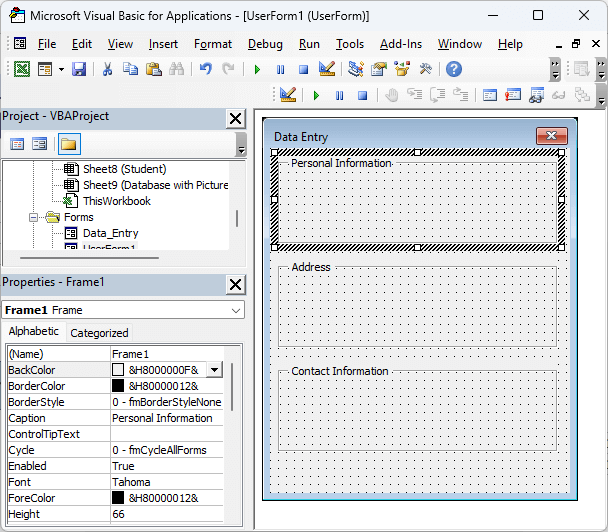
- Add another two frames named Address and Contact Information.
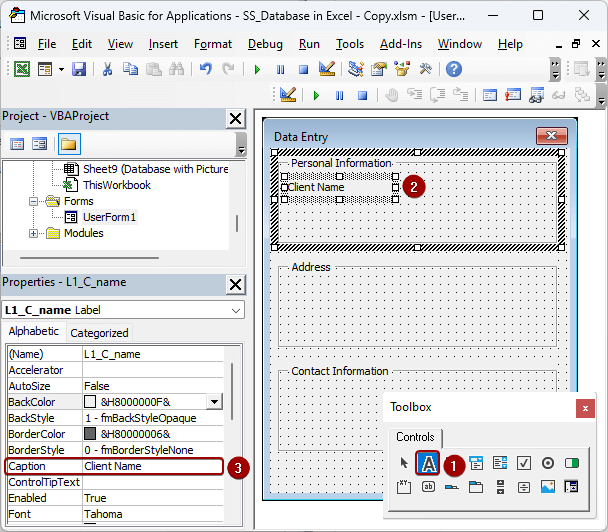
- Add a Label Named Client Name.
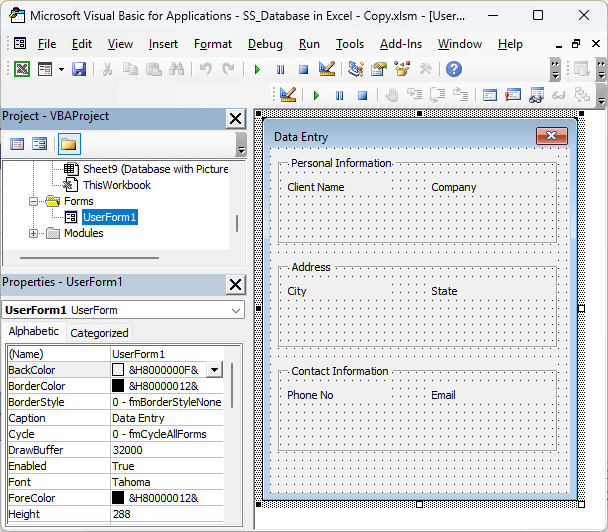
- Add Labels such as Company, City, State, Phone No, and Email.
- Add TextBox from Toolbox below the Client Name
- Change its Name to C_Name. It is essential while executing the VBA code since you will input data to the textbox and it will store data in the Excel worksheet.
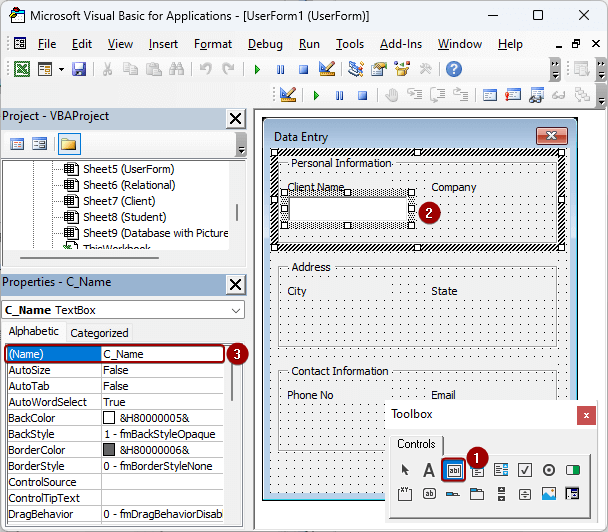
- Insert another 5 TextBox. The names of the TextBox are, Company, City, State, Phone_no, and Email.
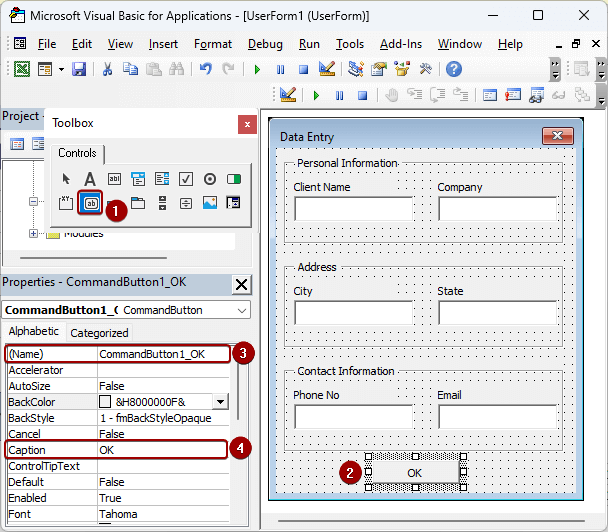
- Add a CommandButton. Name it CommandButton1_OK and change the caption to OK.
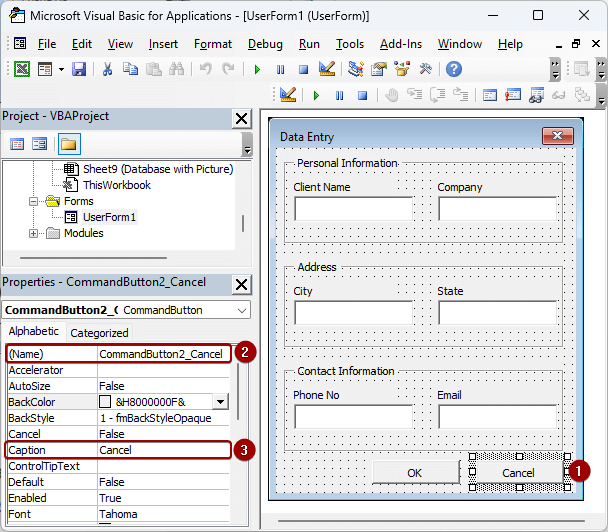
- Add another CommandButton. Name it CommandButton2_Cancel and change the caption to Cancel.
- Write a VBA code. Hit Double-Click on the OK command.
- Write the VBA code in the UserForm1 and Save the Macro.
Private Sub CommandButton1_OK_Click()
Dim ws As Worksheet
Dim lastRow As Long
Dim i As Long
Set ws = ThisWorkbook.Sheets("UserForm")
lastRow = ws.Cells(ws.Rows.Count, "B").End(xlUp).Row
i = lastRow + 1
With ws
    .Cells(i, 2).Value = Me.C_Name.Value
    .Cells(i, 3).Value = Me.Company.Value
    .Cells(i, 4).Value = Me.City.Value
    .Cells(i, 5).Value = Me.State.Value
    .Cells(i, 6).Value = Me.Phone_no.Value
    .Cells(i, 7).Value = Me.Email.Value
End With
i = i + 1
Me.C_Name.Value = ""
Me.Company.Value = ""
Me.City.Value = ""
Me.State.Value = ""
Me.Phone_no.Value = ""
Me.Email.Value = ""
Unload Me
MsgBox "Data added"
End Sub
Private Sub CommandButton2_Cancel_Click()
    Unload Me
End Sub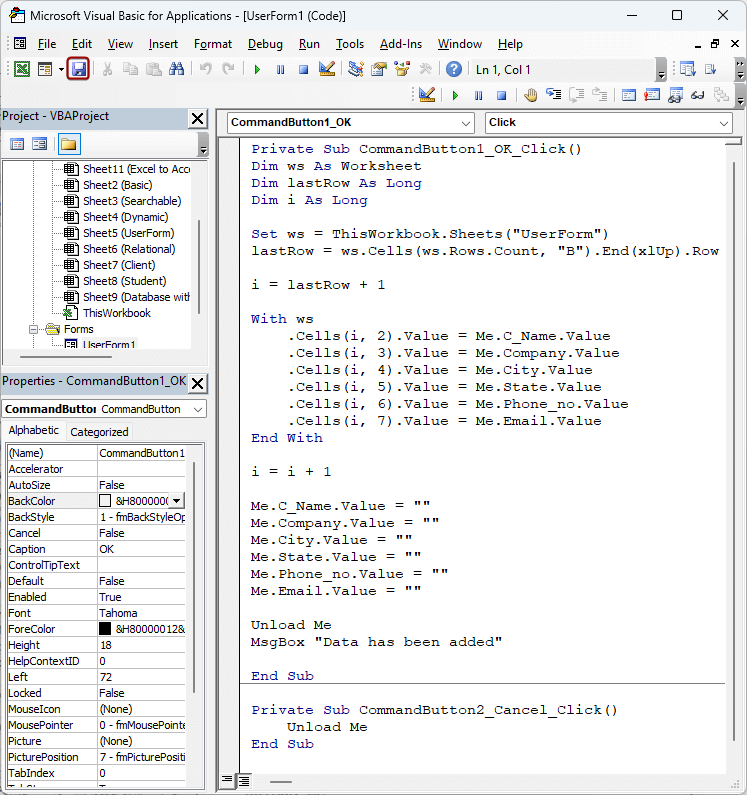
- Go to Insert => Module.
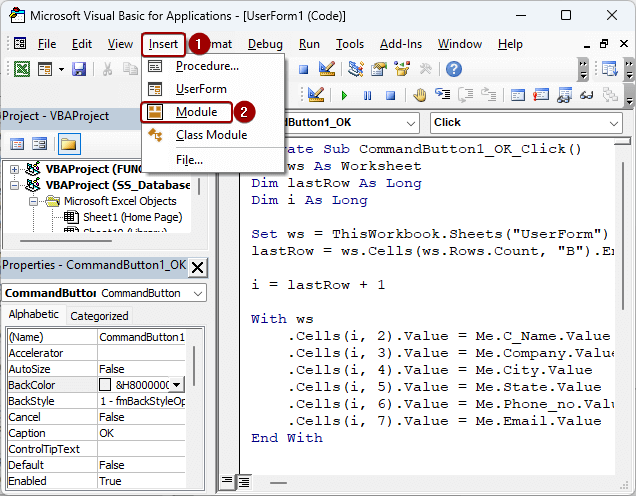
- Write another VBA code to show the UserForm and Save the Macro.
Sub Database_in_Excel()
UserForm1.Show
End Sub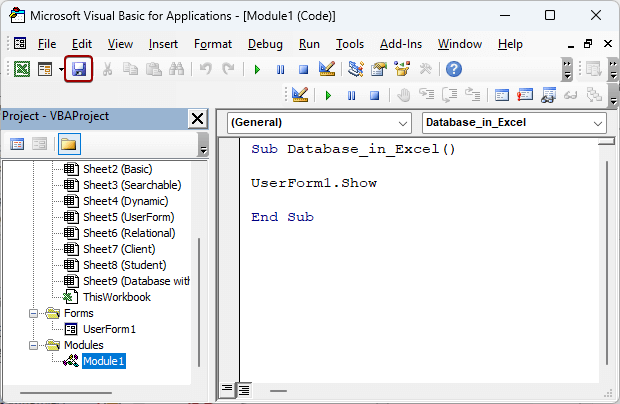
- Create a shape and assign the Macro to show the UserForm.
- Select as follows: Insert => Illustration => Shapes => Rectangle: Rounded Corners.
- Draw the shape in the Worksheet and name it Enter Data.
- Format the Enter Data Now we will assign a Macro.
- Right Click on the Mouse => Assign Macro => Database_in_Excel.
Click here to enlarge the image
- We will test the UserForm.
- Click on the Enter Data shape to get a Data Entry UserForm.
- Insert the necessary information and click OK.
- Get all the information included in the Excel worksheet.
How to Create a Relational Database in Excel
Now we will discuss the creation of a relational database in Excel. A relational database in Excel refers to a setup where multiple tables are related or connected based on standard fields or keys. This allows you to establish relationships between different sets of information. Like we have two datasets in a worksheet. One contains Sales Person and Product, and another one contains Sales Person and Net Sales. We will establish a relationship between Product and Net Sales using the Pivot Table tool.
- Convert the dataset range into a table. So, select: Insert => Table.
- A Create Table dialog box will show up.
- Select the range $B$5:$C$10 => Check My table has headers => OK.
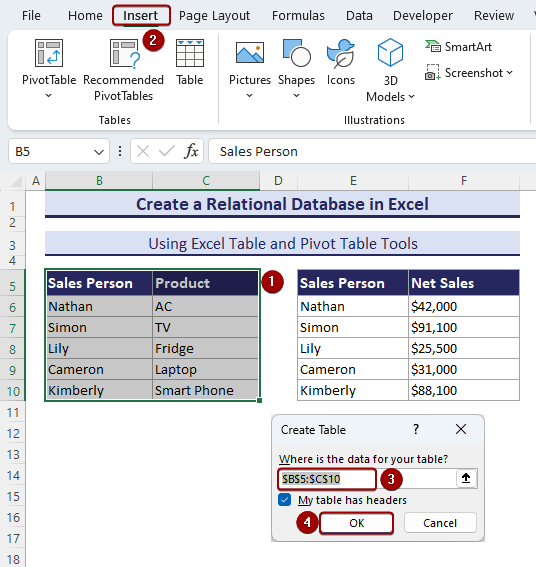
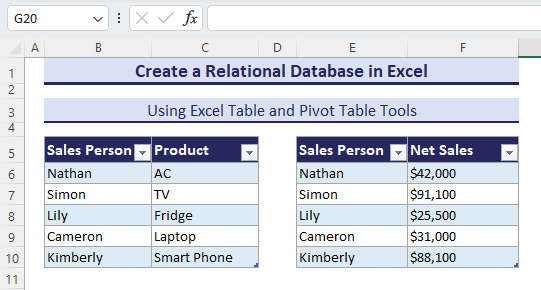
- Convert these two datasets into an Excel Table.
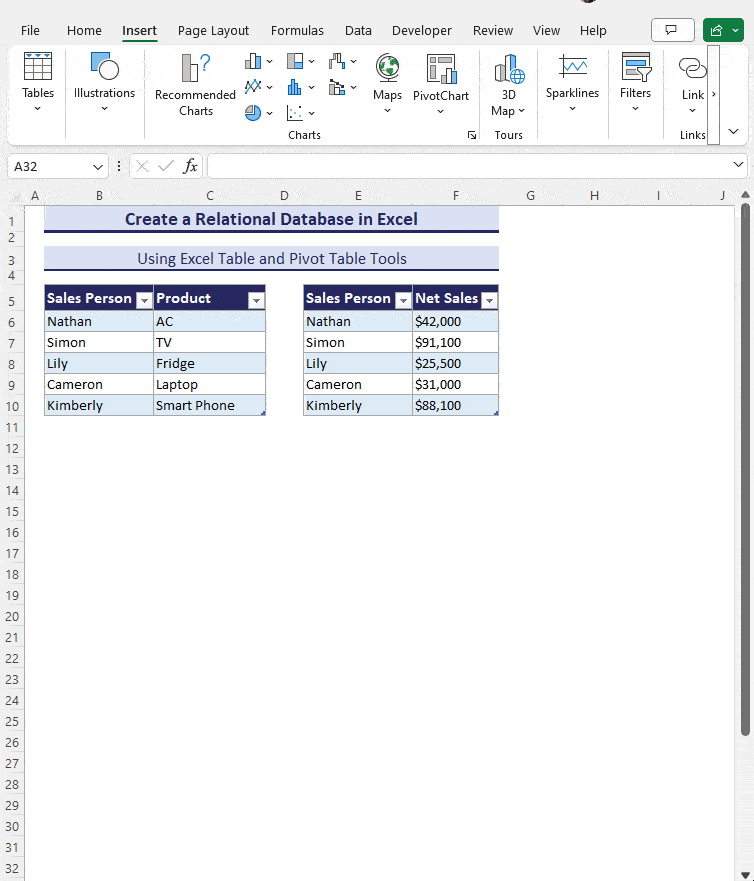
- To make a relational database, we will make a PivotTable.
- Select Table2 => PivotTable. Then the PivotTable from Table or Range dialog box will appear.
- Place the Pivot Table in the Existing worksheet. Select Existing Worksheet => B12
- Check the Add this data to the data Model option => OK.
- The PivotTable Fields pane will show up. Check the Product of Table2 from the Active
- Add Net Sales from PivotTable Fields pane, go to All => Table3 => Net Sales.
For clarification, a GIF is attached below.
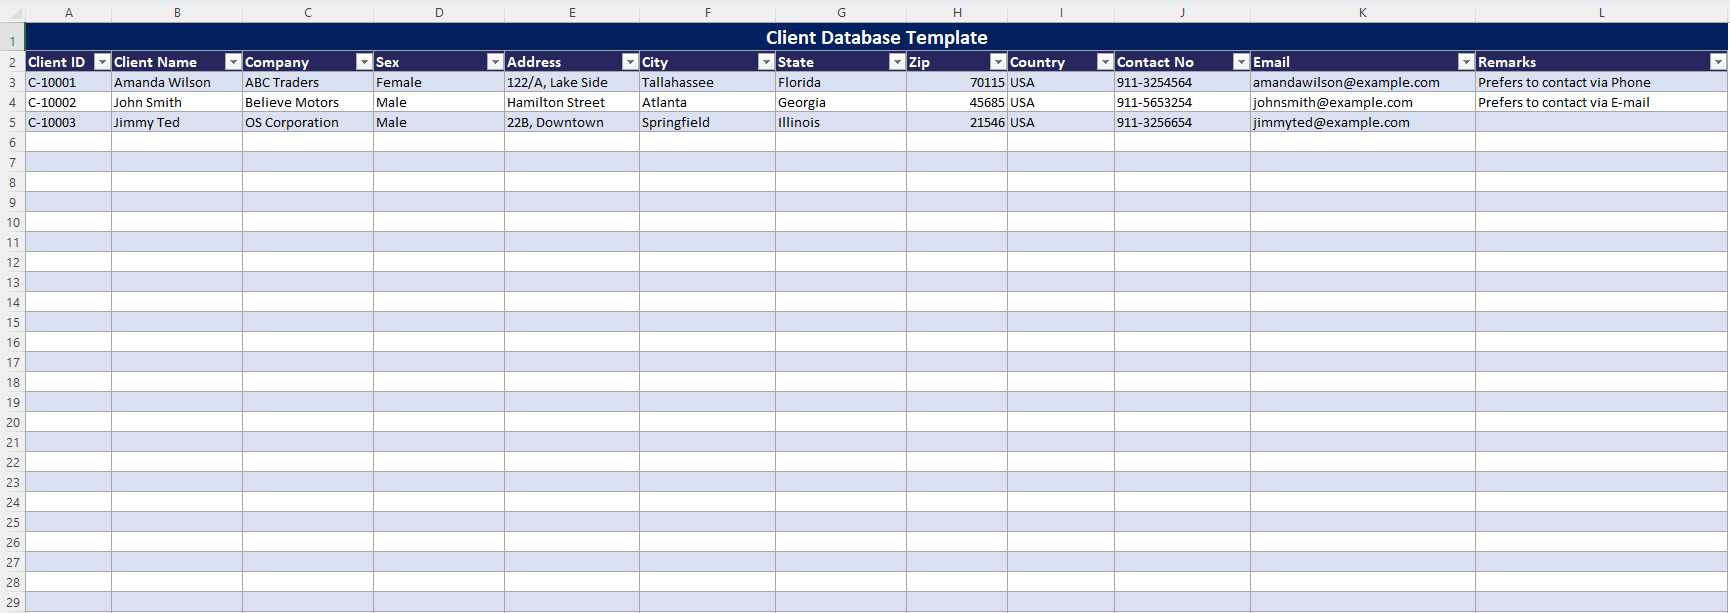
How to Make a Client Database in Excel
Show you how to make a client database in Excel. Client database generally contains Client ID, Client Name, Company, Gender, Age, Marital Status, City, State, Contact No, Email headers, and so on. It is essential for any organization to maintain relationships with their clients or customers.
- Insert the client database headers.
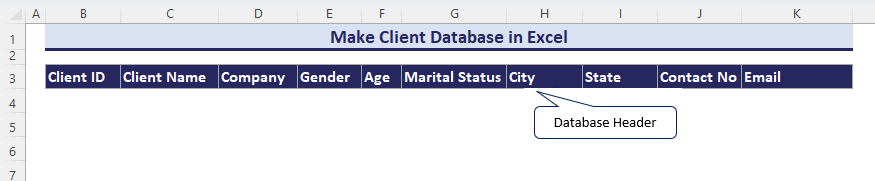
Click here to enlarge the image
- Add information one by one in the specific fields.
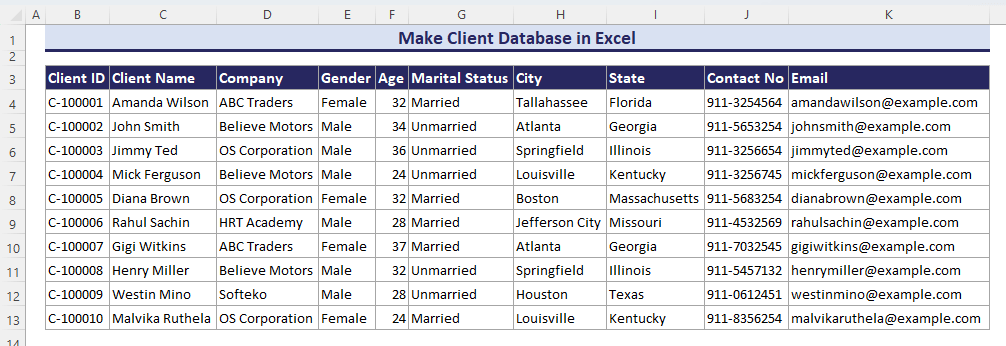
Click here to enlarge the image
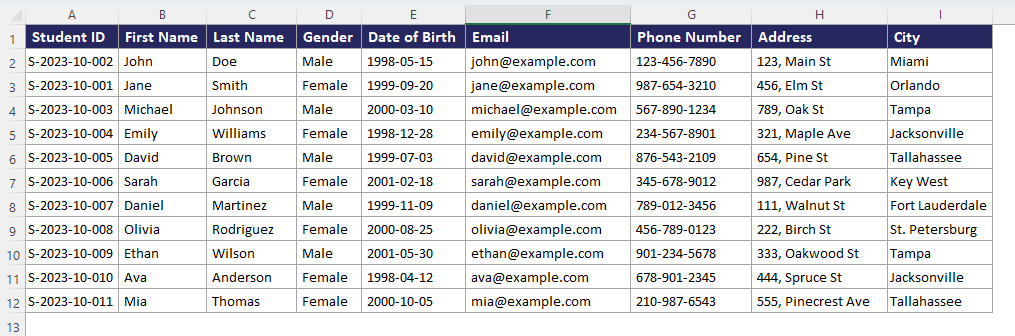
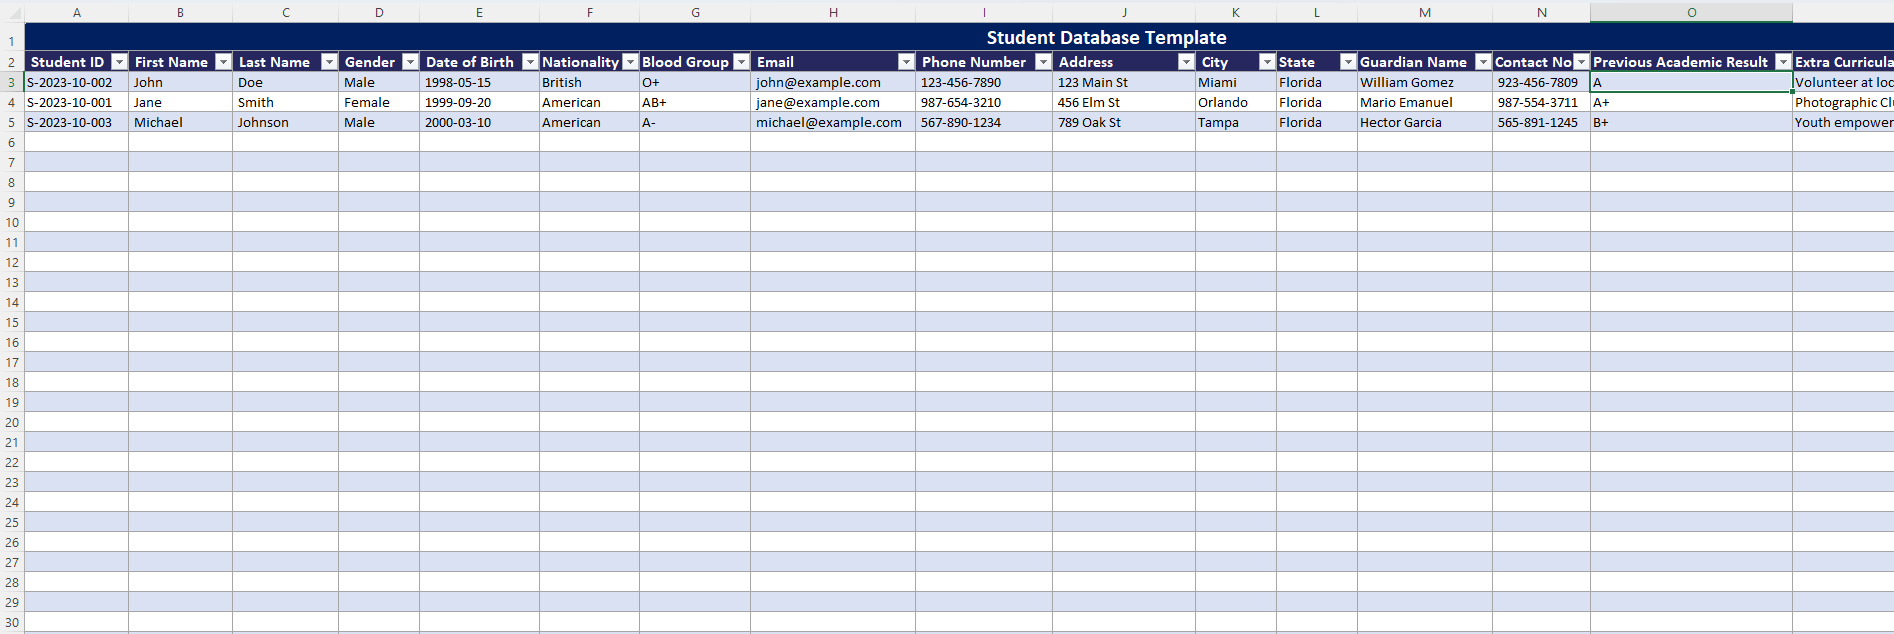
How to Create a Student Database in Excel
We will show you the creation of a student database in Excel. A student database is essential for any educational institution. Student database contains Student ID, First Name, Last Name, Gender, Date of Birth, Email, Phone Number, Address, City, and so on.
- Insert the student database headers.

Click here to enlarge the image
- Adding information one by one like in the following image, you can create a student database.
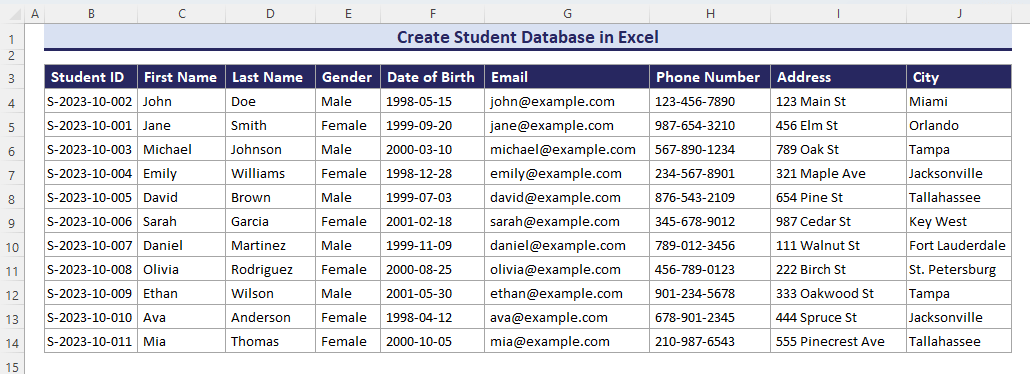
Click here to enlarge the image
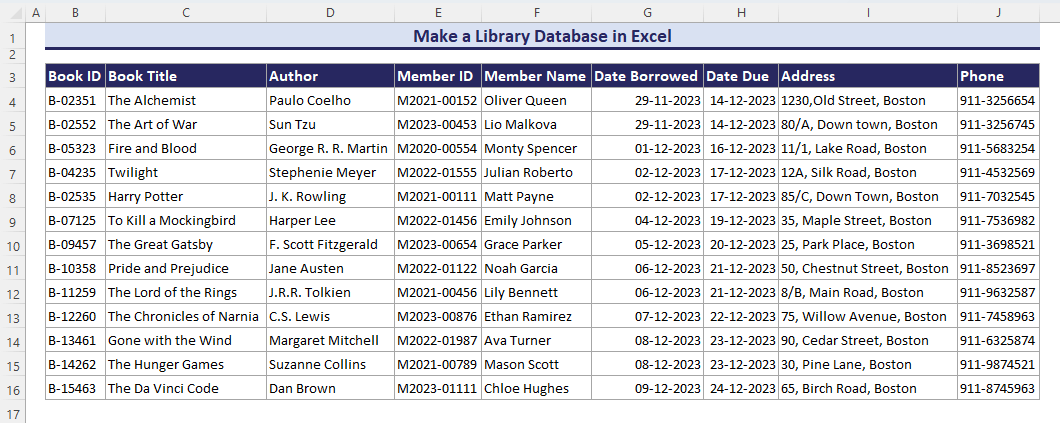
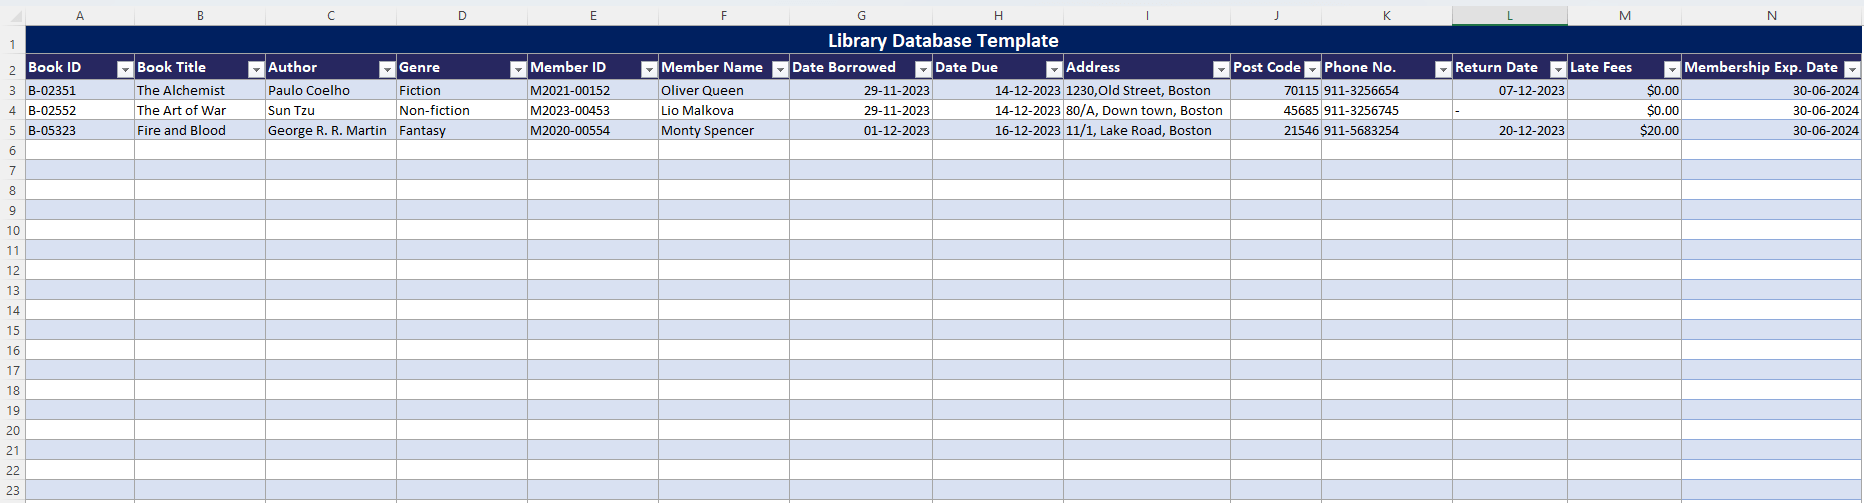
How to Make a Library Database in Excel
Now you will learn to create a library database in Excel. Almost every community has at least one library. Besides, schools, colleges, and organizations have libraries of their own. So, making a database is essential. A library database contains Book ID, Book Title, Author, Member ID, Member Name, Date Borrowed, Date Due, Address, Phone no, and so on. Like the previous two databases, you can easily create a library database, as shown below, with proper fields to input.
Click here to enlarge the image
Key Points for Making a Database in Excel
Those are some excellent key points for your consideration when creating a database in Excel. Let’s summarize them for clarity:
- You can upload Excel files to MS Access for enhanced security and backup capabilities.
- Excel’s formulas and functions facilitate easy calculations and statistical analysis.
- Excel Filter tool and Filter function enable efficient data filtering based on specific criteria.
- Organization of data chronologically by date allows you for easier tracking and analysis.
- Performance can significantly slow down as the data volume increases.
- You can use Excel Pivot Table to analyze and present data in various formats.
- The use of UserForm will help you enter data automatically with a dialog box. But it requires VBA skills and knowledge.
How to Copy or Export Your Database from Excel to Access
Have a dataset in Excel, and we will export the Excel database to Microsoft Access. Besides, you can exchange data between Excel and Access.
Click here to enlarge the image
- Select as follows: External Data => New Data Source => From File => Excel.
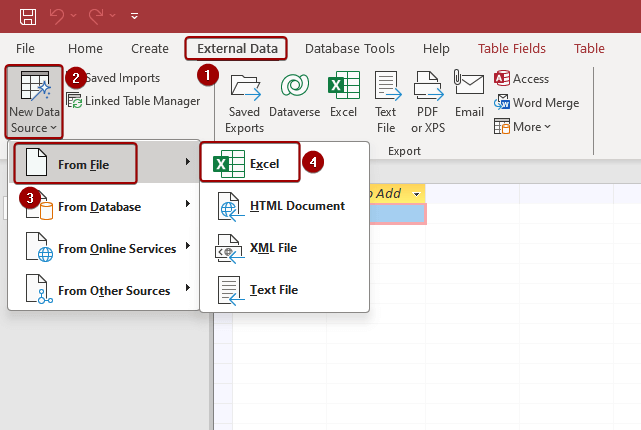
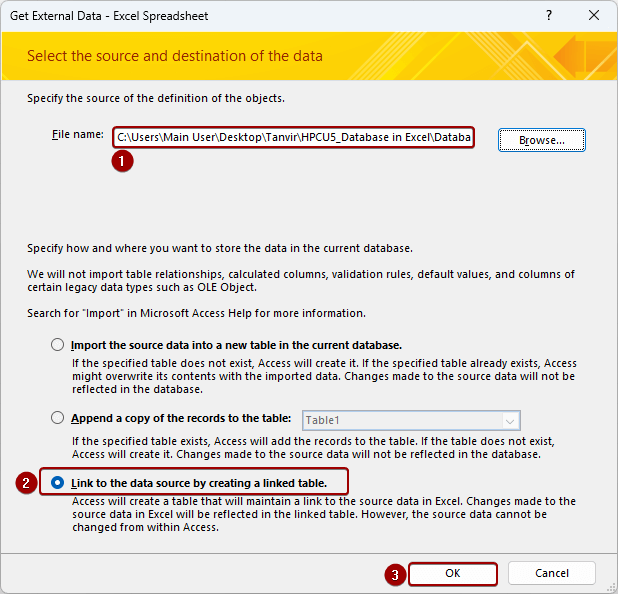
- Get External Data dialog box will appear.
- Insert the File Name => Link to the data source by creating a linked table => OK.
- The Link Spreadsheet Wizard will show up.
- Select the Show Worksheets option => Excel to Access worksheet => Next.
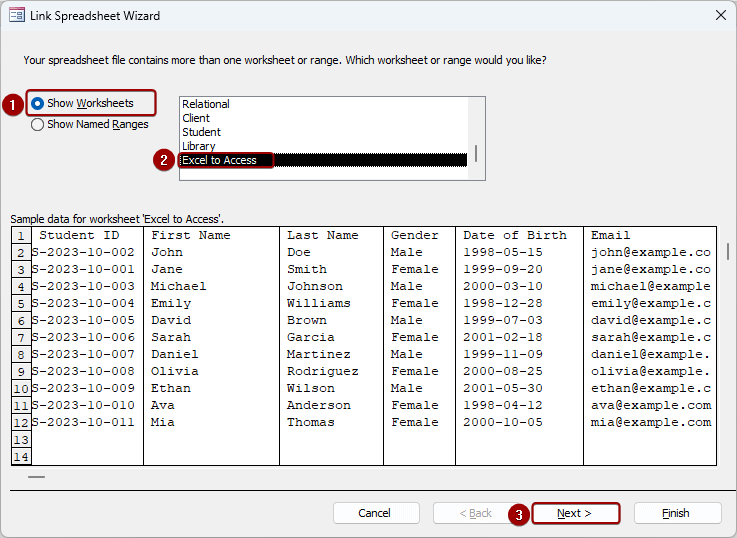
- Check First Row Contains Column Headings => Next.
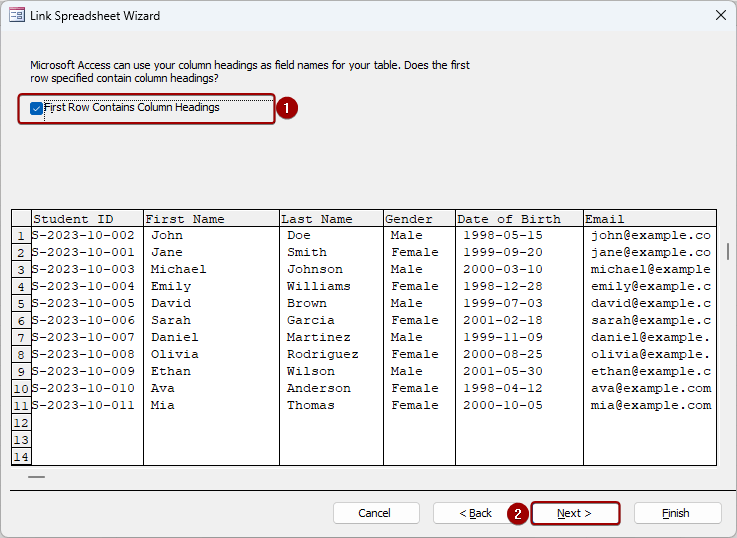
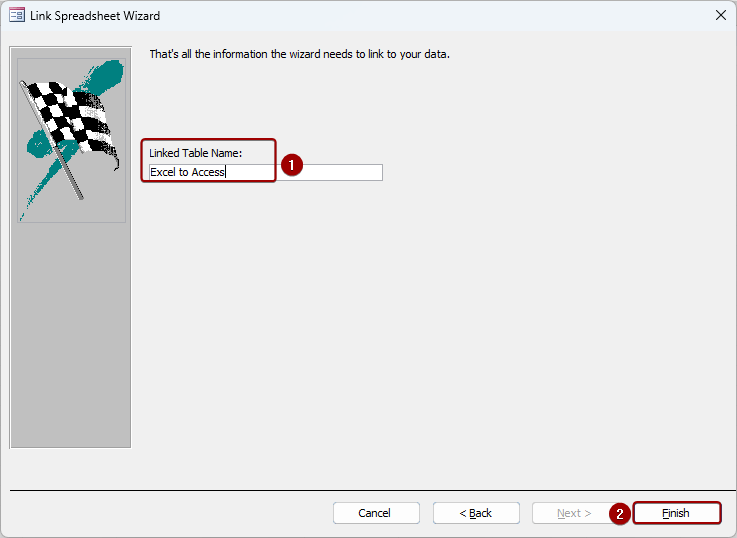
- Insert the Excel to Access in the Linked Table Name field => Finish.
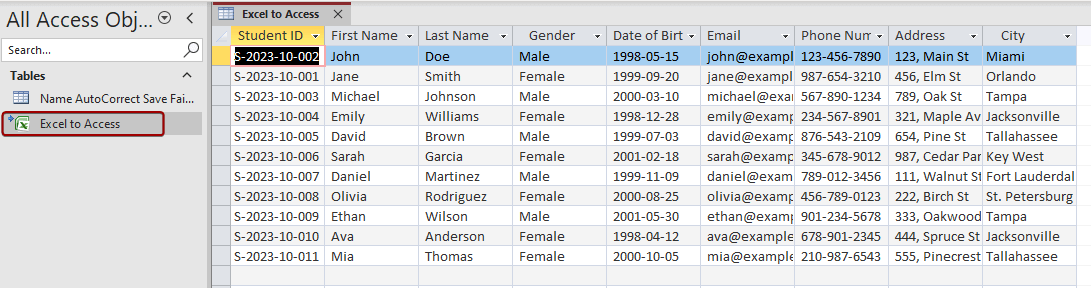
- Selecting the Excel to Access worksheet, we will be able to gather all the data from the Excel worksheet.
Click here to enlarge the image
What Are Database Functions in Excel?
Database functions in Excel are a group of functions designed to work specifically with structured data organized in Excel tables or ranges. These functions help perform calculations, analysis, and retrieval of data based on specified criteria within the database in Excel.
- Select the Database function, click Formulas => Insert Function.
- Insert Function dialog box will open.
- Select Database as Category => Select your desired function => OK.
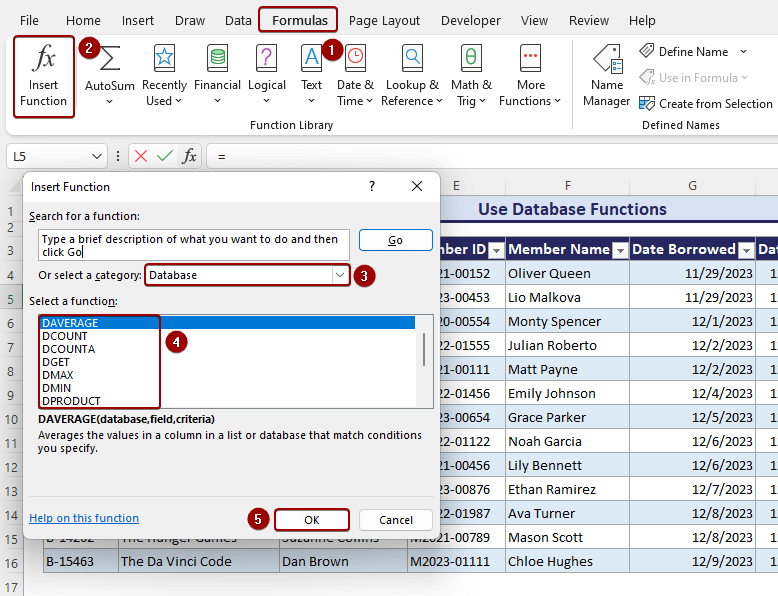
Here are some commonly used database functions in Excel:
DCOUNT: Counts numeric values.
DCOUNTA: Counts non-numeric values.
DCOUNTBLANK: Counts blank values in a database.
DSUM: Calculates the sum of values in a database.
DAVERAGE: Computes the average of values in a database.
DMIN: Returns minimum value from a database.
DMAX: Returns maximum value from a column in a database.
DGET: Retrieves a single value from a database based on specified criteria.
DPRODUCT: Multiplies values in a specified field or column.
DSTDEV, DSTDEVP: Calculate the standard deviation of a population or sample in a database.
DVAR, DVARP: Compute the variance of a population or sample in a database.
Download Our Free Excel Database Templates
We have attached 5 useful Excel database templates. These are all free to download & ready to use. Please check these out.
Client Database
Download Client Database Template
Click here to enlarge the image
Student Database
Download Client Database Template
Click here to enlarge the image
Employee Database
Download Client Database Template
Click here to enlarge the image
Library Database
Download Client Database Template
Click here to enlarge the image
Membership Database
Download Client Database Template
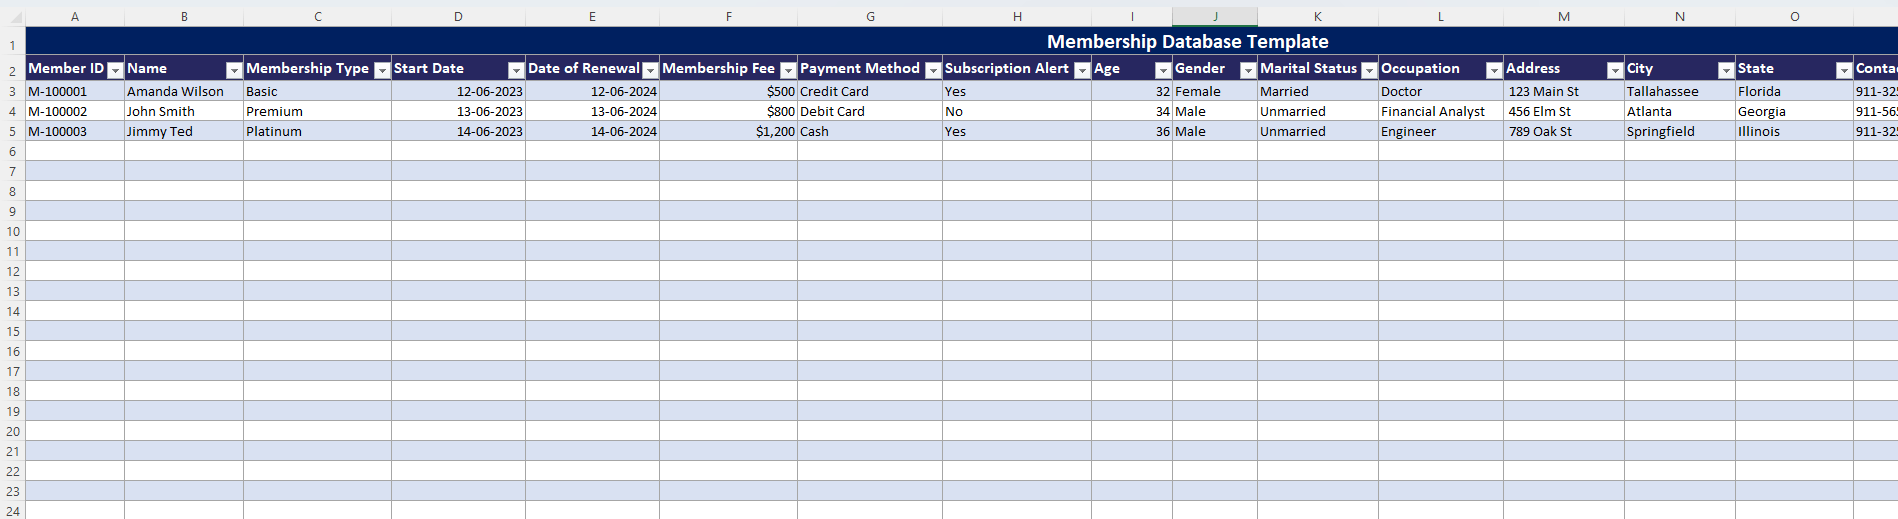
Click here to enlarge the image
Download Practice Workbook
Download the practice workbook that we’ve used to prepare this article.
To summarize, we explained how to make a database in Excel. We showed step-by-step approaches for how to make a basic, client, student, and library database. You can use the Filter tool, FILTER function, and drop-down list to create a searchable database. Besides, Power Query can be a useful tool to make a dynamic database importing data from a website. On the other hand, the use of Pivot Table will help you in creating the relational database. The UserForm can be an excellent tool to enter data into an Excel worksheet while making a database. Finally, we described the way to export data from Excel to Microsoft Access.
Leave your thoughts, queries as well as suggestions in the comment section.
Database in Excel: Knowledge Hub
- Create an Employee Database in Excel
- Create a Simple Database in Excel VBA
- Create a Membership Database in Excel
- Create a Recipe Database in Excel
<< Go Back To Learn Excel
Get FREE Advanced Excel Exercises with Solutions!
