Step 1 – Create a Header Row in a Worksheet
- Open a new Excel workbook.
- Create a new worksheet (you can name it Employee Database or something similar).
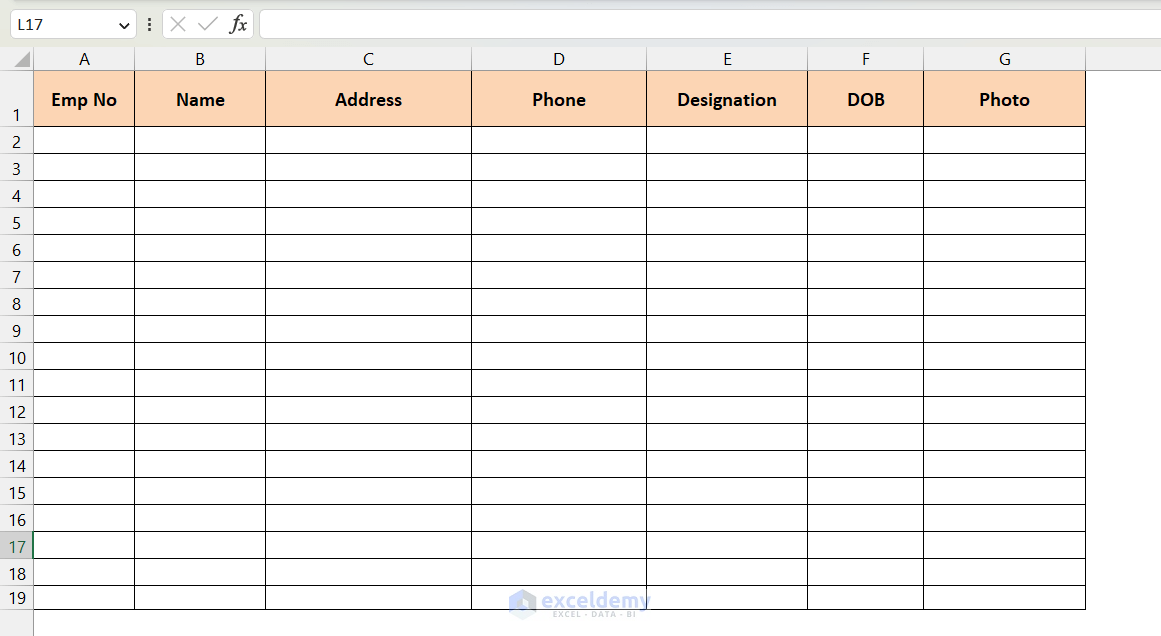
- In the first row (Row 1), create column headers for each section of information you want to store. For example:
- Emp No
- Name
- Address
- Phone
- Designation
- DOB (Date of Birth)
- Photo (for storing employee pictures)
You can manually enter data for each employee directly into this worksheet, or we can use a UserForm (created using VBA) for data entry.
Step 2 – Design a UserForm for Entering Data
- Press ALT + F11 to open the Visual Basic for Applications (VBA) editor.
- Click on Insert and select UserForm to create a new UserForm.
- Design your UserForm with the necessary fields:

-
- Add six TextBox controls (one for each piece of information: Emp No, Name, Address, Phone, Designation, and DOB).
- Add corresponding Label controls next to each TextBox.
- Include an Image control to display employee photos.
- Add four CommandButton controls (e.g., Add Employee, Clear, Save, and Exit).
- Customize the appearance (background color, font, etc.) as desired.
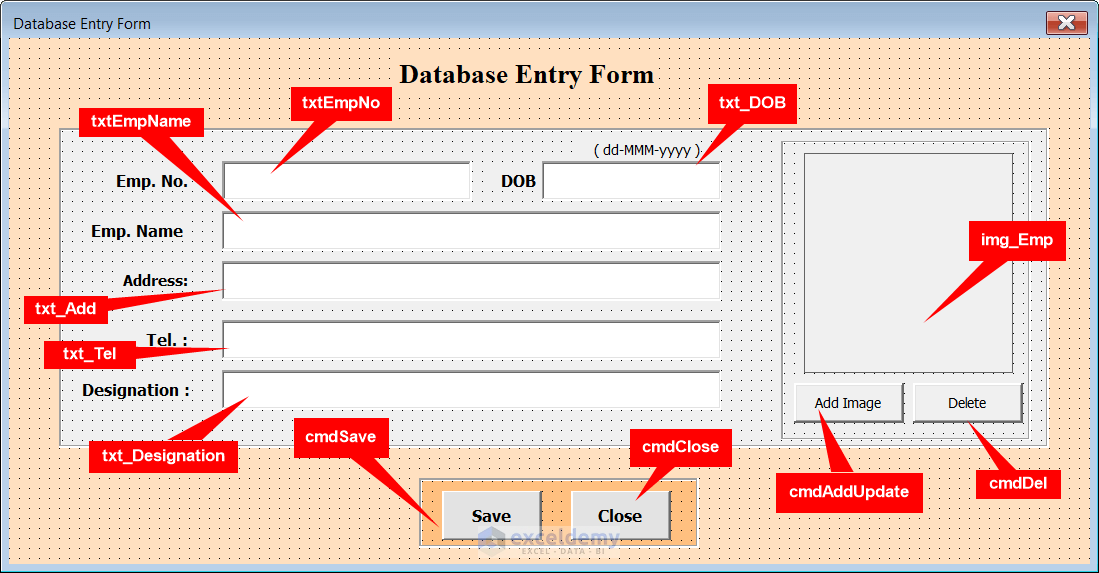
Remember to name each component (TextBox, Label, Image, and CommandButton) appropriately, as these names will be used in your VBA code.
Step 3 – Writing VBA Code
- We need to create some code that will open a window when we click the Add Image button. This window will prompt us to select a picture of an employee. To achieve this, follow these steps:
- Double-click on the Add Image button.
- The code window will open.
- Enter the following code in that window:

Private Sub cmdAddUpdate_Click()
    imagePath = Application.GetOpenFilename("Image Files (*.bmp;*.jpg;*.gif;*.png),*.bmp;*.jpg;*.gif;*.png", , "Select the Image of employee")
    If imagePath = False Then Exit Sub 'user clicked cancel
    img_Emp.Picture = LoadPicture(imagePath)
End Sub
How Does the Code Work?
- The line imagePath = Application.GetOpenFilename(“Image Files (*.bmp;*.jpg;*.gif;*.png),*.bmp;*.jpg;*.gif;*.png”, , “Select the Image of employee”) opens a file dialog box. This dialog box will display only image files of types .bmp, .jpg, .gif, and .png. The file path of the selected image will be stored in a variable named imagePath.
- The condition If imagePath = False Then Exit Sub checks if no image is selected. If that’s the case, the subroutine will exit.
- Otherwise, if a valid image file is selected, it will be loaded into the img_Emp component of the UserForm.
- If no image is selected, then the sub will exit.
img_Emp.Picture = LoadPicture(imagePath)
- Let’s assign code to the Delete button (cmdDel). When we click on this button, it will remove the loaded image from the UserForm. To do this:
- Double-click on the Delete button.
- Paste the following code:
Private Sub cmdDel_Click()
img_Emp.Picture = Nothing
End Sub
- Finally, we’ll assign code to the Save button (cmdSave_Click). When we click on the Save button, all the entered data can be transferred into the Database worksheet. Before that, we’ll also need to write some other subroutines to support the cmdSave_Click functionality.
VBA Code Syntax
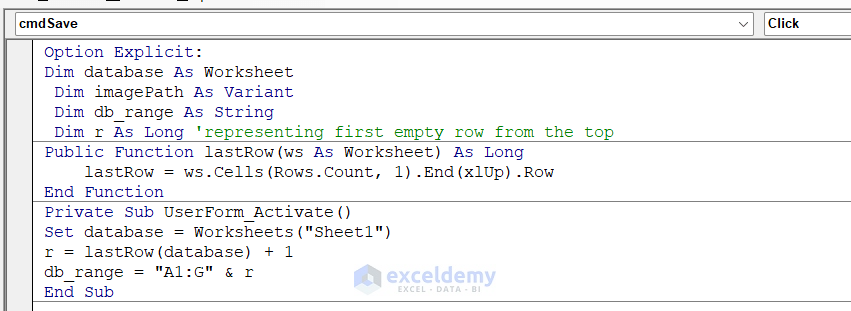
Option Explicit:
Dim database As Worksheet
Dim imagePath As Variant
Dim db_range As String
Dim r As Long 'representing first empty row from the top
Public Function lastRow(ws As Worksheet) As Long
lastRow = ws.Cells(Rows.Count, 1).End(xlUp).Row
End Function
Private Sub UserForm_Activate()
Set database = Worksheets("Sheet1")
r = lastRow(database) + 1
db_range = "A1:G" & r
End Sub
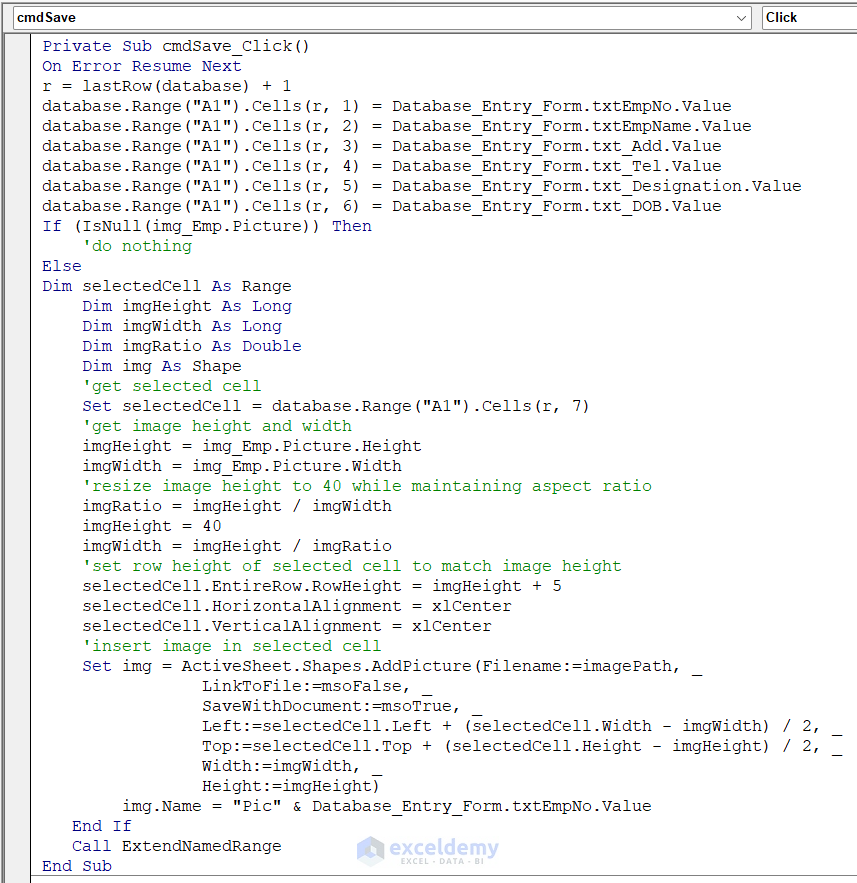
Private Sub cmdSave_Click()
On Error Resume Next
r = lastRow(database) + 1
database.Range("A1").Cells(r, 1) = Database_Entry_Form.txtEmpNo.Value
database.Range("A1").Cells(r, 2) = Database_Entry_Form.txtEmpName.Value
database.Range("A1").Cells(r, 3) = Database_Entry_Form.txt_Add.Value
database.Range("A1").Cells(r, 4) = Database_Entry_Form.txt_Tel.Value
database.Range("A1").Cells(r, 5) = Database_Entry_Form.txt_Designation.Value
database.Range("A1").Cells(r, 6) = Database_Entry_Form.txt_DOB.Value
If (IsNull(img_Emp.Picture)) Then
'do nothing
Else
Dim selectedCell As Range
Dim imgHeight As Long
Dim imgWidth As Long
Dim imgRatio As Double
Dim img As Shape
'get selected cell
Set selectedCell = database.Range("A1").Cells(r, 7)
'get image height and width
imgHeight = img_Emp.Picture.Height
imgWidth = img_Emp.Picture.Width
'resize image height to 40 while maintaining aspect ratio
imgRatio = imgHeight / imgWidth
imgHeight = 40
imgWidth = imgHeight / imgRatio
'set row height of selected cell to match image height
selectedCell.EntireRow.RowHeight = imgHeight + 5
selectedCell.HorizontalAlignment = xlCenter
selectedCell.VerticalAlignment = xlCenter
'insert image in selected cell
Set img = ActiveSheet.Shapes.AddPicture(Filename:=imagePath, _
LinkToFile:=msoFalse, _
SaveWithDocument:=msoTrue, _
Left:=selectedCell.Left + (selectedCell.Width - imgWidth) / 2, _
Top:=selectedCell.Top + (selectedCell.Height - imgHeight) / 2, _
Width:=imgWidth, _
Height:=imgHeight)
img.Name = "Pic" & Database_Entry_Form.txtEmpNo.Value
End If
Call ExtendNamedRange
End SubHow Does the Code Work?
- Variable Declarations:
- Four variables are declared at the beginning of the code. These variables will be used in various procedures later on.
- database: Represents a worksheet (presumably named “Sheet1”).
- imagePath: Stores the path of an image file.
- db_range: A string that defines a range in the database worksheet.
- r : A long integer used to keep track of row numbers.
- Four variables are declared at the beginning of the code. These variables will be used in various procedures later on.
- Custom Function – lastRow:
- The lastRow function is defined. It takes a worksheet (ws) as an argument.
- It determines the last used row in column 1 (column A) of the specified worksheet using the End(xlUp).Row method.
- The function returns the row number of the last used row.
- UserForm Activation – UserForm_Activate:
- When the UserForm is activated (presumably a form in Excel), the following actions occur:
- The database variable is set to reference the “Sheet1” worksheet.
- The r variable is calculated by adding 1 to the last used row number in the database worksheet. This ensures that we find the first empty row for data entry.
- The db_range string is constructed to define a range from cell A1 to column G and row r.
- When the UserForm is activated (presumably a form in Excel), the following actions occur:
- Save Button Click – cmdSave_Click:
- This code runs only when the “Save” button (cmdSave) is clicked.
- On Error Resume Next allows the code to continue even if an error occurs.
- The last used row of the database is determined using the custom lastRow function.
- 1 is added to the last row number to find the first empty row (r).
- Text values from different TextBoxes in the UserForm (e.g., Database_Entry_Form.txtEmpNo.ValueB)are stored in their corresponding cells in the database worksheet.
- If the image (img_Emp.Picture) is null (not selected), nothing happens.
- Checking for Image Presence:
- First, the code checks whether the image component img_Emp contains an image or not. If it doesn’t contain any image, no further action is taken.
- Variable Definitions:
- If the image component imp_Emp contains an image, the subsequent code will run.
- Several variables are defined for use in the following steps:
- selectedCell : Represents the cell in the database worksheet where the image will be stored.
- imgHeight : Stores the height of the loaded image.
- imgWidth : Stores the width of the loaded image.
- imgRatio : Represents the aspect ratio of the image.
- img : Refers to a shape (presumably an image) that will be added to the worksheet.
- Setting the Selected Cell:
- The selectedCell variable is assigned to the cell in the database worksheet where the image will be stored. This cell corresponds to row r and column 7 (column G).
- Calculating Image Dimensions:
- The height and width of the loaded image (img_Emp.Picture) are determined.
- The aspect ratio of the image is calculated.
- The desired height (imgHeight) is set to 40, and the corresponding width (imgWidth) is adjusted while maintaining the same aspect ratio.
- Adjusting Row Height:
- The row height of the cell where the image will be stored is increased by 5 units. This ensures that the image fits comfortably within the cell.
- Adding the Image to the Worksheet:
- The img shape is created using the AddPicture method.
- The image file specified by imagePath is loaded into the shape.
- The position and dimensions of the shape are set based on the selectedCell position and the calculated imgWidth and imgHeight.
- Assigning a Name:
- The name of the shape is set to “Pic” followed by the value from the txtEmpNo TextBox in the Database_Entry_Form.
- Updating Image Name Based on Employee ID:
- The image name that has been inserted is modified to be related to the employee ID. This ensures that we can easily retrieve the image when needed by referencing the employee ID number.
- Extending the Named Range for Employee Data:
- When searching for employee data in the database using the Employee ID, we need to specify the range within which we want to search. To achieve this:
- We have already named the used range for data storage.
- Additionally, after entering a new entry, we need to extend the named range to include the new data.
- For this purpose, a separate subroutine called ExtendNamedRange has been written. We will explain the code for this subroutine later when we discuss how to search for an employee’s information using their Employee ID.
- Close Button Functionality:
- We also need to write code so that when we click the “Close” button, it will close down the UserForm.
- Ready for Data Entry:
- With these adjustments, our code is now ready for data entry.
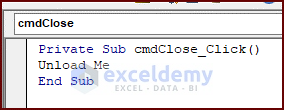
Private Sub cmdClose_Click()
Unload Me
End Sub
Read More: How to Create a Simple Database in Excel VBA
Step 4 – Running UserForm to Enter Data into Database
Let’s walk through the steps to use the Database_Entry_Form UserForm for entering data into the database worksheet. Follow the instructions below:
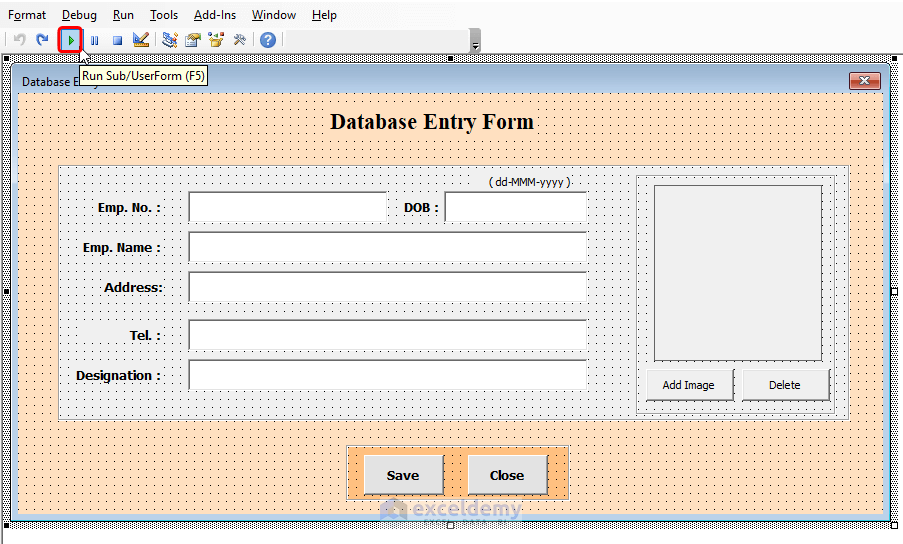
- Run the UserForm:
- Click on the Database_Entry_Form UserForm.
- Click the Run button at the top (presumably in the Excel interface).
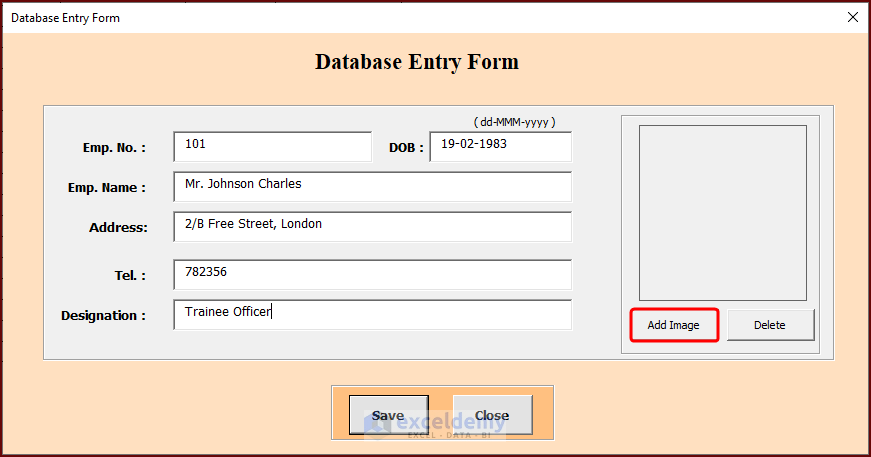
- Entering Data:
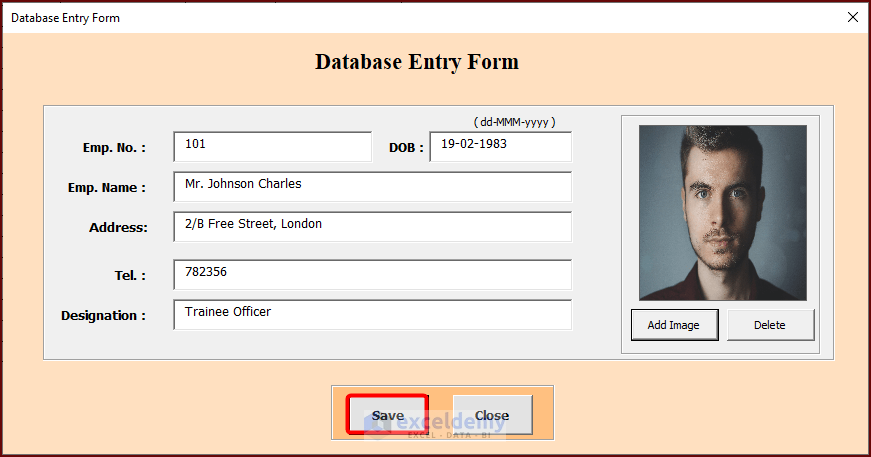
- The UserForm will open up.
- Enter all the necessary data in the UserForm. This may include details like employee name, address, telephone number, designation, and date of birth.
- To add the image of the employee:
- Click on the Add Image button.
-
-
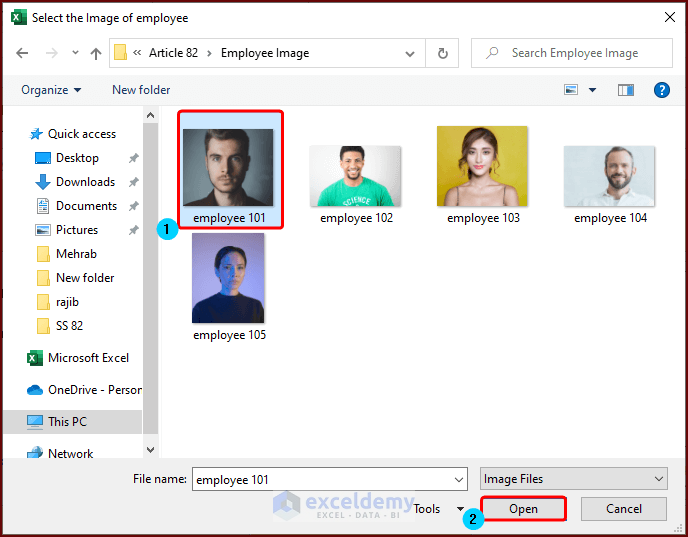
- A window will open, prompting you to select the image file from your computer using the File Explorer.
- Choose any image and click Open.
-
-
-
- The selected image will load into the UserForm.
-
- Saving Employee Information:
- To save the employee’s information:
- Click on the Save button on the UserForm.
- The inserted information, along with the image, will be stored in the database worksheet.
- Data Storage:
- The information will be safely stored inside the database worksheet.

-
- You can continue entering data for as many employees as needed. In your example, you’ve entered data for a total of 5 employees.
- Closing the UserForm:
- When you’re done entering data, click the Close button to close the UserForm.

- The database looks like this:
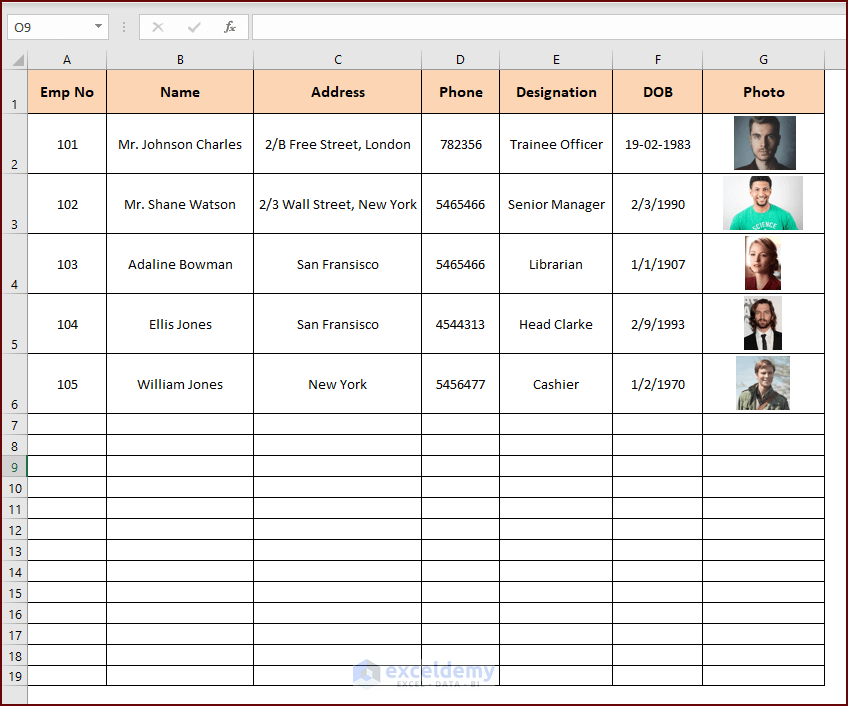
- Database Ready:
- Your database is now ready, complete with pictures.
- Keep in mind that while Excel provides basic database functionality, it doesn’t offer all the features of dedicated database software (such as advanced data analysis, reporting, and queries).
- To enhance the functionality further, you mentioned creating a search function in another sheet. This will allow you to search for employee details using their Employee ID.
Step 5 – Creating Database Search System
In this step, we’ll create a search system on another sheet that looks like the following:
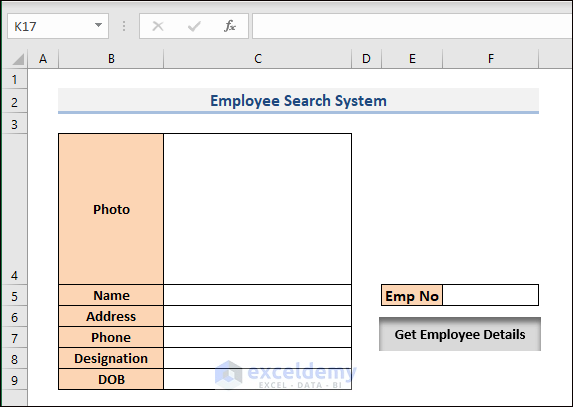
- Enter the Employee Number (Emp No) in cell F5.
- Automatically retrieve the employee’s other information on the left side.
- To achieve this, follow these steps:
- Open a new module in your Excel workbook.
- Paste the following VBA code:
VBA Code
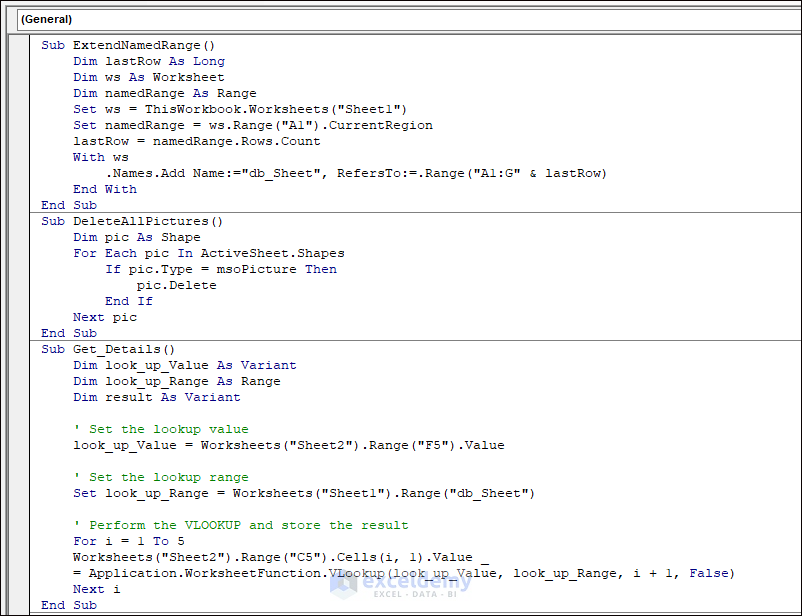
Sub ExtendNamedRange()
Dim lastRow As Long
Dim ws As Worksheet
Dim namedRange As Range
Set ws = ThisWorkbook.Worksheets("Sheet1")
Set namedRange = ws.Range("A1").CurrentRegion
lastRow = namedRange.Rows.Count
With ws
.Names.Add Name:="db_Sheet", RefersTo:=.Range("A1:G" & lastRow)
End With
End Sub
Sub DeleteAllPictures()
Dim pic As Shape
For Each pic In ActiveSheet.Shapes
If pic.Type = msoPicture Then
pic.Delete
End If
Next pic
End Sub
Sub Get_Details()
Dim look_up_Value As Variant
Dim look_up_Range As Range
Dim result As Variant
' Set the lookup value
look_up_Value = Worksheets("Sheet2").Range("F5").Value
' Set the lookup range
Set look_up_Range = Worksheets("Sheet1").Range("db_Sheet")
' Perform the VLOOKUP and store the result
For i = 1 To 5
Worksheets("Sheet2").Range("C5").Cells(i, 1).Value _
= Application.WorksheetFunction.VLookup(look_up_Value, look_up_Range, i + 1, False)
Next i
End Sub
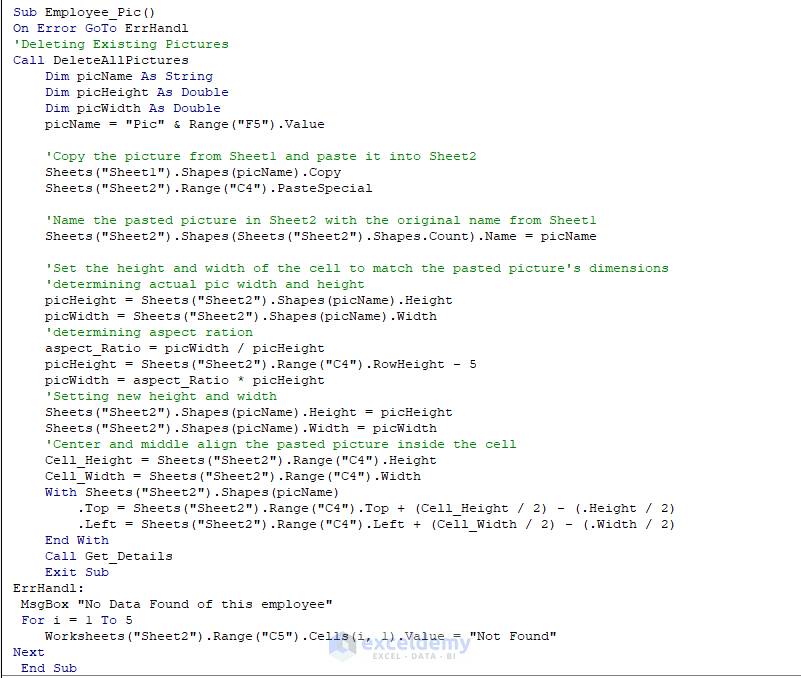
Sub Employee_Pic()
On Error GoTo ErrHandl
'Deleting Existing Pictures
Call DeleteAllPictures
Dim picName As String
Dim picHeight As Double
Dim picWidth As Double
picName = "Pic" & Range("F5").Value
'Copy the picture from Sheet1 and paste it into Sheet2
Sheets("Sheet1").Shapes(picName).Copy
Sheets("Sheet2").Range("C4").PasteSpecial
'Name the pasted picture in Sheet2 with the original name from Sheet1
Sheets("Sheet2").Shapes(Sheets("Sheet2").Shapes.Count).Name = picName
'Set the height and width of the cell to match the pasted picture's dimensions
'determining actual pic width and height
picHeight = Sheets("Sheet2").Shapes(picName).Height
picWidth = Sheets("Sheet2").Shapes(picName).Width
'determining aspect ration
aspect_Ratio = picWidth / picHeight
picHeight = Sheets("Sheet2").Range("C4").RowHeight - 5
picWidth = aspect_Ratio * picHeight
'Setting new height and width
Sheets("Sheet2").Shapes(picName).Height = picHeight
Sheets("Sheet2").Shapes(picName).Width = picWidth
'Center and middle align the pasted picture inside the cell
Cell_Height = Sheets("Sheet2").Range("C4").Height
Cell_Width = Sheets("Sheet2").Range("C4").Width
With Sheets("Sheet2").Shapes(picName)
.Top = Sheets("Sheet2").Range("C4").Top + (Cell_Height / 2) - (.Height / 2)
.Left = Sheets("Sheet2").Range("C4").Left + (Cell_Width / 2) - (.Width / 2)
End With
Call Get_Details
Exit Sub
ErrHandl:
MsgBox "No Data Found of this employee"
For i = 1 To 5
Worksheets("Sheet2").Range("C5").Cells(i, 1).Value = "Not Found"
Next
End SubHow Does the Code Work?
Sub ExtendNamedRange()
    Dim lastRow As Long
    Dim ws As Worksheet
    Dim namedRange As Range
    Set ws = ThisWorkbook.Worksheets("Sheet1")
    Set namedRange = ws.Range("A1").CurrentRegion
    lastRow = namedRange.Rows.Count
    With ws
        .Names.Add Name:="db_Sheet", RefersTo:=.Range("A1:G" & lastRow)
    End With
End Sub- We explain the ExtendNamedRange subroutine inside the UserForm’s code window. Here, we are essentially extending the named range to the last used row in the database worksheet. The last used row is determined by namedRange.Rows.Count from cell A1. As our data will always be confined to column G, we will extend the named range db_Sheet to the last used row of column G(“A1:G” & lastRow).
Sub DeleteAllPictures()
    Dim pic As Shape
    For Each pic In ActiveSheet.Shapes
        If pic.Type = msoPicture Then
            pic.Delete
        End If
    Next pic
End Sub- When we load a picture of the employee from the database worksheet, before that, we need to delete the already existing picture on the worksheet so that the newly loaded picture doesn’t coincide with the previous picture. By running this subroutine, we loop through each shape in the worksheet and delete those that are msoPicture in type.
Sub Get_Details()
    Dim look_up_Value As Variant
    Dim look_up_Range As Range
    Dim result As Variant
    ' Set the lookup value
    look_up_Value = Worksheets("Sheet2").Range("F5").Value
    ' Set the lookup range
    Set look_up_Range = Worksheets("Sheet1").Range("db_Sheet")
    ' Perform the VLOOKUP and store the result
    For i = 1 To 5
    Worksheets("Sheet2").Range("C5").Cells(i, 1).Value _
    = Application.WorksheetFunction.VLookup(look_up_Value, look_up_Range, i + 1, False)
    Next i
End Sub- Here, using the worksheet function VLOOKUP, the text details are extracted and written on corresponding cells in the C column.
Sub Employee_Pic()
On Error GoTo ErrHandl- Here, we wrote another subroutine named InsertPic. By running the subroutine, we will load the employee’s picture. Firstly, for error handling, we wrote a line that will lead us to ErrHandl if any error occurs while running the code.
Call DeleteAllPicturesHere we call the DeleteAllPictures subroutine to delete any existing pictures.
Dim picName As String
    Dim picHeight As Double
    Dim picWidth As Double
picName = "Pic" & Range("F5").Value- Here, Range(“F5”).Value is actually the Employee Number(Emp No). As the name of the employee’s picture on the database worksheet will be associated with his/her Employee Number (Pic+Emp No), we set the name of the picture, picName, as “Pic” & Range(“F5”).Value.
Sheets("Sheet1").Shapes(picName).Copy
Sheets("Sheet2").Range("C4").PasteSpecial- Here, we first copy the Employee’s image from the database worksheet(Sheet1) and paste it on cell C4 of this worksheet (Sheet2).
Sheets("Sheet2").Shapes(Sheets("Sheet2").Shapes.Count).Name = picNameNamed the pasted picture in Sheet2 with the original name from Sheet1.
picHeight = Sheets("Sheet2").Shapes(picName).Height
picWidth = Sheets("Sheet2").Shapes(picName).Width
aspect_Ratio = picWidth / picHeight- Determining the actual picture width, height and aspect ratio.
picHeight = Sheets("Sheet2").Range("C4").RowHeight - 5
picWidth = aspect_Ratio * picHeight- Adjusting the picture height and width with the cell C4 height.
Sheets("Sheet2").Shapes(picName).Height = picHeight
Sheets("Sheet2").Shapes(picName).Width = picWidth- Setting new determined height and width to the inserted picture.
Cell_Height = Sheets("Sheet2").Range("C4").Height
    Cell_Width = Sheets("Sheet2").Range("C4").Width
    With Sheets("Sheet2").Shapes(picName)
        .Top = Sheets("Sheet2").Range("C4").Top + (Cell_Height / 2) - (.Height / 2)
        .Left = Sheets("Sheet2").Range("C4").Left + (Cell_Width / 2) - (.Width / 2)
End With- Make the picture Center and Middle aligned inside the cell, then exit the subroutine.
Call Get_Details
Exit Sub- Calling the Get_Details subroutine to extract the text details.
ErrHandl:
MsgBox "No Data Found of this employee"
 For i = 1 To 5
    Worksheets("Sheet2").Range("C5").Cells(i, 1).Value = "Not Found"
Next
 End Sub
If the employee ID is not found, a MsgBox will tell the user that No Data Found of this employee. On the cells, it will be written: Not Found.
- Now, for our convenience, we insert a button and then assign the Employee_Pic subroutine to the button so that we can run the code from the worksheet.
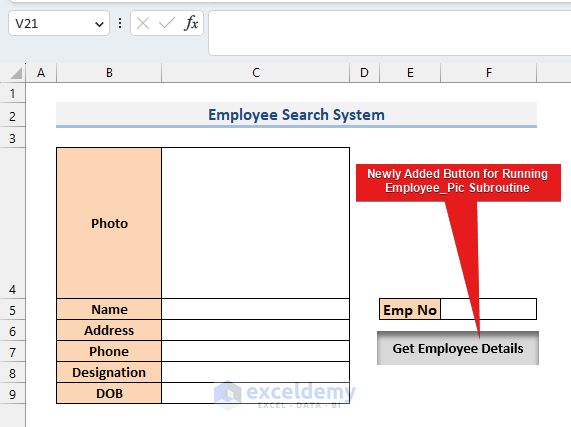
- Now, if we click on the button, we will get the details of the employee.

In this way, we can get all the provided details of an employee, including his or her image, by only using his/her Employee Number.
Read More: How to Create a Searchable Database in Excel
Things to Remember
- The types and number of information items that need to be stored in a database vastly depend on the context. So, you need to modify the layout of the database sheet, UserForm, and search sheet according to your needs.
- You also need to modify the codes accordingly if you make changes to the worksheet.
Download Practice Workbook
Download this practice workbook to exercise while you are reading this article. We used Microsoft Excel 365 to explain the steps.
Related Articles
- How to Create a Database with Form in Excel
- How to Create a Database That Updates Automatically in Excel
- How to Create a Membership Database in Excel
<< Go Back To Database in Excel | Learn Excel
Get FREE Advanced Excel Exercises with Solutions!

in the private sub UserForm_Activate() I get a byref argument type mismatch error to do with the variable database how do I fix this
Hello Ravi
Thanks for visiting our blog and posting your problem. The ByRef argument type mismatch error typically occurs when the data types of variables are passed to a subroutine or function mismatch. In this case, the issue seems to be with the variable database in the UserForm_Activate() event.
To fix the ByRef argument type mismatch error:
Regards
ExcelDemy
Hi, I’m having the same problem. I’ve gone through all of your suggestions on how to fix it and it’s still not working. Can you please explain to me how you declare the database variable as a worksheet type? Maybe I’m missing a step that has nothing to do with the written code? I’ve gone through the code several times and it matches yours perfectly. I don’t understand most of this so please respond as though I know nothing. This is so frustrating and I really want this to work.
Thank you
Hello Christie,
Thanks for reaching out! To declare the database variable as a Worksheet type:
Open your VBA Editor and ensure the variable is properly defined at the top of the module using:
Dim database As Worksheet
Assign it to your desired worksheet, like this:
Set database = ThisWorkbook.Sheets(“SheetName”)
If issues persist, ensure the sheet name is correct, and no other conflicting variables exist. Let me know if this helps!
Best regards,
ExcelDemy
why do I get a byref error in my UserForm_Activate for my database variable
Hello Nirmani
Thanks for reaching out and sharing your problem. You passed an argument that could not be manipulated into the type expected; the ByRef error happens. For example, when you try to supply an Integer variable when a Long is required.
If you encounter a ByRef error related to your database variable, it could be due to how you pass the worksheet object reference. Ensure that the data types of the database variable matches the expected data type in the subroutine.
When the UserForm_Activate event triggers, pass the correct worksheet reference. Double-check that the worksheet name you’re passing matches the actual name of the worksheet in your Excel file.
Regards
Lutfor Rahman Shimanto
Excel & VBA Developer
ExcelDemy
thank you sir
Hello Mr. John,
You are most welcome. Thanks for your appreciation. Keep learning Excel with ExcelDemy!
Regards
ExcelDemy
Hi there, this code outputs the picture “over” the relevant cell. I want to call the picture on another sheet and display it. To do this, I need to manually go to the picture in the database and click “place in cell”, is there a way I can automate this in VBA? thanks
Hello Nick,
To automate the process of inserting a picture from a database sheet into a specific cell on another sheet using VBA, you can use the following approach:
Assign the Picture to a Cell in the Database Sheet: Ensure that each picture in your database sheet is placed within its respective cell. This can be done manually by right-clicking the picture, selecting “Format Picture,” navigating to the “Properties” tab, and choosing “Move and size with cells.”
Use VBA to Copy and Insert the Picture into the Target Sheet: The VBA code below demonstrates how to copy a picture from the database sheet and insert it into a specific cell on the target sheet:
Explanation of the Code:
1. wsDatabase and wsTarget are set to reference the database and target sheets, respectively.
2. rng specifies the cell in the database sheet that contains the picture you want to copy.
3. targetCell specifies the cell in the target sheet where the picture will be inserted.
4. The code loops through all pictures in the database sheet to find the one that intersects with the specified cell (rng). Once found, it copies and pastes the picture into the target cell on the target sheet.
This method ensures that the picture is placed within the desired cell on the target sheet without the need for manual intervention.
Regards
ExcelDemy
Hi, please, I keep having a “ByRef argument type mismatch” in the save button, and the code is correct.
Hello Nuva,
The “ByRef argument type mismatch” error usually means that the variable type you’re passing to a procedure (like a Sub or Function) doesn’t match the expected type in its definition. Even if the code looks correct, double-check these common causes:
Make sure the argument types match exactly between where you call the procedure and where it’s defined (e.g., String vs. Variant, or Range vs. String).
If you’re passing a cell reference, use Range as the argument type, not String.
For example, if your Sub is defined as Sub SaveData(ByRef cell As Range), but you call it with a string like SaveData(“A1”), that will cause this error. Instead, use SaveData(Range(“A1”)).
Regards
ExcelDemy
SALAMO ALAIKOM DO YOU HAVE YOU TUBE TUTORIAL ALSO?
Hello Mohaimen,
Walaikumassalam, hope you are doing well. We have video tutorial in youtube, you can explore our Youtube chanel:
Regards,
ExcelDemy