Many of us employ Excel in our business organizations. In any business organization, we use Excel to analyze data as per need and make databases for the future. Making invoices is an intriguing thing we can accomplish with Excel easily. In this article, we’ll demonstrate a step-by-step procedure to create an invoice in Word from Excel data. So, go through the whole article to understand the entire topic properly.
Download Practice Workbook
You may download the following Excel workbook and doc file for better understanding and practice.
6 Easy Steps to Create Invoice in Word from Excel Data
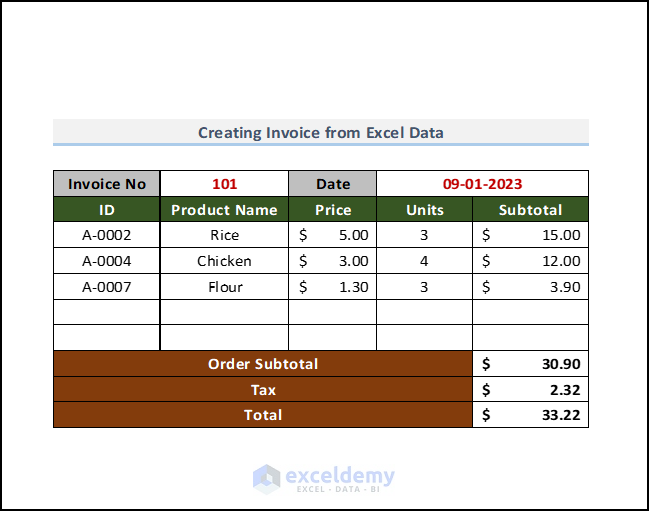
For ease of understanding, we are going to use a dataset of Product Details. This dataset concludes the ID, Product Name, and their corresponding Prices in columns B, C, and D respectively.

Note: This is a basic dataset to keep things simple. In a practical scenario, you may encounter a much larger and more complex dataset.
Now, we’ll use this dataset to create an invoice in Word using Excel data. So, let’s explore the method step-by-step.
Not to mention, here, we have used the Microsoft Excel 365 version, you may use any other version according to your convenience. Please leave a comment if any part of this article does not work in your version.
Step 01: Convert Dataset into Table
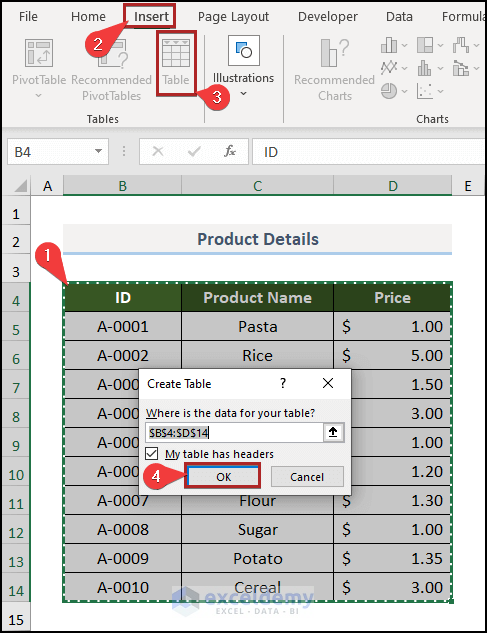
At the very beginning, we have to transform our dataset into a table. It’s quite simple and easy. Just follow the steps below.
- At first, select the whole dataset with the heading (B4:D14).
- Then, navigate to the Insert tab.
- From the Tables group of commands, click on Table.
Immediately, the Create Table dialog box will pop up.
- Just click OK.
As a result, it will convert itself into a table. Now, rename the table as per your wish. In this case, we named it “Product”.
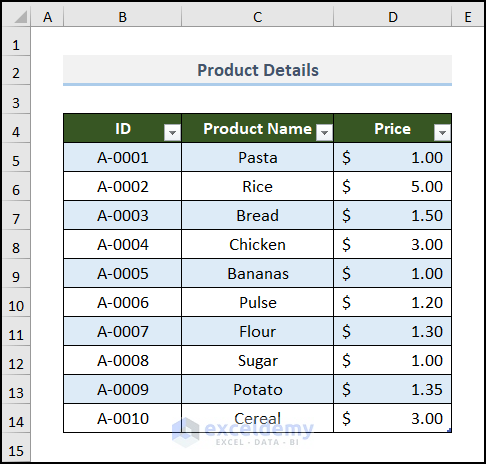
Now, we are eligible to easily use this table in the upcoming steps of the procedure.
Read More: How to Create a Cash Bill Format in Excel (A step-by-step Guideline)
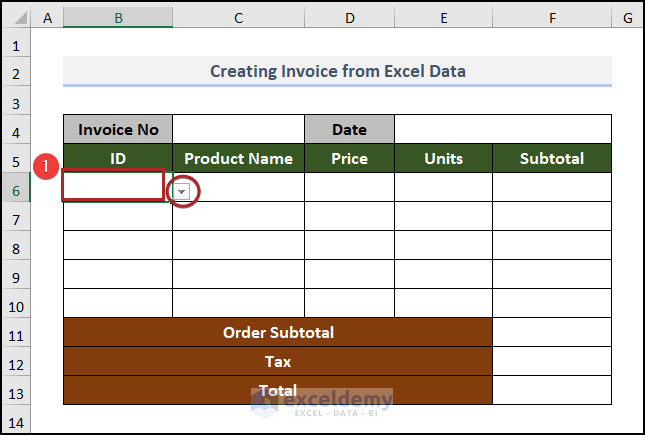
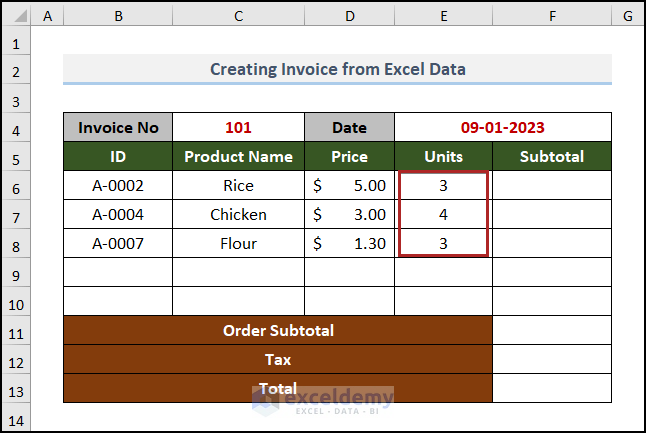
Step 02: Create Basic Outline of Invoice
In the second step, we will build the fundamental silhouette of the invoice.
- Firstly, we gave a suitable title for the sheet in the B2:F2 cell range.
- Here, we wrote the column headings in the B5:F5 range.
- Then, we kept spaces in the B6:F10 range for calculating the amount for individual products.
- At last, there is an area for the order total in the B11:F13 range.
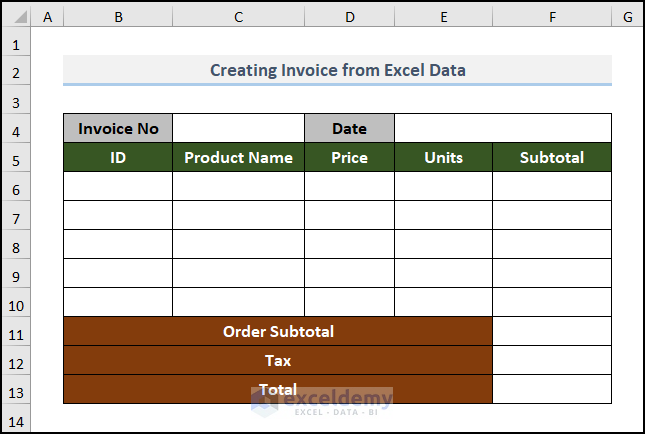
We also maintained blank cells for inserting Invoice No and Date in cells C4 and E4.
Read More: How to Create Fully Automatic Invoice in Excel (with Easy Steps)
Step 03: Apply Data Validation
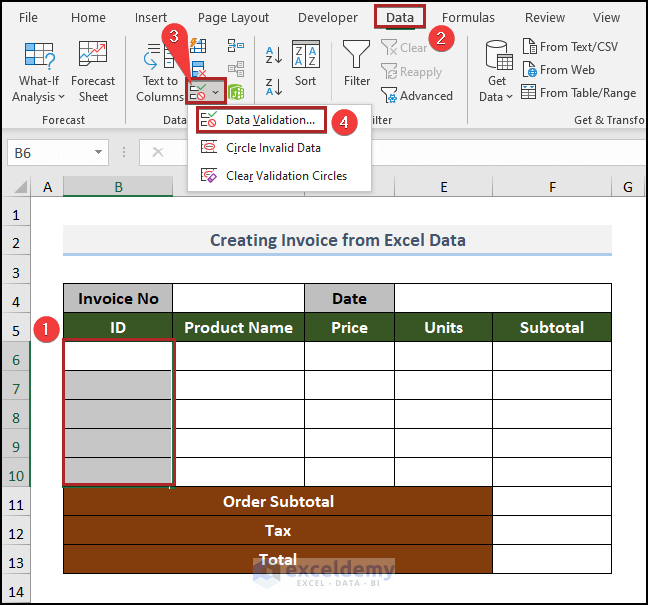
For entering the ID of the products in the invoice, we’ll use the Data Validation tool in Excel. So, we don’t have to write down the ID manually, which will lessen the chance of errors occurring. So, let’s see it in action.
- First of all, select cells in the B6:B10 range.
- Then, proceed to the Data tab.
- After that, click on the Data Validation drop-down icon.
- Next, select the Data Validation option.
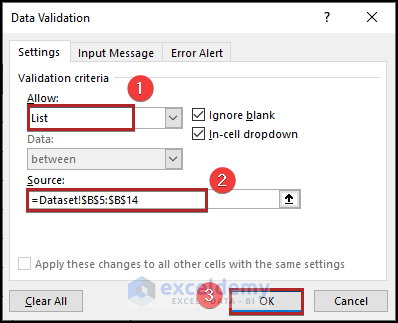
Instantly, the Data Validation wizard will open up. Now, let’s give the Validation criteria in the box.
- Here, select List in the Allow box.
- In the Source box, give the cell reference of B5:B14 of the Dataset worksheet.
- Then, click OK.
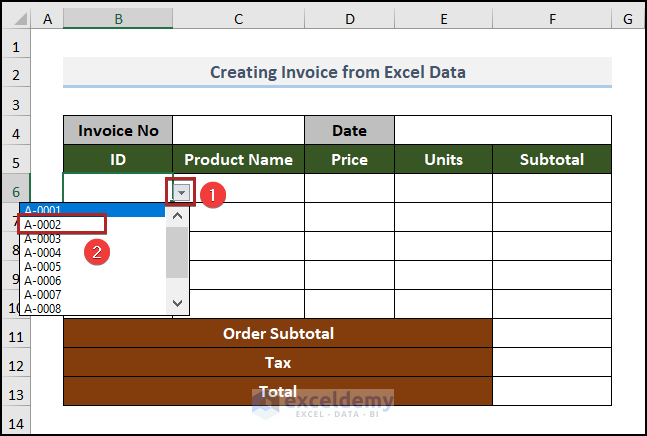
Right away, you can see a down arrowhead beside the cell if you click on that cell.
- At this time, click on the arrowhead to bring the drop-down list and select A-0002 from the list.
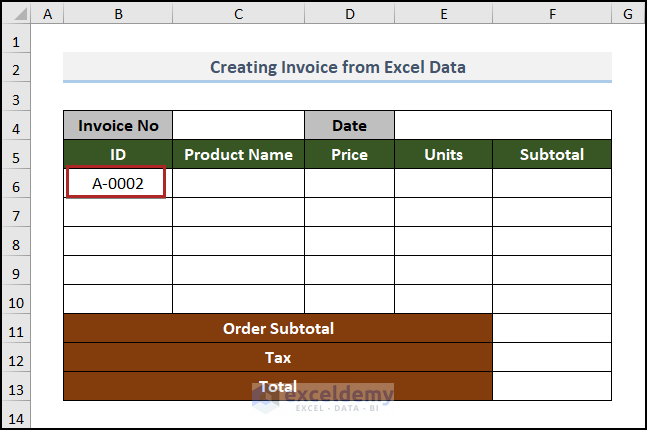
Consequently, it will be placed in cell B6 as a product ID.
Similar Readings
- Transport Bill Format in Excel (Create in 4 Simple Steps)
- Create GST Invoice Format in Excel (Step-by-Step Guideline)
Step 04: Insert Formula to Get Product Name and Price
Here comes the complex part of the work. Now, we’ll apply the formula to get the Product Name and corresponding Price according to the product ID. So, follow this part carefully.
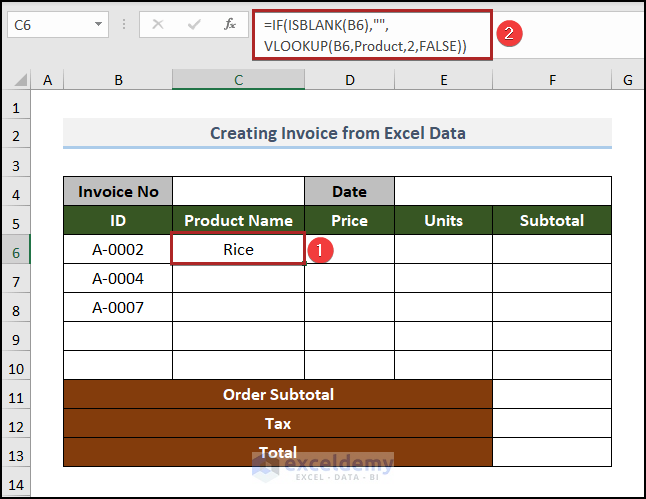
=IF(ISBLANK(B6),"",VLOOKUP(B6,Product,2,FALSE))Formula Breakdown
- VLOOKUP(B6,Product,2,FALSE) → the VLOOKUP function will search B6 on the Product table on the Dataset worksheet and shows output from the 2nd column of the range.
- Output → Rice
- IF(ISBLANK(B6),””,VLOOKUP(B6,Products!$B$5:$D$14,2,FALSE)) → If a match is found, then show the result otherwise the cell will be blank.
- Output → Rice
- As always, press ENTER.
At this moment, bring the cursor to the right-bottom corner of cell C6, where it’ll look like a plus (+) sign. Actually, it’s the Fill Handle tool.
- Now, double-click on it.
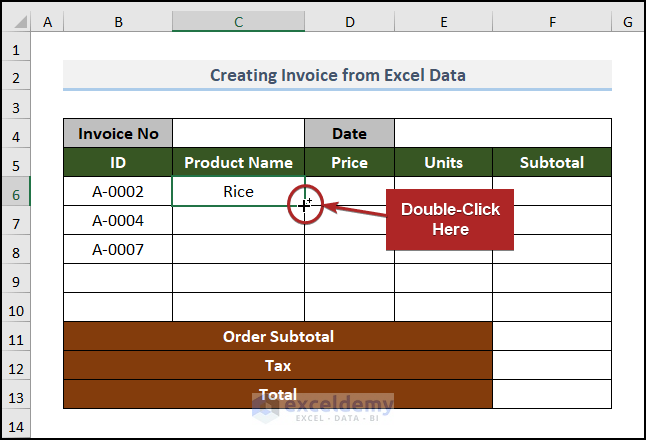
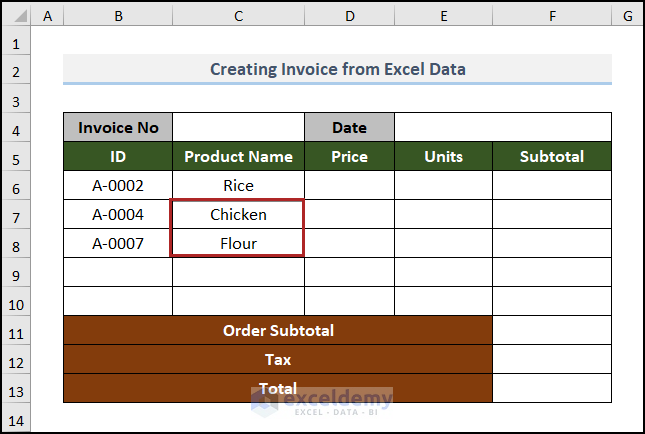
Magically, it copies the formula with the right cell references in the lower cells and gives us outputs in those remaining cells.
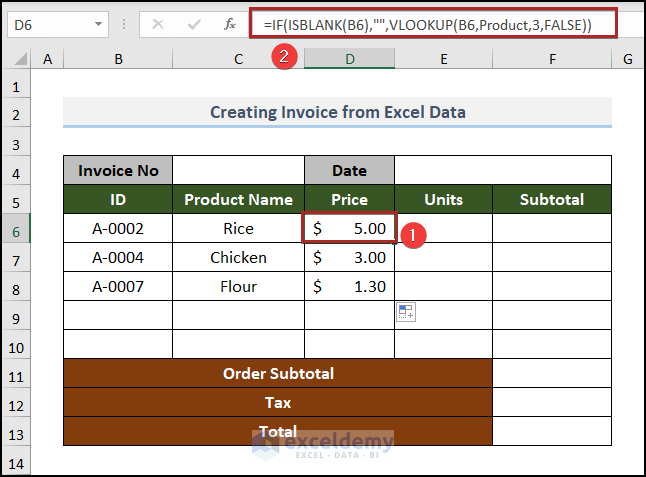
- Afterward, select cell D6 and insert the formula below.
=IF(ISBLANK(B6),"",VLOOKUP(B6,Product,3,FALSE))This formula is similar to the above formula. Just see that for clarification. Here, we intend to fetch the Price from the Product table.
- As usual, press the ENTER key.
Read More: Invoice Excel Formula
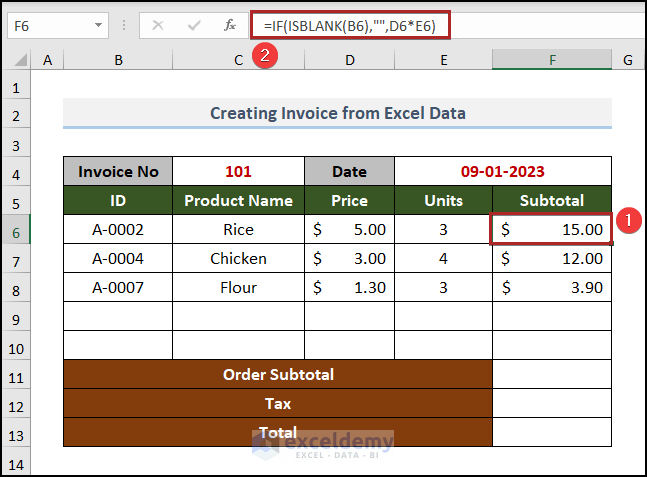
Step 05: Show Final Output
We are too close to see the final output with our own eyes. Simply wait a few minutes and complete the remaining tasks.
- Primarily, give the Units manually as per your need.
- Secondarily, select cell F6, and write down the following formula.
=IF(ISBLANK(B6),"",D6*E6)Formula Breakdown
- ISBLANK(B6) → the ISBLANK function checks whether the cell is blank or not.
- Output → FALSE
- IF(ISBLANK(B6),””,D6*E6) becomes IF(FALSE,””,D6*E6). So, the value_if_false argument of the IF function (D6*E6) will be the output.
- Output → 15
- After that, tap the ENTER key.
- Furthermore, go to cell F11 and put down the formula below.
=SUM(F6:F10)Here, F6:F10 cells represent the range of Subtotals for each item. The SUM function adds all the numbers in this range.
- Then, press ENTER.

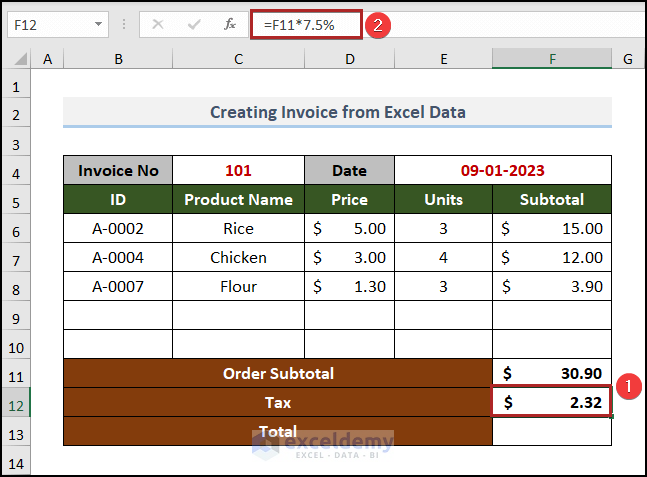
- In addition, select cell F12 and place the following formula into that cell.
=F11*7.5%Here, we have assumed the tax amount as 7.5% of the amount.
- Also, hit the ENTER key.
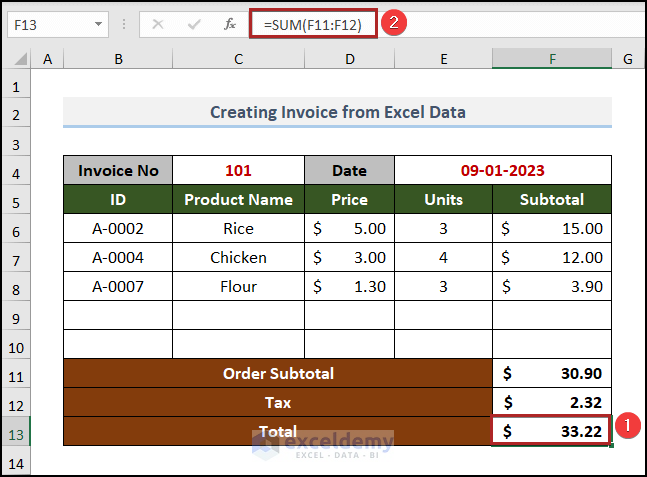
Last but not least, we’ll calculate the final Total amount of this invoice. It consists of two things: the Order Subtotal and the Tax.
- Just go to cell F13 and enter the formula beneath.
=SUM(F11:F12)- As usual, press ENTER.
Constructing the invoice part is done. In the following steps, we’ll look at the closest part.
Read More: Tax Invoice Format in Excel (Download the Free Template)
Step 06: Extract Data to Word
In this section, we’ll extract the data from Excel to Word. It’s so simple. Just go through the steps below.
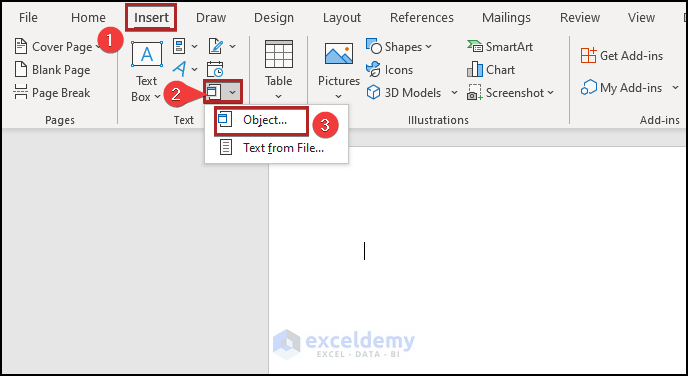
- Firstly, open the Word application.
- Then, jump to the Insert tab.
- After that, click on the Object drop-down icon.
- From the drop-down list, select the Object option.
Promptly, the Object dialog box will appear before us.
- Secondly, advance to the Create from File tab.
- Next, click on the Browse button.
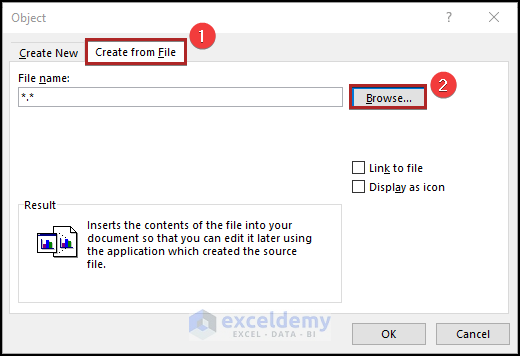
We will search for the Excel file where we created the invoice.
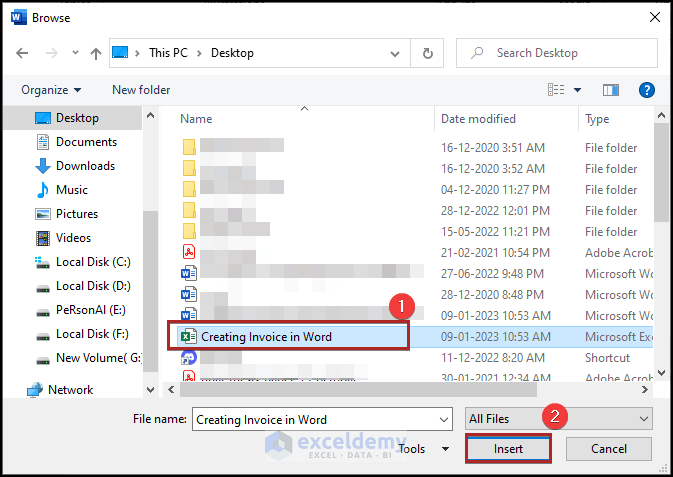
- In the Browse window, choose the right file and click on the Insert button.
- Lastly, click OK.
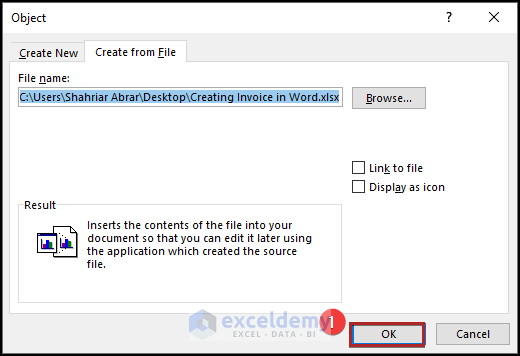
After loading for some time, the exact invoice will be opened in Word also.
Read More: How to Create Proforma Invoice in Excel (Download Free Template)
Things to Remember
- Make sure to keep the correct worksheet open while extracting the data from Excel. Because the object will extract data from the active worksheet only.
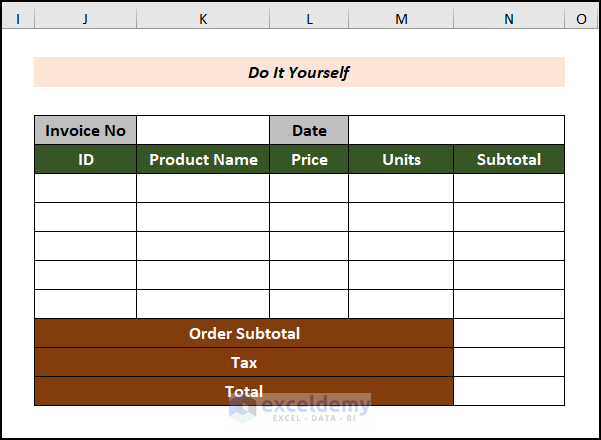
Practice Section
For doing practice by yourself, we have provided a Practice section like the one below on the right side of the sheet. Please do it by yourself.
Conclusion
This article explains how to create an invoice in Word from Excel data in a simple and concise manner. Thank you for reading this article. We hope this was helpful. Please let us know in the comment section if you have any queries or suggestions. Please visit our website, ExcelDemy, a one-stop Excel solution provider, to explore more.
Related Articles
- How to Create Bill Payment Checklist in Excel (2 Smart Ways)
- Use Electricity Bill Calculation Formula in Excel
- How to Create Bill Book in Excel (2 Easy Ways)
- Labour Contractor Bill Format in Excel (Download Free Template)
- Hotel Bill Format in Excel (Create with Easy Steps)
- Tally Bill Format in Excel (Create with 7 Easy Steps)
- Excel Invoice Tracker (Format and Usage)

