The Fill Handle tool is used to fill or extend data or series in Excel. It is a plus-sign cursor (+).
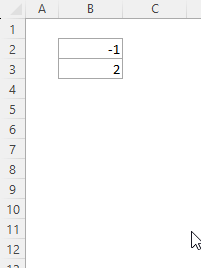
For example, in the following GIF, we have an Excel series with only two entries: -1 and 2. We want to fill it up to 20.
- Select the cells and drag them using the fill handle tool.
⏷What Is Fill Handle in Excel?
⏷How Do I Enable/Disable Fill Handle in Excel?
⏷Why Do We Need to Use Fill Handle? When Not to Use It?
⏷How to Use Fill Handle in Excel: 7 Suitable Examples
⏵To Fill Data Quickly from Adjacent Cells
⏵Fill Data Quickly for Multiple Cells
⏵To Fill Down Blank Cells Until Next Value
⏵To Copy a Formula to the Left, Right, Up, and Down
⏵To Drag Formula Horizontally With Vertical Reference in Excel
⏵To AutoFill Number Series in Excel
⏵To Insert Patterned List Easily in Excel
⏵To Fill Days, Months, or Years Automatically in Excel
⏷Can We Use Fill Handle from the Keyboard?
⏷What to Do If Excel Fill Handle Does Not Work?
⏵Turn on Automatic Workbook Calculation
⏷What Are the AutoFill Options (Fill Handle Options) in Excel?
⏵AutoFill Options for a List with Numbers
⏵Autofill Options for a List with Dates
⏵AutoFill Options for Formatting
⏵AutoFill Options for Flash Fill
⏷How to Create Custom List for AutoFill in Excel?
What Is Fill Handle in Excel?
The Fill Handle is a time-saving feature that automatically fills cells with values up to a point. Use it for data entry and manipulation.
You can find the icon by moving the mouse cursor to the bottom-right corner of a selection.
![]()
There are two ways to use the Fill Handle in Excel:
- You can click on it and drag it to a point to fill in values.
- You can double-click when the icon changes to a plus sign.
It will give you the same result.
The Fill Handle doesn’t work on a Protected Sheet.
Click on the GIF to get a detailed view
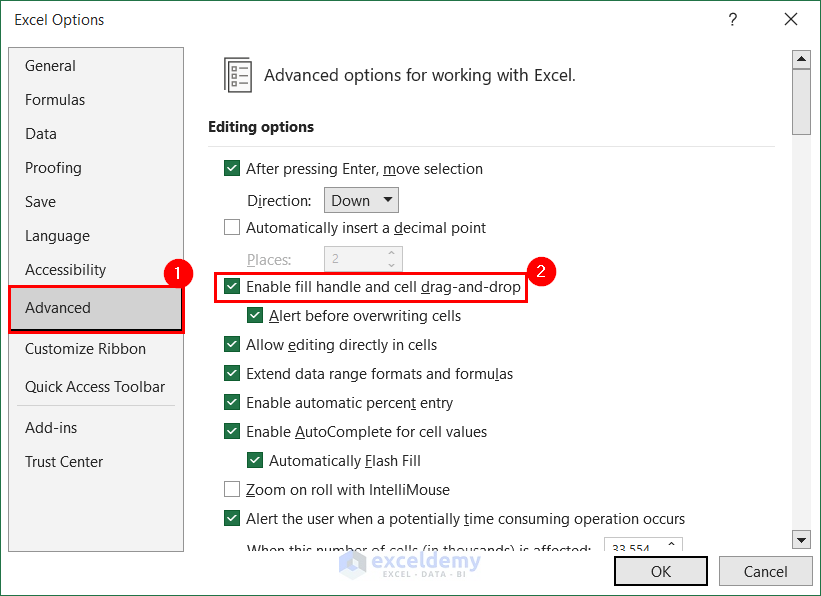
How Do I Enable or Disable the Fill Handle in Excel?
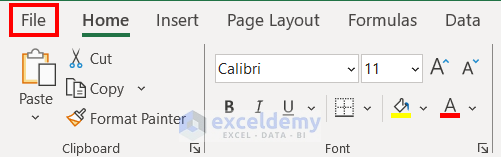
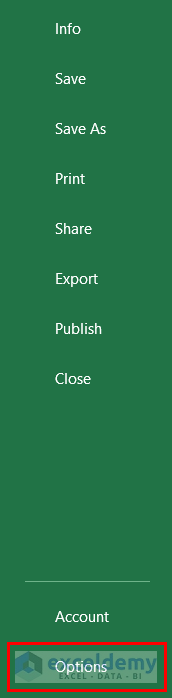
- Click on File from the ribbon.
- Select Options.
- Select the Advanced tab in the Excel Options dialog box.
- Check or uncheck the Enable fill handle and cell drag and drop option depending on whether you want to enable or disable the feature.
Click on the image for a detailed view
Why Do You Need to Use Fill Handle? When Not to Use It?
The Fill Handle is a useful feature of Excel because of its advantages. Some of its advantages include:
– Can autofill patterns.
– Provides a quick method for copying and pasting data.
– Provides efficiency while using formulas, so that we don’t have to manually insert each one.
– Can fill data in all directions by dragging.
However, it also has some disadvantages.
– It is highly dependent on the pattern you have already provided. So, it may require some additional inputs before getting the desired output.
– Can’t fill “irregular” numeric patterns like 1,1,2,2,3,3,…
– Can’t skip cells while dragging the fill handle down.
– Ineffective against data with no patterns, such as text values.
– Can return wrong outputs for formulas when references aren’t put properly.
How to Use Fill Handle in Excel: 7 Suitable Examples
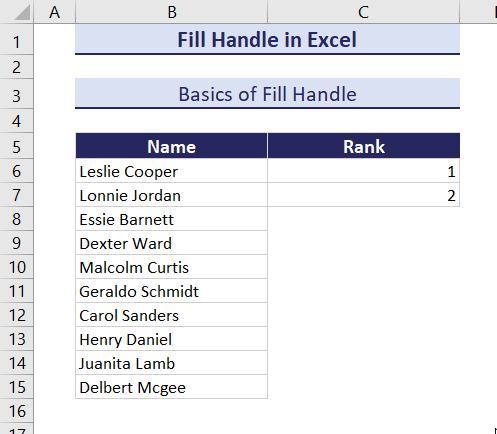
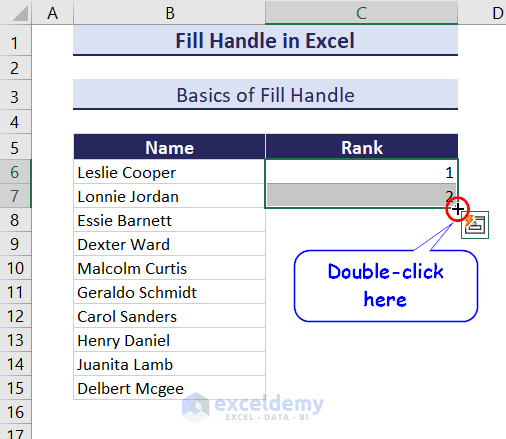
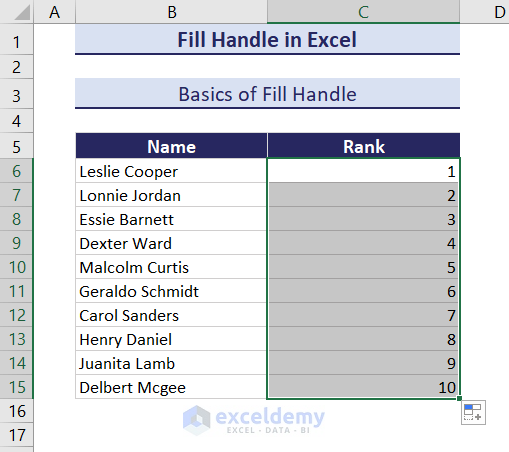
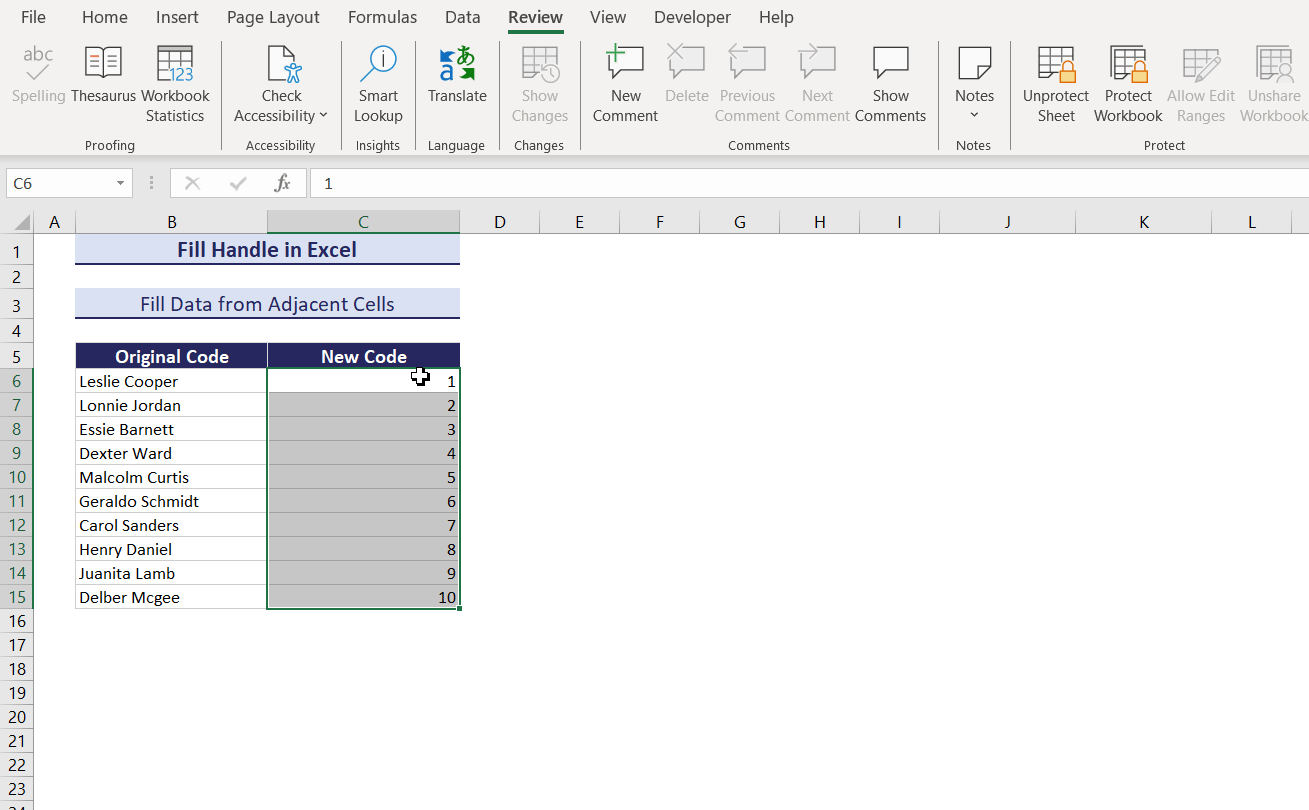
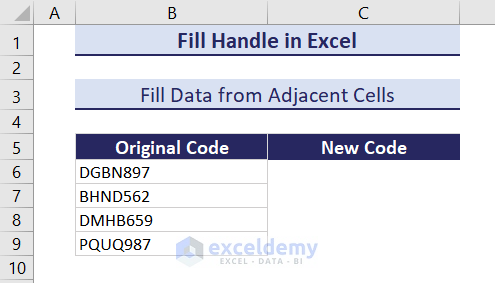
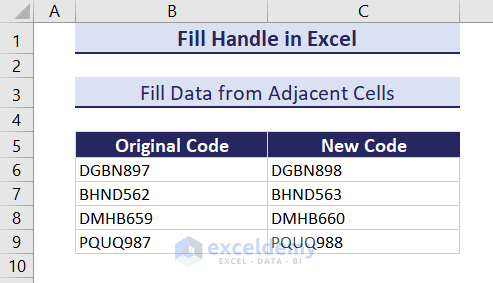
Example 1 – Fill Data Quickly from Adjacent Cells
There are some codes in column B. We want to create a new one in column C, where each code is one number higher than the adjacent one.
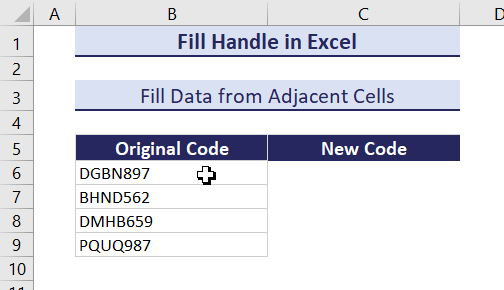
- Select cell B6 and drag the fill handle to C6 to fill in the next value.
- Select cell B7 and drag it to cell C7 to get the next value.
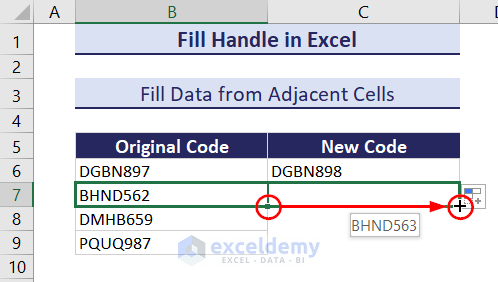
- Repeat for the other cells.
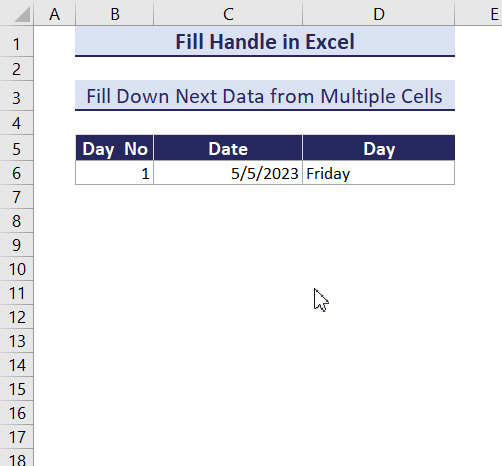
Case 2 – Fill Data Quickly for Multiple Cells
Suppose we want to create a table of Day No, Date and Day from the following data. We want the next value in every row.
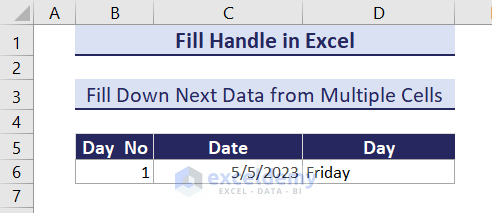
- Select the range B6:D6.
- Move your cursor to the bottom-right of the selection until the fill handle icon appears.
- Click and drag it to the point you want to fill.
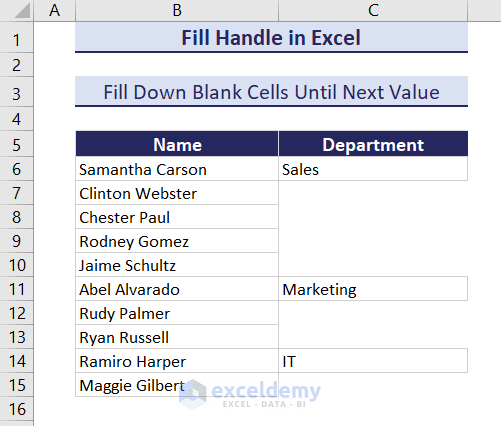
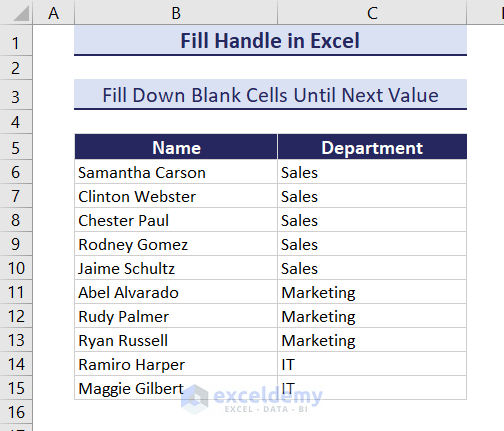
Example 2 – Fill Down Blank Cells Until the Next Value
In the following dataset, we need to fill “Sales” up to cell C10, “Marketing” up to cell C13, and “IT” in cell C16.
- The fill handle copies text values. Select cell C6 and drag the fill handle down to cell C10, and it will fill the range with “Sales”.

- Selecting cell C11 and dragging it to C13 will fill the range with “Marketing”.
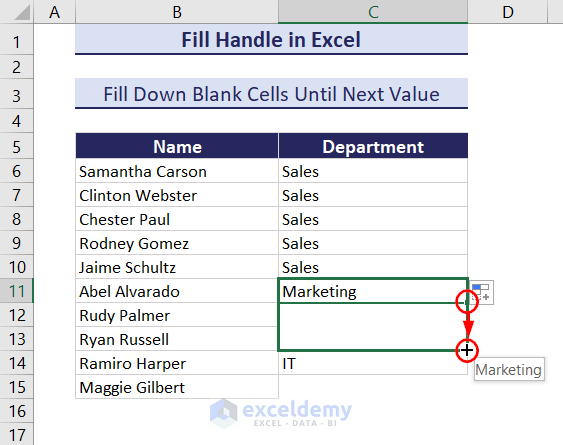
- Doing the same for C15 and C16 will fill the range with “IT”.
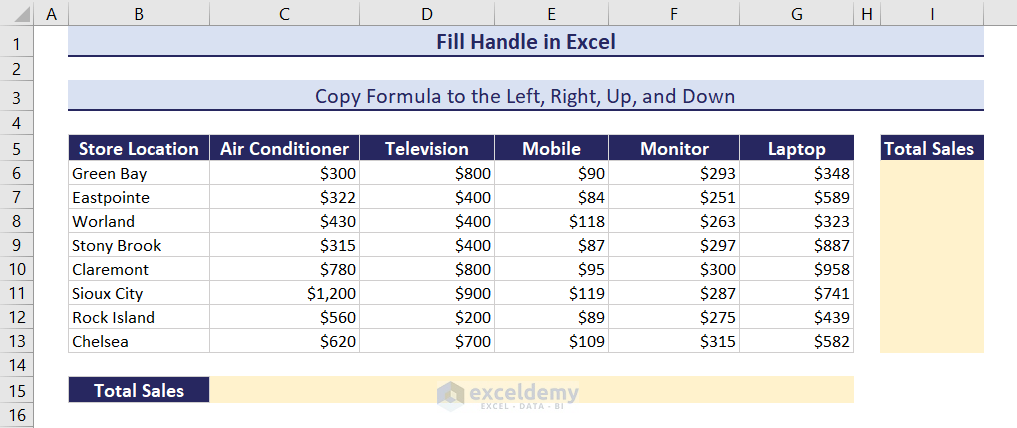
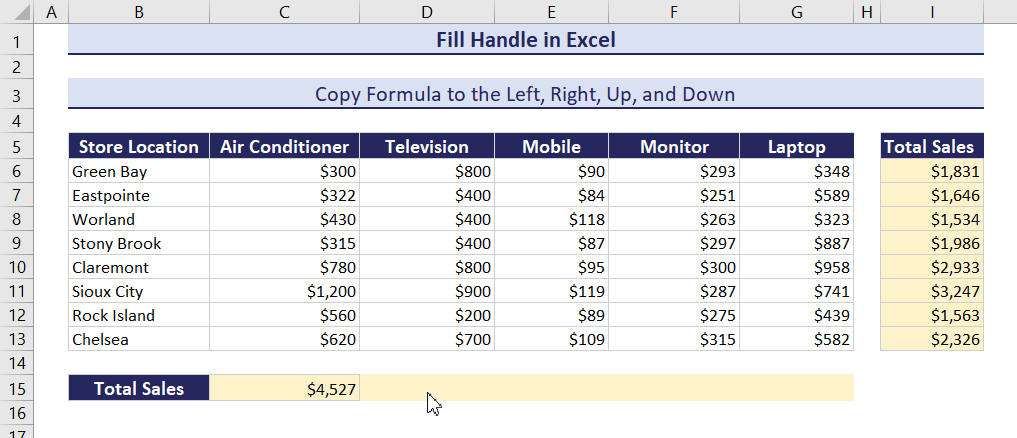
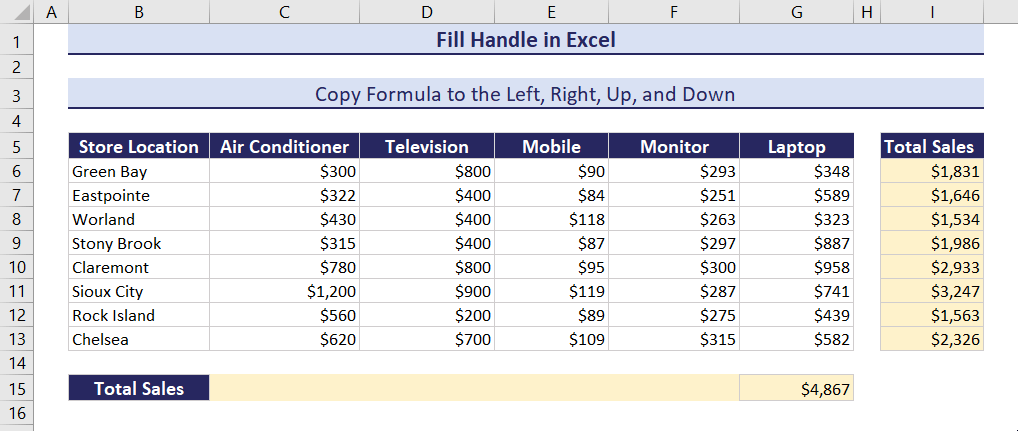
Example 3 – Copy a Formula to the Left, Right, Up, or Down
Here is a dataset showing different products sold in different store locations. We want to sum the total sales based on both locations and products. We need to sum them vertically and horizontally for that.
Fill Formula Down:
- Use the following formula in cell I6:
=SUM(C6:G6)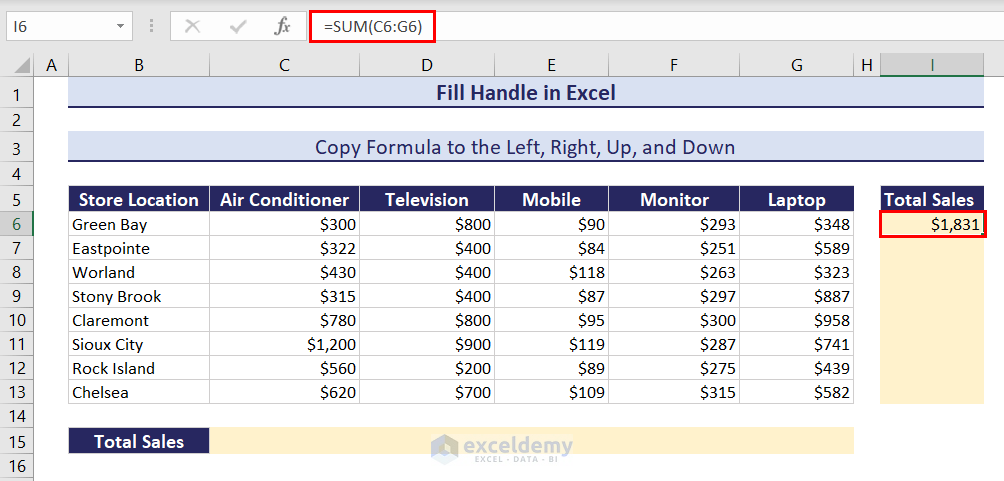
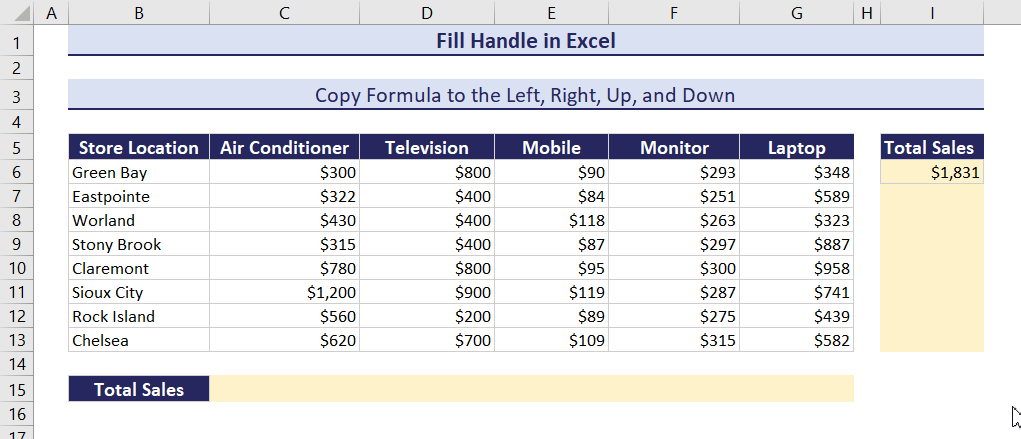
- Select the cell again, move your cursor to the bottom-right of the selection, and drag the fill handle down.
Fill Formula Up:
- Use the formula in cell I13:
=SUM(C13:G13)- Move your cursor to the bottom-right of the selection.
- Click and drag up to cell I6.

Fill Formula to the Right:
- Use the SUM formula in cell C15:
=SUM(C6:C13)- Move the cursor to the bottom-right of the selection until it turns into the fill handle icon.
- Click and drag the cursor to the right to fill in the formula.
Fill Formula to the Left:
- Use the formula in the rightmost cell (G15).
=SUM(G6:G13)- Move your cursor to the bottom-right of cell G15 to get the fill handle icon.
- Click and drag it to the left to fill in the formula.
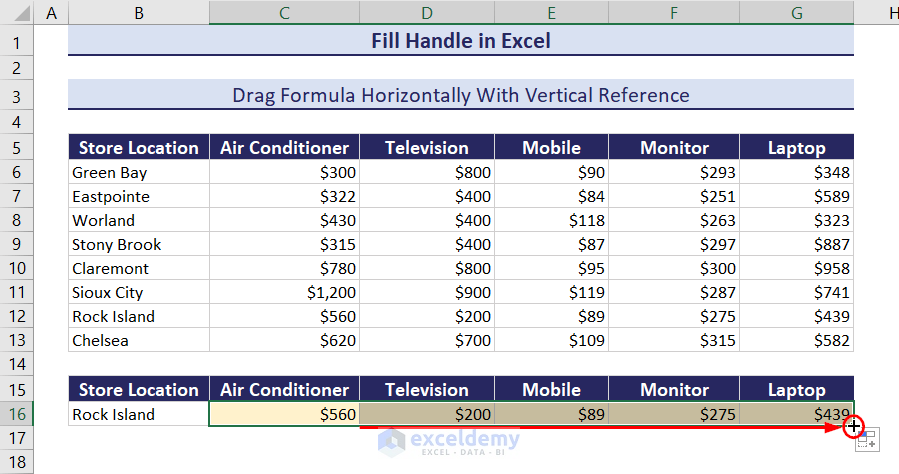
Example 4 – Drag Formula Horizontally With a Vertical Reference in Excel
For the same dataset of product sales in different store locations, let’s say we want to find out the sales amount of each item in “Rock Island”.
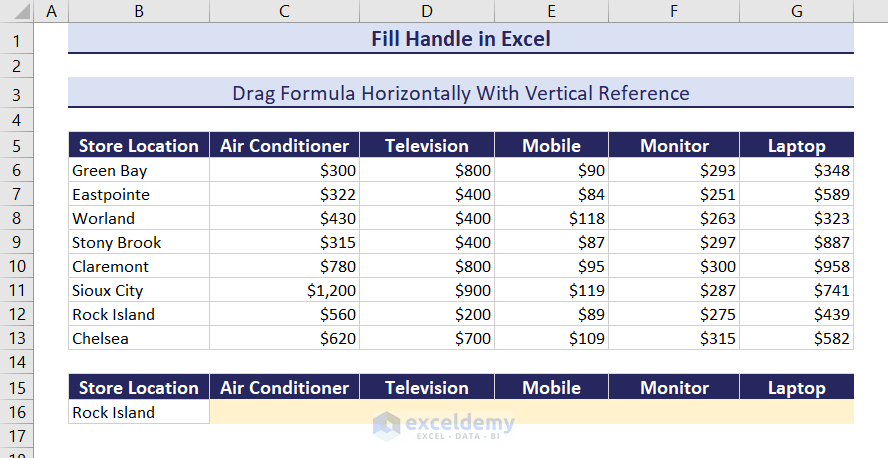
- Insert the following formula in cell C16:
=VLOOKUP($B$16,$B$6:$G$13,COLUMN(C6)-1,FALSE)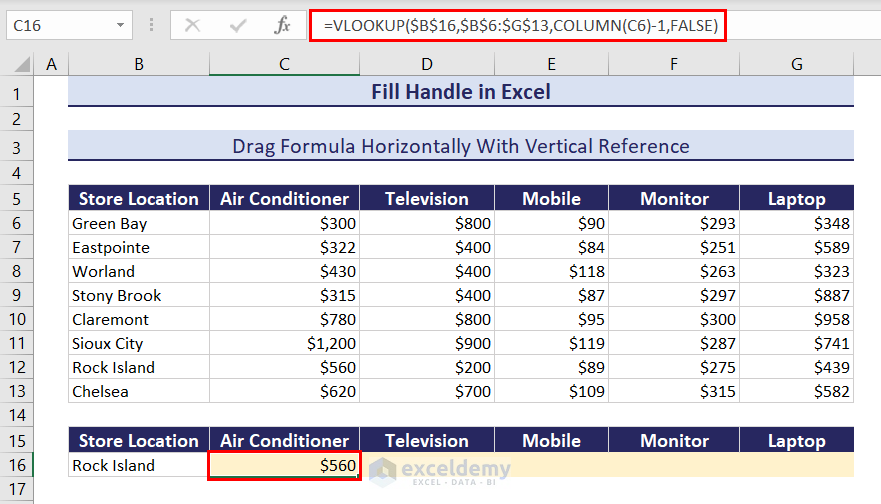
- Select the cell again and click and drag the fill handle to the right until cell C16.
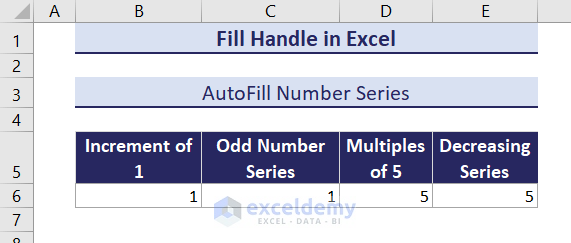
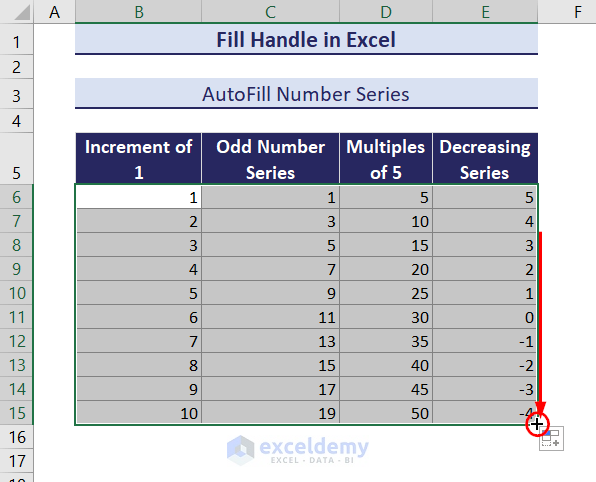
Example 5 – AutoFill a Number Series in Excel
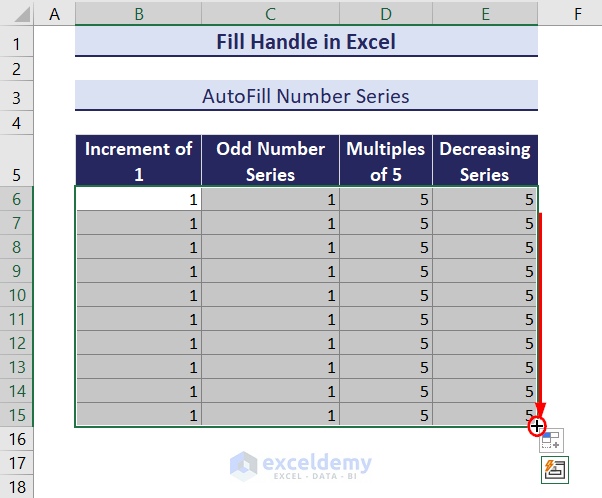
We want to create a normal divergent series, an odd number series, a geometric series of 5, and a decreasing series.
- If we select these cells and drag them down, it will create only copies of the existing values.
- Insert another row of values in the original dataset.
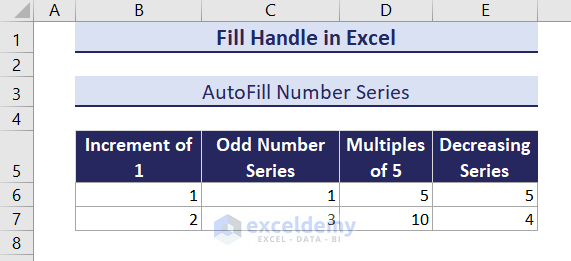
- Select the range B6:E7 and drag it down. The fill handle will pick up the pattern and autofill accordingly.
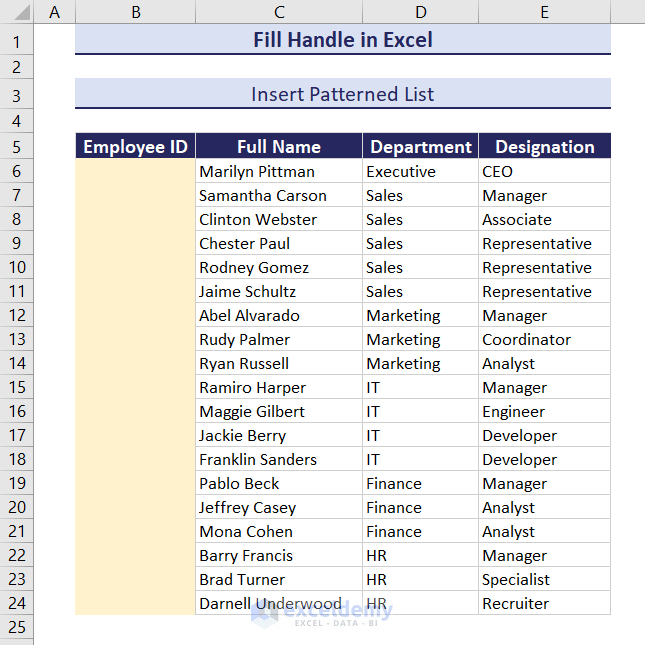
Example 6 – Insert a Patterned List Easily in Excel
Let’s look at another dataset where we want to fill in alphanumeric values while maintaining a pattern.
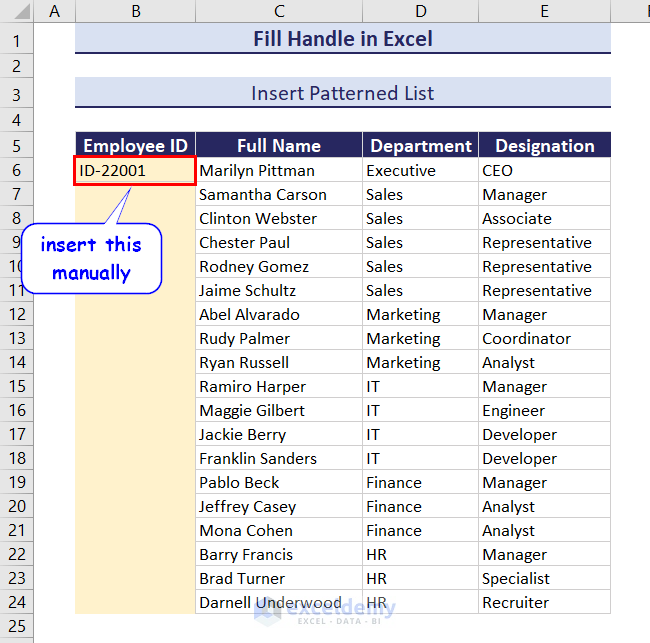
- Insert the first value manually.
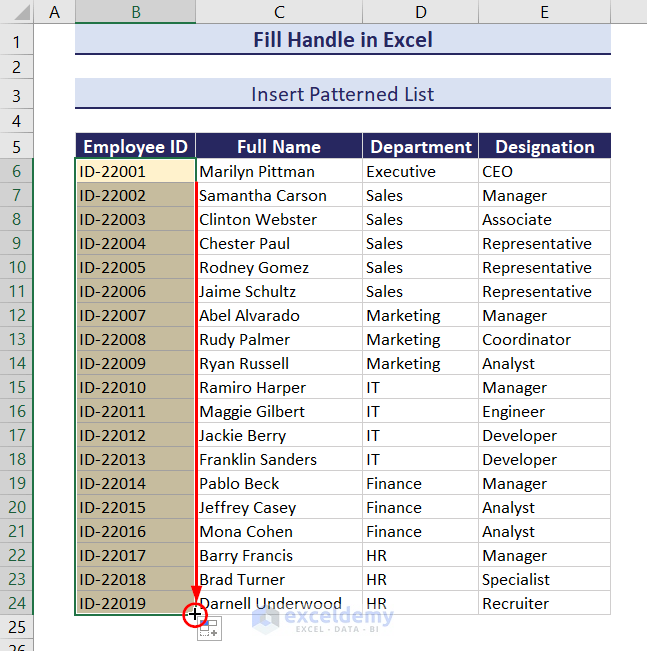
- Select the cell and drag it down. Excel will automatically maintain the pattern of filling in the next ID.
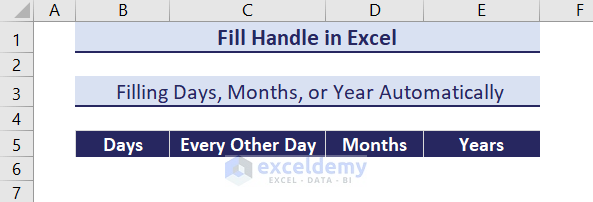
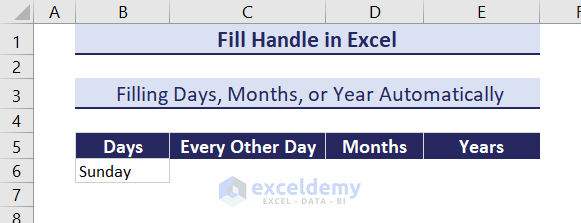
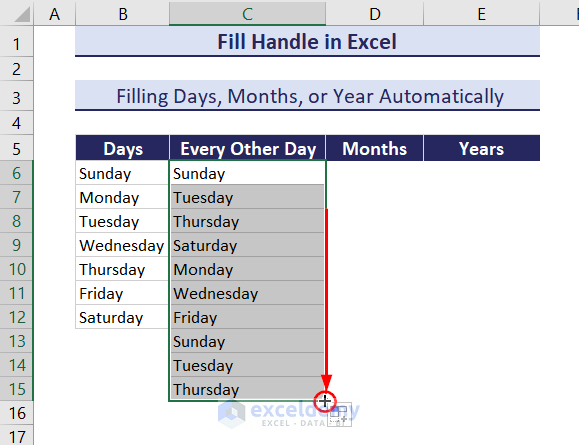
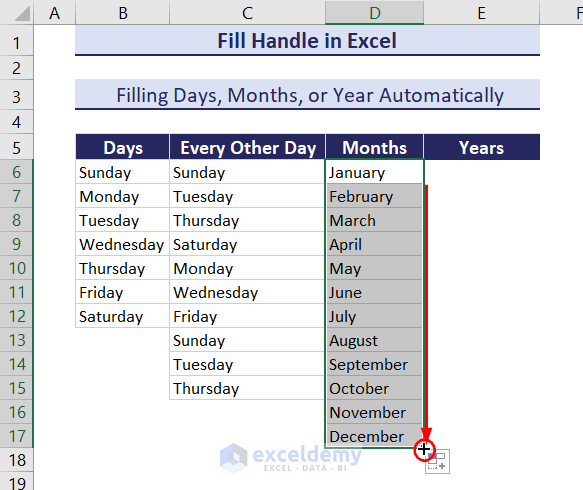
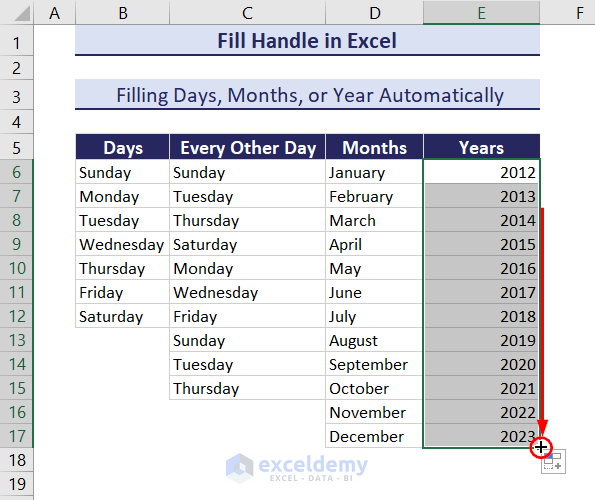
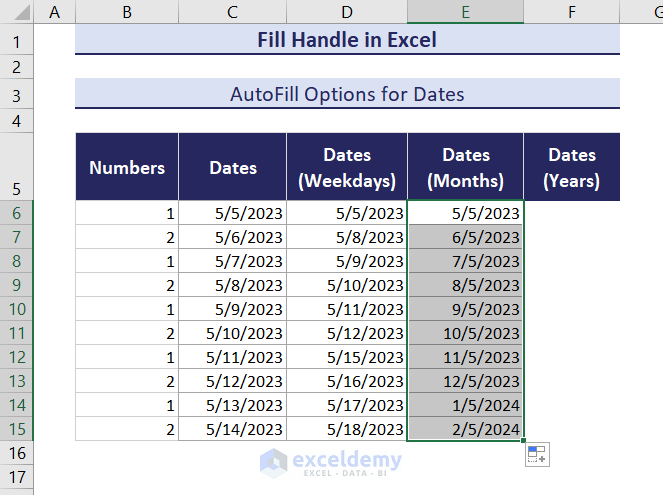
Example 7 – Fill Days, Months, or Years Automatically in Excel
We want to fill up the following table with Days, Months, or Years using the Fill Handle feature.
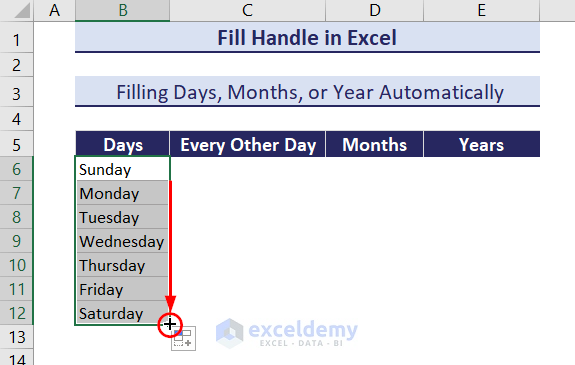
Filling Days:
- Insert “Sunday” in cell B6.
- Select the cell and drag the fill handle down to cell C12.
Fill Every Other Day:
- Insert two values (e.g. Sunday and Tuesday) in cells C6 and C7.
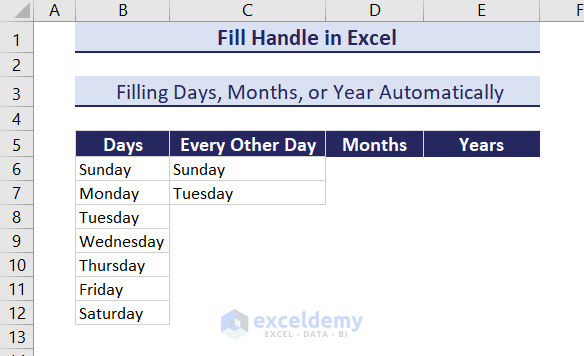
- Select both cells and drag the selection down to get the series.
Fill Months:
- Insert the first month in cell D6.
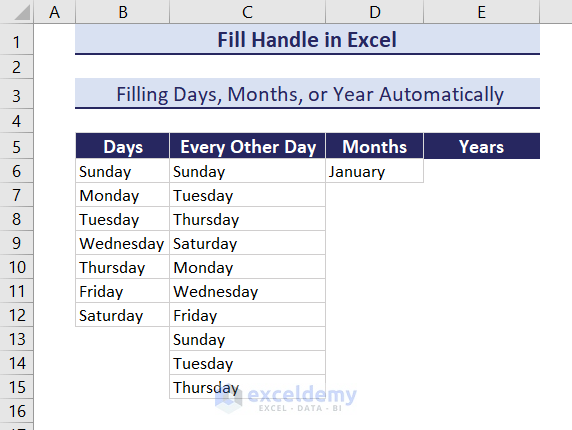
- Select the cell and drag it down to get all the months in order.
Fill Years:
- Insert two values.

- Select both cells and drag them down to get the years.
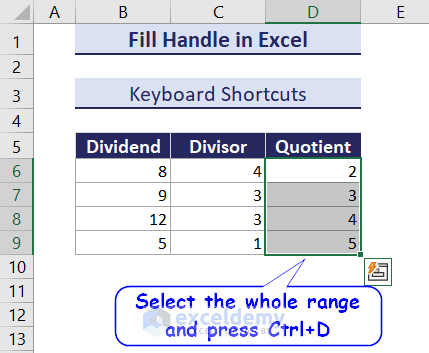
Can You Use the Fill Handle from the Keyboard?
There are keyboard shortcuts to fill values- Ctrl+D and Ctrl+R to fill down and right. The method doesn’t work for filling up a series.
For example, there is a formula in cell D6 in the following image dividing the value of cell B6 by C6. We want to fill the formula up to cell D9.
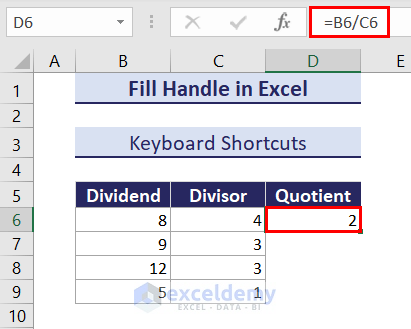
- Select the cells up to cell D9 and press Ctrl + D to see the result.
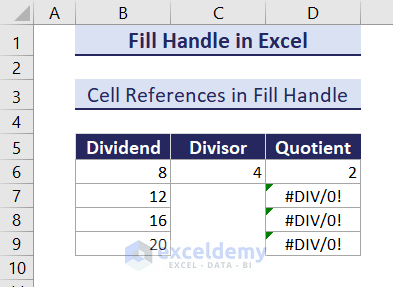
What to Do If Excel Fill Handle Does Not Work?
Fix 1 – Check Cell References
In the following example, we have used a division formula in cell D6 and filled it in using the Fill Handle.
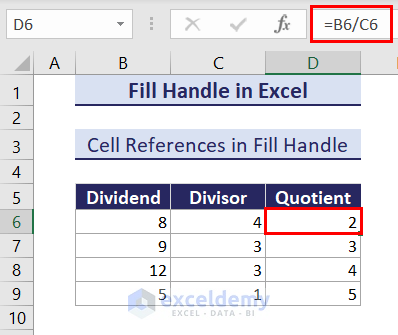
If we check the next cell, the references have already shifted down one cell with the selection (B7 and C7 instead of B6 and C6).
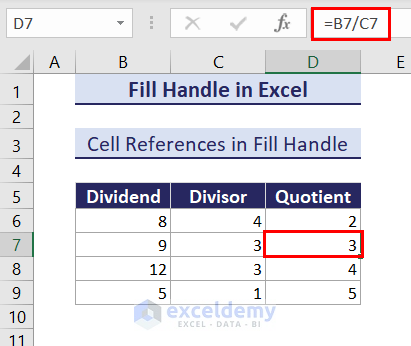
Usually, this is helpful while working with formulas. However, this may cause issues when we need to work with the same cell reference in every formula.
Take the following dataset, for example. We wanted to divide each number by 4. It returned errors after filling with the same formula because there were no values involved in the C7:C10 range.
Solution:
We can fix this issue by using Absolute Cell References. Instead of using B6/C6, we can insert B6/$C$6 in cell D6.
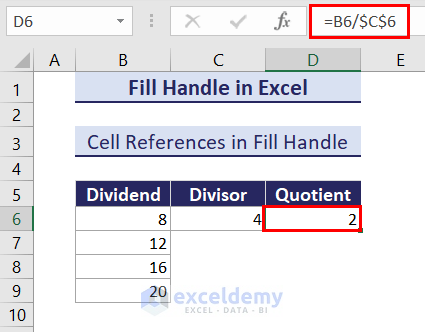
This gives the same result for cell D6, but when we fill it down using the fill handle, it won’t return an error.

By using the Dollar ($) signs, we have indicated to use the same reference every time while autofilling.
Fix 2 – Turn on Automatic Workbook Calculation
Sometimes the series may end up repeating formulas instead of replicating the formulas for the next cell.
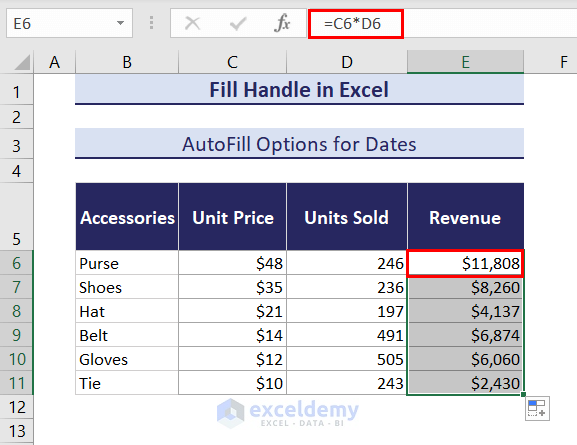
In the following example, we have used a formula to calculate the revenue from different accessory sales in cell E6. When we drag the formula down, the fill handle copies the same value instead of calculating its respective revenue.
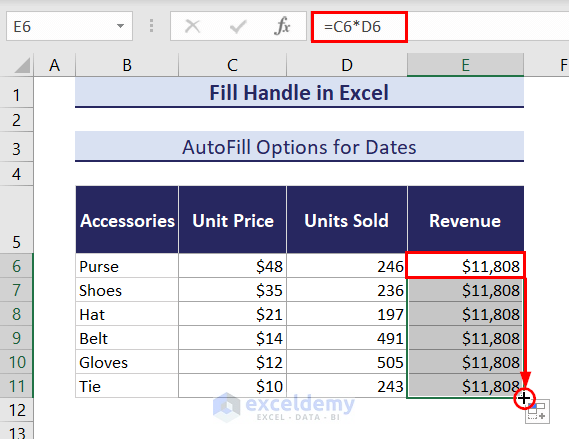
This is because the Calculation Options was set to Manual in the workbook.
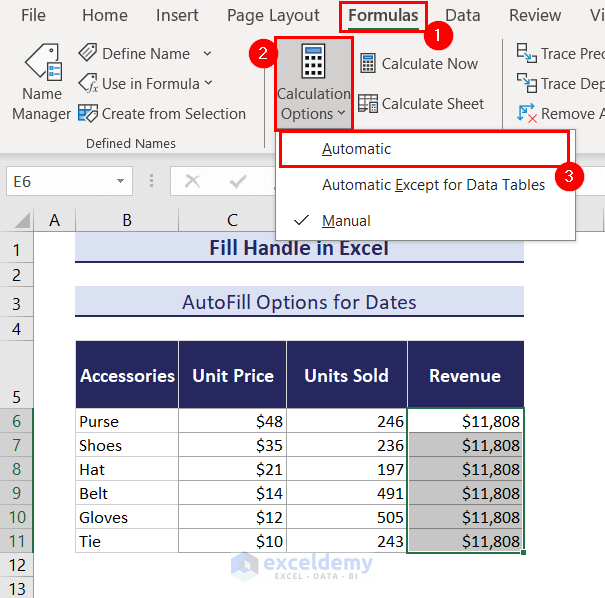
Solution:
Turn the Calculation Options into Automatic and the formulas will be calculated according to their respective cells. You will find it under the Calculation group in the Formulas tab.
The fill handle will fill down the next value it picks up, depending on the data.
What Are the AutoFill Options (Fill Handle Options) in Excel?
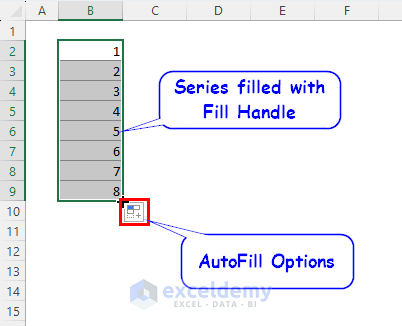
To control outputs in these scenarios, Excel has different AutoFill options. This is available in the box-shaped sign at the bottom-right of the filled range right after we drag the Fill Handle.
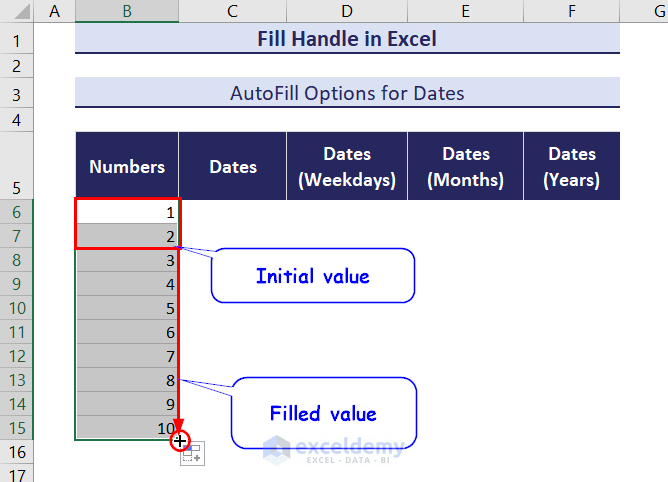
Option 1 – AutoFill Options for a List with Numbers
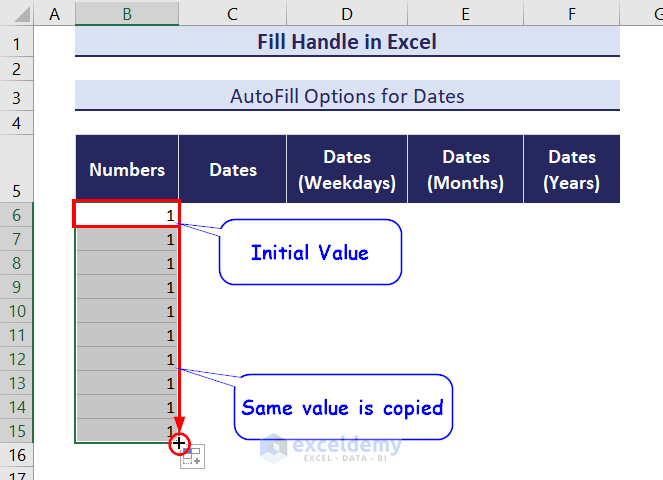
When we drag the fill handle from one number, we usually get the copied value of the number.
- Click on AutoFill Options from the bottom-right and select Fill Series.
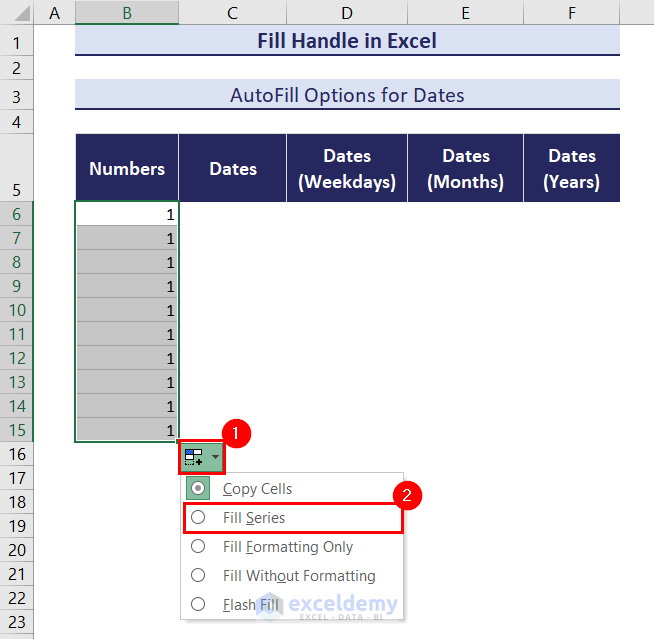
- The numbers will change into a series.
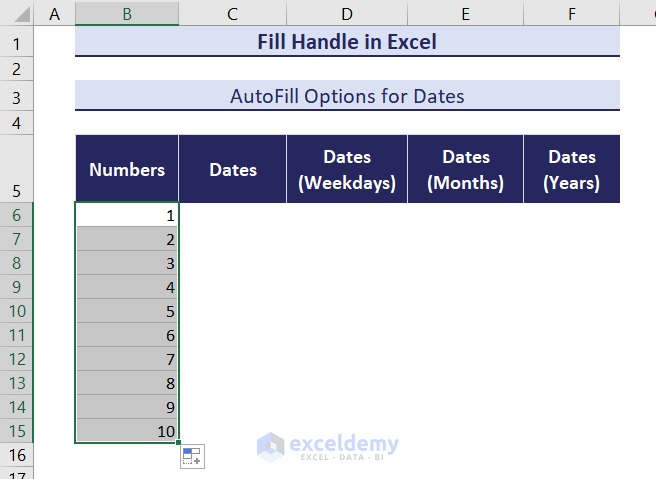
- If we take two values, it fills up a series.
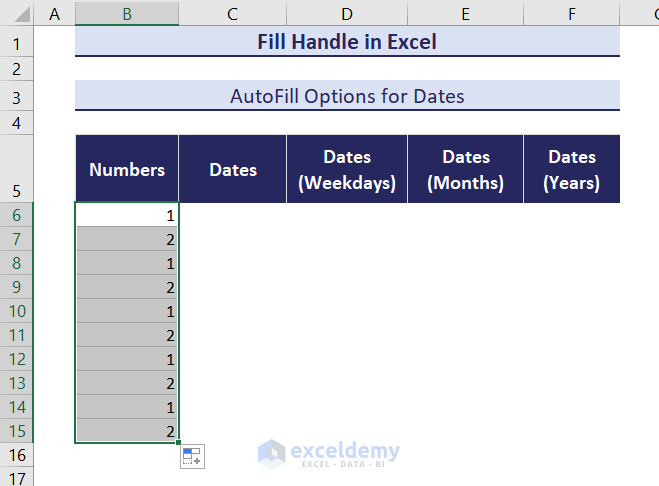
- If we want to copy the same value instead of creating a series, we need to select Copy Cells from AutoFill Options.
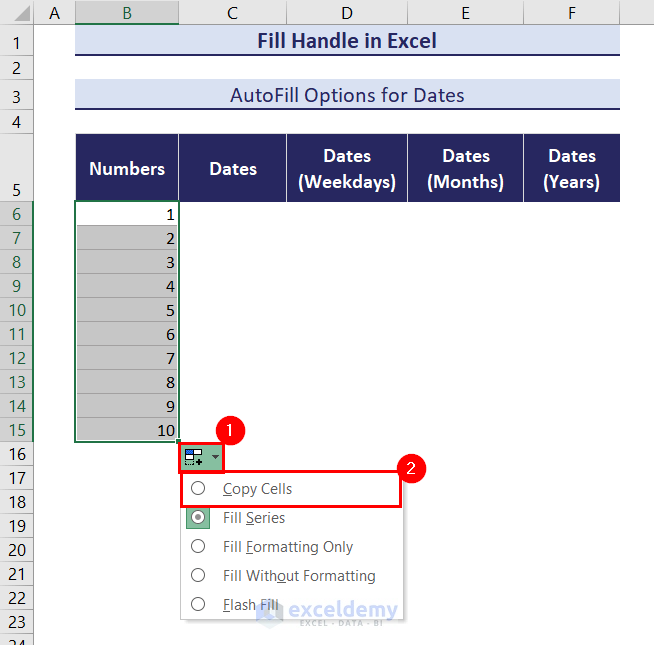
- The initial numbers will be copied after that.
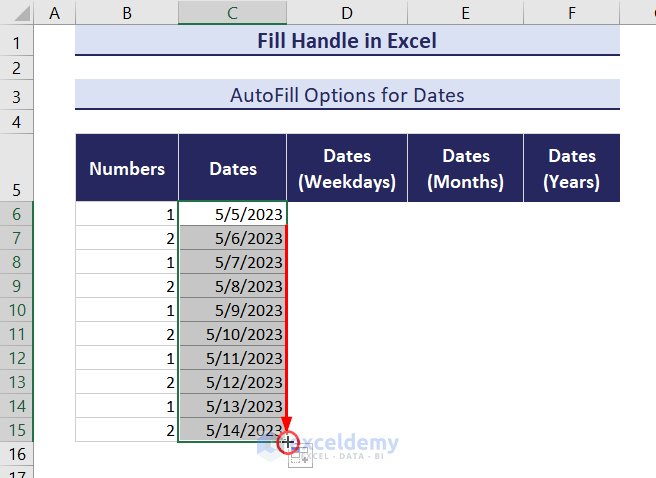
Option 2 – Autofill Options for a List with Dates
In the following dataset, we have set a date in cell C6. After dragging the fill handle down for ten cells, we get the next ten dates.
AutoFill Weekdays:
Now let’s take an example with the same starting date. But we want the next weekdays to appear only after filling.
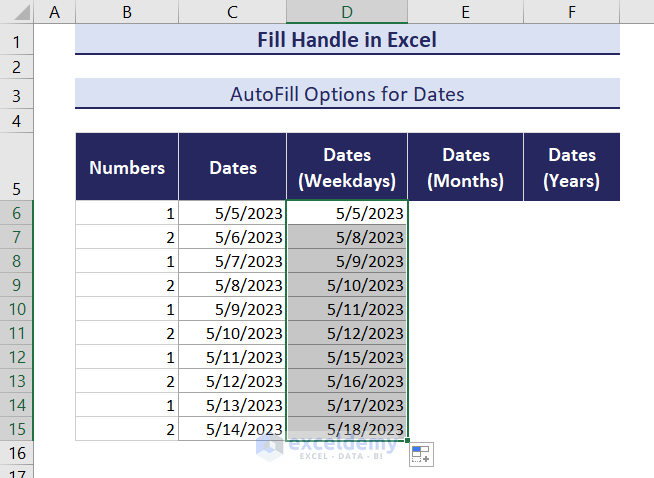
- Drag the fill handle down as usual for this and select Fill Weekdays from the AutoFill options.
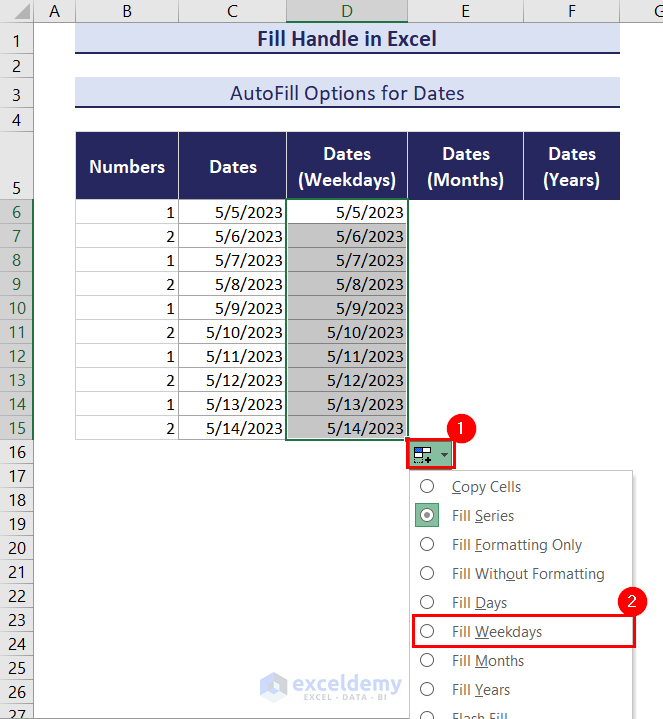
- It will ignore the Saturdays and Sundays in the range and fill out the range with the rest of the dates.
AutoFill Months:
For example, you want the 5th of June to appear after the 5th of May.
- Drag the fill handle down from the first date and select Fill Months from the AutoFill Options.
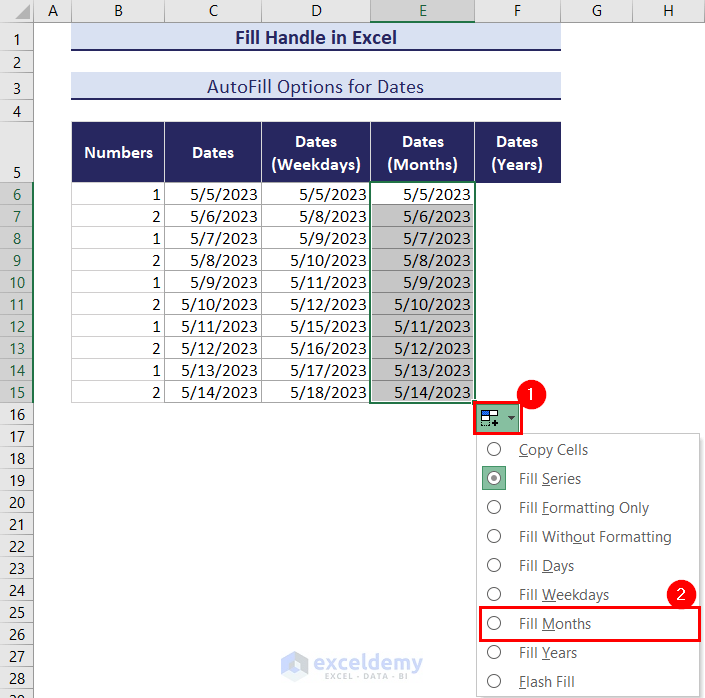
- You will notice the days remain the same as the first one, but the month values change to the next.
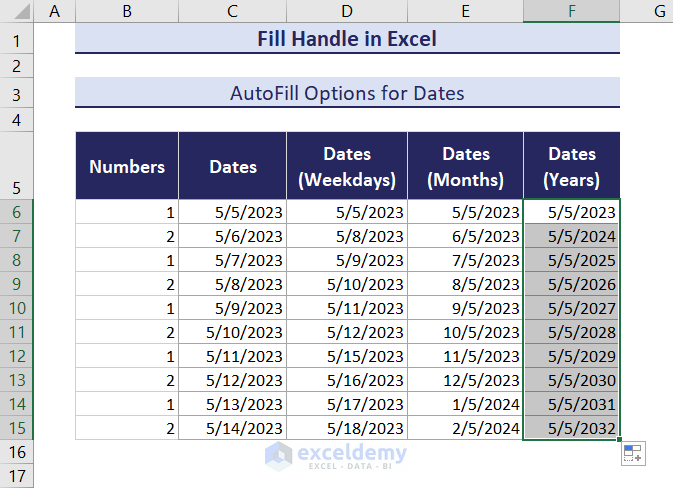
AutoFill Years:
- You can drag a date and select the Fill Years option from AutoFill Options.
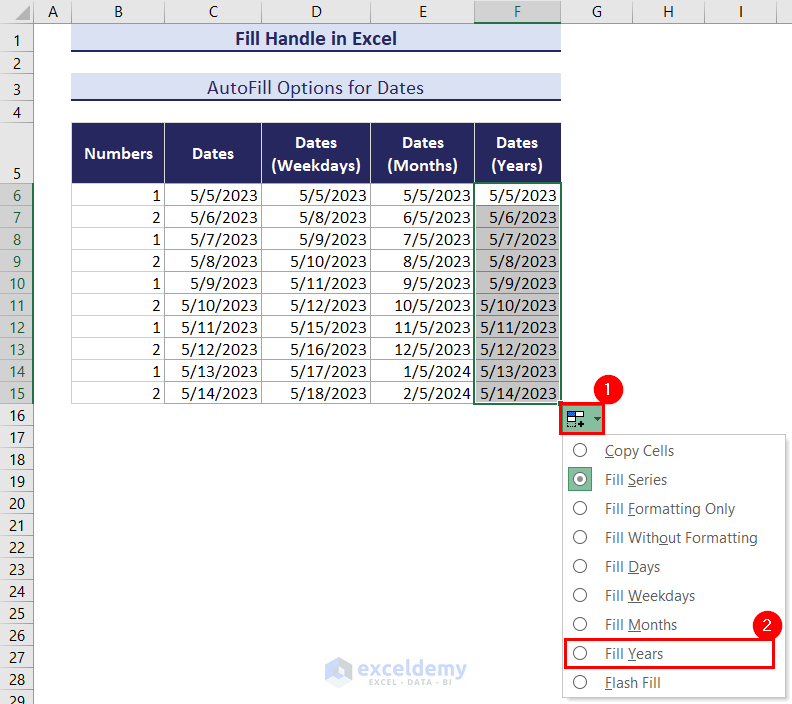
Click on the image for a detailed view
- This will keep the days and months the same but fill in the next years subsequently.
Option 3 – AutoFill Options for Formatting
If you have a formatted range and drag it with the Fill Handle, it will usually fill the values along with formatting.
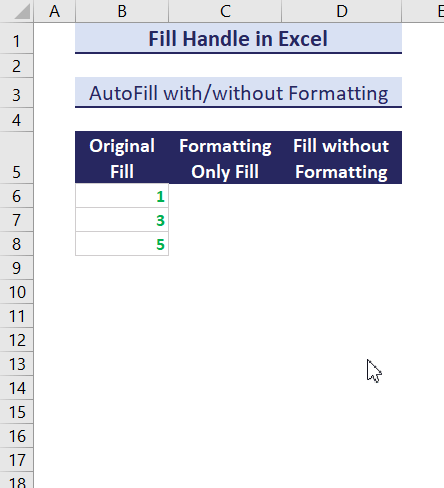
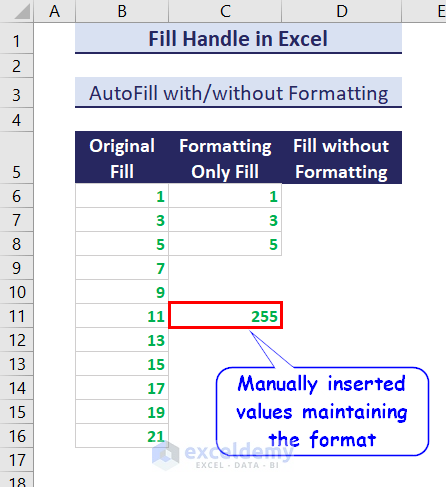
Fill Formatting Only:
- Let’s take the same initial values (C6 to C8) and drag them down. Click on the AutoFill Options, and you will see the Fill Formatting Only option.
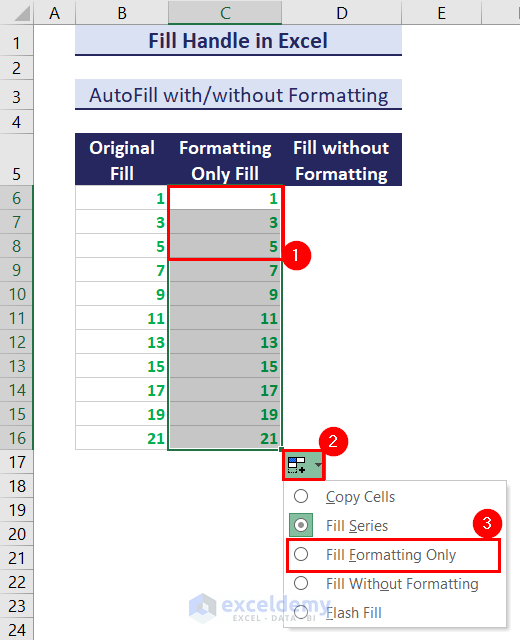
- Click on it, and you will see the values from the fill disappear.
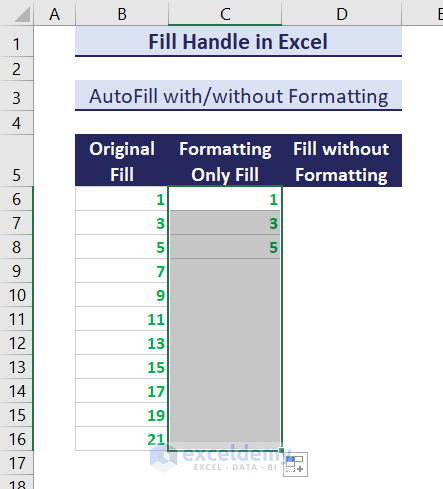
- The format (text color in this case) remains for the cell. Insert a random value in this range, and you will notice it is transforming into a green-colored text.
Fill Without Formatting:
- If you do the same with the same initial values and select the Fill Without Formatting option from the AutoFill Options, you can get the values only without any formats.
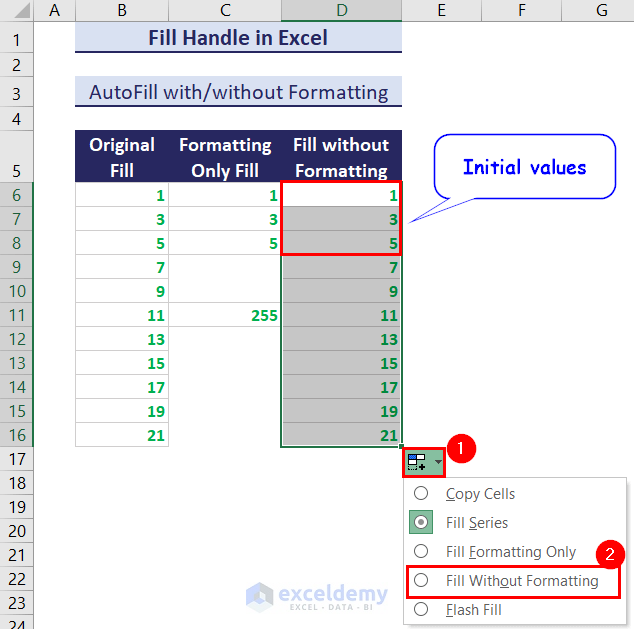
- This will be the result.

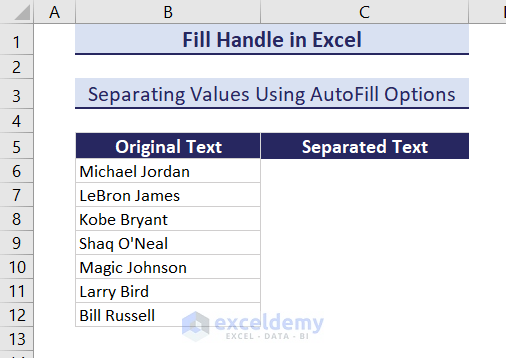
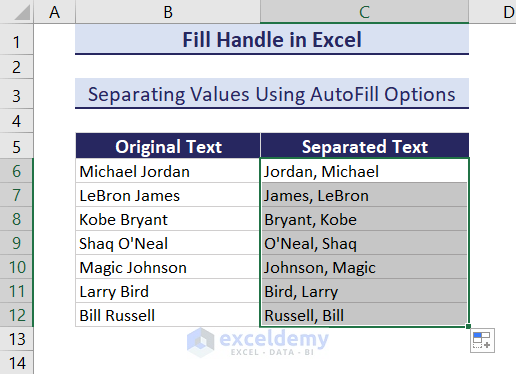
Option 4 – AutoFill Options for Flash Fill
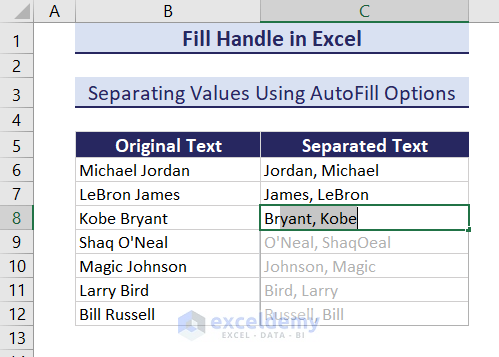
Let’s look at the following dataset, where we want to separate the full name into a last name and first name.
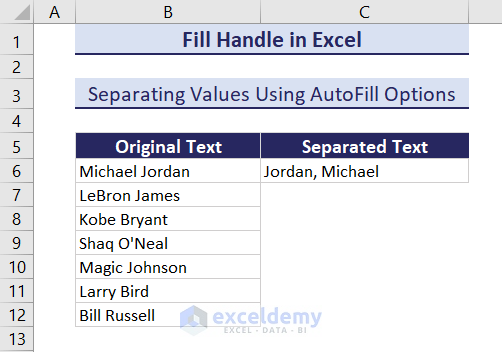
- Insert some values manually first in cells C6 and C7. In cell C8, Excel will suggest the result after it picks up the pattern.
- After pressing Enter, you will get the final result.
Here is how we can achieve that with the AutoFill Options using the Fill Handle:
- Type out the first value manually.
- Select the cell and drag it down. It will copy the text first.
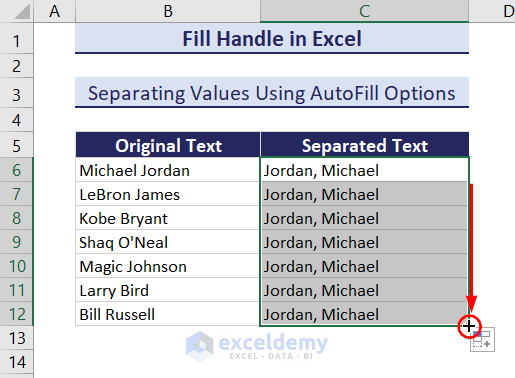
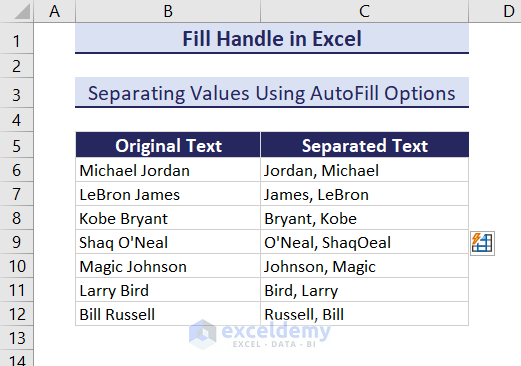
- Click on the AutoFill Options and select Flash Fill.
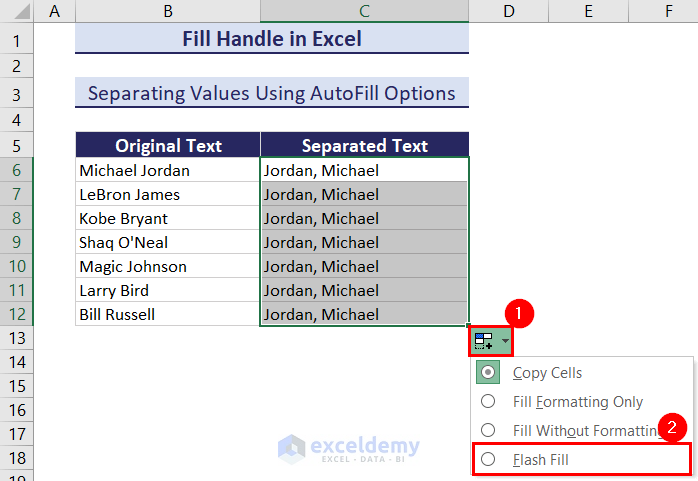
- The texts will be separated after that.
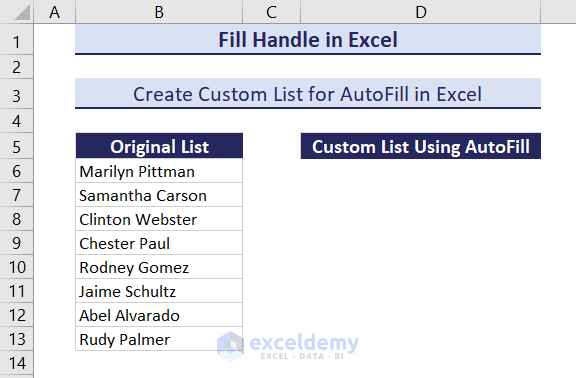
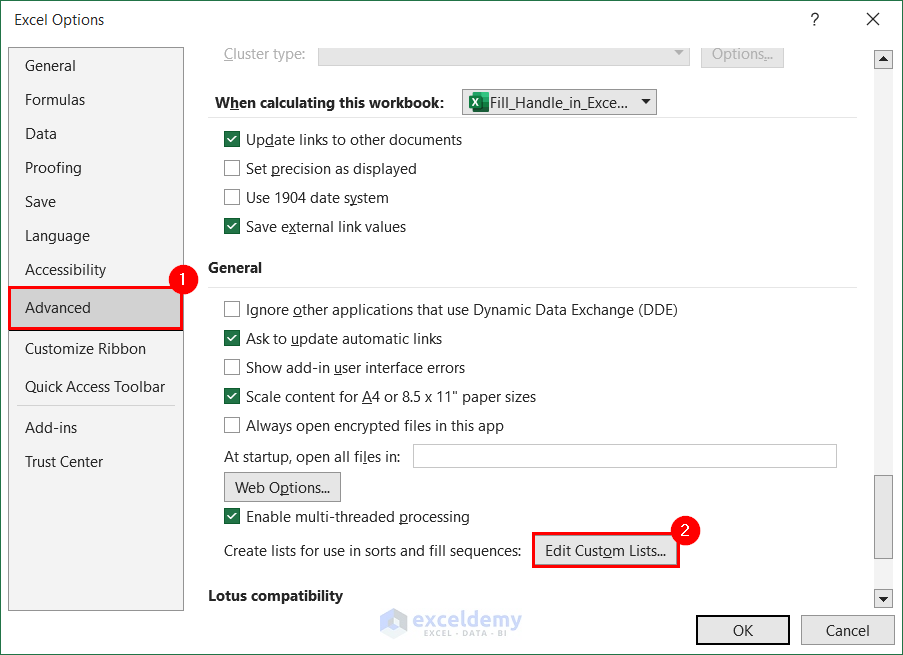
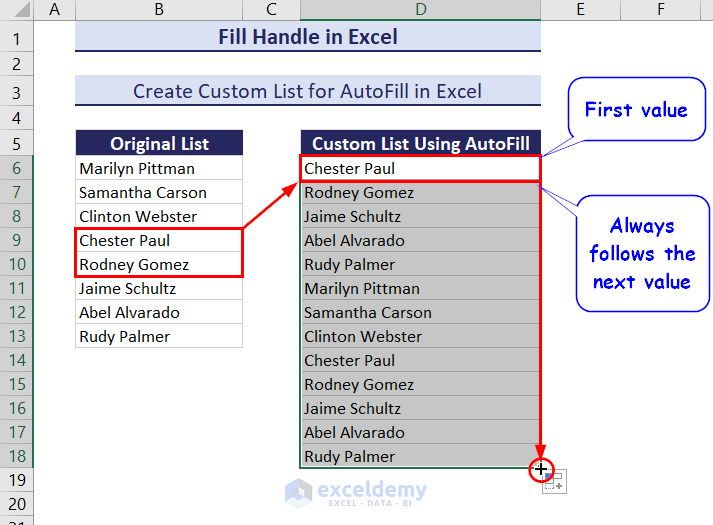
How to Create a Custom List for AutoFill in Excel?
We have a list of employees, and we need to repeat the list over and over again.
- Select the File tab.
- Select Options.
- In the Excel Options, select the Advanced tab.
- Select Edit Custom Lists under the General section.
Click on the image for a detailed view
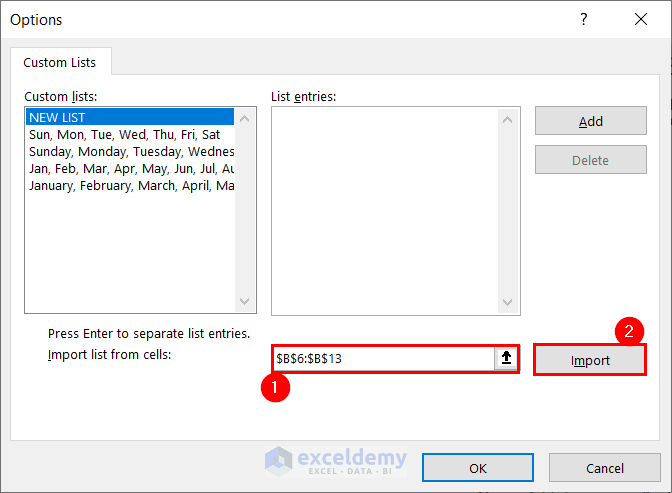
- Select the range from the spreadsheet that you want to save as a custom list, as shown in the image below, and click on Import.
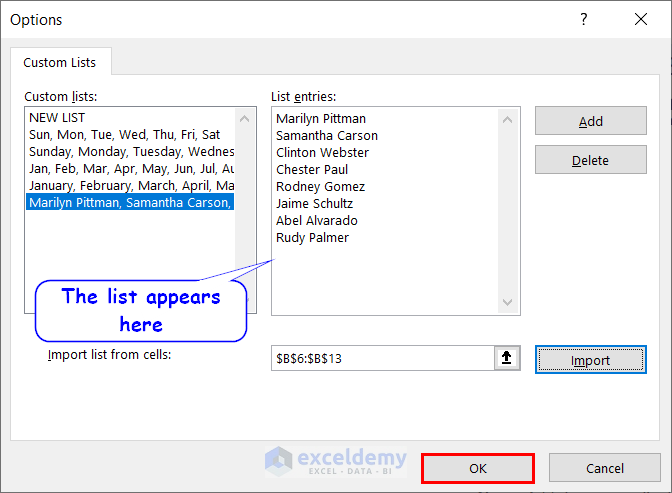
- The list will appear under List entries.
- Click OK once you are done.
- Close all the boxes and go back to where you want to use the custom list.
- Insert a value and drag the Fill Handle down. It will fill the cells according to the existing list.
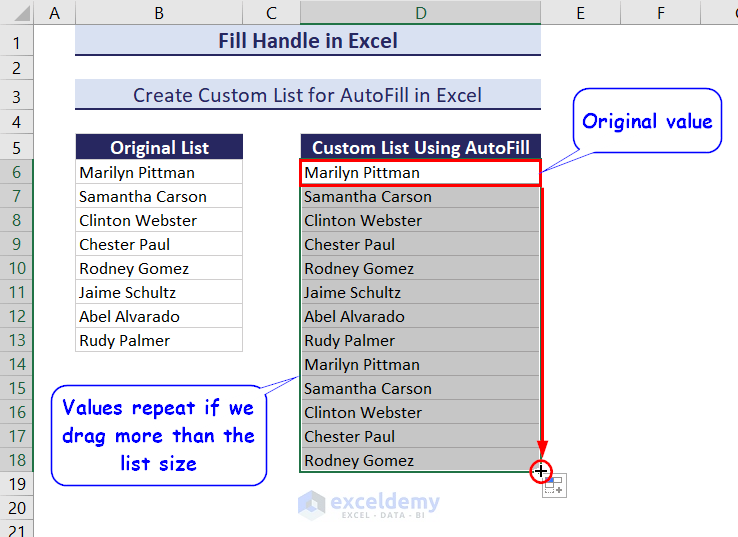
- You can start with any value and drag it down. The Fill Handle will insert the next value from the list.
Download the Practice Workbook
Fill Handle in Excel: Knowledge Hub
- How to Fill Formula Down to Specific Row in Excel
- How to Drag Formula and Ignore Hidden Cells in Excel
- How to Use Fill Handle to Copy Formula in Excel
- How to Drag Cells in Excel Using Keyboard
- How to Drag Formula in Excel with Keyboard
- How to Enable Drag Formula in Excel
<< Go Back to Learn Excel
Get FREE Advanced Excel Exercises with Solutions!

U forgot decimal numbers !!! Start 0.01 number increase incremental for that value, Fill series doesnt WORK properly !!!
Hello Jeff,
If the Fill Series option isn’t working properly for decimal numbers, try manually entering the first two values (e.g., 0.01 and 0.02), then drag the fill handle while holding down the Ctrl key (Windows) or Option key (Mac).
This should force Excel to recognize the pattern correctly. Let me know if you need further help!
Regards
ExcelDemy