
A “Clear All Filters” button is one of the most user-friendly features you can add to a Power BI dashboard. It is an excellent way to improve user experience on interactive dashboards. It lets users quickly reset all slicers and filters to their default state with one click — no more manually deselecting each filter one by one.
In this tutorial, we will show how to create a “Clear All Filters” slicer button in Power BI. We will build it using Power BI’s Bookmarks and Buttons features.
Step 1: Set Up the Default (Reset) State
Before creating the button, make sure all the slicers you want the button to reset are already on the report page. This includes slicers for dates, regions, product categories, or any other field.
- Clear all slicers and filters:
- For each slicer, click the eraser icon (Clear selections) in the slicer header
- Clear any other page or report-level filters in the Filters pane
- Adjust any other visuals (e.g. expand/collapse cards, reset drill-through states) to how you want the “reset” view to appear.
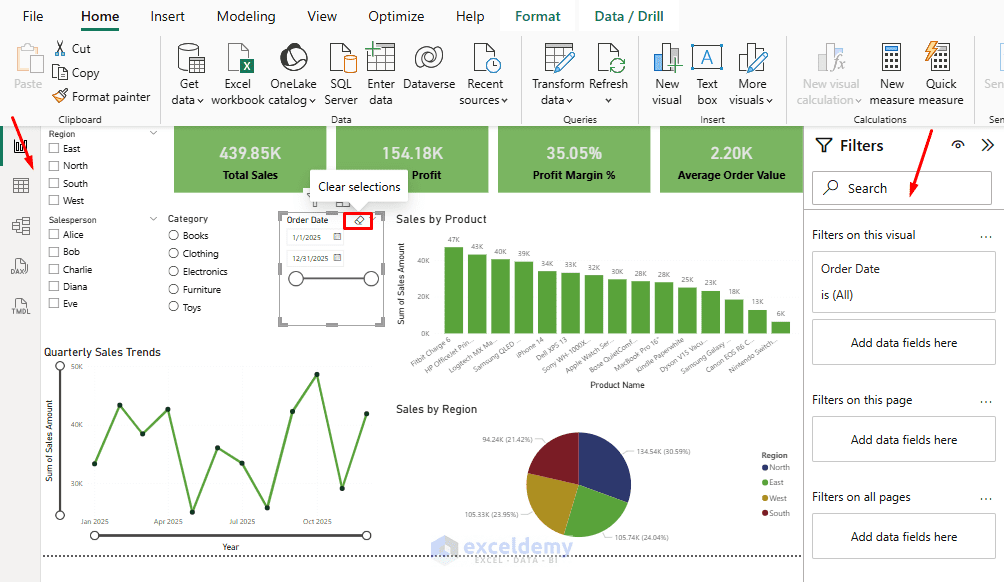
This is the state your bookmark will capture.
Tip: “Default state” doesn’t have to mean blank. If you want certain slicers pre-filtered to a specific value by default (e.g. current year), set them to that value before creating the bookmark.
Step 2: Create and Configure the Bookmark
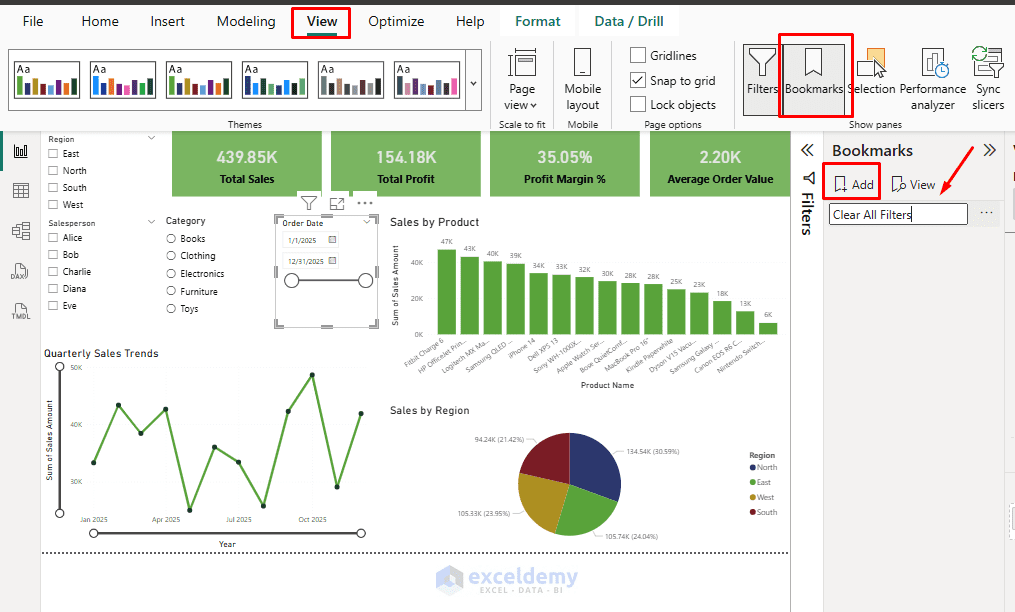
- Go to the View tab >> check Bookmarks to open the Bookmarks pane (if not already visible)
- In the Bookmarks pane >> click Add
- A new bookmark appears
- Double-click the bookmark and rename it meaningfully, e.g. “Clear All Filters” or “Reset Dashboard”
- Click the ellipsis (…) next to the bookmark and make sure the following settings are configured correctly:
- Data is checked (captures slicer/filter selections)
- Display is checked if you want to capture the visual state (optional)
- Current Page is unchecked unless you want the bookmark to apply only to this page
- All visuals is checked to reset slicers across the whole page
- Uncheck options you don’t want to reset (e.g. if you want to preserve certain page filters)
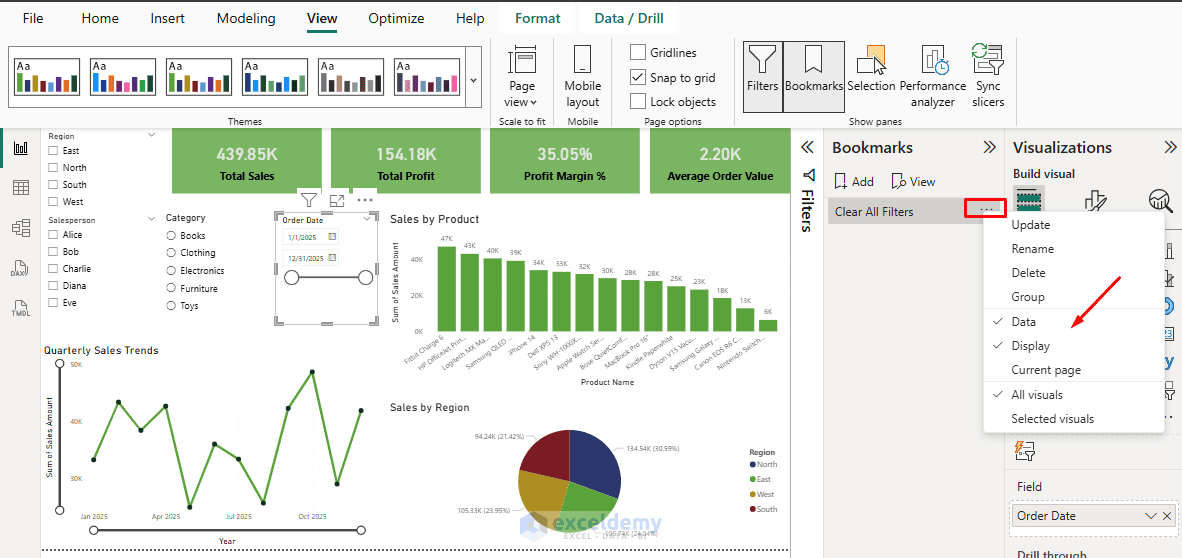
Unchecking Display is especially important — it ensures the bookmark only resets data and filters and doesn’t accidentally toggle the visibility of your visuals.
Tip: If you later change the default state, re-clear everything, select the bookmark, and click Update to refresh it.
Step 3: Create and Configure the Button
- Go to the Insert tab >> select Buttons (or Elements in newer interfaces)
- Choose one of the following:
- Blank: Gives you full design freedom
- Reset: A pre-styled button with a reset icon (ideal for this use case)
- Any other style that fits your report design
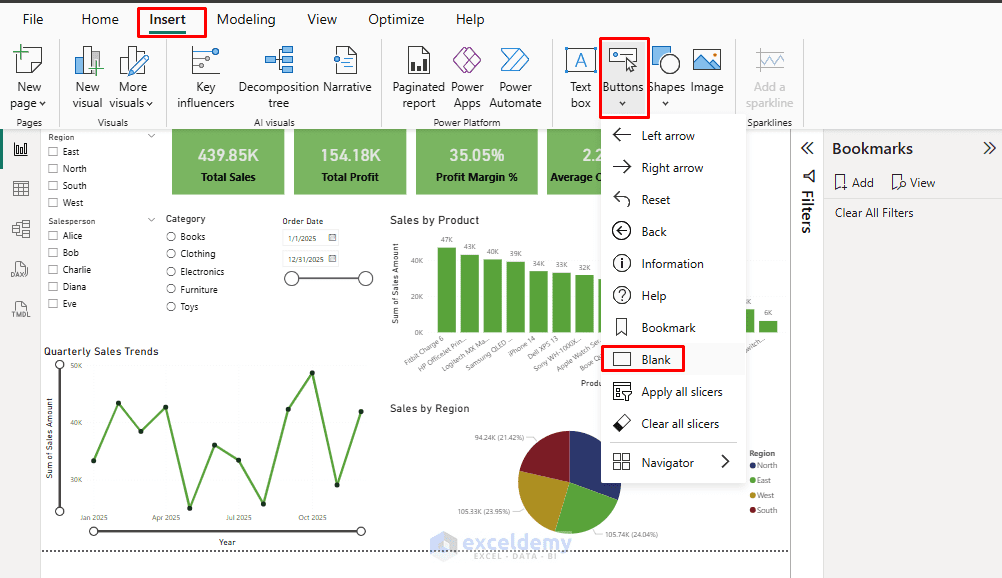
- Drag the button onto the canvas and resize or reposition it (e.g. top-right corner)
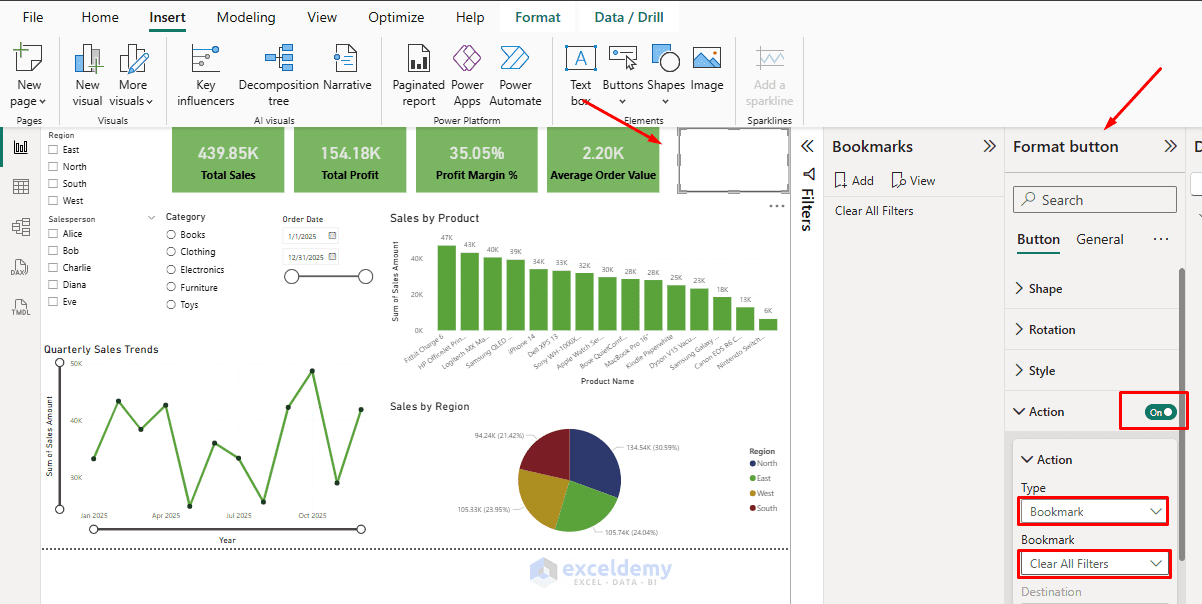
- Select the Button >> go to Format Button
- Under Action:
- Toggle Action to On
- Set Type to Bookmark
- Select your “Clear All Filters” bookmark from the dropdown
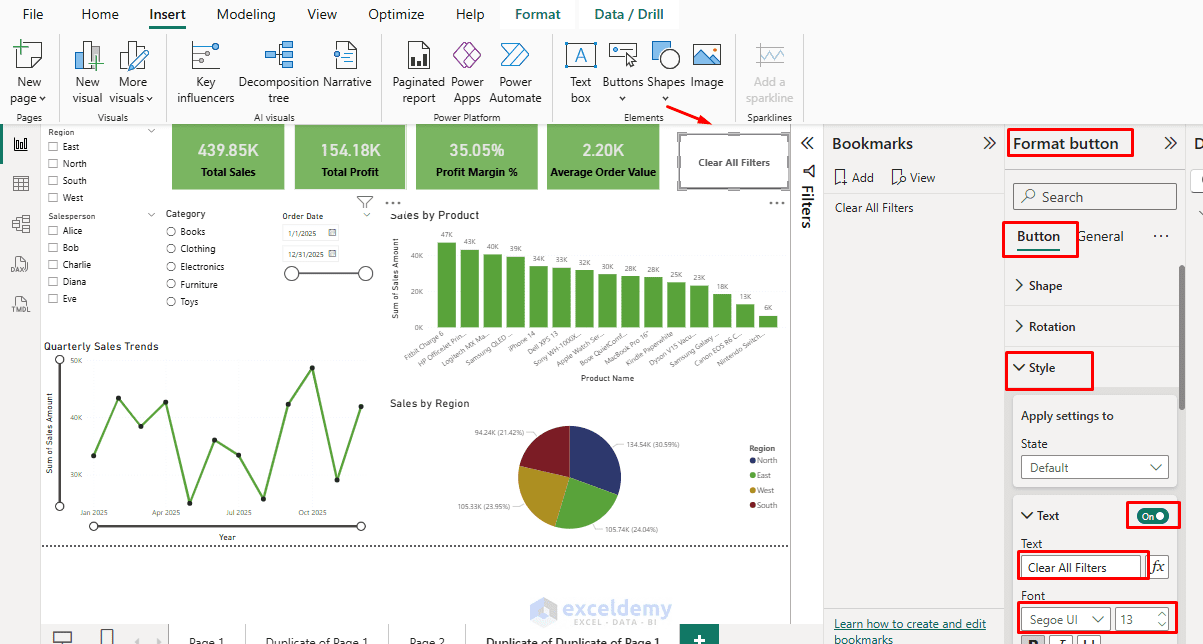
- Under Style:
- Toggle Text to On
- Add text like “Clear All Filters”
Step 4: Test the Button
In Power BI Desktop, buttons only fire their actions when you hold Ctrl and click them (this is by design in edit mode).
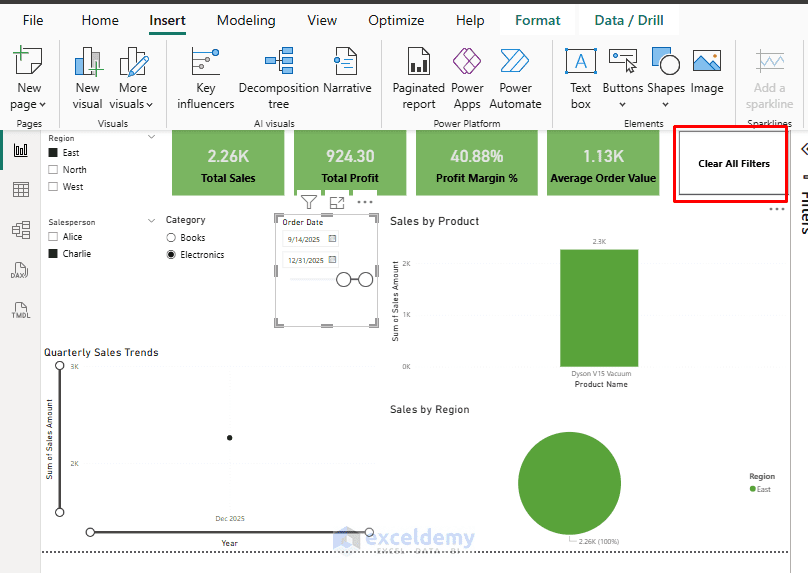
- Apply different slicer selections to your report
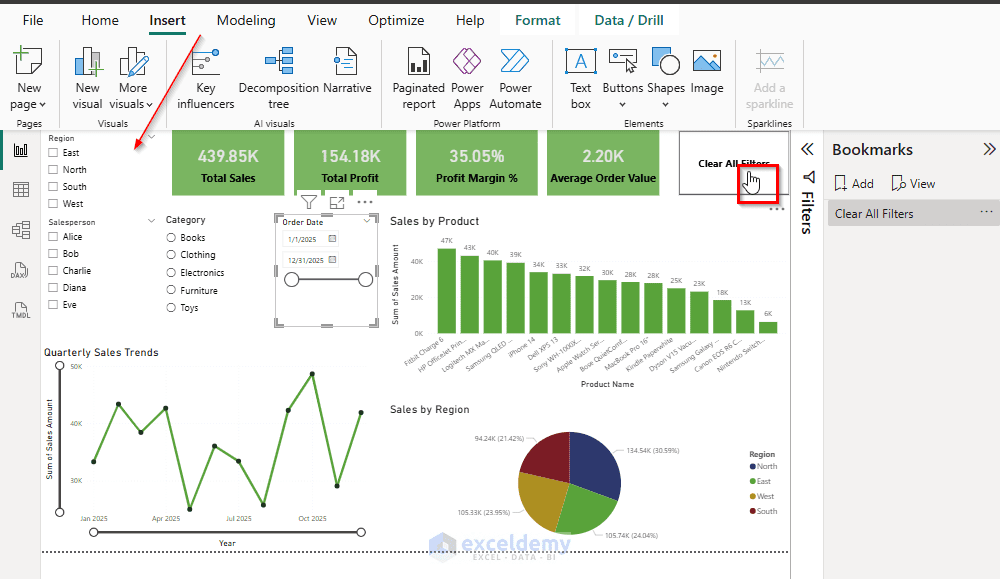
- Ctrl+click the Clear All Filters button
- The report should reset all slicers and visuals to the default state you captured in the bookmark
Note: In the Power BI Service, users may need to Ctrl+click the button for actions (depending on settings).
Step 5: Style the Button
Make the button’s purpose obvious to your users.
- In the Format Button pane, you can customize:
- Text: Add a label like “✕ Clear Filters” or “↺ Reset All”
- Icon: Use the built-in reset or eraser icon if using a blank button
- Fill color: Use a neutral or contrasting color so it stands out
- On Hover state: Change the color slightly so users know it’s clickable
- Border and rounded corners: These small touches improve the overall polish significantly
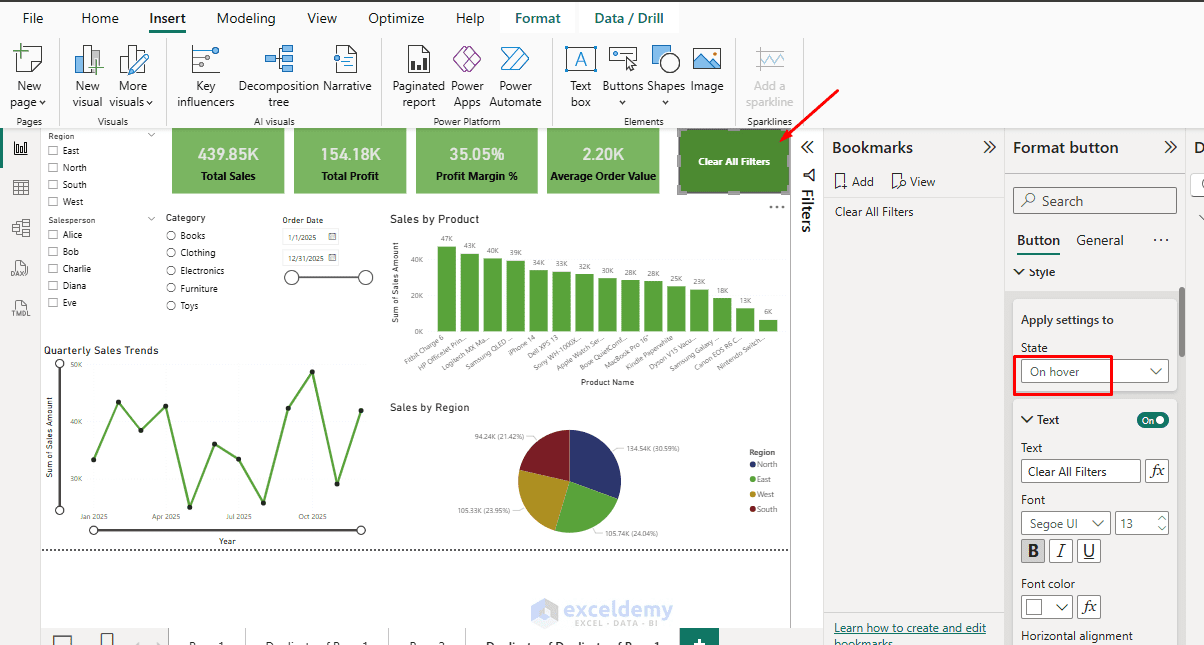
Consistency with your report’s color palette makes the button feel native rather than bolted on.
Alternative: Use the Built-In “Clear All Slicers” Button
Since 2023, Power BI has included a ready-made button for this purpose:
- Go to the Insert tab >> select Buttons >> select Clear all slicers
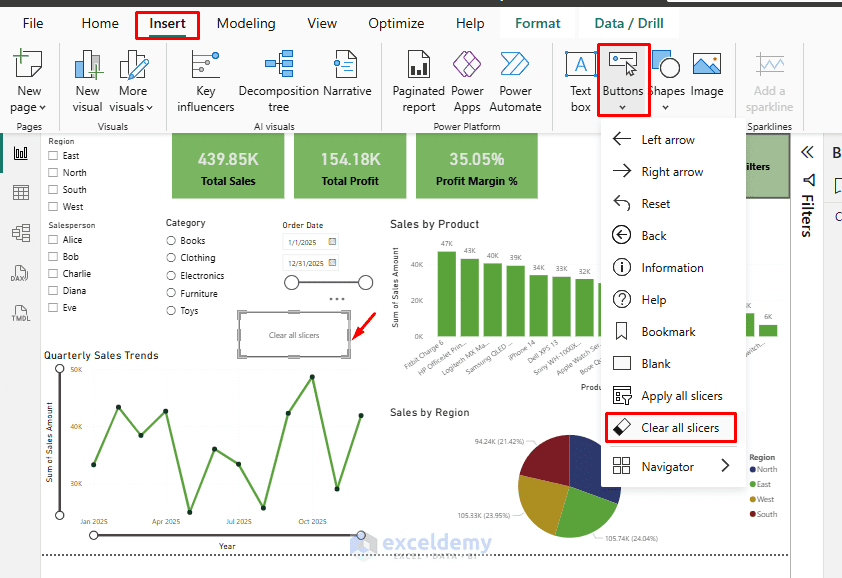
- Position and format it as needed
- Ctrl+click to use it — it automatically clears slicer selections efficiently (with better query performance than clearing them one by one)
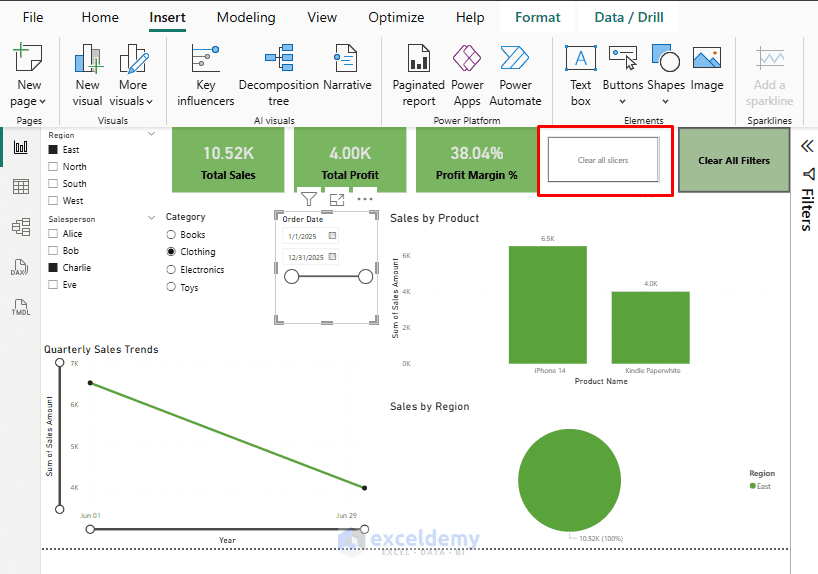
This approach is simpler but targets slicers only, not all page or report filters. Use bookmarks for broader resets.
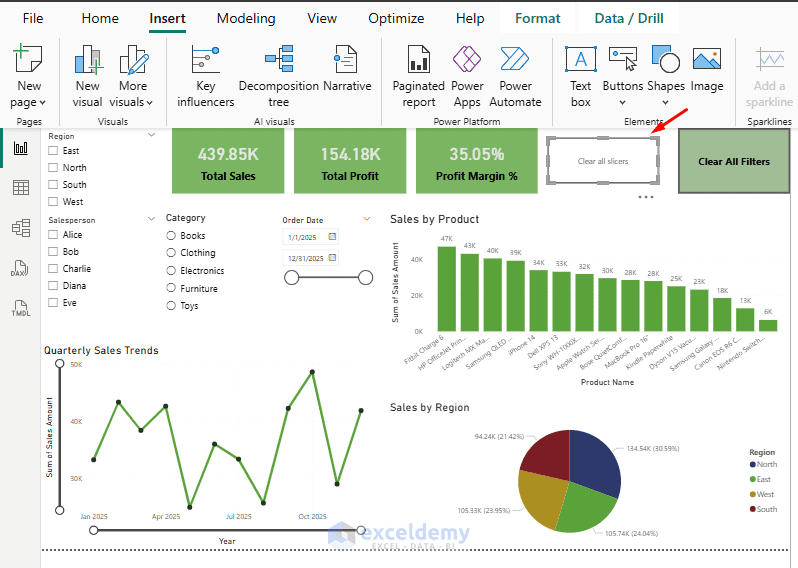
You can also combine both approaches, or use Apply all slicers alongside it for reports with deferred filters.
Advanced Tips and Troubleshooting
- Reset specific filters only: Create the bookmark with only the desired slicers cleared. Use Selected visuals in the bookmark settings for granular control.
- Multiple pages: Bookmarks are page-specific. Create one per page, or use the “All pages” option carefully.
- Search box text in slicers: Bookmarks may not always clear search text; test thoroughly.
- Performance: The button is efficient as it applies the reset state in a single operation.
- Update after changes: Always Update the bookmark if you modify slicers or the default state.
- Hide/show with bookmarks: Use the Selection pane along with additional bookmarks to show or hide the reset button conditionally.
- Cross-page reset: More complex workarounds (e.g. a blank page with navigation) may be needed for cross-page resets.
Best Practices
- Place the button prominently but unobtrusively (e.g. near slicers or in a header)
- Use consistent styling across your report
- Label it clearly (e.g. “Reset Filters” or “Clear All”, with an icon)
- Test with end users, especially on published reports in the Power BI Service
Conclusion
By following these steps, you can easily create a “Clear All Filters” slicer button in Power BI. The result is a professional, intuitive reset button that dramatically improves the user experience of your dashboards. It’s one of those small additions that report viewers immediately appreciate and quickly come to rely on. This simple feature significantly improves dashboard usability by giving users control without frustration.
Get FREE Advanced Excel Exercises with Solutions!