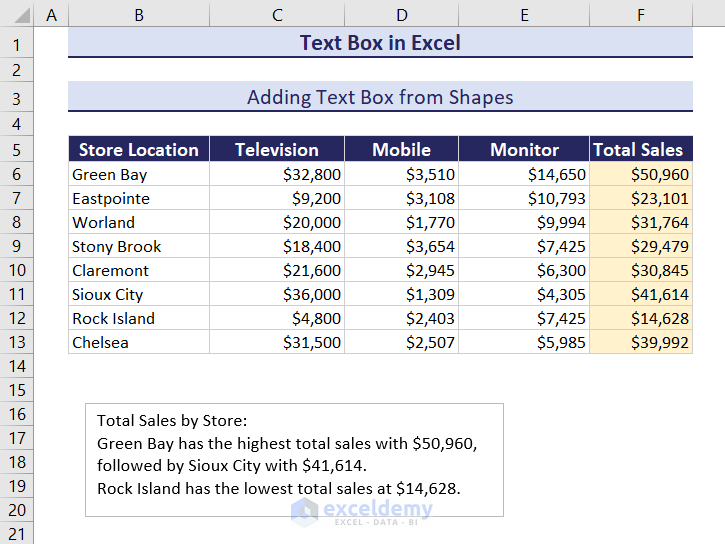
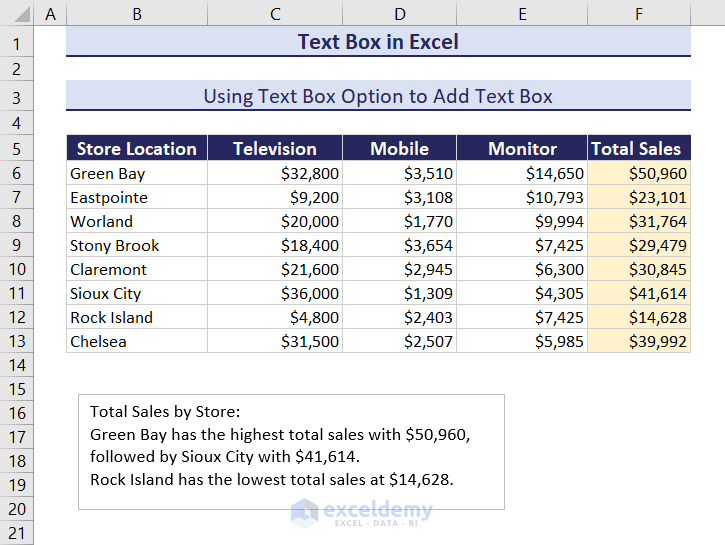
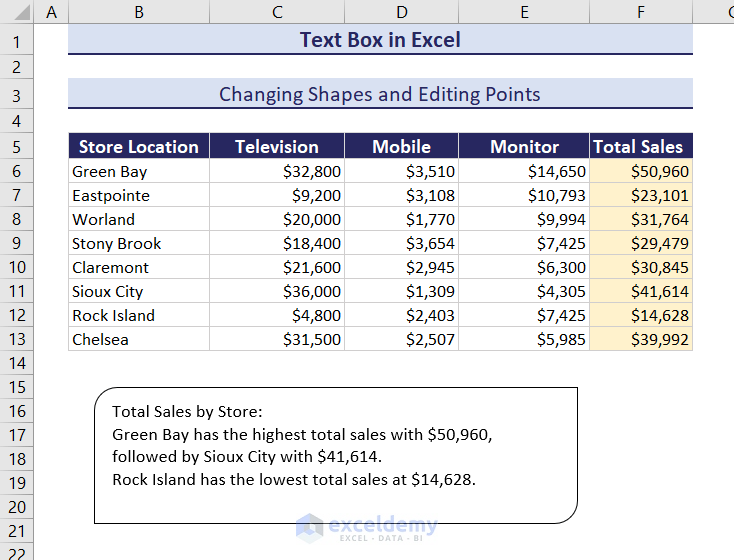
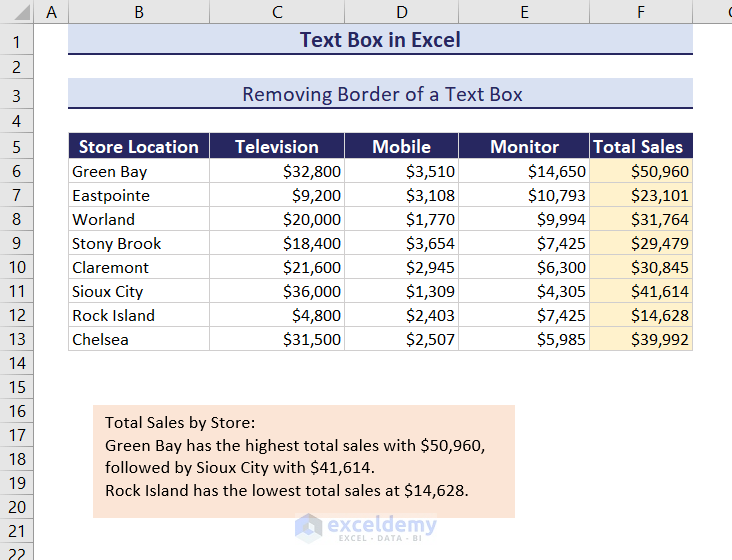
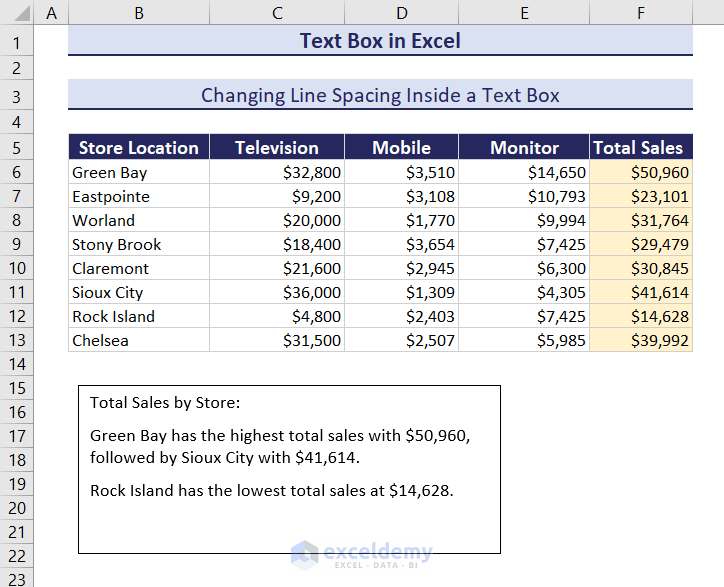
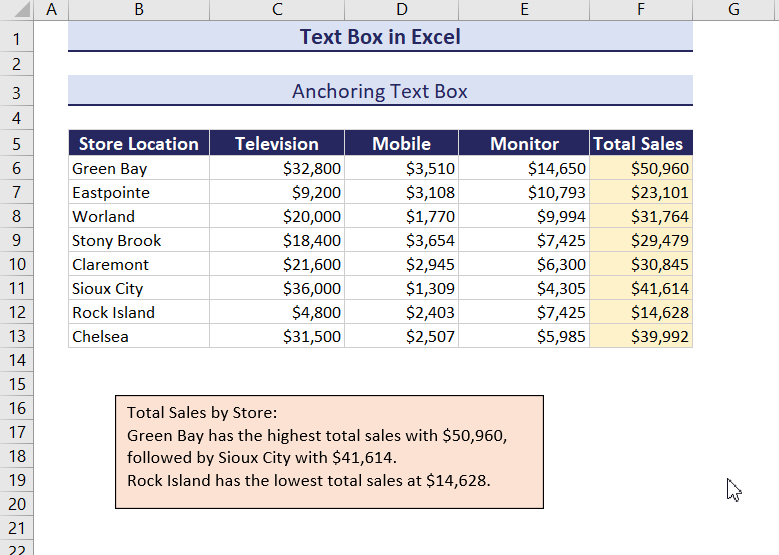
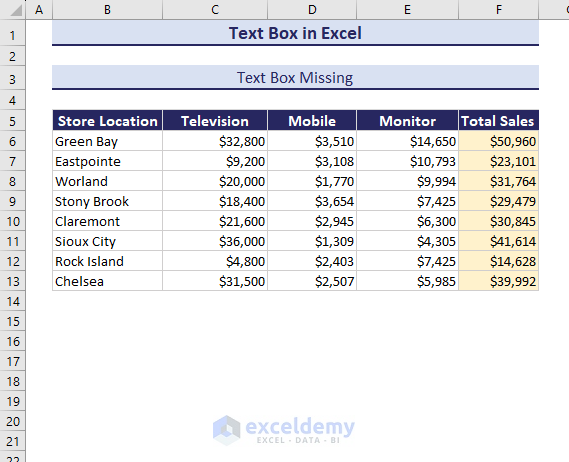
The sample dataset contains sales of different accessories in different locations. The text box below showcases a summary of the dataset, displaying the highest and lowest sales.
What Is a Text Box?
A Text Box is a rectangular-shaped object that can hold and display texts within a specific area of a worksheet.
How to Add Text Box in Excel: 4 Methods
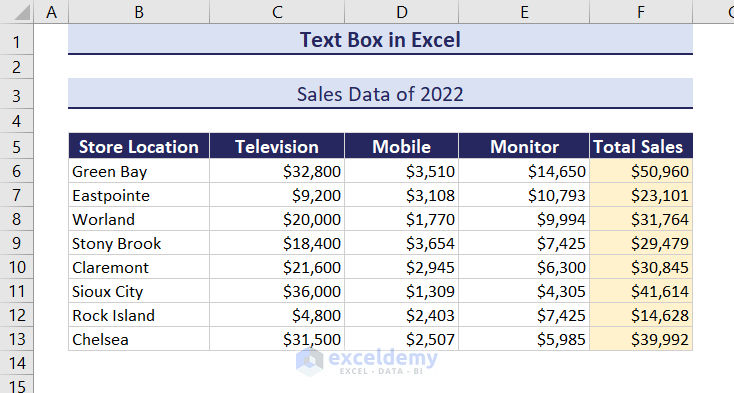
The dataset contains sales data of a company.
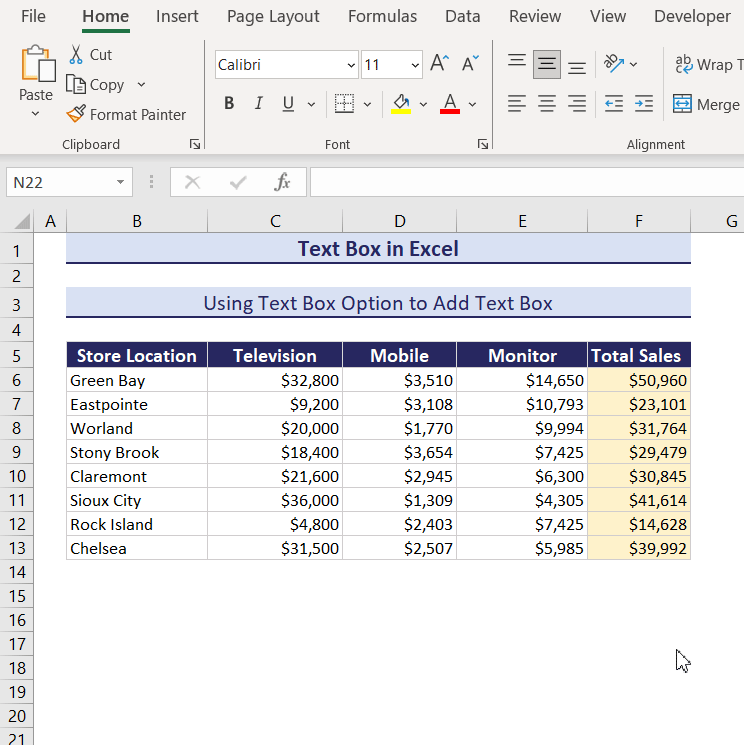
Method 1- Using the Text Box Option
- Go to the Insert tab and select Text Box in Text.
The cursor will change.
- Click an area in the worksheet to insert the text box and drag it down.
- Enter the text in the text box.
Using the Keyboard:
You can also press Alt, N, X . It will create a text box on the worksheet.
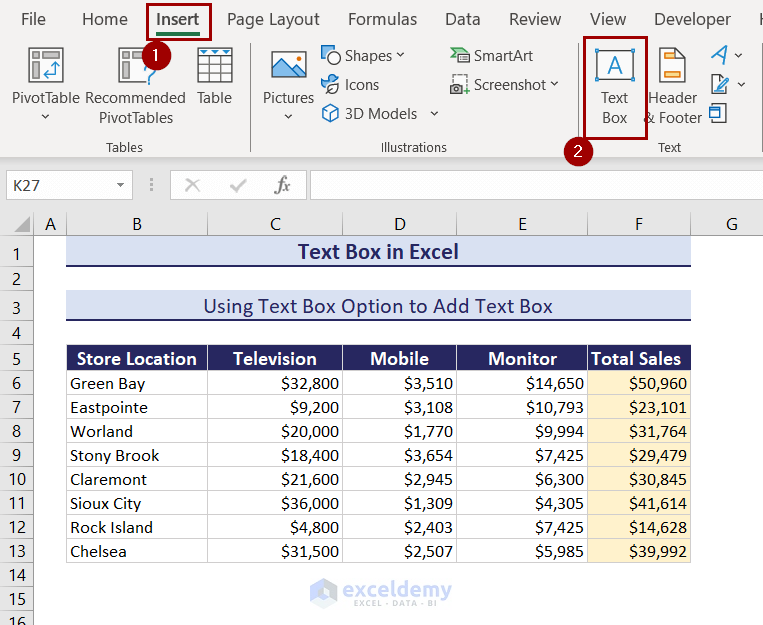
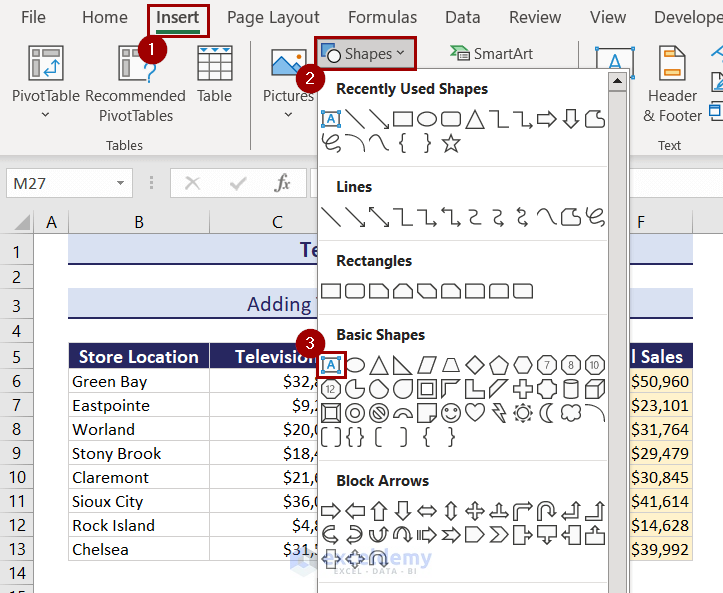
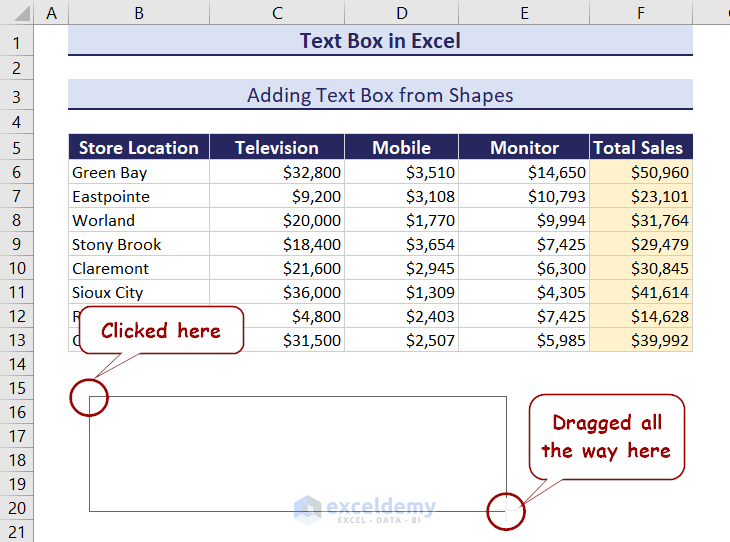
Method 2- Adding a Text Box from Shapes
- Go to Insert >> Illustrations >> Shapes.
- Select Text Box in Basic Shapes.
The cursor will change.
- Click an area in the worksheet to insert the text box and drag it down.
- Enter the text in the text box.
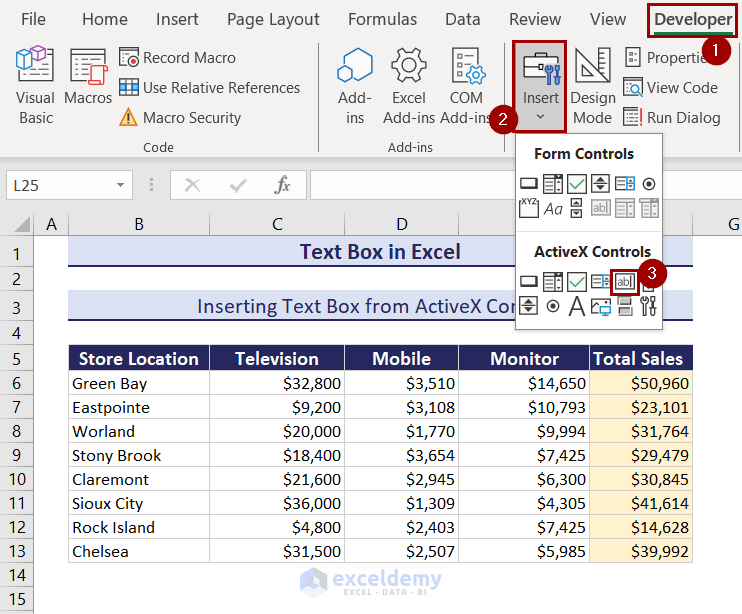
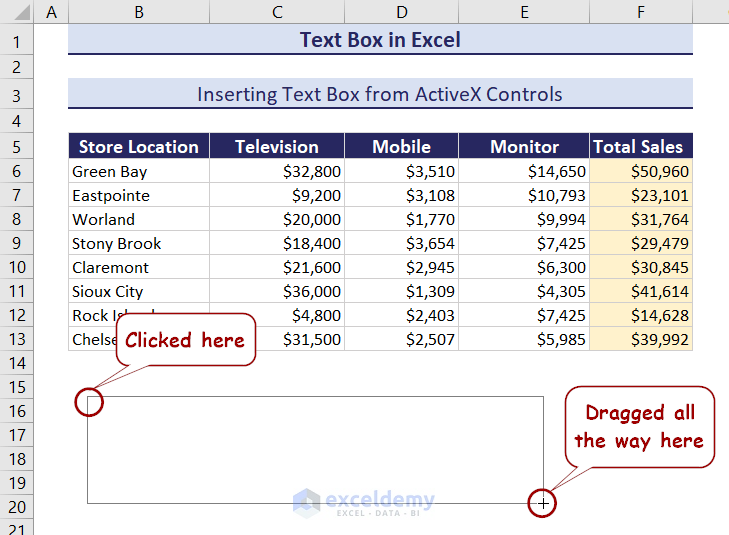
Method 3 – Inserting Text Box from the ActiveX Controls in Excel
To insert an ActiveX Control Text Box:
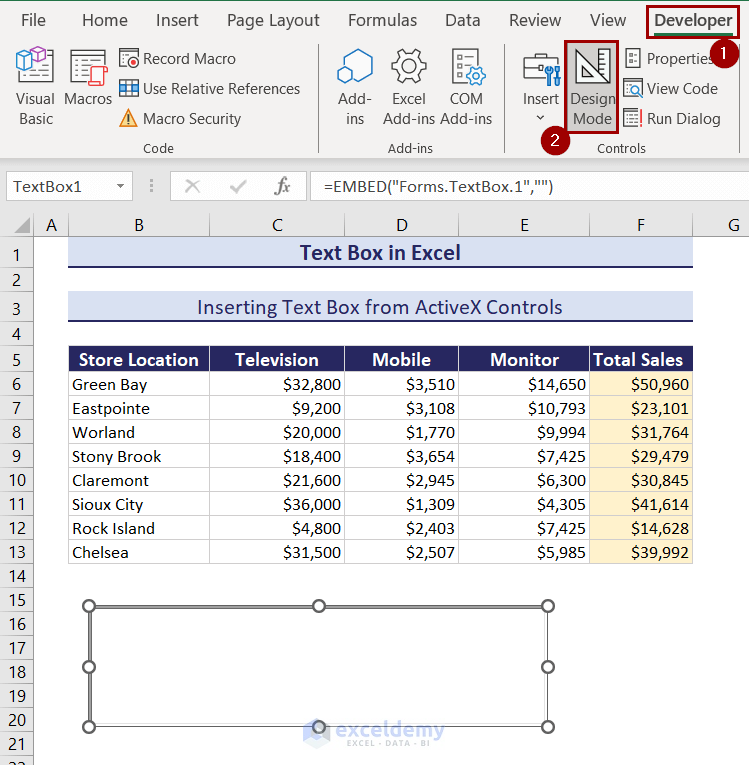
- Enable the Developer tab on the Ribbon.
- Go to Developer >> Controls >> Insert.
- Select Text Box (ActiveX Controls) in ActiveX Controls.
The cursor will change.
- Click an area in the worksheet to insert the text box and drag it down.
- The object is in design mode. To turn it off, click Developer >> Controls >> Design Mode.
- Enter the text in the text box.
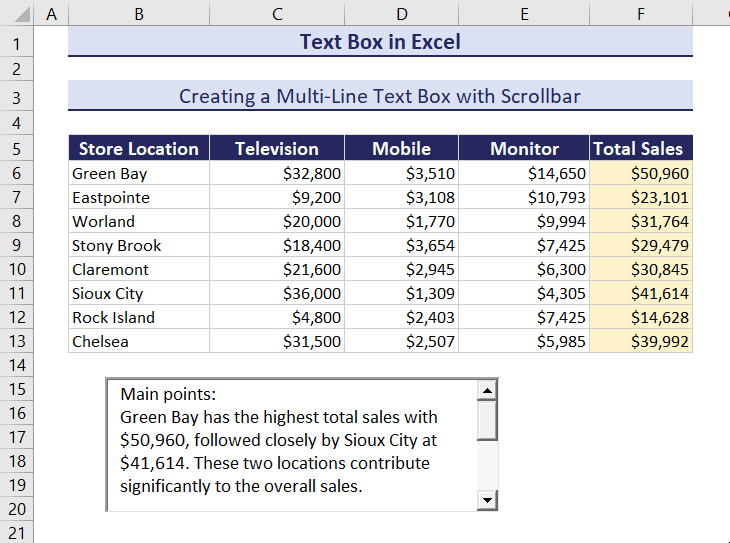
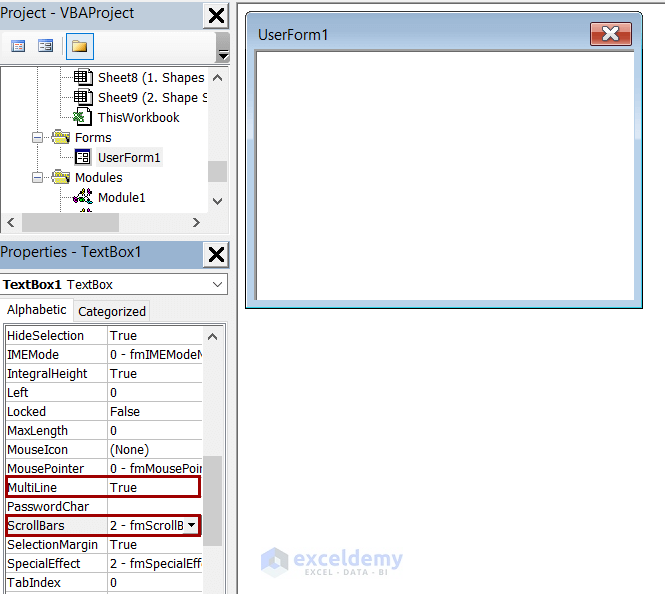
Adding a Multi-Line Text Box with a Scrollbar
- Create an ActiveX Control text box first using the previous method.
- Right-click the text box and select Properties.
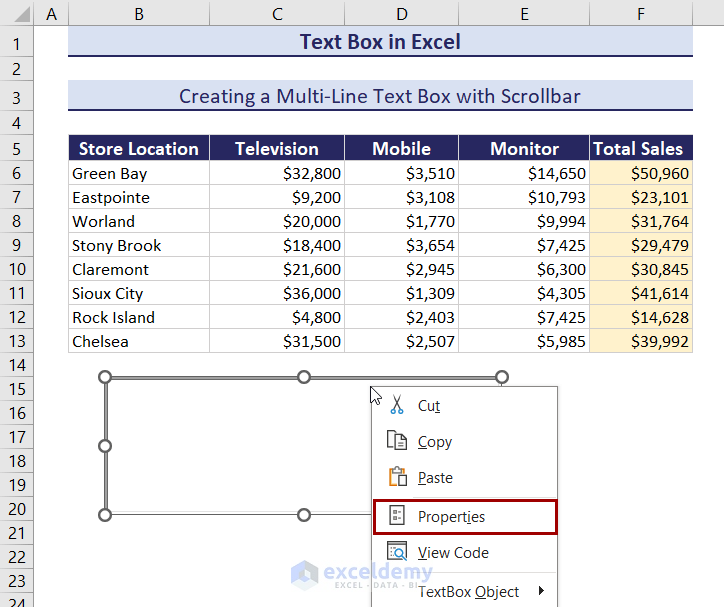
- In the Properties window, select True as MultiLine.
- Choose 1, 2, or 3 for ScrollBars. Here, 2 to create vertical scrollbars.

- Enter your text. The scrollbars will be displayed in the text box.
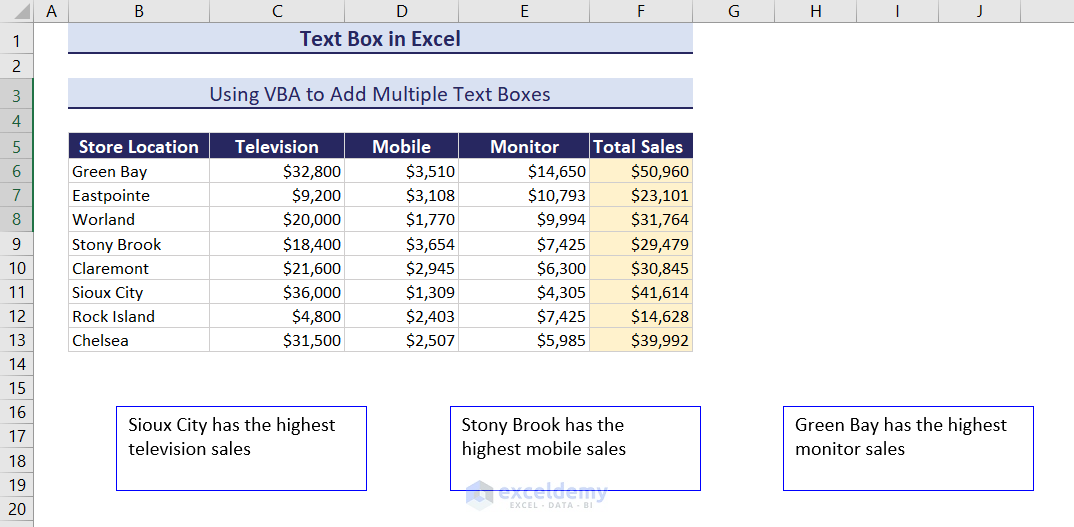
Method 4 – Using a VBA to Add Multiple Text Boxes in Excel
Click on the image to get a detailed view
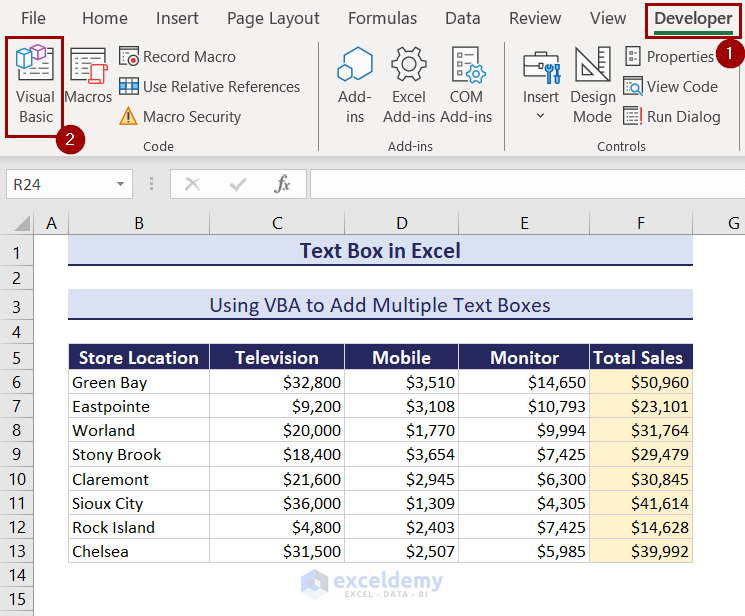
- Go to Developer >> Code >> Visual Basic.
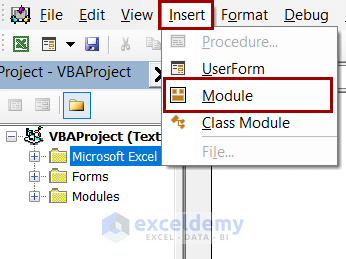
- Select Insert >> Module.
- Insert the following code in the module.
Sub InsertMultipleTextBoxes()
    Dim ws As Worksheet
    Dim textBox As Shape
    Dim i As Integer
    Dim numTextBoxes As Integer
    Dim textArray() As String

    ' Set the worksheet where you want to insert the text boxes
    Set ws = ThisWorkbook.Sheets("4.1 VBA Multiple Box") ' Replace "4.1 VBA Multiple Box" with your actual sheet name

    ' Set the number of text boxes you want to insert
    numTextBoxes = 3 ' Change this to the desired number

    ' Array of different texts for each text box
    textArray = Split("Sioux City has the highest television sales,Stony Brook has the highest mobile sales,Green Bay has the highest monitor sales", ",")

    ' Loop to insert multiple text boxes
    For i = 1 To numTextBoxes
        ' Insert a text box
        Set textBox = ws.Shapes.AddTextbox(Orientation:=msoTextOrientationHorizontal, _
                                          Left:=50 + (i - 1) * 200, Top:=230, Width:=150, Height:=50)

        ' Set the text inside the text box
        textBox.TextFrame.Characters.Text = textArray(i - 1)
        textBox.TextEffect.FontSize = 12
        textBox.Line.ForeColor.RGB = RGB(0, 0, 255)
    Next i
End Sub
Click on the image to get a detailed view
- Press F5 to run the code.
Click on the image to get a detailed view
Use the same code without a loop to create a single text box:
Sub InsertTextBox()
Dim ws As Worksheet
Dim textBox As Shape
Set ws = ThisWorkbook.Sheets("4. VBA") ' Replace "4. VBA" with your actual sheet name
Set textBox = ws.Shapes.AddTextbox(Orientation:=msoTextOrientationHorizontal, _
Left:=60, Top:=230, Width:=250, Height:=80)
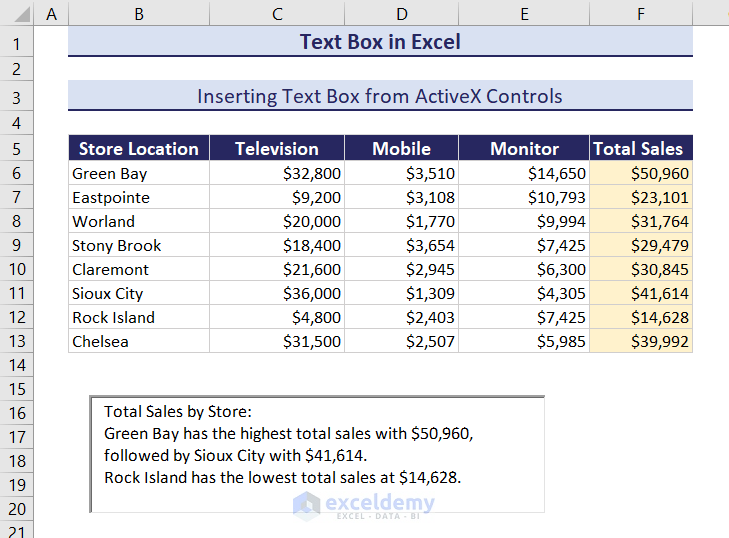
textBox.TextFrame.Characters.Text = "Total Sales by Store:" & vbNewLine & "Green Bay has the highest total sales with $50,960, followed by Sioux City with $41,614." & vbNewLine & "Rock Island has the lowest total sales at $14,628."
textBox.Line.ForeColor.RGB = RGB(0, 0, 255)
End SubHow to Format Text Boxes in Excel
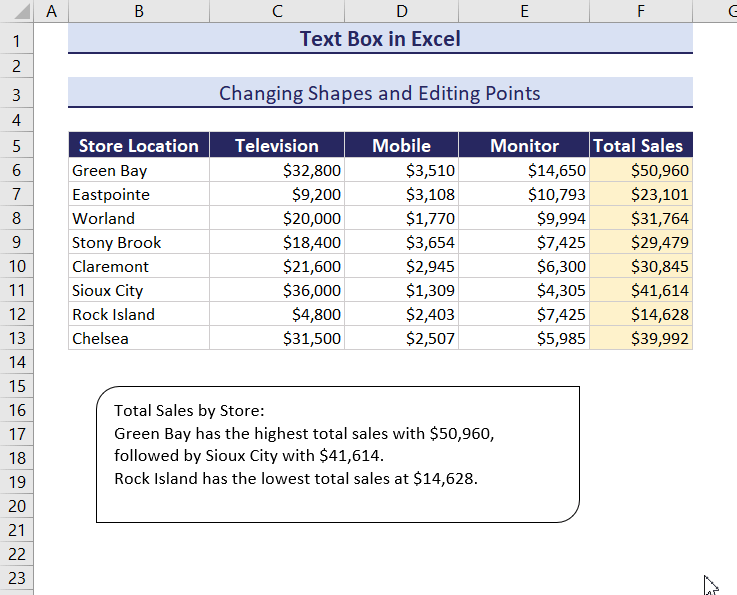
1. Changing Shapes and Editing Points
- Click the text box and go to Shape Format.
- Select Shape Format >> Insert Shapes >> Edit Shape >> Change Shape.
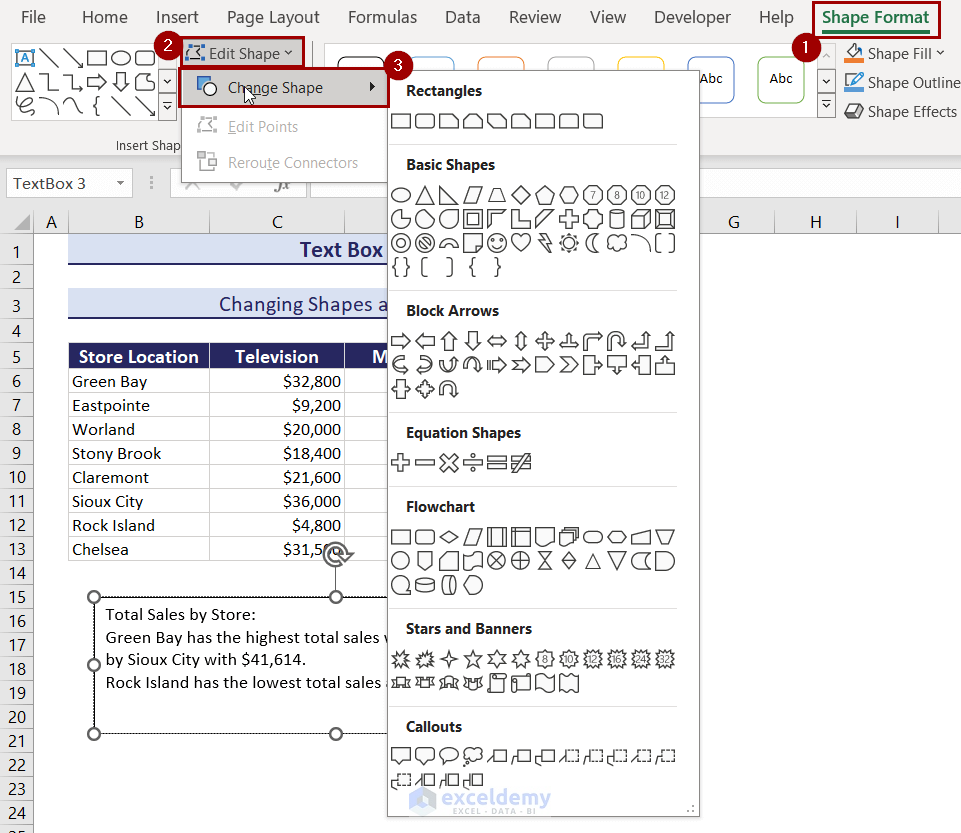
Click on the image to get a detailed view
The selected text box will change.
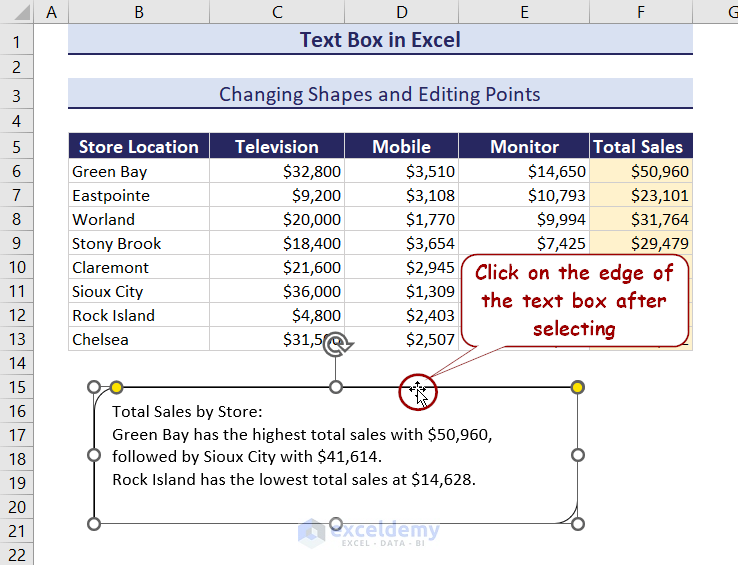
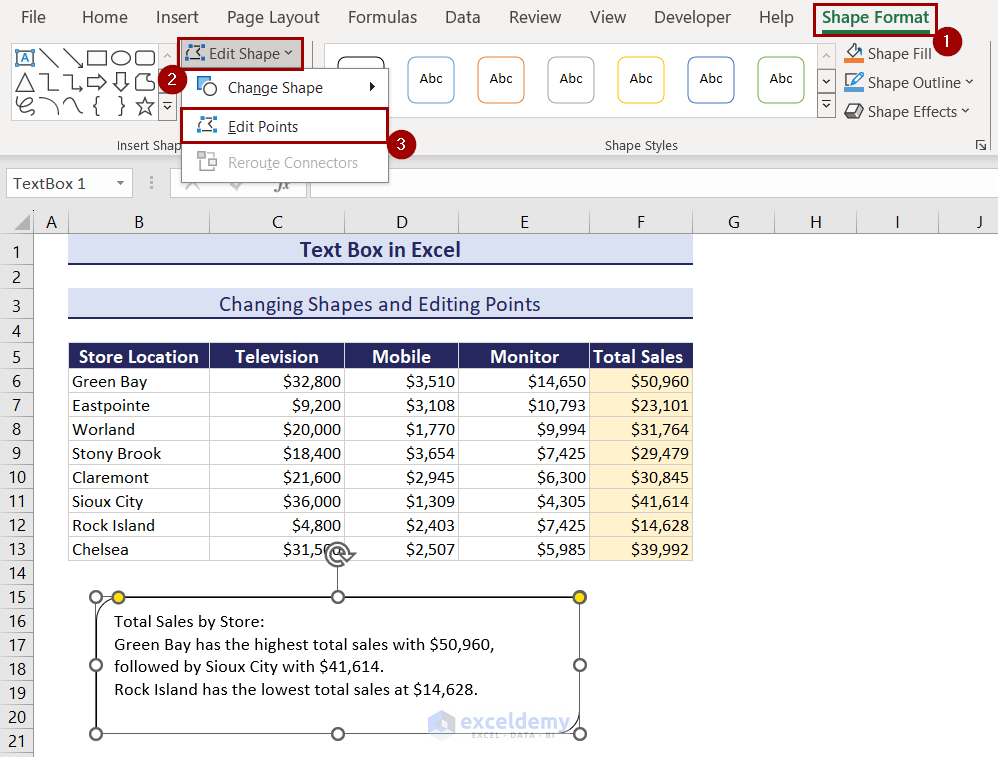
Change Edit Points:
- Click the edge of the text box. The mouse cursor will display a pointed plus sign.
- Select Shape Format >> Insert Shapes >> Edit Shape >> Edit Points.
Click on the image to get a detailed view
- Click and drag the edge points to move the edges and change shape manually.
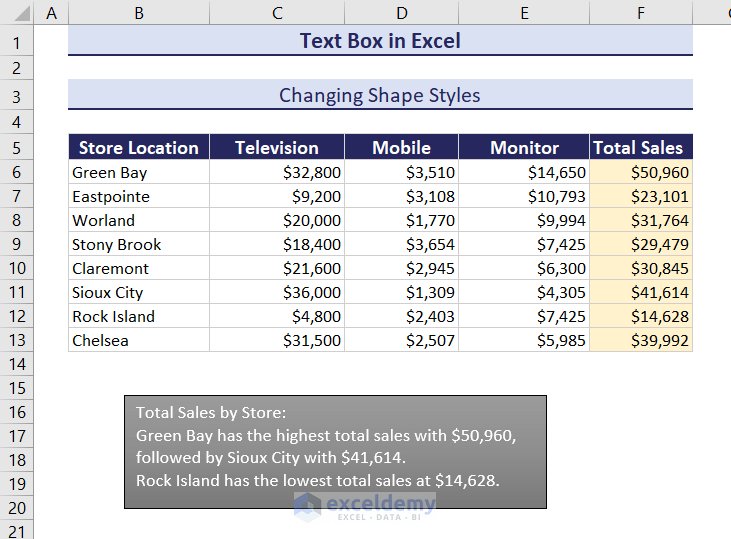
2. Changing Shape Styles
- Select the text box and go to the Shape Format tab.
- Select a style in Shape Styles.
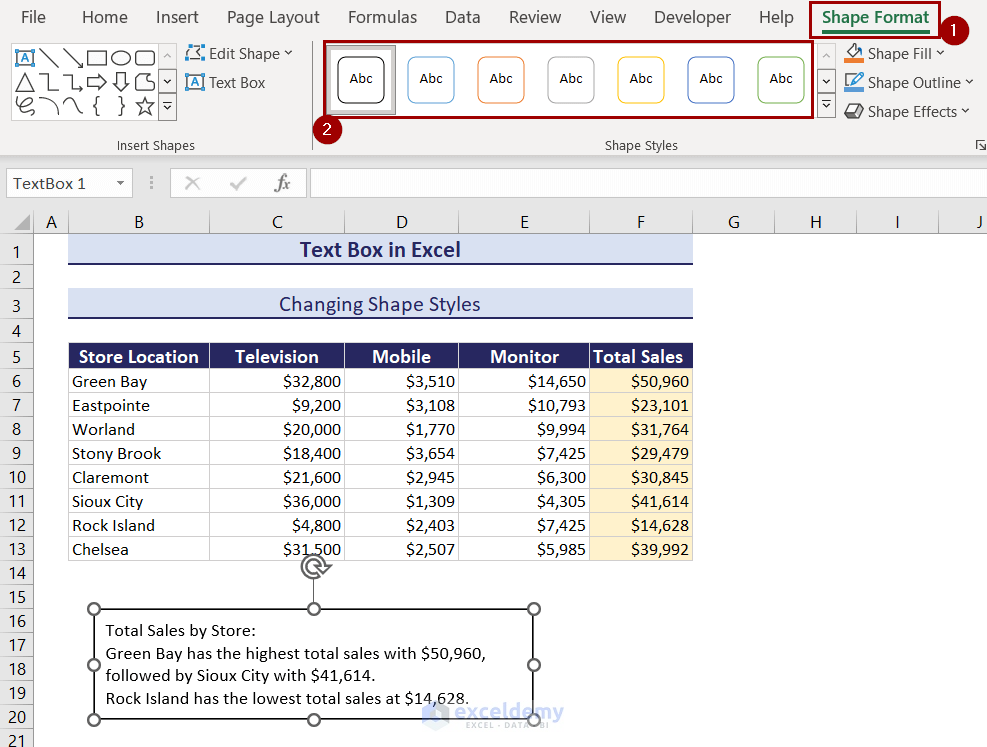
Click on the image to get a detailed view
- Access Quick Styles by clicking the downward arrow.
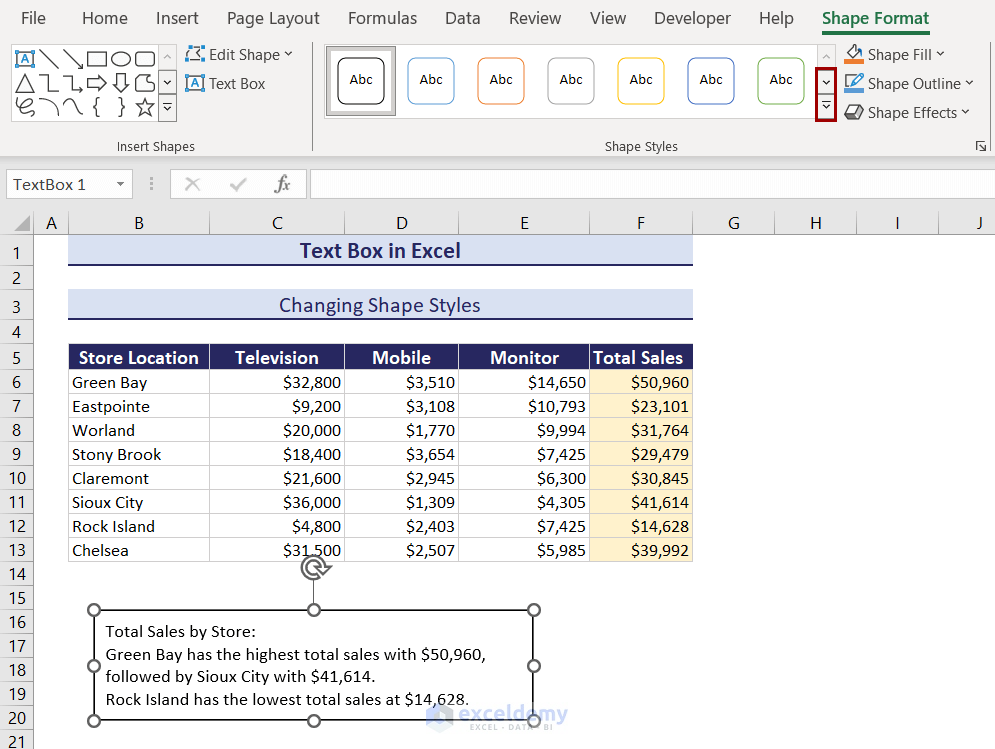
Click on the image to get a detailed view
- Click a style.
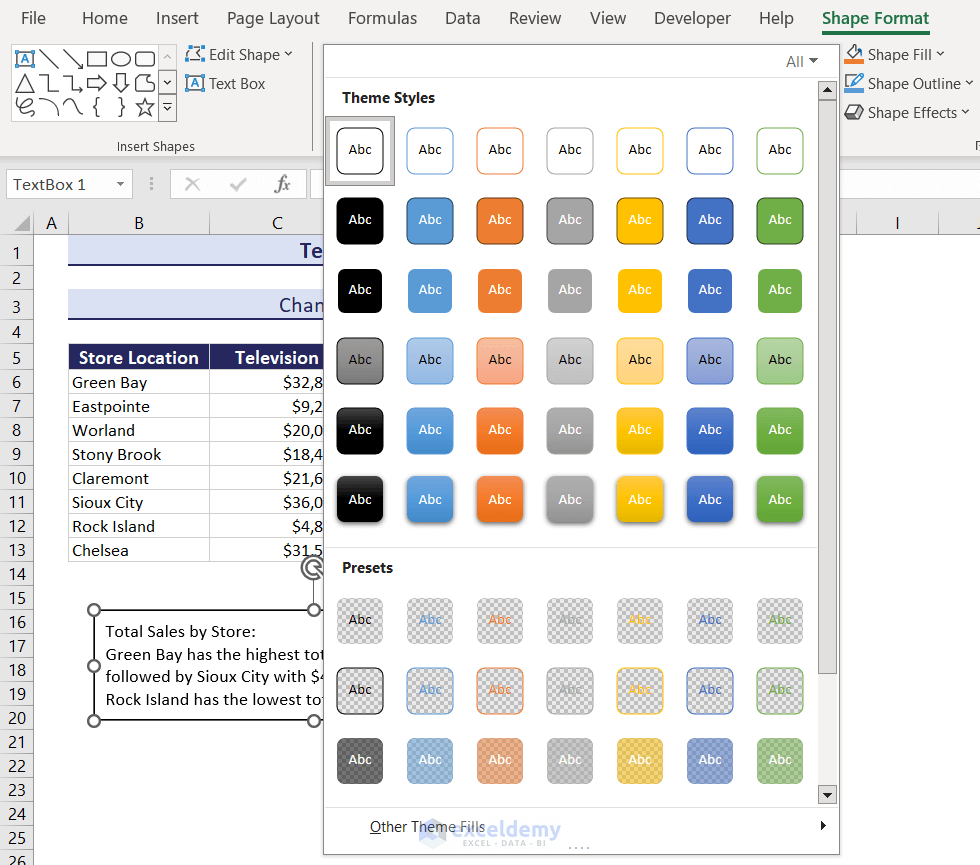
Click on the image to get a detailed view
- The text box will change. Here, Subtle Effect- Black, Dark-1 was selected.
3. Changing the Fill Color of Text Boxes
- Click the text box and select Shape Format >> Shape Styles >> Shape Fill.
- Select a color.
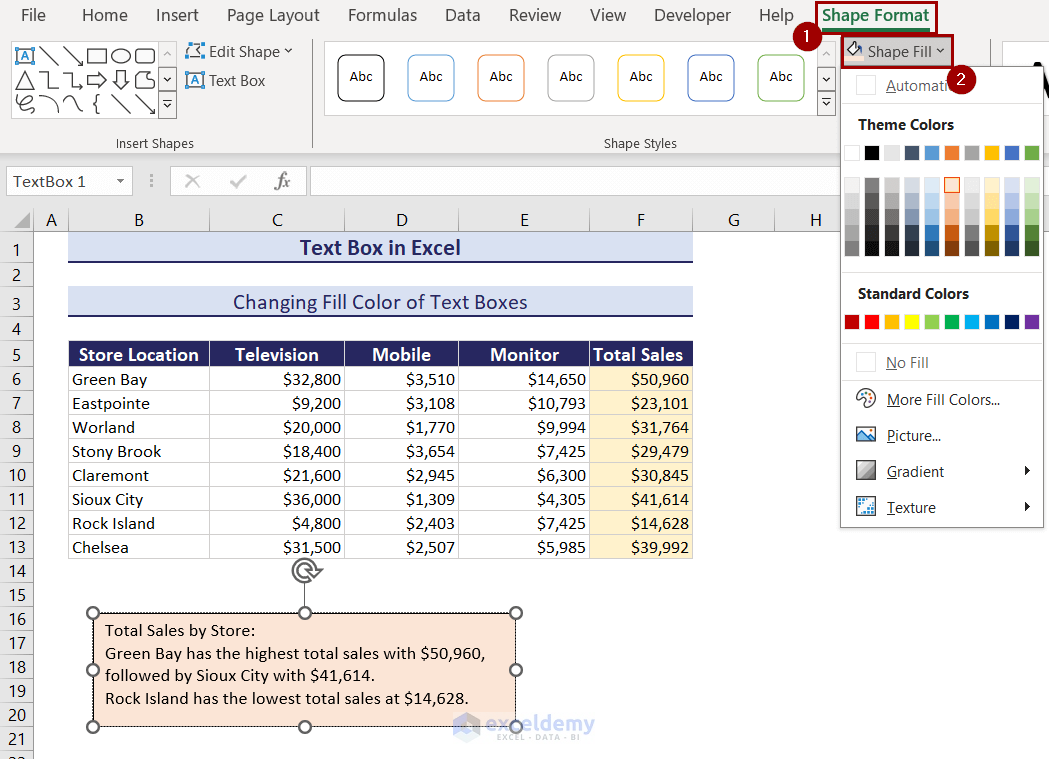
Click on the image to get a detailed view
You can also change the fill color choosing Fill in Font in the Home tab.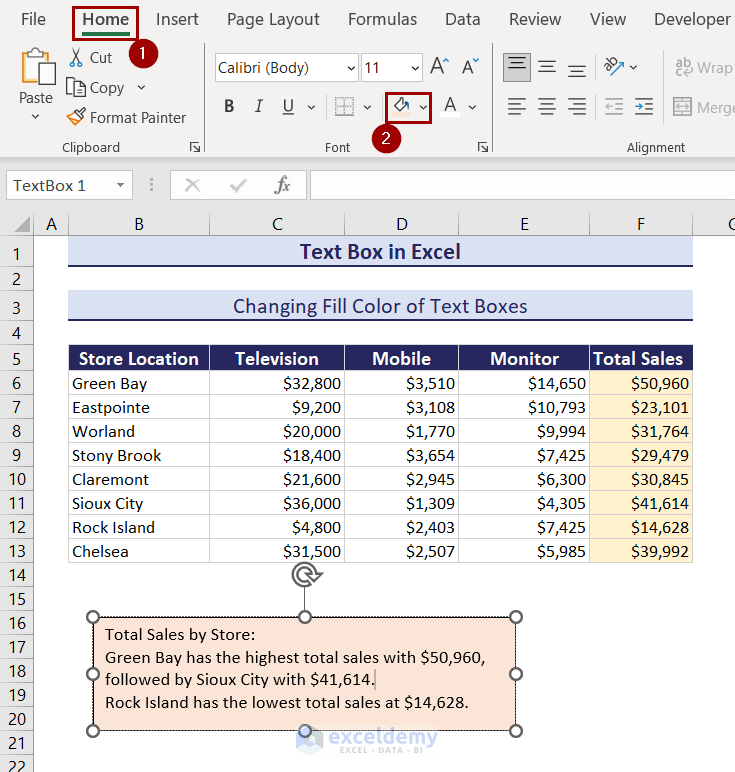
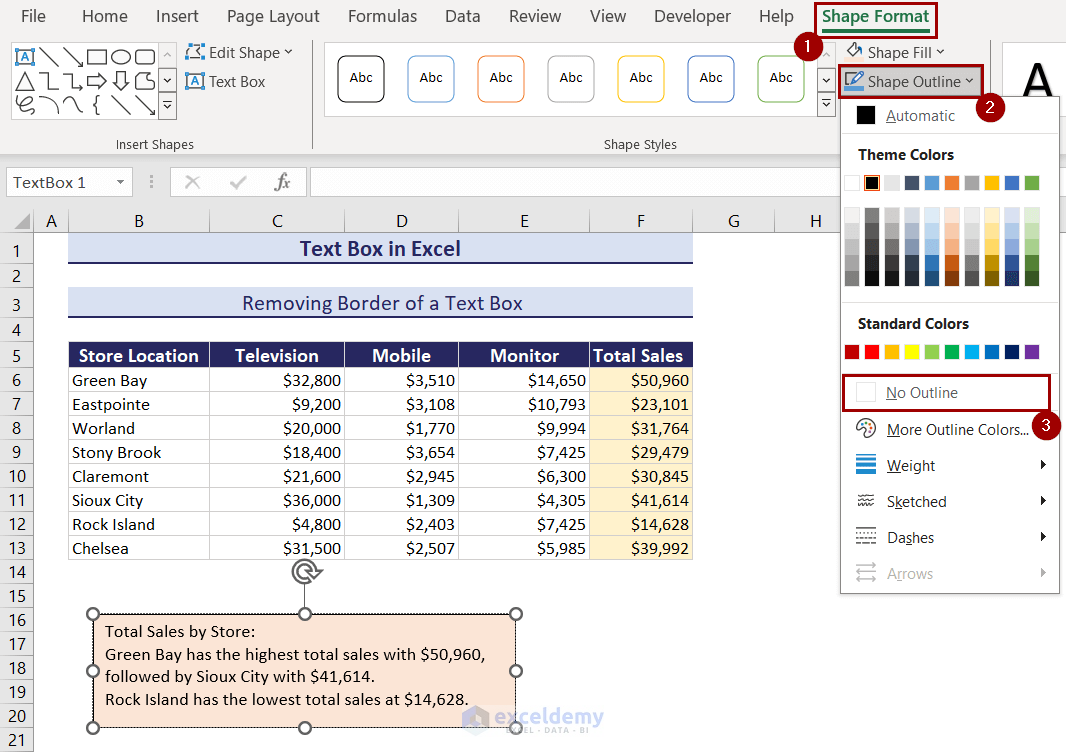
4. Removing the Border
Click the text box and select Shape Format >> Shape Styles >> Shape Outline >> No Outline.
Click on the image to get a detailed view
The border will be removed.
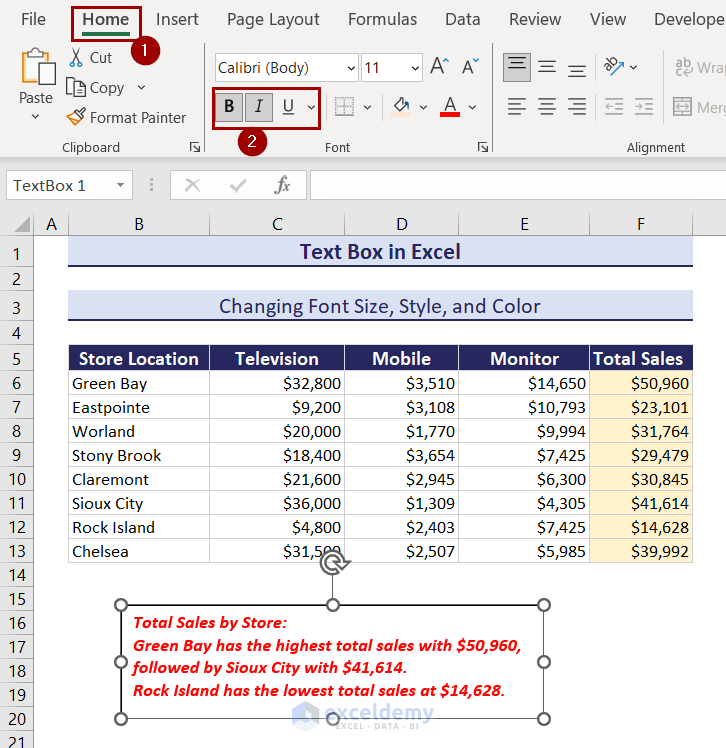
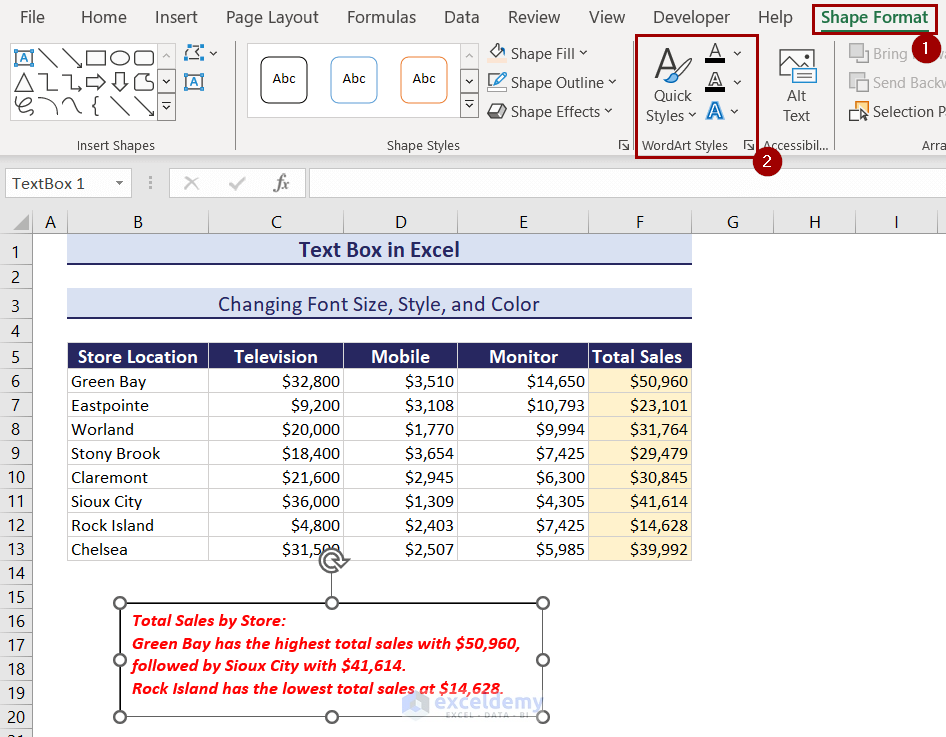
5. Changing Font Size, Style, and Color
- Go to Home >> Font >> Font Color.
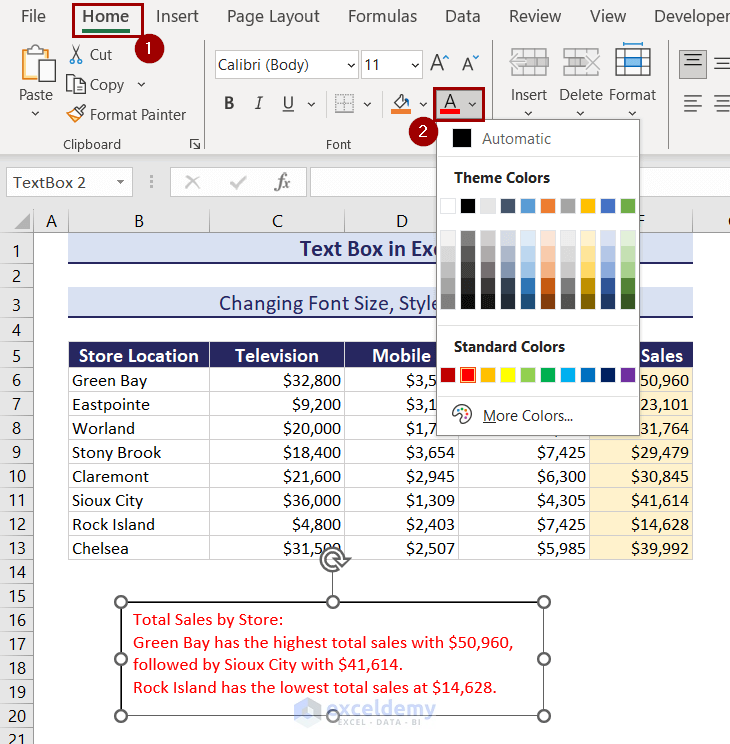
- There are other editing options in Font.
- Access different WordArt Styles in Shape Format.
Click on the image to get a detailed view
6. Changing the Line Spacing Inside a Text Box
- Select the whole text.
- Right-click the text and select Paragraph.
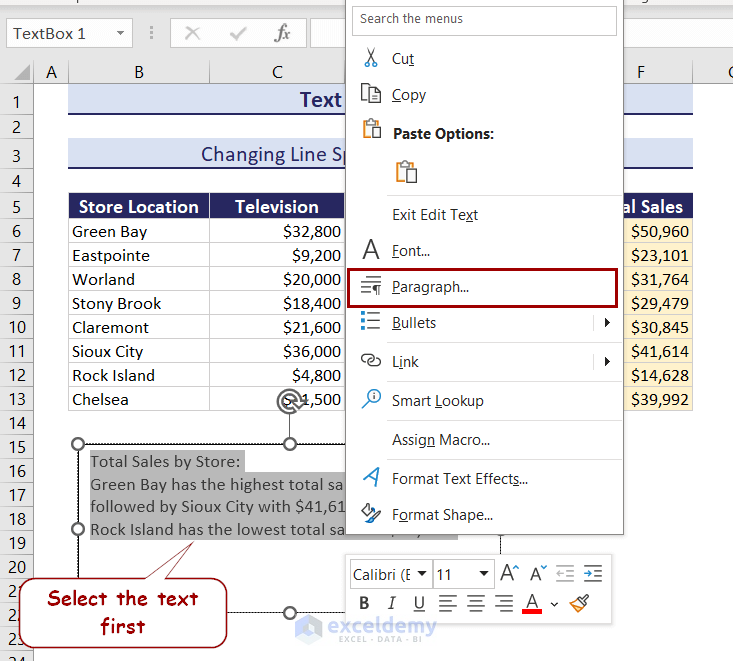
- In Paragraph, select Spacing.
- Choose different line spacing options.
- Click OK.
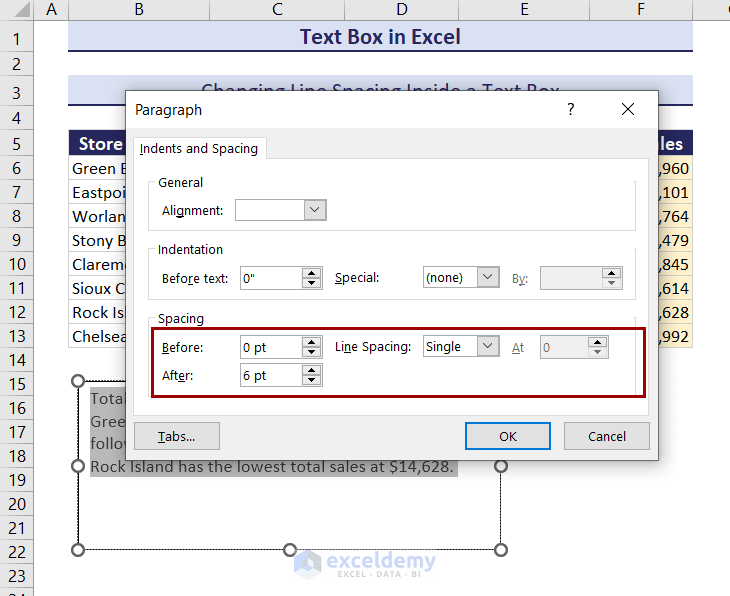
Here, 6pt was selected.
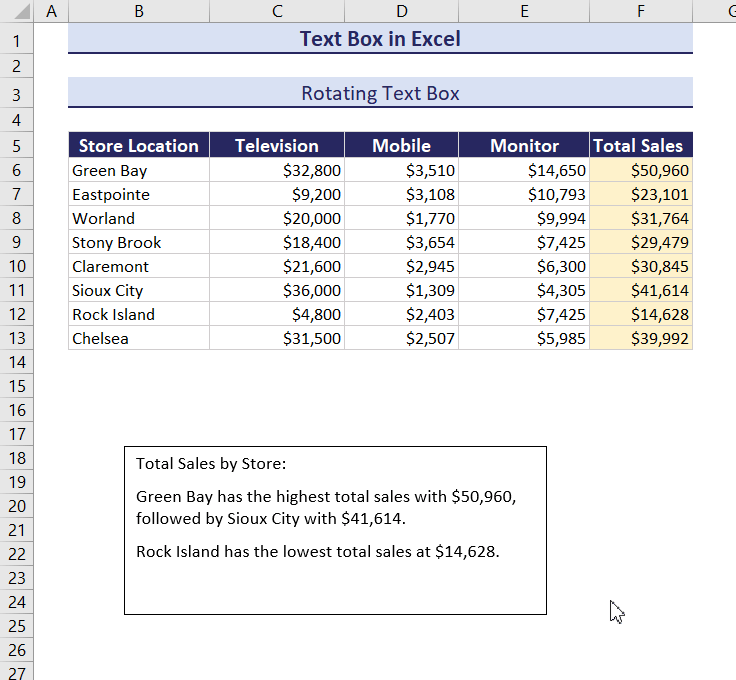
7. Rotating the Text Box
- Select the text box and you will see a clockwise rotating icon at the top of the box.
- Click it and move your mouse cursor to rotate the text box.
Observe the GIF.
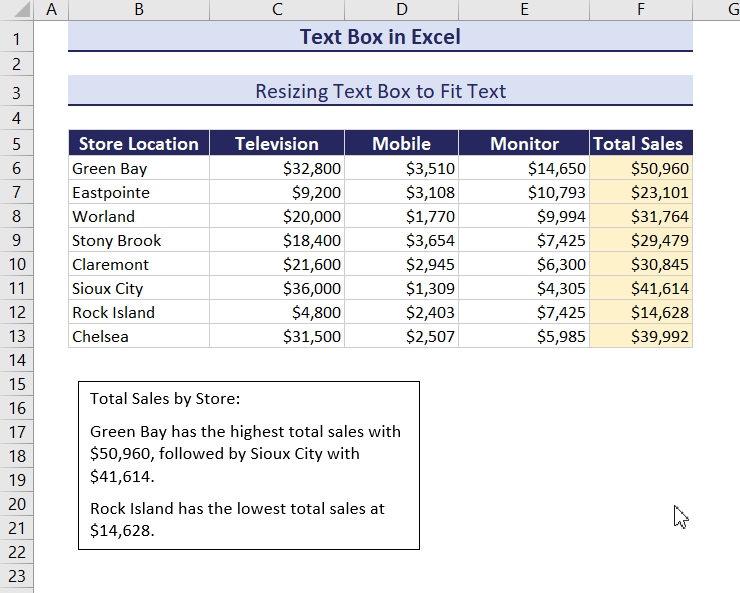
8. Resizing the Text Box to Fit Text
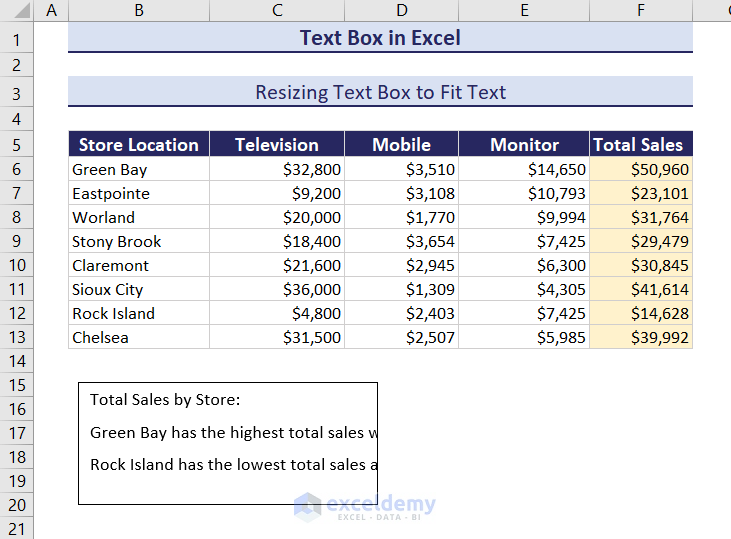
Resizing Text Box Automatically to Fit:
- Select the text box by clicking its edge.
- Press Ctrl+1 to open the Format Shape option.
- Select Text Options >> Textbox
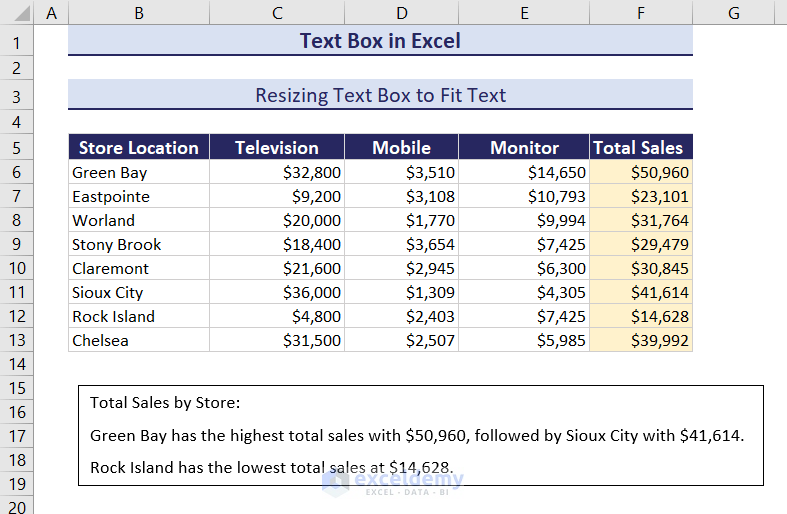
- In Text Box, check Resize shape to fit text.
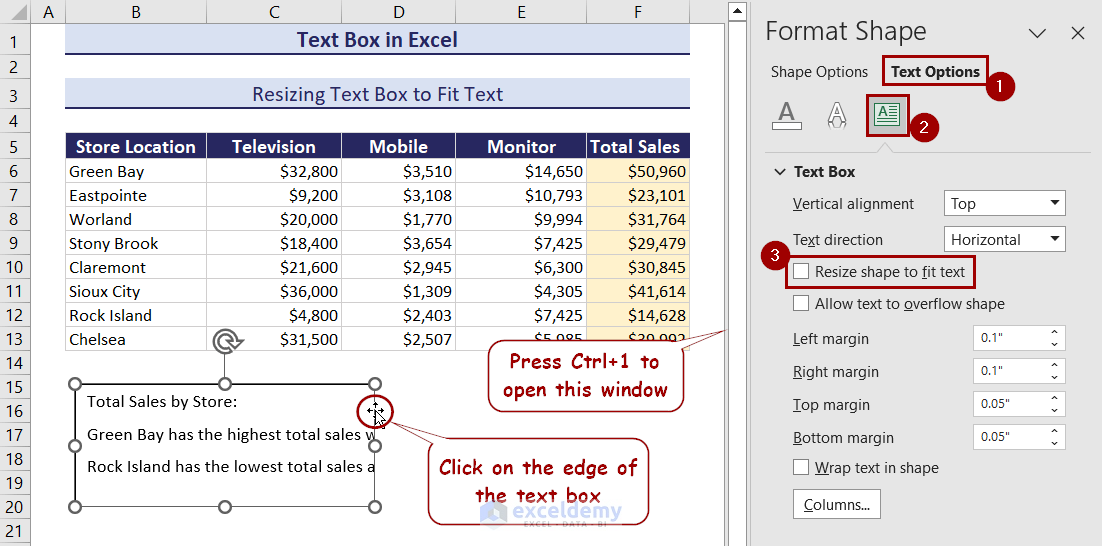
Click on the image to get a detailed view
Height and width will be adjusted to match the text.
Click on the image to get a detailed view
Resize to Fit and Wrap:
- Select Wrap text in shape.
- Height will be adjusted and width will be kept.
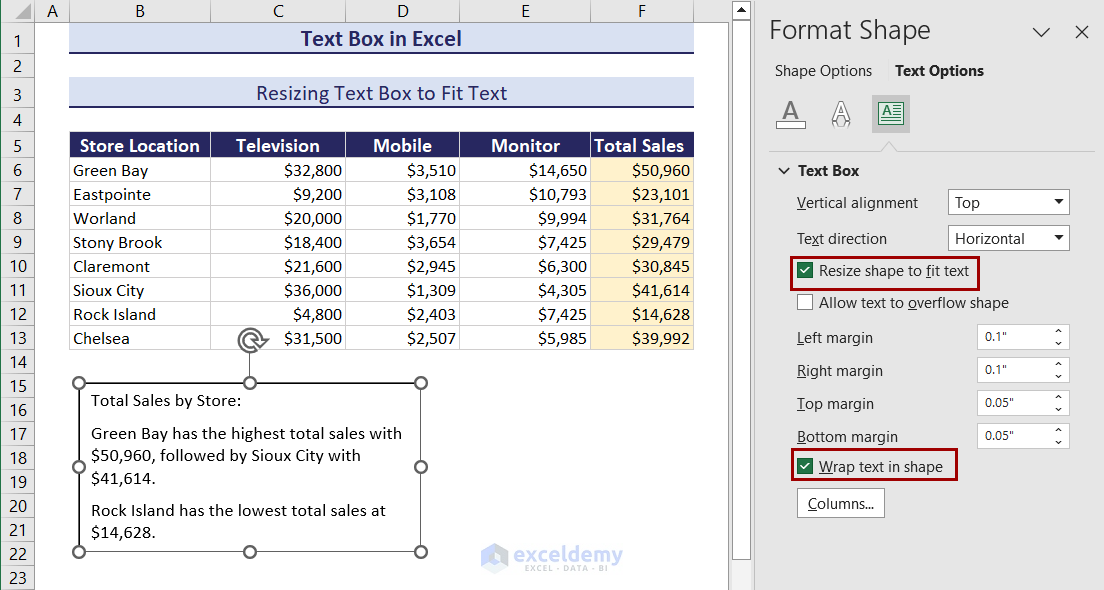
Click on the image to get a detailed view
This is the output.
Resize to Fit Using VBA:
- Open the VBA editor and insert the following code in the module.
Sub FitTextBoxToText()
    Dim ws As Worksheet
    Dim textBox As Shape

    ' Set the worksheet
    Set ws = ThisWorkbook.Sheets("8. Resize to Fit Text")
    ' Replace "YourSheetName" with your actual sheet name

    ' Set the name of the text box
    Dim textBoxName As String
    textBoxName = "TextBox 1"
    ' Replace with the actual name of your text box

    ' Check if the text box exists
    On Error Resume Next
    Set textBox = ws.Shapes(textBoxName)
    On Error GoTo 0

    If Not textBox Is Nothing Then
        ' Fit the text box to its content
        textBox.TextFrame.AutoSize = True
    Else
        MsgBox "Text box not found!"
    End If
End Sub
Click on the image to get a detailed view
- Press F5 to run the code. It will resize the text box.
Click on the image to get a detailed view
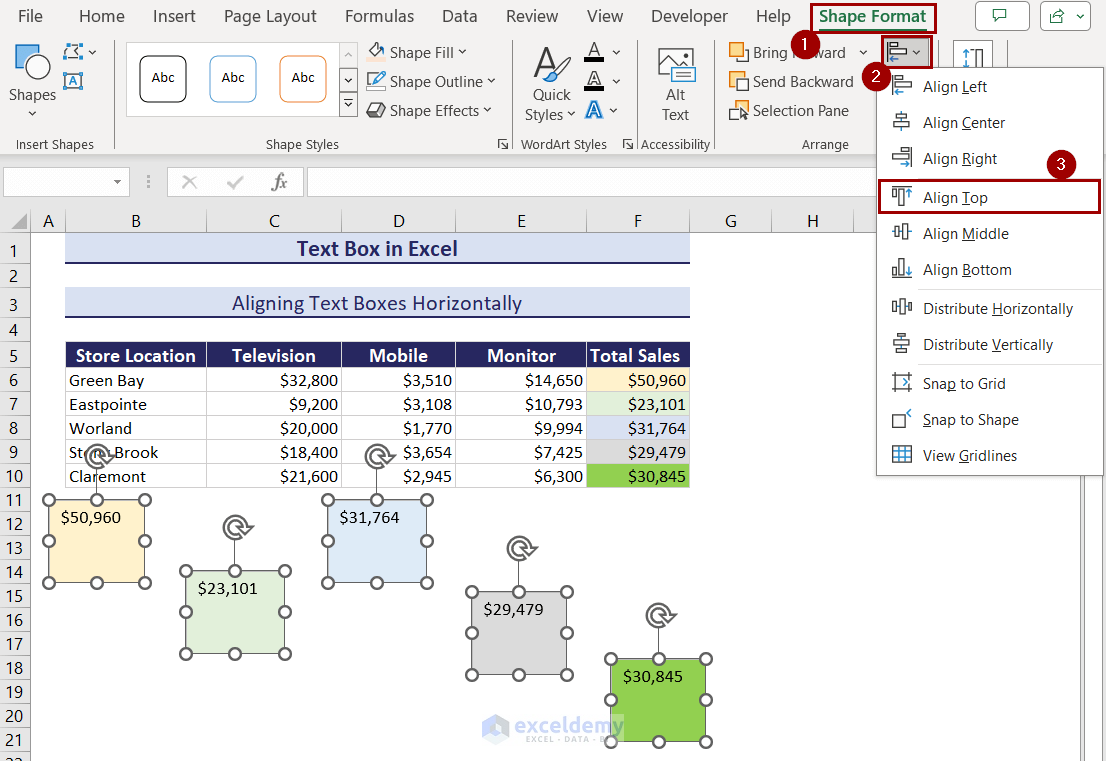
9. Aligning Text Boxes in Excel
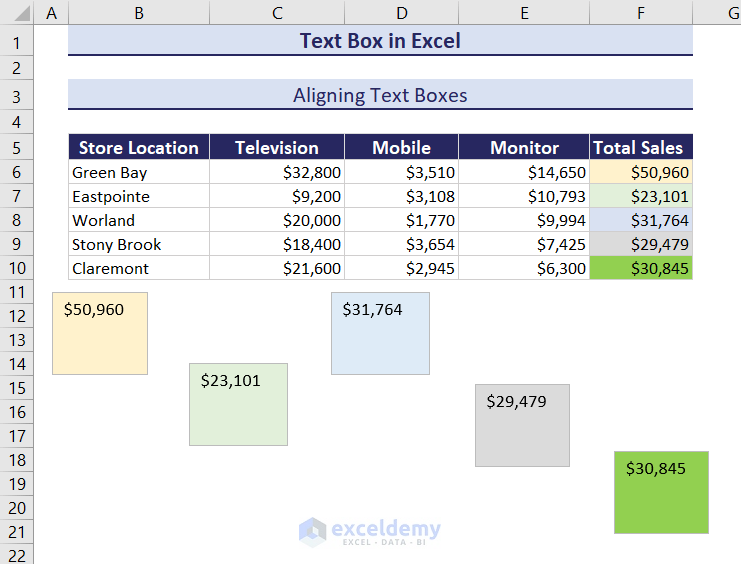
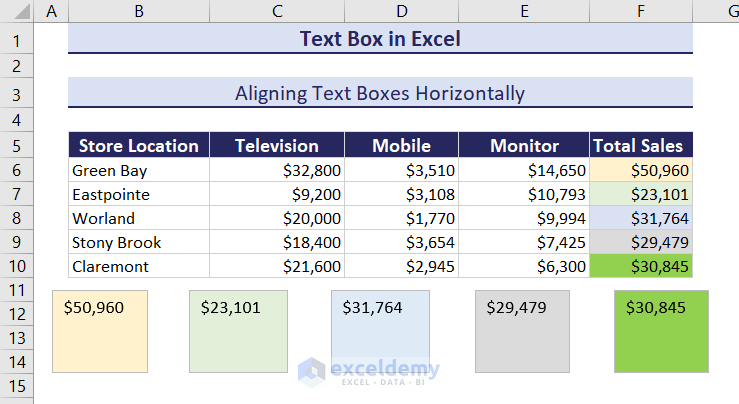
Aligning Text Boxes Horizontally:
- Select all text boxes by holding Ctrl and left-clicking them.
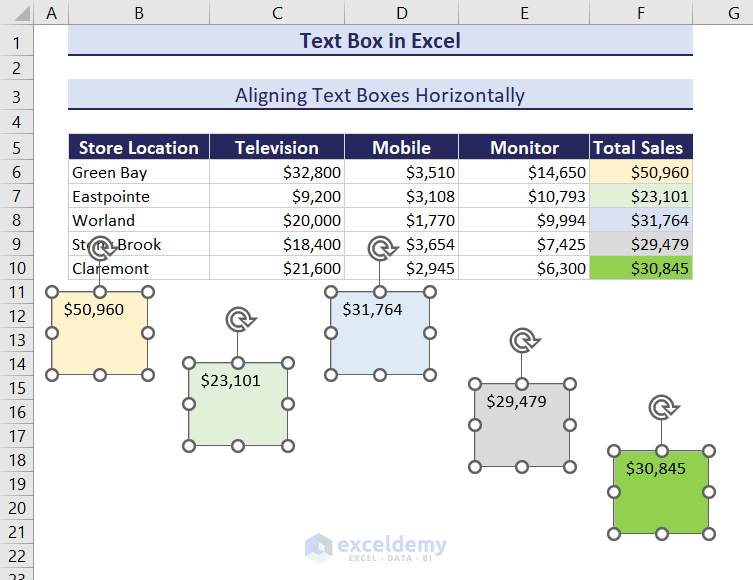
- Select Shape Format >> Align Objects >> Align Top.
Click on the image to get a detailed view
The boxes will be horizontally aligned.
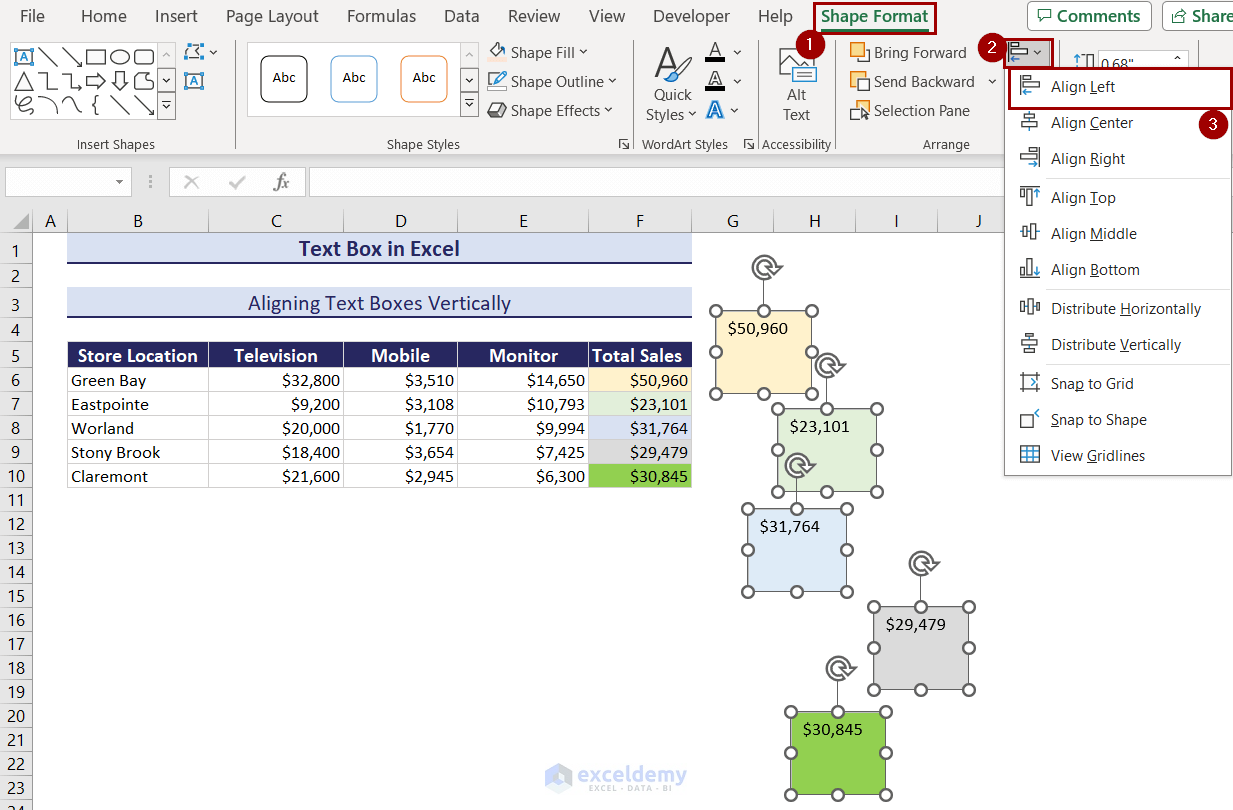
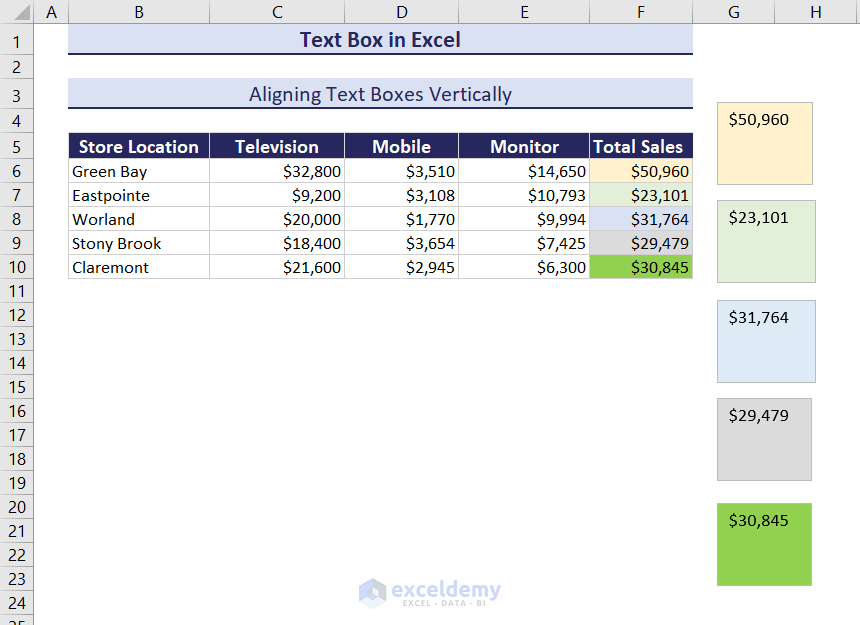
Aligning Text Boxes Vertically:
- Select all text boxes.
- Select Shape Format >> Align Objects >> Align Left.
Click on the image to get a detailed view
This will align the text boxes vertically.
Click on the image to get a detailed view
10. Changing the Transparency of a Text Box
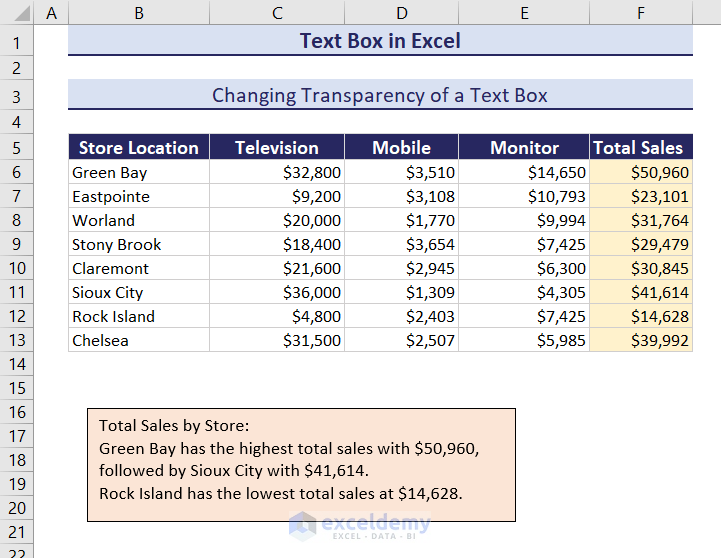
To change the transparency of the text box:
- Select the text box by clicking its edge.
- Press Ctrl+1 to open the Format Shape window.
- Select Shape Options >> Fill & Line >> Fill.
- Change the Transparency level in Color.
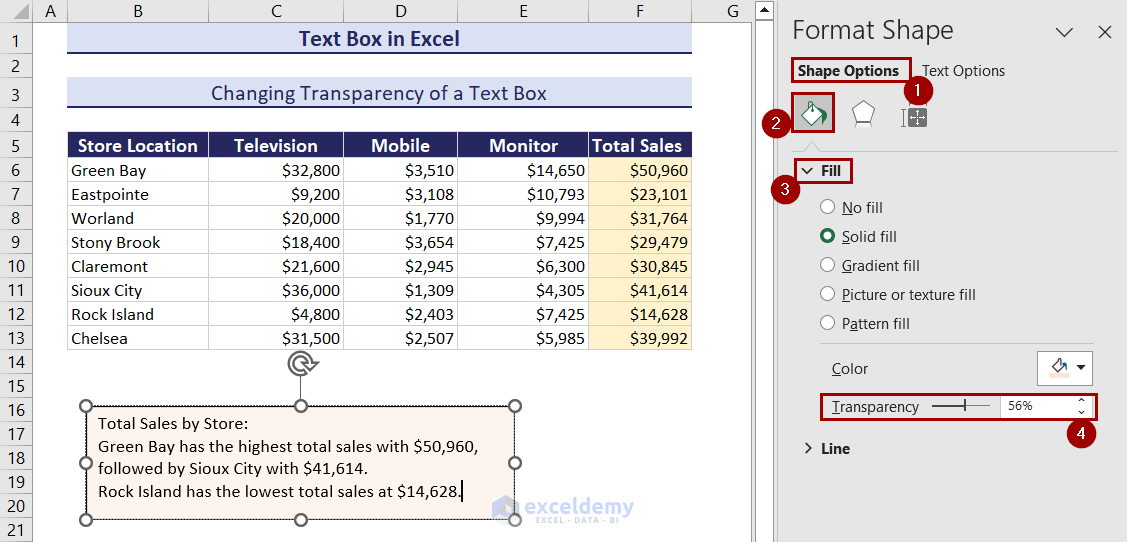
Click on the image to get a detailed view
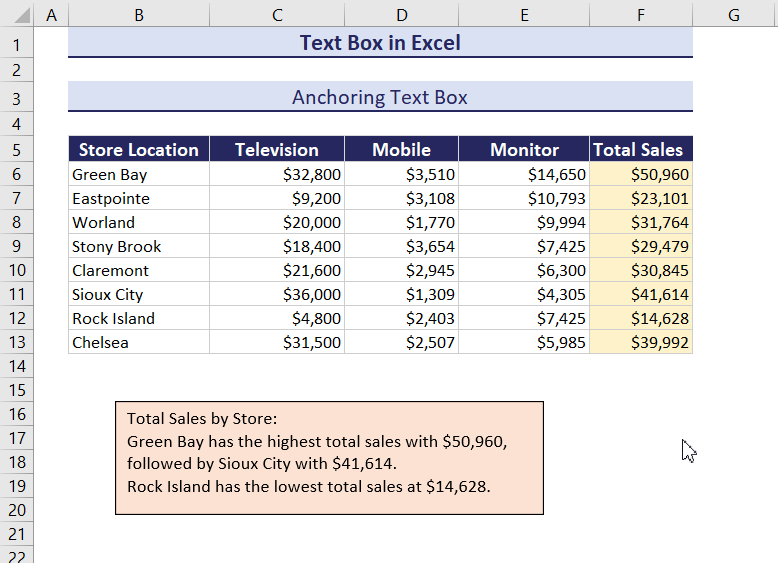
11. Anchoring a Text Box in Excel
- Select the text box by clicking its edge.
- Press Ctrl+1 to open the Format Shape window.
- Select Shape Options >> Size & Properties >> Properties.
- Check Don’t move and size with cells.
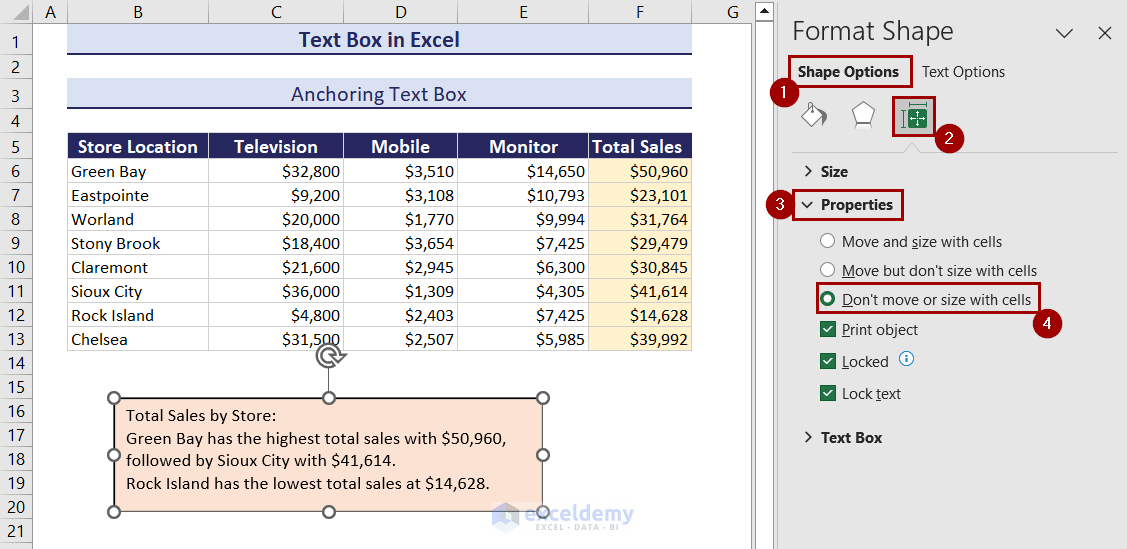
Click on the image to get a detailed view
Lock a Text Box:
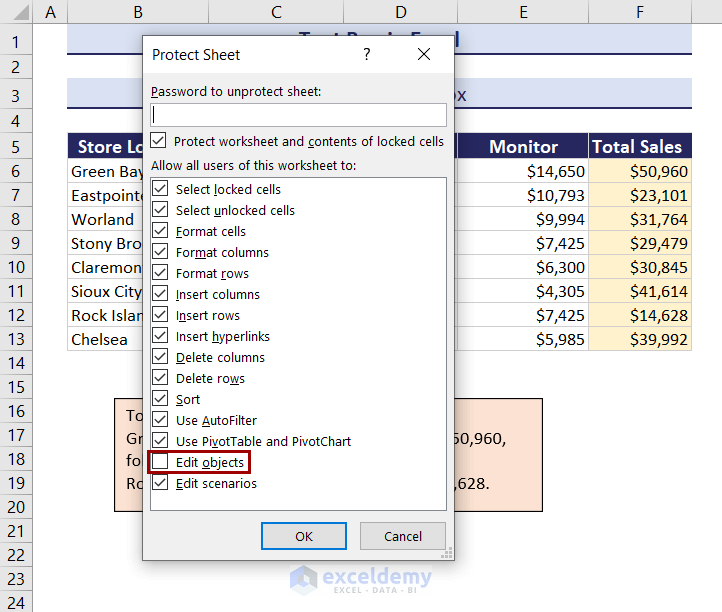
- Go to Home >> Cells >> Format >> Protect Sheet.
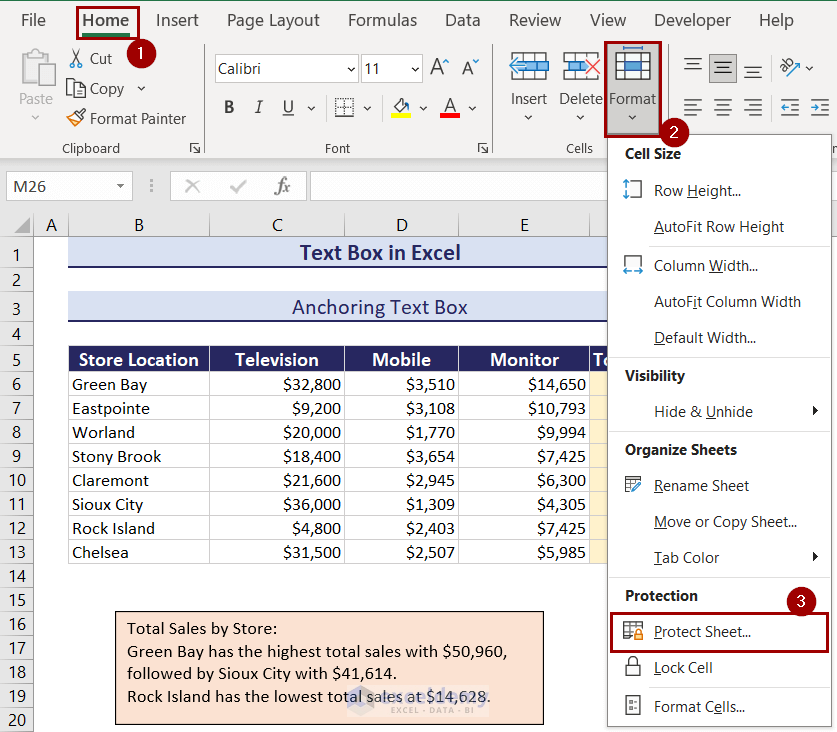
Click on the image to get a detailed view
- Uncheck Edit objects in Protect Sheet and click OK.
The text box won’t be resized by changing the size of a column or row.
You need to unprotect the sheet to edit the text box again.
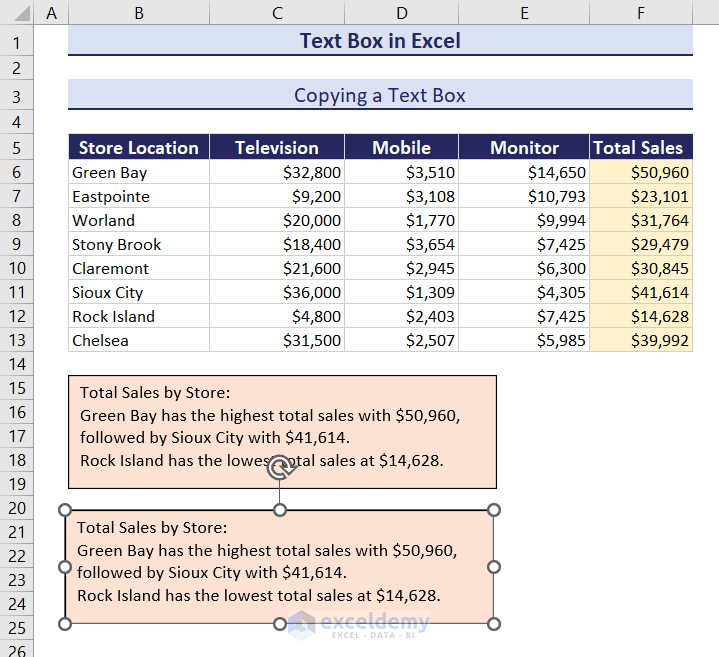
How to Copy a Text Box in Excel
- Select the text box by clicking its edge.
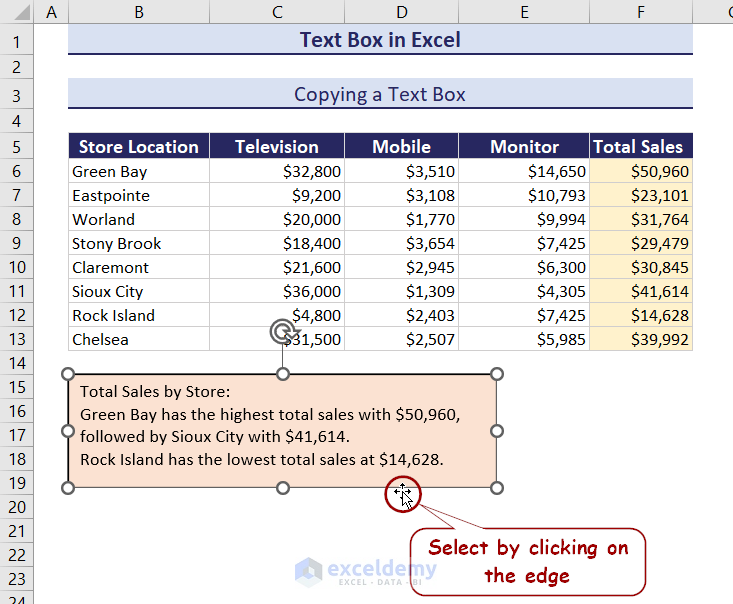
- Press Ctrl+C to copy and Ctrl+V to paste.
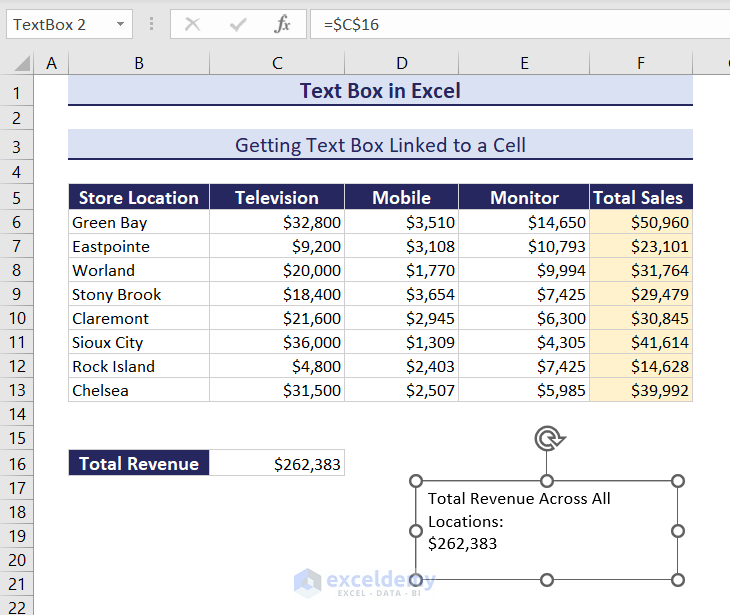
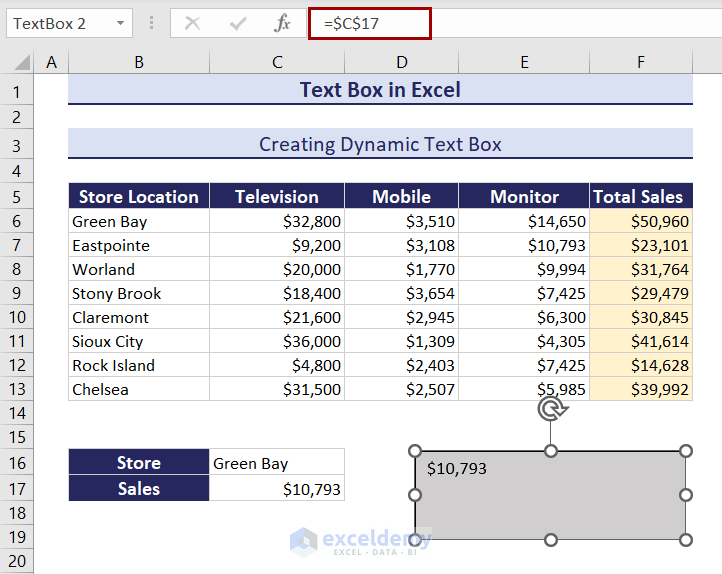
How to Get a Text Box Linked to a Cell in Excel
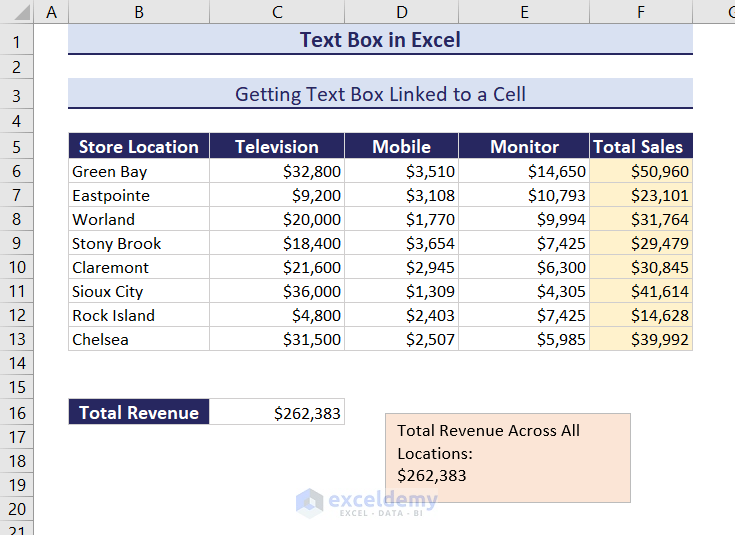 .
.
- Create a text box.
- Click the middle of the box. Instead of entering text there, use the formula bar.
- Enter “=” followed by the cell you want to reference to. Here, =$C$16 to link to C16.
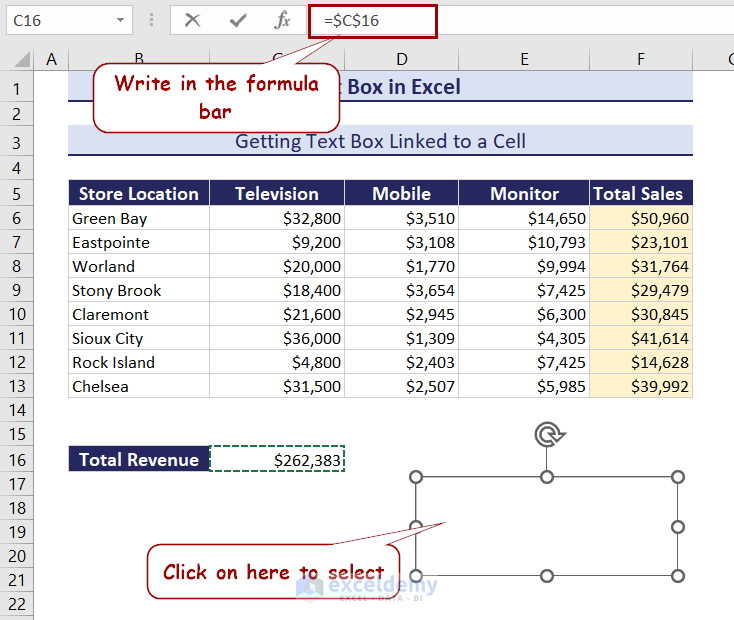
- Press Enter. The value will be displayed in the text box.
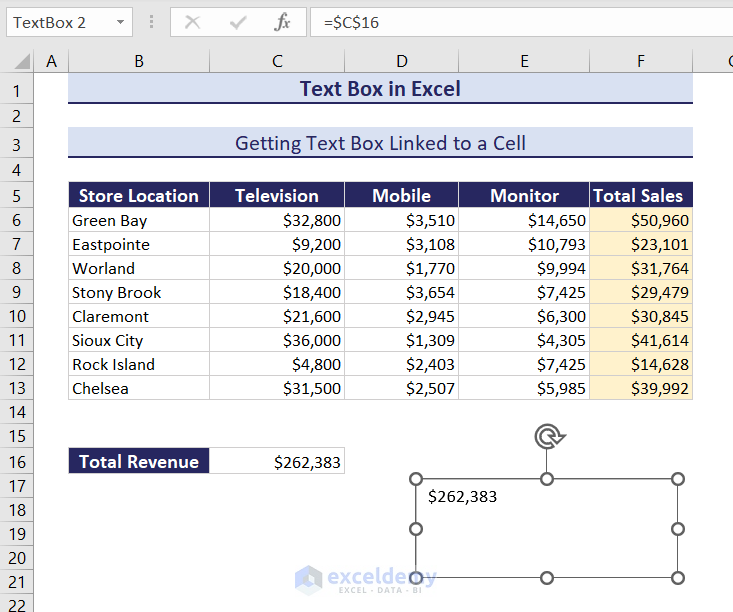
- Double-click the text box and enter your text.
Read More: Get a Text Box Linked to Cell
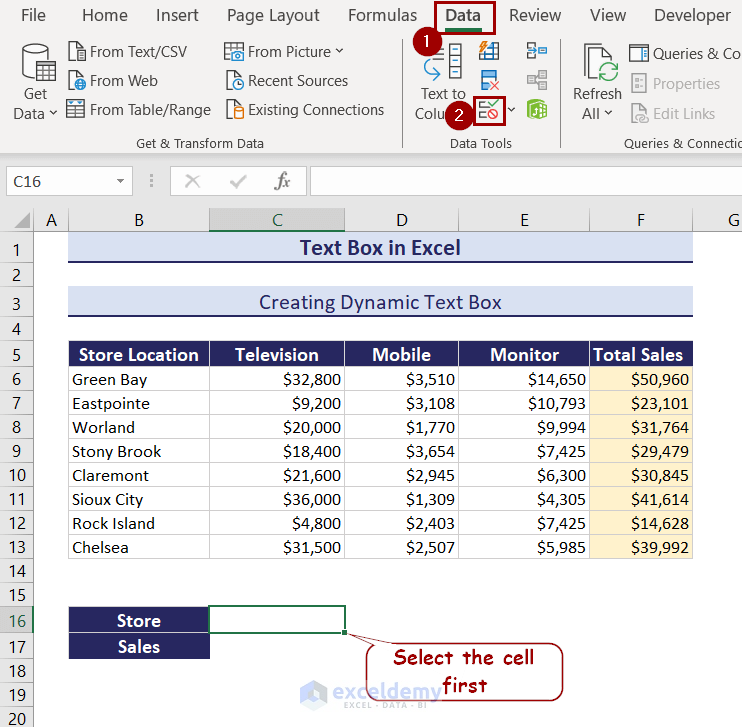
How to Create a Dynamic Text Box in Excel
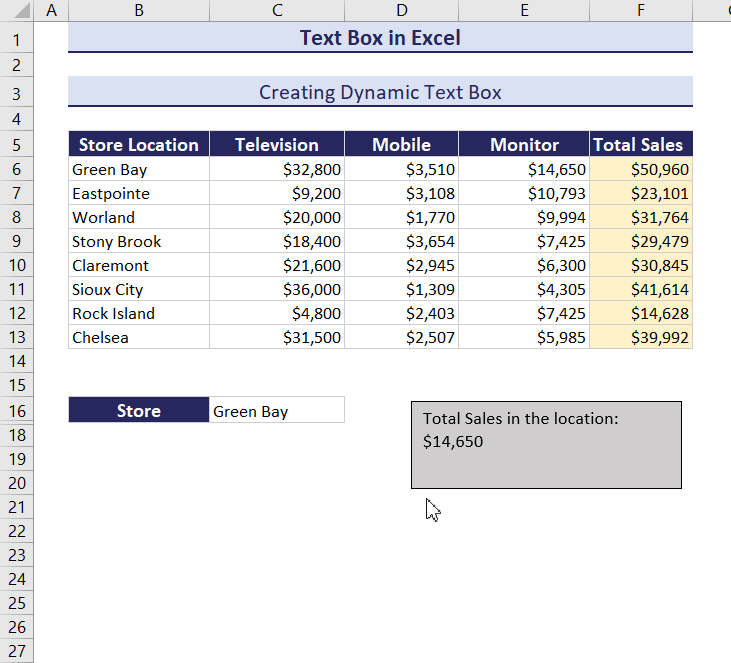
.
- Select a cell to insert a location and go to Data >> Data Tools >> Data Validation.
- In Data Validation, select Settings.
- Select List in Allow and enter the range in Source. Here, source data is B6:B13.
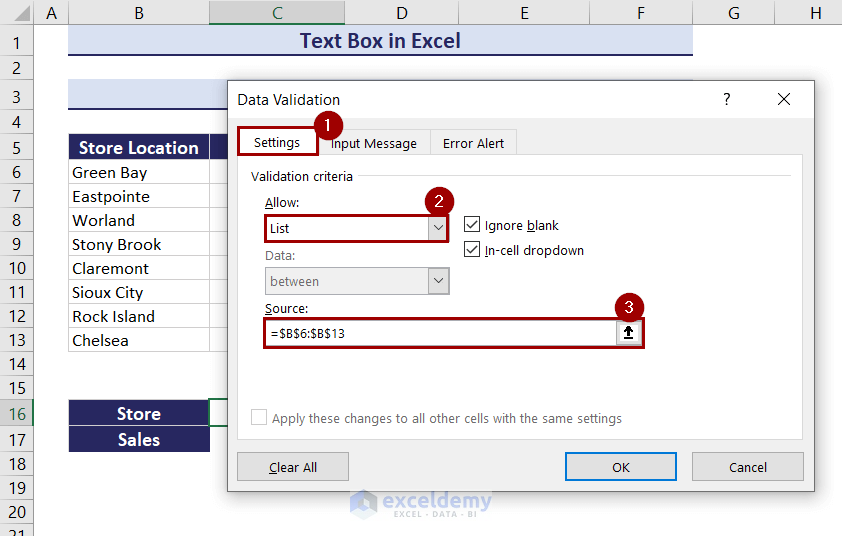
Click on the image to get a detailed view
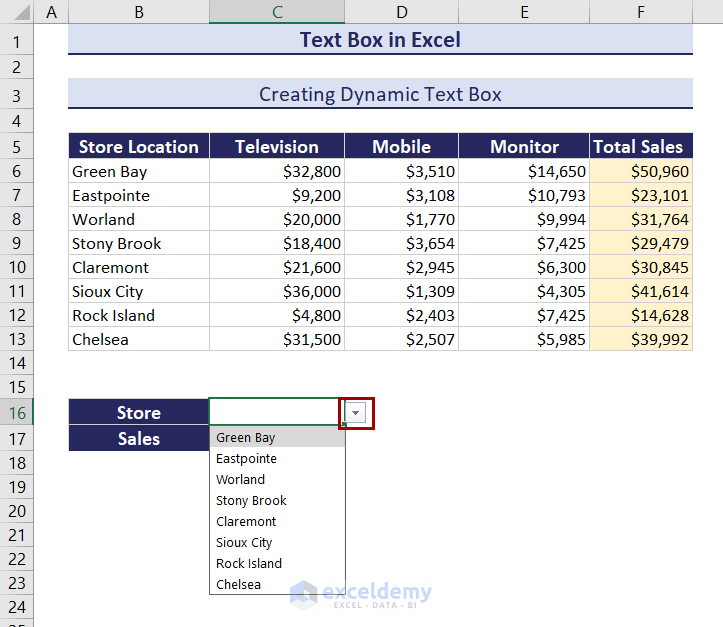
- A drop-down arrow will be displayed in the cell. Choose a value.
- Enter the following formula in C17.
=VLOOKUP(C16,B6:F13,4,TRUE)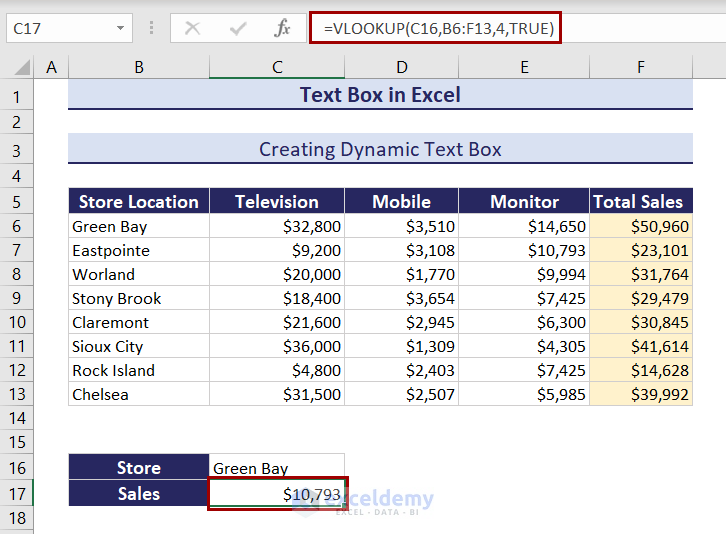
- Insert a text box, select it and link it to the cell by entering =$C$17 in the formula bar.
Read More: Add a Dynamic Text Box
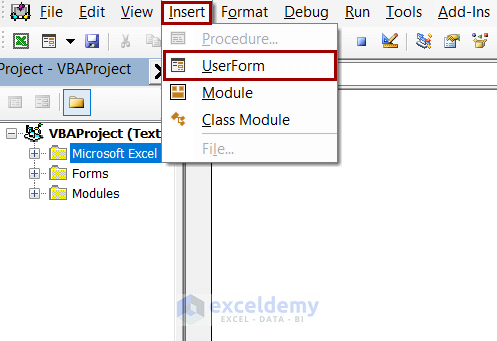
How to Create a Floating Text Box in Excel
- Open the VBA window.
- Select Insert >> UserForm.
- In Toolbox, select TextBox and drag and drop your text box.
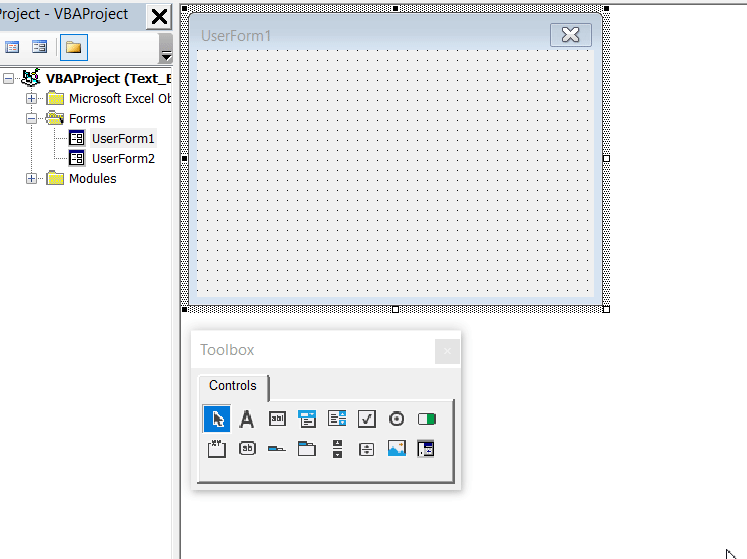
- Set Multiline as True and choose 2 in the ScrollBars option.
- Create a Module and enter the following code.
Sub floating_text_box()
UserForm1.TextBox1.Text = "Monthly sales of accessories in different branches of XYZ company"
UserForm1.Show vbModeless
End Sub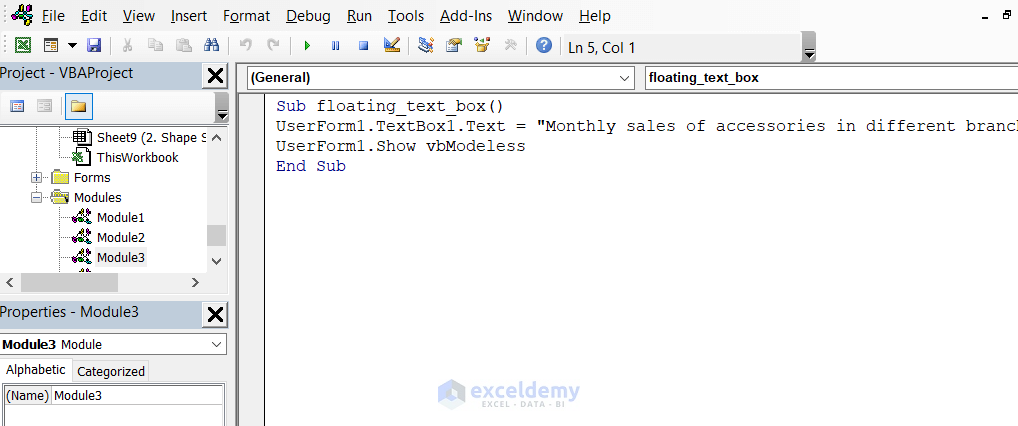
Click on the image to get a detailed view
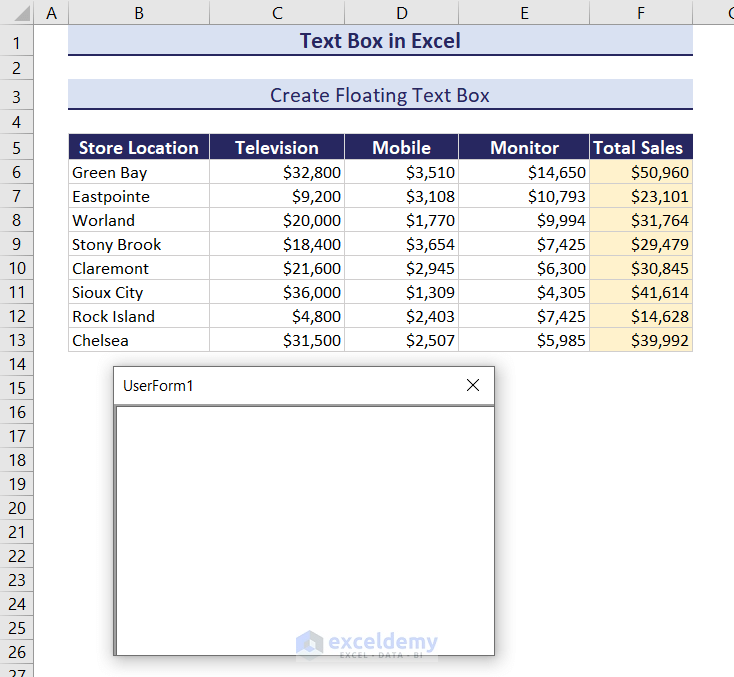
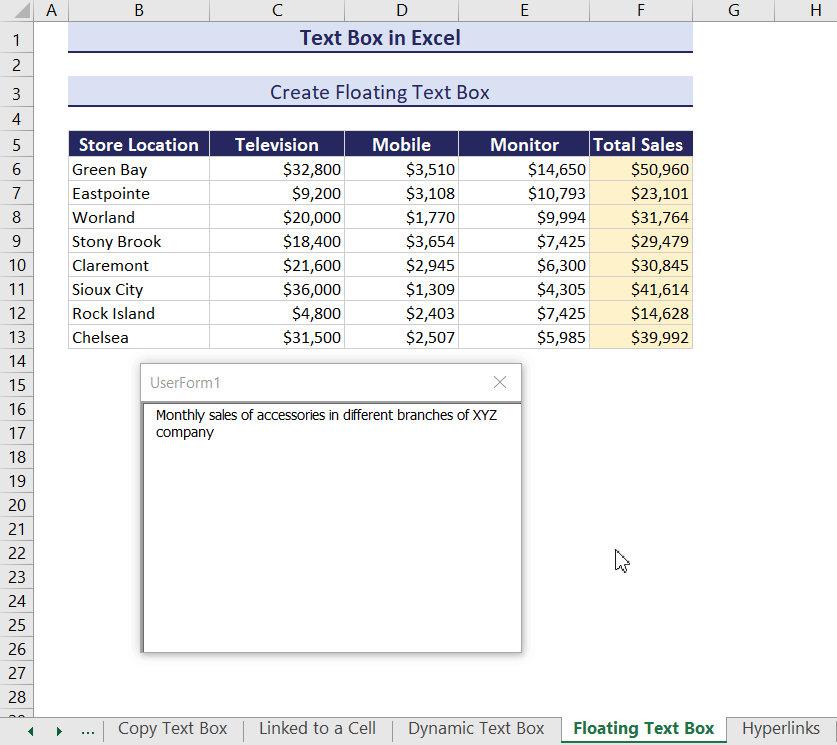
- Press F5 to run the code. The floating text box will be displayed.
- Enter your text in the text box , like in an ActiveX text box.
Click on the image to get a detailed view
Read More: Create Floating Text Box
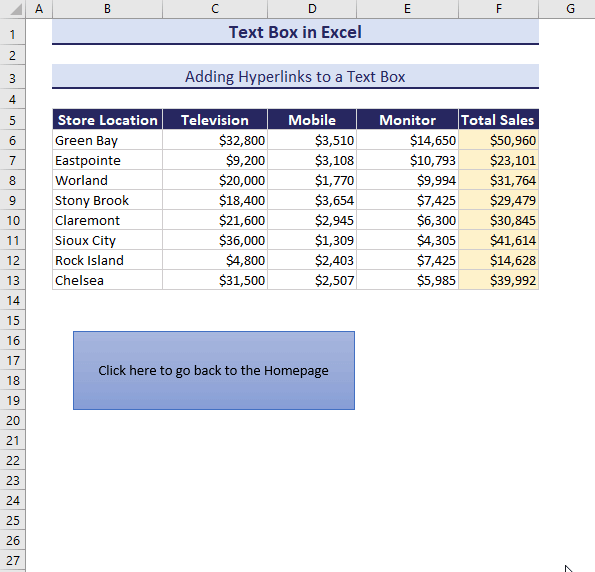
How to Add Hyperlinks to a Text Box in Excel
- Insert a text box.
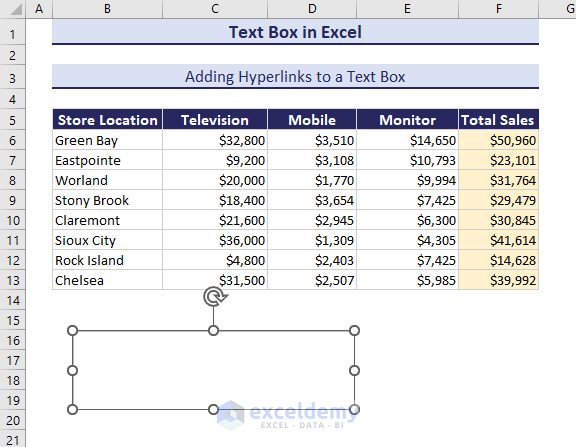
- Add formatting to the box (optional).
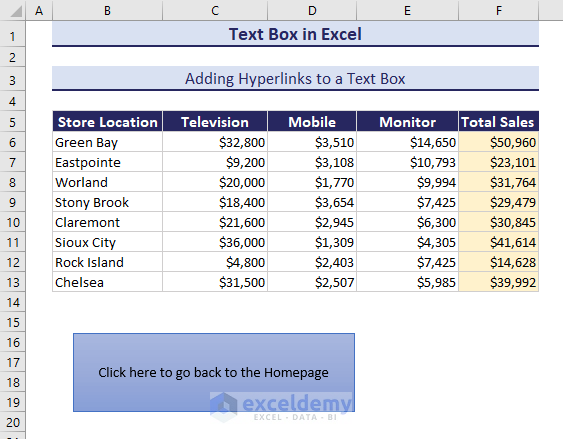
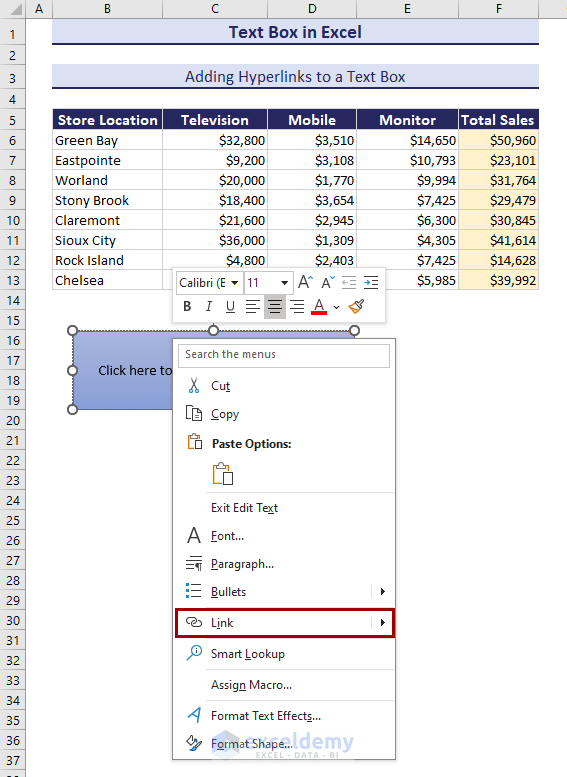
- Right-click the text box and select Link.
- Choose a place for the link in Insert Hyperlink. Here, Place in This Document in Link to: was selected and a named sheet was chosen.
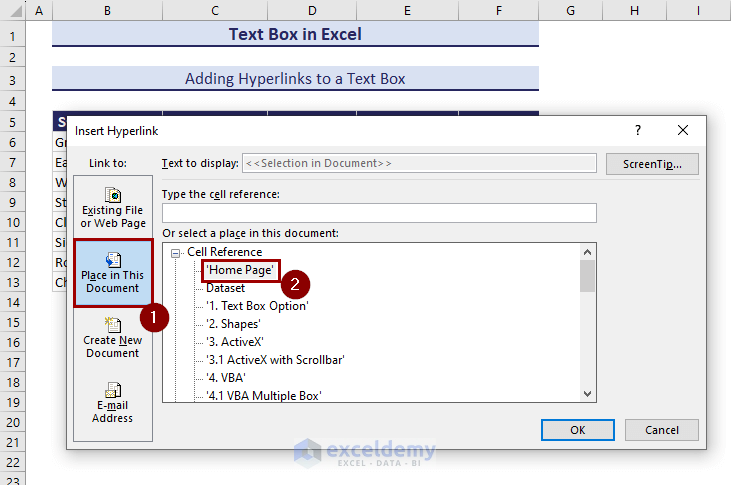
- Click OK.
The text box will work as a button. Clicking it will take us to the homepage.
Read More: Anchor Text Box in Excel
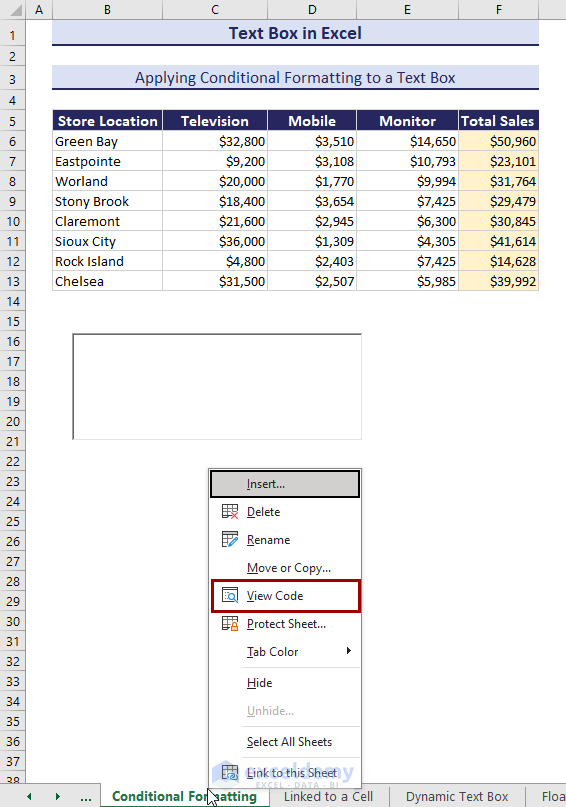
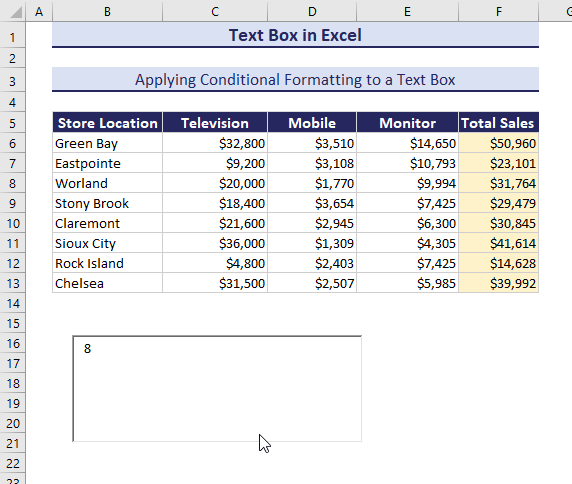
How to Apply Conditional Formatting to a Text Box in Excel
Use ActiveX text boxes:
- Create an ActiveX text box.
- Select the box and rename it in Name Box. Here, “ConditionalTextBox”. (The Design Mode in Controls must be active)
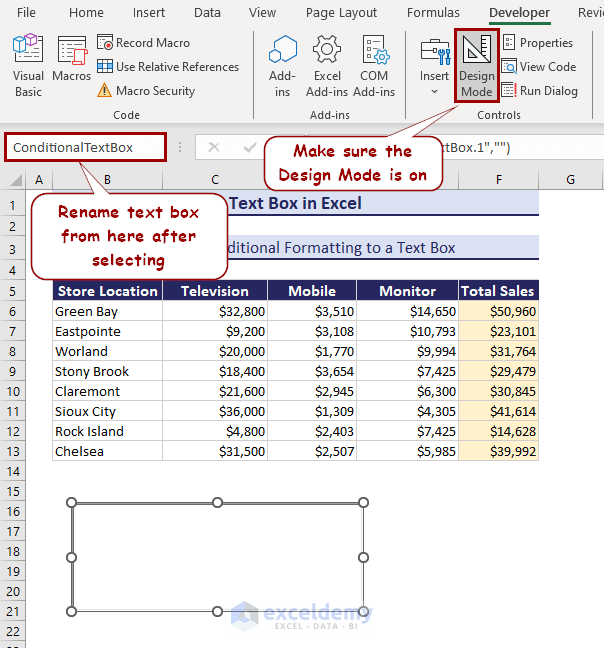
- Right-click the sheet name and select View Code.
- Insert the following code in the editor.
Private Sub ConditionalTextBox_Change()
If ConditionalTextBox.Value < "0" Then ConditionalTextBox.BackColor = rgbBlack
If ConditionalTextBox.Value < "0" Then ConditionalTextBox.ForeColor = rgbWhite
If ConditionalTextBox.Value > "0" Then ConditionalTextBox.BackColor = rgbWhite
If ConditionalTextBox.Value > "0" Then ConditionalTextBox.ForeColor = rgbBlack
End Sub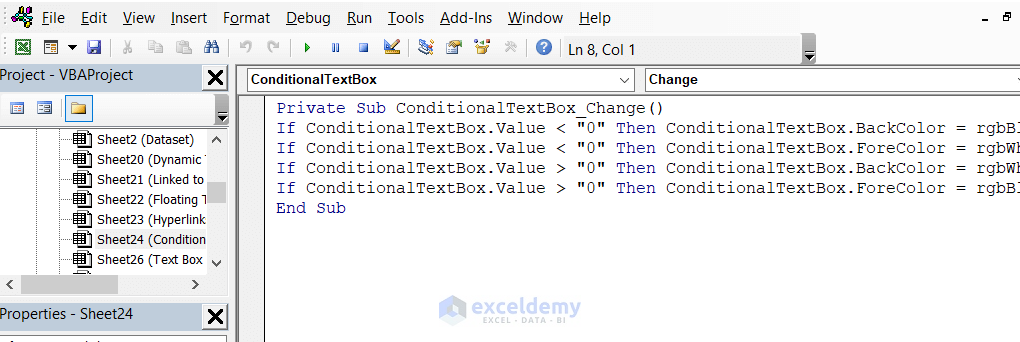
Click on the image to get a detailed view
- Close the VBA editor.
The color will change to white if the value is positive and to black if zero or negative.
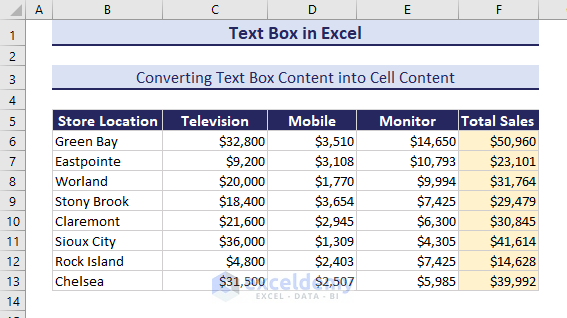
How to Convert Text Box Content into Cell Content in Excel
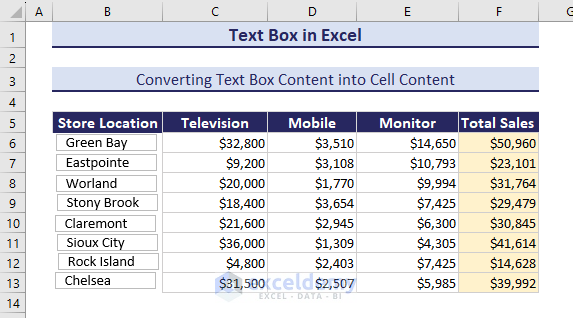
- Open the VBA Editor and insert a Module.
- Enter the following code.
Sub ConvertTextBoxToCell()
    Dim Sh_xRg As Range
    Dim Sh_xRow As Long
    Dim Sh_xCol As Long
    Dim Sh_xTxtBox As textBox
    Set Sh_xRg = Application.InputBox("Select a cell):", "Convert Text Box to Cell ", _
                       ActiveWindow.RangeSelection.AddressLocal, , , , , 8)
    Sh_xRow = Sh_xRg.Row
    Sh_xCol = Sh_xRg.Column
    For Each Sh_xTxtBox In ActiveSheet.TextBoxes
        Cells(Sh_xRow, Sh_xCol).Value = Sh_xTxtBox.Text
               Sh_xRow = Sh_xRow + 1
    Next
End Sub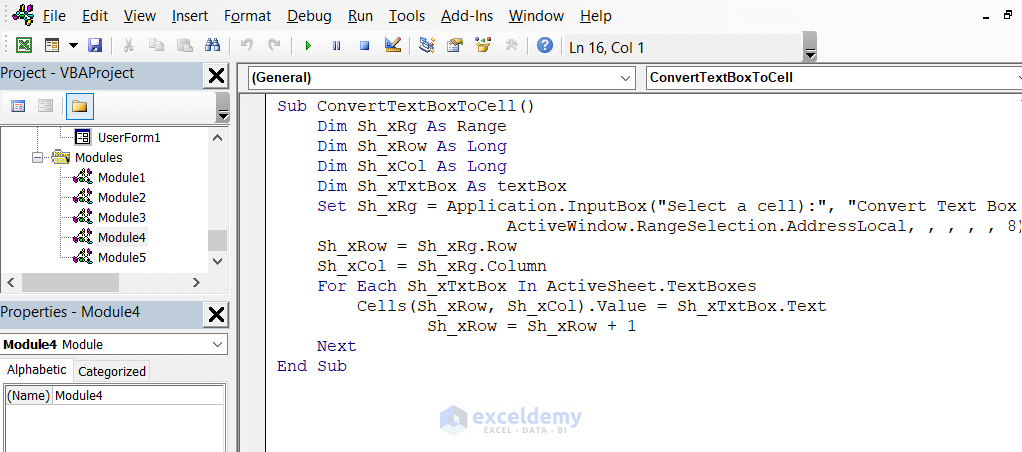
Click on the image to get a detailed view
- Press F5 to run the code.
- A box will open asking for a cell reference. Select B6 (the first cell containing the text box).
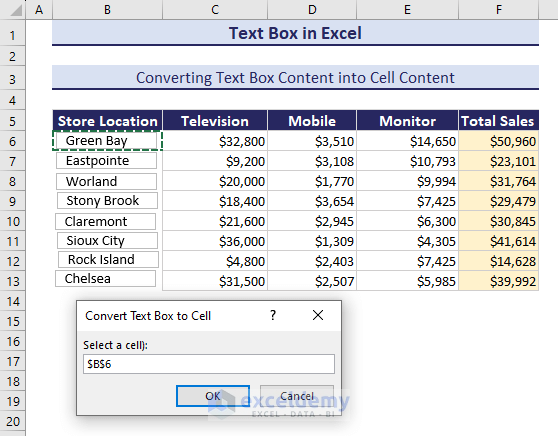
- Click OK to delete the text boxes.
Read More: Convert Text Box to Cell
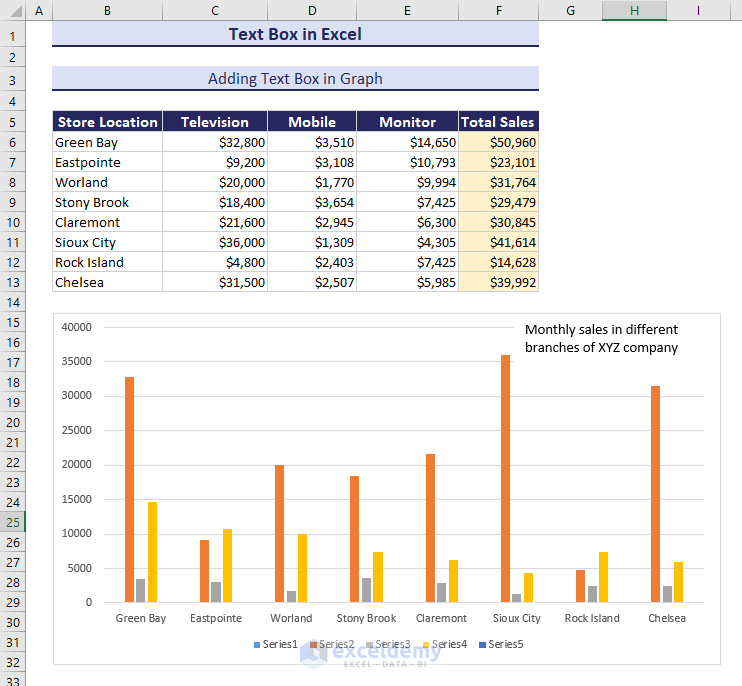
How to Add a Text Box in an Excel Graph
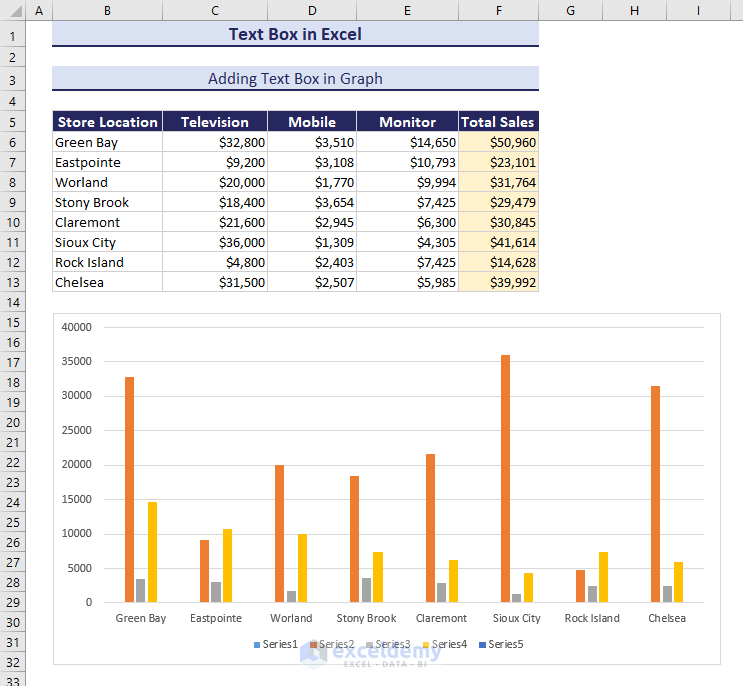
- Go to Insert >> Text >> Text Box.
- Click it and drag it to the chart area where you want to add the text box.
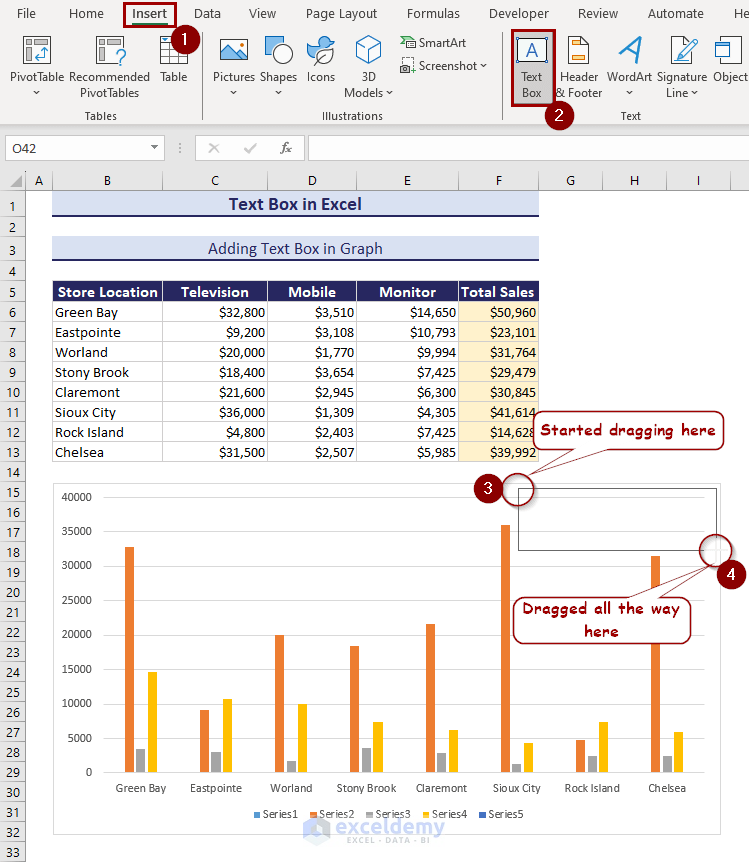
- Enter your text in the text box.
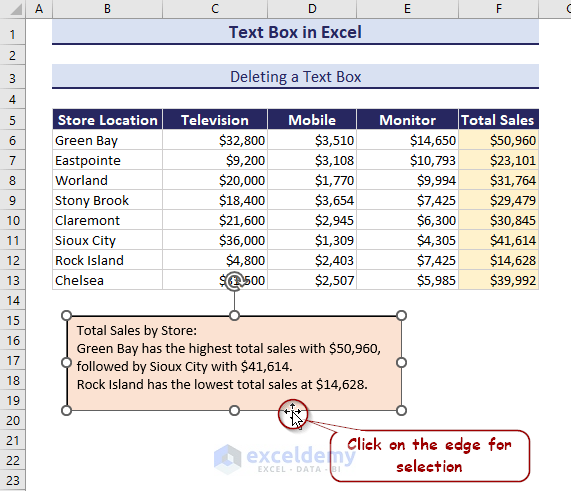
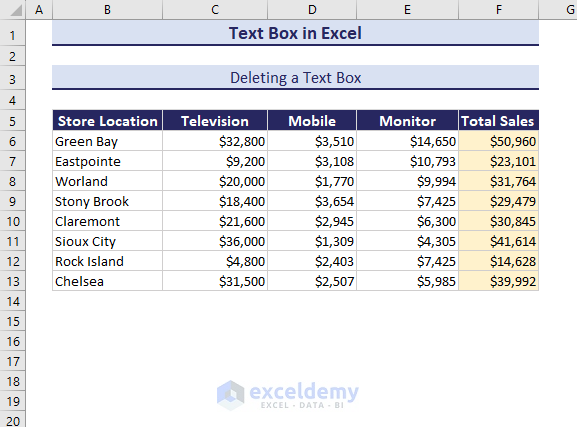
How to Delete a Text Box in Excel
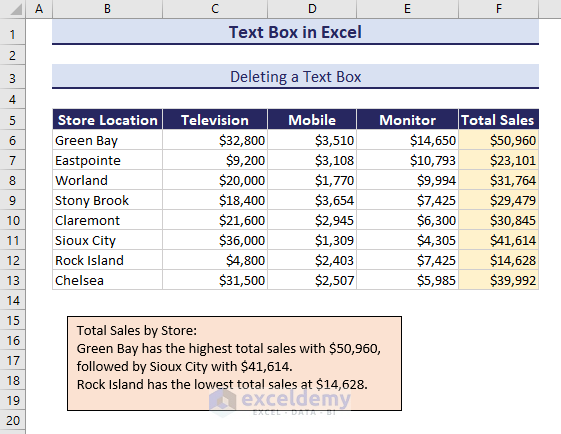
- To delete the text box, select it by clicking its edge.
- Press Delete.
What to Do When the Text Box is Not Showing in Excel?
- It can be toggled off and on. Press Ctrl+6.
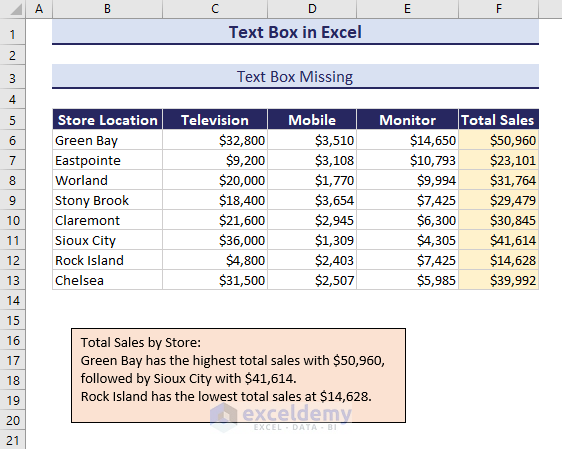
- If you press Ctrl+6, it will not be visible.
Download Practice Workbook
Text Box in Excel: Knowledge Hub
<< Go Back to Learn Excel
Get FREE Advanced Excel Exercises with Solutions!
