Method 1 – Using Paste Special Feature
1.1. Transposing a Single Column to a Single Row
Steps:
- Select cells B4:B10 >> press CTRL+C.
- You can right-click on the selected cells and select Copy from the Context Menu.
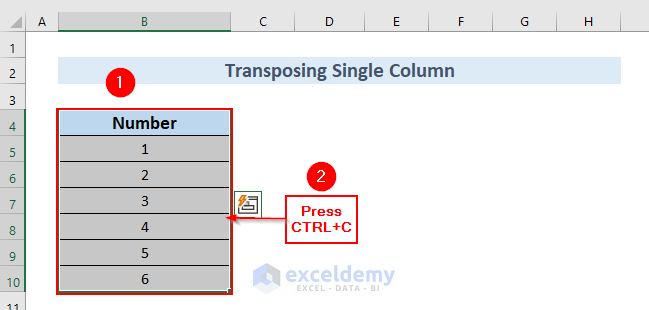
- Select the cell that you want to have the first value of the row. We selected cell B13.
- Right-click on the selected cell >> in the Paste Options section >> select Transpose (T), as shown in the following image.
![]()
- Select the Transpose (T) Paste Option and it will transform the column into a row.
![]()
Read More: How to Convert Single Columns to Rows in Excel with Formulas
1.2. Transposing Multiple Columns to Multiple Rows
Steps:
- Select cells B4:C10 >> press CTRL+C. Or, you can also right-click on the selected cells and select Copy from the Context Menu.
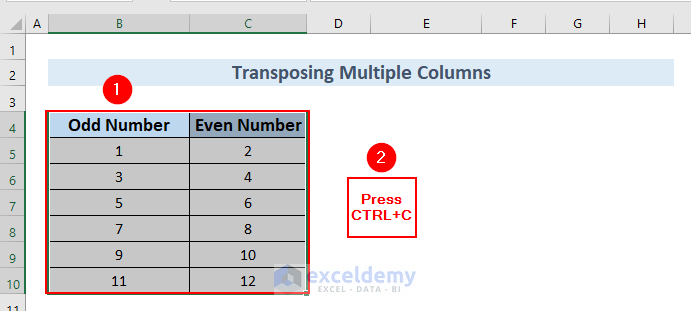
- Select the cell that you want to have the first value of the row. We selected cell B13.
- Right-click on the selected cell >> in the Paste Options section >> select Transpose (T) as shown in the following image.
![]()
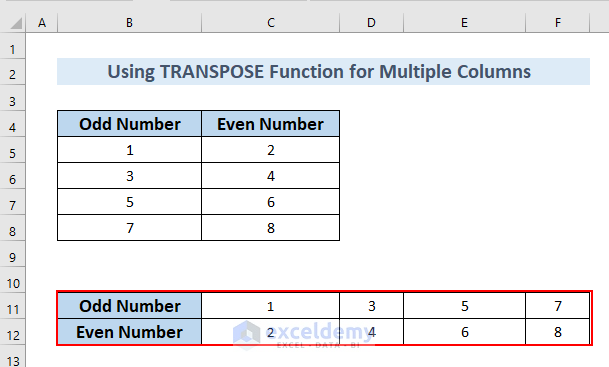
- It will transform the column into a row.
![]()
Read More: How to Convert Multiple Columns into a Single Row in Excel
Method 2 – Using TRANSPOSE Function
2.1. TRANSPOSE Function for Converting a Single Column to a Single Row
Steps:
- Enter the following formula in cell B13.
=TRANSPOSE(B4:B10)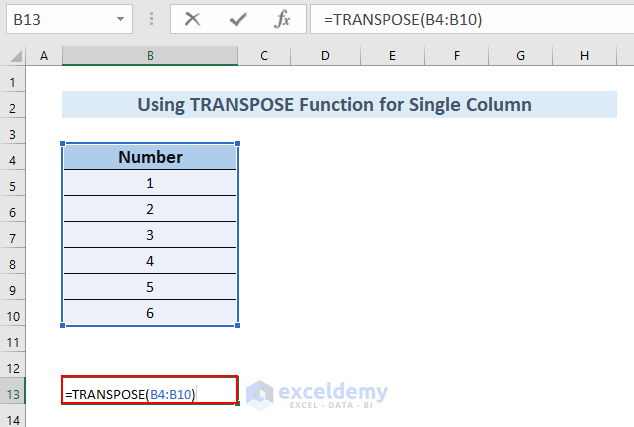
Formula Breakdown
- TRANSPOSE(B4:B10) → the TRANSPOSE function converts the column to a row.
- B4:B10 → is the array.
- Press ENTER.
Note: If you are not using Excel 365, you have to press CTRL+SHIFT+ENTER since this is an array formula.
- The column will be converted to a row.
![]()
Read More: How to Convert Columns to Rows in Excel
2.2. TRANSPOSE Function for Conversion of Multiple Columns to Multiple Rows
Steps:
- Enter the following formula in cell B13.
=TRANSPOSE(B4:C8)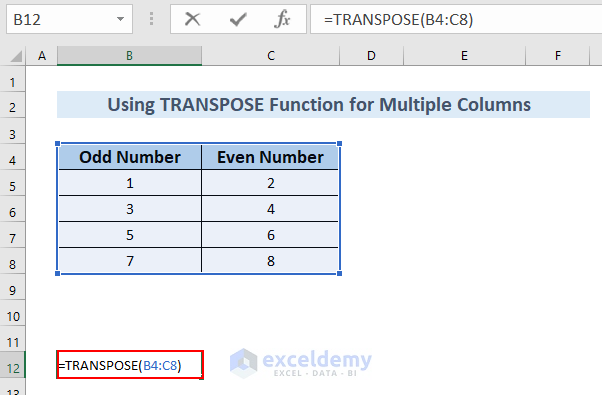
- Press ENTER.
- The columns will be converted to rows.
Method 3 – Combining OFFSET, COLUMNS, and ROWS Functions
Steps:
- Enter the following formula in cell C17.
=OFFSET($B$5, COLUMNS($B: B)-1+(ROWS($5:5)-1)*5,0)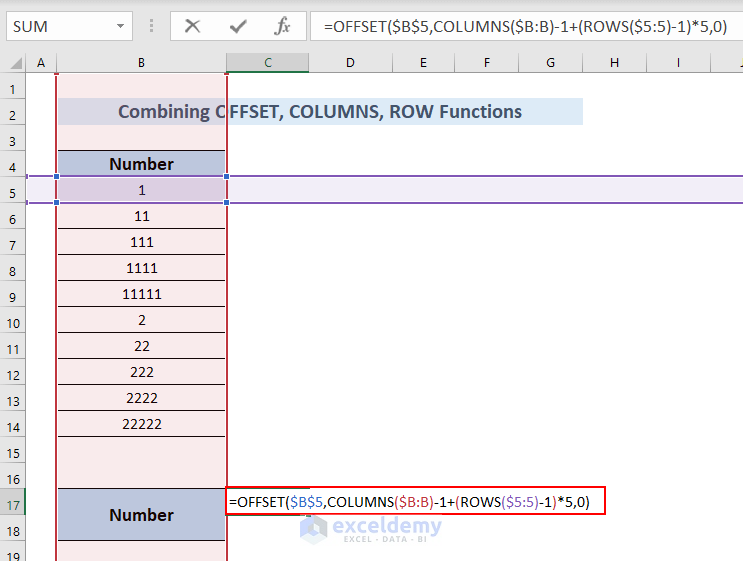
Formula Breakdown
- The OFFSET function gives out a reference to a range which is a particular number of rows and columns from a cell or a number of cells.
- The COLUMNS function gives out the number of columns in a range.
- The ROWS function finds the number of rows in a range.
- OFFSET($B$5,COLUMNS($B:B)-1+(ROWS($5:5)-1)*5,0) → becomes
- Output: 1
- Press ENTER.
- You can see the result in cell C17.
- Drag the formula horizontally up to cell G17 using the Fill Handle tool.

- You can see one transposed row.
- Drag down the formula of cell C17 to cell C18 using the Fill Handle tool.
- This will give us another transposed row.
![]()
- You can see a value in cell C18.
- Drag the formula horizontally till cell G18.
![]()
- You can see two transposed rows.
![]()
Read More: How to Transpose Formulas Without Changing References in Excel
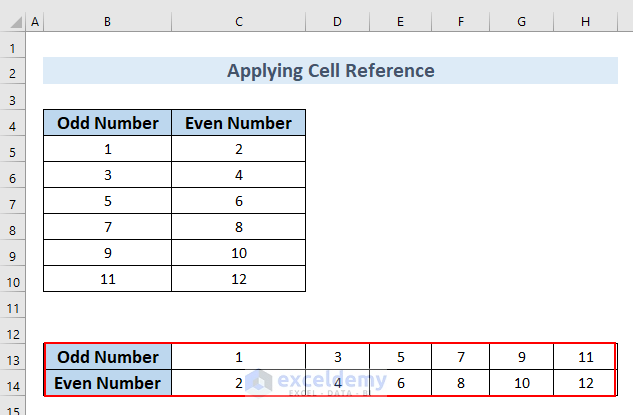
Method 4 – Applying Cell Reference to Transpose Columns to Rows in Excel
Steps:
- Enter saB5 in cell C13.
- We included sa with the cell reference, you can enter according to your reference.
- Drag the value horizontally up to cell H13 with a Fill Handle tool.
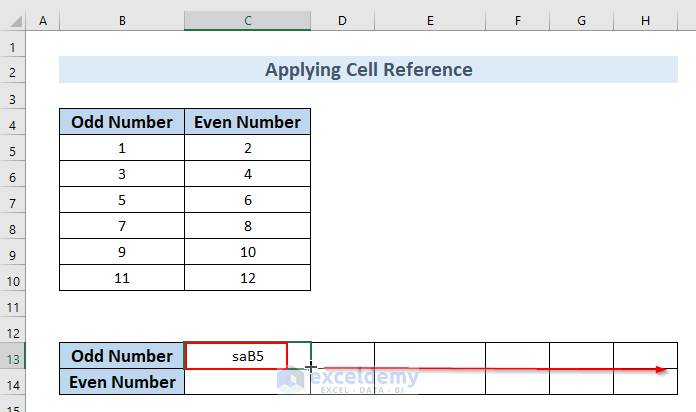
- You can see the Odd Number.
- Enter saC5 in cell C14.
- Drag the formula horizontally with a Fill Handle tool.
![]()
- You can see two rows.
![]()
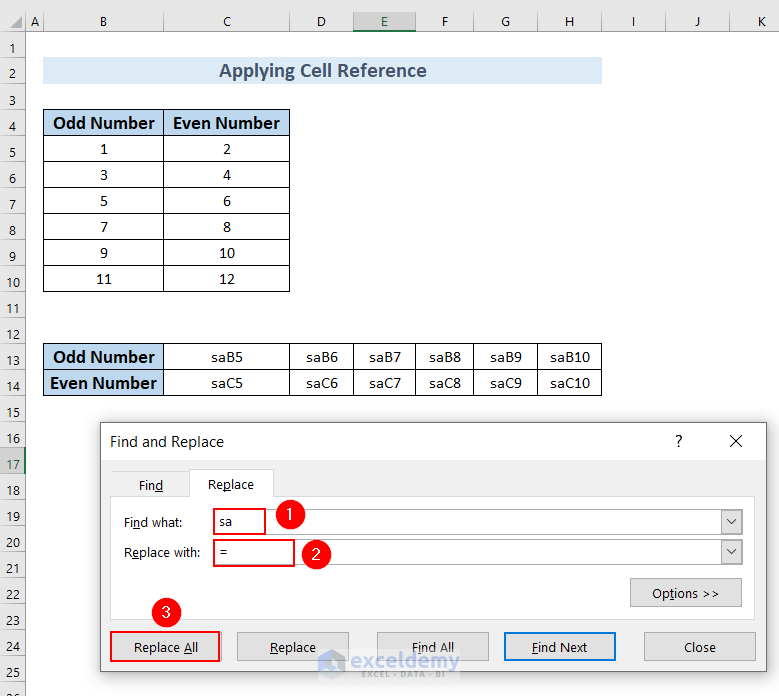
- Replace sa with “=” so that the cells extract the value from the columns.
- Go to the Home tab >> go to Editing.
- From Find & Select >> select Replace.
![]()
- A Find and Replace dialog box will appear.
- In the Find what box, type sa.
- In the Replace with box, insert =.
- Click on Replace All.
- A confirmation dialog box will pop up.
- Click OK.
![]()
- Close the Find and Replace dialog box.
- You can see that rows now have the values of the columns.
- You can transpose columns to rows.
Read More: How to Transpose Rows to Columns Based on Criteria in Excel
Method 5 – Merging INDIRECT and COLUMN Functions to Transpose Columns to Rows in Excel
Steps:
- Enter the following formula in cell F4.
=INDIRECT("b"&COLUMN()-1)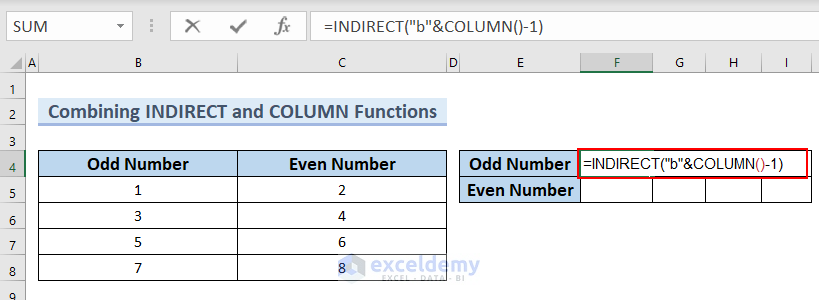
Formula Breakdown
- The INDIRECT function finds the reference to a particular text string.
- The COLUMN function finds the column number of a particular cell reference.
- INDIRECT(“b”&COLUMN()-1) →becomes
- Output: 1
- Press ENTER.
- You can see the result in cell F4.
- Drag the formula horizontally up to cell I4 with the Fill Handle tool.
![]()
- You can see the complete Odd Number row.
![]()
- Enter the following formula in cell F5.
=INDIRECT("c"&COLUMN()-1)![]()
- Press ENTER.
- You can see the result in cell F5.
- Drag the formula horizontally up to cell I5 with the Fill Handle tool.
![]()
- You can see the transposed rows.
![]()
Read More: How to Reverse Transpose in Excel
Method 6 – Combining INDEX and COLUMN Functions to Transpose Columns to Rows in Excel
Steps:
- Enter the following formula in cell F4.
=INDEX($B$4:$C$8, COLUMN()-4,1) 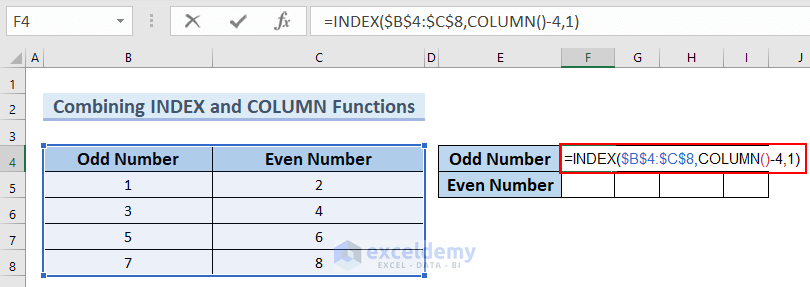
Formula Breakdown
- The INDEX function finds a value with a table or range.
- The COLUMN function finds the column number of a particular cell reference.
- INDEX($B$4:$C$8,COLUMN()-4,1) → becomes
- Output:1
- Press ENTER.
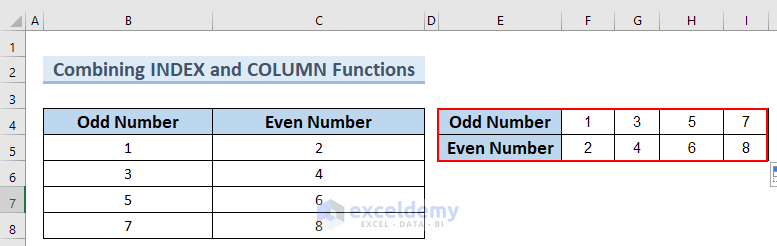
- You can see the result in cell F4.
- Drag the formula horizontally up to cell I4 with the Fill Handle tool.
![]()
- You can see the complete Odd Number row.
- Enter the following formula in cell F5.
=INDEX($B$4:$C$8,COLUMN()-4,1)![]()
- Press ENTER.
- You can see the result in cell F5.
- Drag the formula horizontally up to cell I5 with the Fill Handle tool.
![]()
- You can see two transposed rows.
Method 7 – Use of Power Query to Transpose Columns to Rows in Excel
Steps:
- Select the entire dataset by selecting cells B4:C11.
- Go to the Data tab >> select From Table/Range.
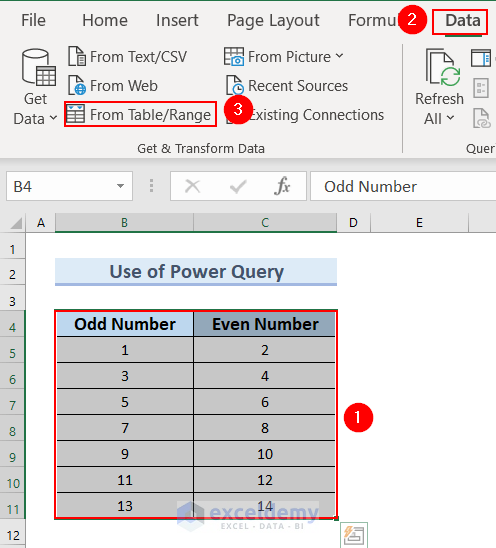
- A Create Table dialog box will appear.
- Mark My table has headers.
- Click OK.
![]()
- You can see the created Power Query of the dataset.
- Go to the Transform tab >> select Transpose.
![]()
- You can see the transposed rows in the Power Query.
![]()
We now have to move the transposed dataset to our Worksheet.
- Go to the Home tab.
- From the Close & Load group >> select Close & Load To.
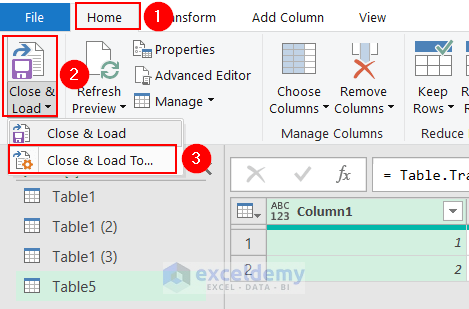
- An Import Data dialog box will pop up.
- We want to import data in the existing worksheet, therefore, we select Existing Worksheet.
- Select cell B14 for the location.
- Click OK.
![]()
- You can see the transposed rows in the existing worksheet.
![]()
Read More: Convert Columns to Rows in Excel Using Power Query
Method 8 – Inserting VBA Macro to Transpose Columns to Rows in Excel
Steps:
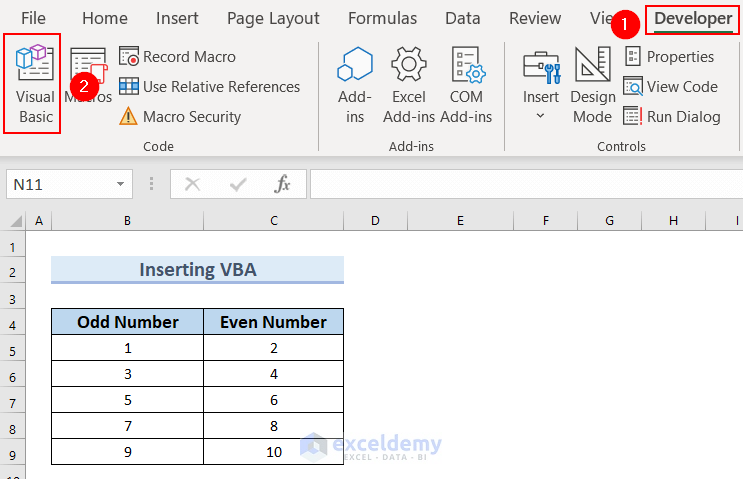
- Go to the Developer tab >> select Visual Basic.
- This will bring out a VBA Editor window. (You can also press ALT+F11 to open the VBA Editor window)
- In the VBA Editor window, from the Insert tab >> select Module.
![]()
- Enter the following code in the Module.
Sub Transpose_Columns_to_Rows()
Dim work_range As Range
Dim target_range As Range
Set work_range = Application.InputBox _
(Prompt:="Select the columns", Type:=8)
Set target_range = Application.InputBox _
(Prompt:="Select location cell", Type:=8)
work_range.Copy
target_range.Select
Selection.PasteSpecial Paste:=xlPasteAll, Operation:=xlNone, _
SkipBlanks:=False, Transpose:=True
Application.CutCopyMode = False
End Sub![]()
- Save the Code.
- Return to the Worksheet, go to the Developer tab >> select Macro.
![]()
- Select the Sub-procedure of the code >> click on Run.
![]()
- An Input window will appear.
- Select columns B4:B9 in the Select the column box >> click OK.
![]()
- Another Input window will appear.
- Select cell B12 in the Select the location box >> click OK.
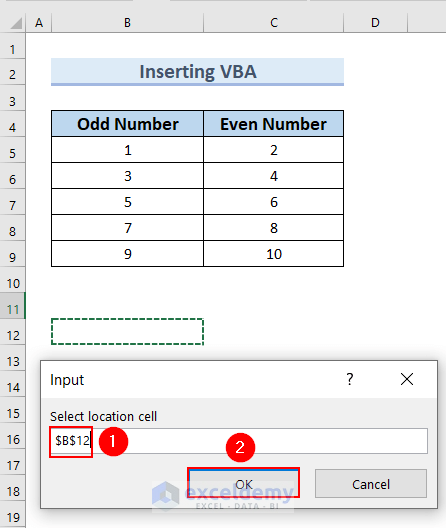
- You can see a transposed row in cell B12:G12.
![]()
- Run the code for the Even Number column.
- You can see two transposed rows.
![]()
Read More: VBA to Transpose Multiple Columns into Rows in Excel
Download Practice Workbook
Related Articles
- How to Swap Rows in Excel
- Excel VBA to Transpose Array
- How to Paste Transpose in Excel Using Shortcut
- Conditional Transpose in Excel
- How to Transpose Rows to Columns Using Excel VBA
- How to Convert Column to Comma Separated List With Single Quotes

