Dataset Overview
To illustrate the process of transposing rows to columns in Excel using VBA, we’ll work with a dataset representing the marks obtained by 5 students out of 100 in 3 subjects.
![]()
Example 1 – Using the VBA Transpose Function
- Open the VBA window by pressing Alt + F11.
- Insert a new module (Insert ➨ Module).

- Enter the following code to the module:
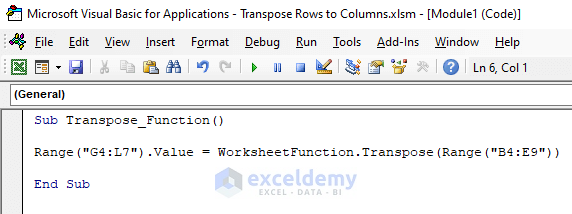
Sub Transpose_Function()
Range("G4:L7").Value = WorksheetFunction.Transpose(Range("B4:E9"))
End Sub- Return to the sheet.
- Go to Developer and select Macros.
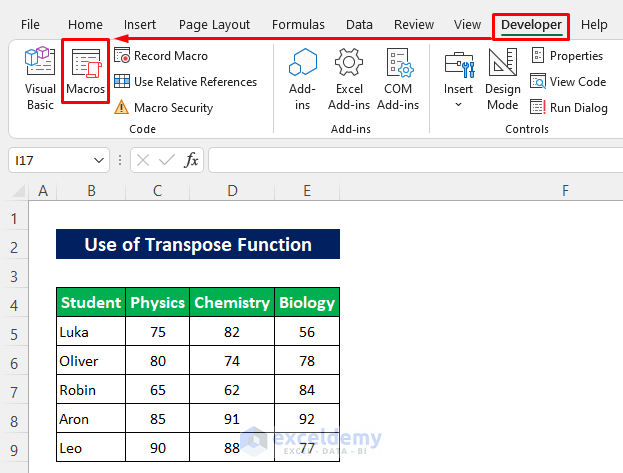
- Select the specified macro name and click Run.
![]()
The transposed data will appear in the destination range G4:L7. Note that this macro does not retain formatting.
![]()
Example 2 – Using the VBA PasteSpecial
- Follow the first two steps from Example 1 to open the VBA window and insert a new module.
- Add the following code:
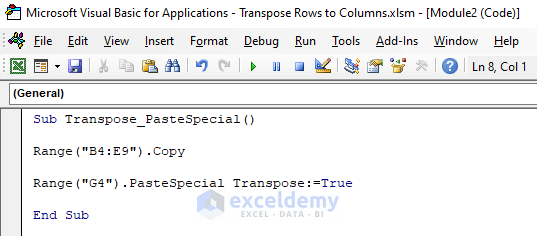
Sub Transpose_PasteSpecial()
Range("B4:E9").Copy
Range("G4").PasteSpecial Transpose:=True
End Sub- Return to your sheet.
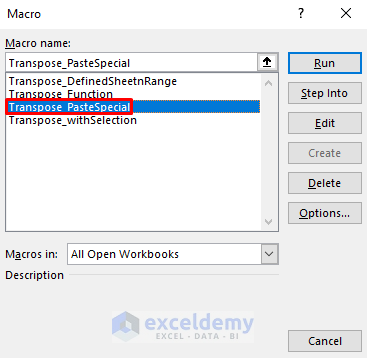
- Open the Macros dialog box (as in Example 1) and run the macro.
The output will include formats in the destination range.
![]()
Read More: How to Transpose in Excel VBA
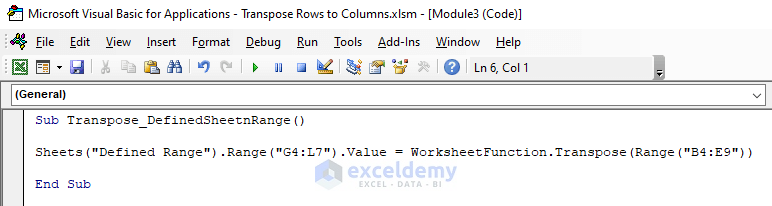
Example 3 – Transposing Rows to Columns with Defined Sheet and Range
- Follow the steps from Example 1 to open the VBA window and insert a new module.
- Insert the following code:
Sub Transpose_DefinedSheetnRange()
Sheets("Defined Range").Range("G4:L7").Value = WorksheetFunction.Transpose(Range("B4:E9"))
End Sub- Return to your sheet.
- Open the Macros dialog box and run the macro.

The data will be transposed, but formatting won’t be preserved.
![]()
Read More: VBA to Transpose Multiple Columns into Rows in Excel
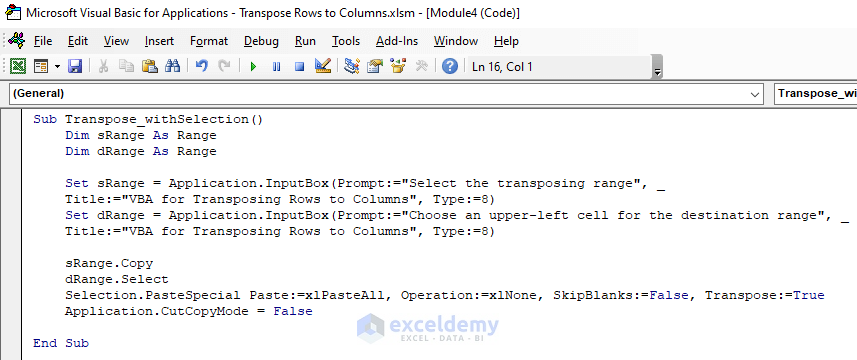
Example 4 – Transposing Rows to Columns with User Selection
- Open the VBA window and insert a new module (as in Example 1).
- Enter the following code:
Sub Transpose_withSelection()
Dim sRange As Range
Dim dRange As Range
Set sRange = Application.InputBox(Prompt:="Select the transposing range", _
Title:="VBA for Transposing Rows to Columns", Type:=8)
Set dRange = Application.InputBox(Prompt:="Choose an upper-left cell for the destination range", _
Title:="VBA for Transposing Rows to Columns", Type:=8)
sRange.Copy
dRange.Select
Selection.PasteSpecial Paste:=xlPasteAll, Operation:=xlNone, SkipBlanks:=False, Transpose:=True
Application.CutCopyMode = False
End Sub- Return to the sheet.
Code Breakdown
- We created a Sub procedure Transpose_withSelection.
- Defined two variables- sRange and dRange as Range.
- We used InputBox to set the operation name for the input box.
- And used Title to define the title for the input boxes.
- Applied PasteSpecial to paste the selected data in transposed form.
- Run the macro from the Macros dialog box.

- You’ll be prompted to select the source range.
- Press OK.
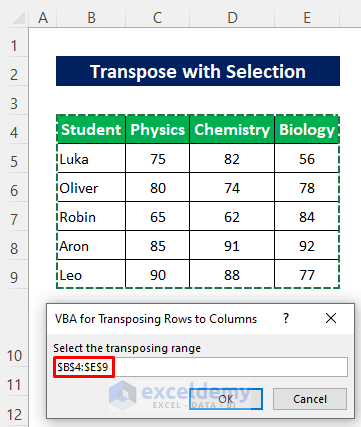
- Another Input box will request the cell from where the output should start.
- Select the cell and press OK.
![]()
The transposed data will reflect, including the formats as shown in the image below.
![]()
Read More: VBA to Transpose Array in Excel
Download Practice Workbook
You can download the practice workbook from here:
Related Articles
- How to Transpose Every n Rows to Columns in Excel
- Convert Columns to Rows in Excel Using Power Query
- How to Convert Columns to Rows in Excel Based On Cell Value
- How to Convert Column to Comma Separated List With Single Quotes
- Conditional Transpose in Excel
- How to Transpose Columns to Rows In Excel
- How to Transpose in Excel

