One of the most important and widely used activities that we have to accomplish while working in Excel is to transpose a data set. Today I’ll show you how you can transpose both one-dimensional and multi-dimensional arrays in Excel using VBA.
3 Handy Approaches to Transpose in Excel VBA
Here we’ve got a data set with the Names of some products and their Sales in three years of a company called Rainbow Group.
Today our objective is to transpose this data set using VBA in Excel.
Method 1: Applying VBA to Transpose One Dimensional Array in Excel
First of all, we’ll try to transpose a one-dimensional array through VBA. VBA is a programming language that may be used for a variety of tasks, and different types of users can use it for those tasks. Using the Alt + F11 keyboard shortcut, you can launch the VBA editor. In the last section, we will generate VBA code that makes it very easy to fill down to the last row with data Excel.
Steps:
- Firstly, we will open the Developer tab.
- Then, we will select the Visual Basic command.
- Here, the Visual Basic window will open.
- After that, from the Insert option, we will choose the new Module to write the VBA code.
![]()
- Therefore, a new module window called “Module 1” will open.
- Besides, insert and save the following VBA code in the module.
Sub Transpose()
Dim Destination As String
Destination = InputBox("Enter the Range Where You Want to Keep the Transposed Array: ")
Range(Destination).Value = WorksheetFunction.Transpose(Range(Selection.Address))
End Sub
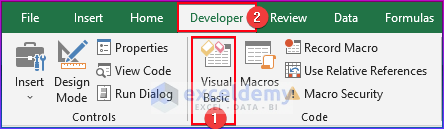
- Then, Return to your workbook and select the one-dimensional array that you want to transpose.
- Here I am selecting the Product Name column.
![]()
- Afterward, press ALT+F8 on your keyboard.
- Now, a dialogue box called Macro will open. Select Transpose and click on Run.
![]()
- You will get an input box that will ask you to enter the cell reference of the range where you want to keep the transposed array.
- Enter the cell reference of the range where you want to keep the transposed array. Here I have entered H4:R4.
- Then click OK.
![]()
- Finally, You will get the transpose of your selected array in your selected destination.
Read More: Excel VBA to Transpose Array
Method 2: Using VBA to Transpose Multi-Dimensional Array in Excel
The VBA code described above works for multi-dimensional arrays too.
Therefore, instead of transposing a single column, you can transpose the whole data set using this code.
Steps:
- Firstly, insert and save the following VBA Macro in module 1.
Sub Transpose()
Dim Destination As String
Destination = InputBox("Enter the Range Where You Want to Keep the Transposed Array: ")
Range(Destination).Value = WorksheetFunction.Transpose(Range(Selection.Address))
End Sub
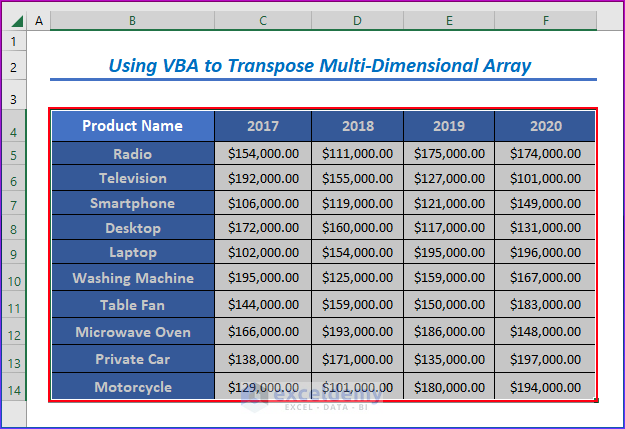
- Then select the whole data set instead of a single column.
- Afterward, press ALT+F8 on your keyboard.
- Now, a dialogue box called Macro will open. Select Transpose and click on Run.
![]()
- This time I have entered range H4:R8 to keep the transposed range.
- Then click OK.
![]()
- Finally, you will find your whole data set being transposed in your destination cell range.
Read More: How to Perform Conditional Transpose in Excel
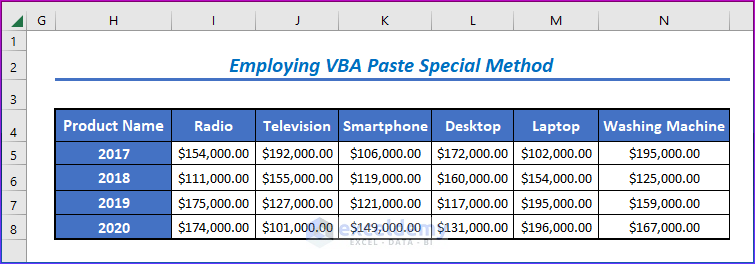
Method 3: Employing VBA Paste Special Method to Transpose with Keeping the Format Intact
The VBA code described above does transpose the whole data set, but it doesn’t copy the format along with it.
That means, it just copies the values but doesn’t copy the design and other formats that we applied to our main data set for the purpose of beautification.
But you can use a slightly changed VBA code to transpose your data set along with keeping the format intact.
Steps:
- Firstly, insert and save the following VBA Macro into module 2.
Sub Transpose_Paste_Value()
Dim sourceRng As Excel.Range
Dim taretRng As Excel.Range
Set sourceRng = Range(Selection.Address)
Set targetRng = Range(InputBox("Enter the Range Where You Want to Keep the Transposed Array: "))
sourceRng.Copy
targetRng.PasteSpecial Operation:=xlNone, SkipBlanks:=False, Transpose:=True
End Sub
- Then, Return to your workbook and select the entire data set.
![]()
- Afterward, press ALT+F8 on your keyboard.
- Now, a dialogue box called Macro will open. Select Transpose_Paste_Value and click on Run.
![]()
- After that, you will get an input box that will ask you to enter the cell reference of the range where you want to keep the transposed array.
- Besides, enter the cell reference of the range where you want to keep the transposed array. Here I have entered H4:R8.
- Then, click OK.
![]()
- Therefore, the transposed array of your data set will be created in your selected range, carrying the format from the original data set.
Read More: How to Paste Transpose in Excel Using Shortcut
Download Practice Workbook
You may download the following Excel workbook for better understanding and practice it by yourself.
Using these methods, you can transpose a data set of any dimension in your workbook taking the help of Excel VBA. Do you know any other method? Or do you have any questions? Feel free to ask us.
Conclusion
Related Articles
Get FREE Advanced Excel Exercises with Solutions!


Dear Sir or Madam,
I appreciate your help / website in learning how to use Excel VBA.
Today I used your Code https://www.exceldemy.com/excel-vba-insert-rows-based-on-cell-value/.
But I would need help in how to accomplish my task if you have some time for advice.
I can’t send you my Excel in your “Leave a Reply”, so it might be not easy to understand what I am asking but I will try.
My result of multiplying needed columns is completely down (Additionally I made formula in my table to copy the same data of first raw into all of the rest of multiplied rows).
But do you think I can make a VBA Sub/Function which would fill all the numbers (columns 5-9) into only one column below each other to the respective person? I am the beginner with VBA so at the moment I do not have an idea how to do it. If there is a way how to do it directly in Excel table it is also possible. I have an idea but it seems to me too complicated with a large set of data (copying all numbers to additional columns always one row lower and then making only one column at the end which would join them by concatenate function).
I mean that the result should be like this:
5 columns:
1 Miriam Pekníková UKOLFKN 59718
1 Miriam Pekníková UKOLFKN 348197
1 Miriam Pekníková UKOLFKN 71891
1 Miriam Pekníková UKOLFKN 111479
1 Miriam Pekníková UKOLFKN 112065
2 Ana Kánová UKOSSK 59716
2 Ana Kánová UKOSSK 348197
3 Jana Melounová UKOCHK 59715
3 Jana Melounová UKOCHK 349197
3 Jana Melounová UKOCHK 71891
3 Jana Melounová UKOCHK 111479
… and so on further.
Original table has 9 columns:
1 Miriam Pekníková UKOLFKN 59718 348197 71891 111479 112065
1 Miriam Pekníková UKOLFKN
1 Miriam Pekníková UKOLFKN
1 Miriam Pekníková UKOLFKN
1 Miriam Pekníková UKOLFKN
1 Miriam Pekníková UKOLFKN
2 Ana Kánová UKOSSK 59716 348197
2 Ana Kánová UKOSSK
2 Ana Kánová UKOSSK
3 Jana Melounová UKOCHK 59715 349197 71891 111479
3 Jana Melounová UKOCHK
3 Jana Melounová UKOCHK
3 Jana Melounová UKOCHK
3 Jana Melounová UKOCHK
4 Petr Heler UKOFFLL 59714 379197 71891 159479
4 Petr Heler UKOFFLL
4 Petr Heler UKOFFLL
4 Petr Heler UKOFFLL
4 Petr Heler UKOFFLL
I looked at this but I do not know if it can help me (https://www.exceldemy.com/excel-transpose-multiple-rows-in-group-to-columns/). Do you have some other link which would be more related to my problem?
Thank you very much
Veronika
Completely original table was like this:
1 Miriam Pekníková UKOLFKN 59718 348197 71891 111479 112065
2 Ana Kánová UKOSSK 59716 348197
3 Jana Melounová UKOCHK 59715 349197 71891 111479 112010
4 Petr Heler UKOFFLL 59714 379197 71891 159479 896010
5 Helena Bylinková UKOOO 59713 378197 71891 111779
6 Silva Horáková UKOIMU 59712 349197 71991 159479 112010
7 David Mokrý UKOZEK 59711 348197 71891
8 Roderik Tekla UKODDDD 59710 348197 71991 111479 112065
9 Tereza Sivá UKOMMM 59722
Hi Veronika, if your problem isn’t solved yet, you can send the file to my mail or can send an image of your file. I’ll try.