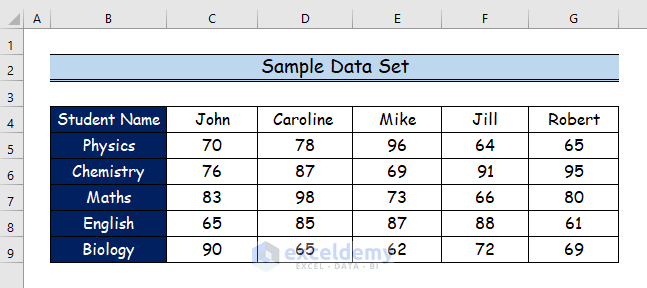
Below, we have a sample dataset for these methods.
Method 1 – Using Paste Special Command to Move Data from Row to Column in Excel
Steps:
- Select the data table below.
- Copy the selected table by clicking CTRL+C.
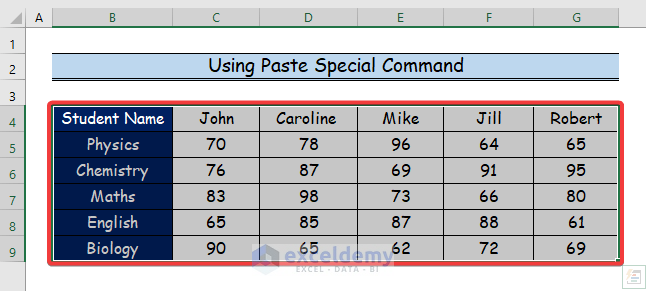
- Select the new cell where you want to copy your transpose data.
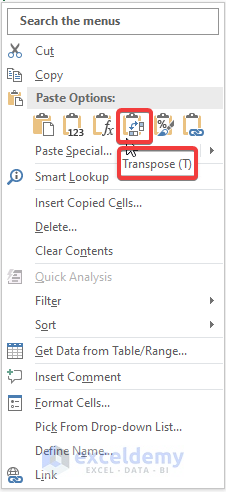
- Choose the Transpose icon.
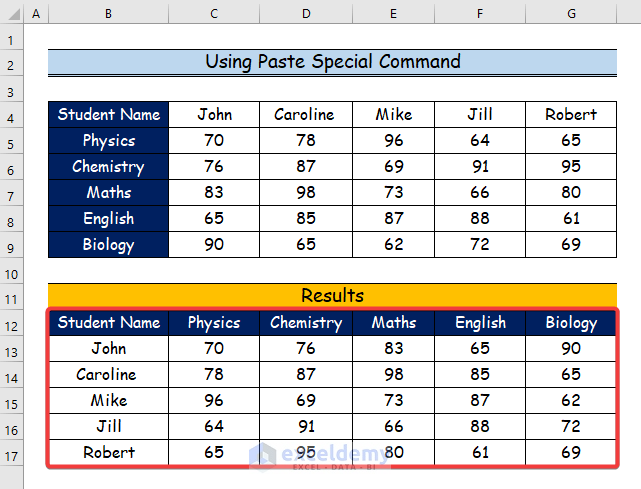
- The graphic below will convey the results of transferring the data from row to column.
Method 2 – Utilizing the TRANSPOSE Function to Move Data from Row to Column
Steps:
- Select the same number of blank cells but in the reverse direction, as your main table has rows and columns.
- Enter the following formula in the upper left empty cell:
=TRANSPOSE(B4:G9)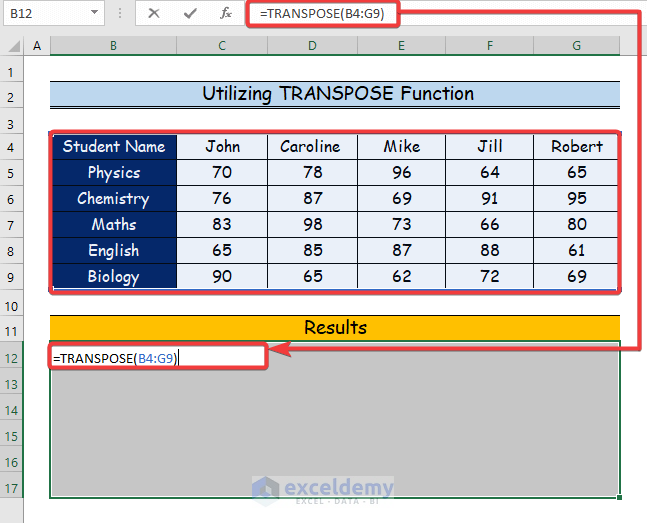
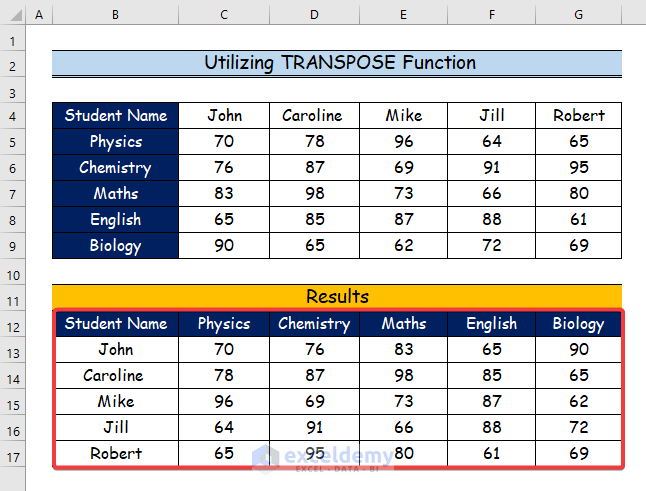
The graphic below will display the results of transferring the data from row to column.
Read More: How to Flip Data from Horizontal to Vertical in Excel
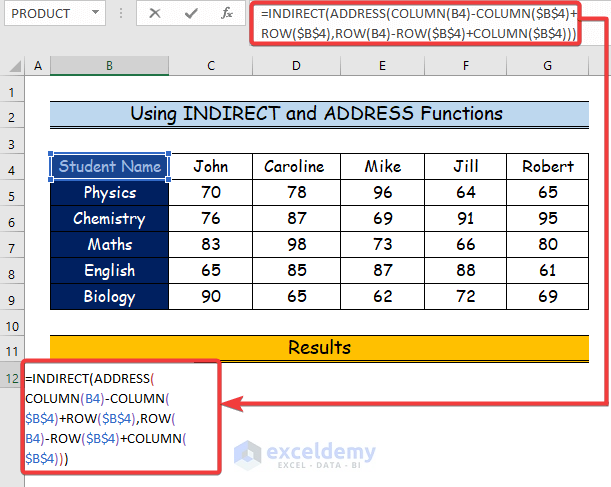
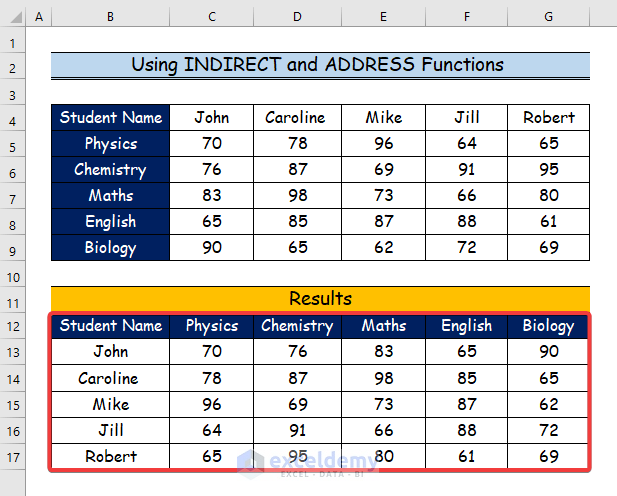
Method 3 – Using INDIRECT and ADDRESS Functions to Move Data from Row to Column
Formula Syntax of the INDIRECT Function
=INDIRECT(ref_text,[a1])Arguments of the INDIRECT Function
- Ref_text represents a reference cited in the text.
- A1 represents a logical value designating either the A1 or the R1C1 reference style Rows are labelled numerically in A1 format, and columns are labelled alphabetically. Both the rows and the columns are given number labels in the R1C1 reference style (Optional).
Formula Syntax of the ADDRESS Function
=ADDRESS(row_num,col_num,[abs_num],[a1],[sheet])Arguments of the ADDRESS Function
- Row_num is a number that indicates the row to use as the cell reference.
- Column_num is a numeric value that indicates the column to use as the cell reference.
- Abs_num indicates the kind of reference to return as a numeric value (Optional).
- A1 represents a logical value designating either the A1 or the R1C1 reference style Rows are labelled numerically in A1 format, and columns are labelled alphabetically. Both the rows and the columns are given number labels in the R1C1 reference style ( Optional).
- Sheet as a text value that displays the name of the worksheet (Optional).
Steps:
- If the first row and column of your data are not 1 and A, you must apply a more complicated formula.
- Enter the following formula:
=INDIRECT(ADDRESS(COLUMN(B4)-COLUMN($B$4)+ROW($B$4),ROW(B4)-ROW($B$4)+COLUMN($B$4)))where B4 is the cell at the top left in our original data table.
Formula Breakdown
- Firstly, we use three more functions here, including ADDRESS, COLUMN, and ROW.
- Now, the row and column numbers we specify are used by the ADDRESS function to determine the cell address.
- So, we input the coordinates in the inverse order to our formula.
- However, this portion of the function (ADDRESS(COLUMN(B4)-COLUMN($B$4)+ROW($B$4),ROW(B4)-ROW($B$4)+COLUMN($B$4))) turns the rows to columns.
- The rotated data is finally output via the INDIRECT function.
- Press ENTER.
- Drag the cursor in the lower right corner of the chosen cells to copy the formula upward and downward to as many rows and columns as necessary.
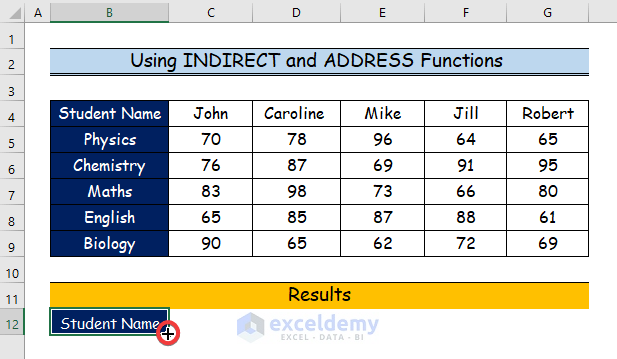
- The outcomes of moving the data from row to column are in the graphic below.
Read More: How to Convert Multiple Rows to Columns in Excel
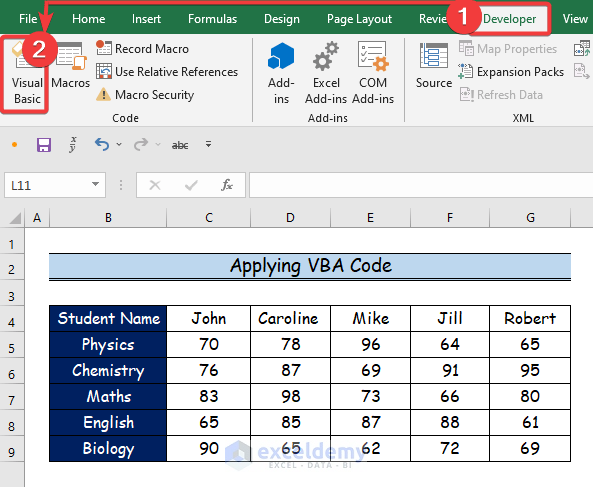
Method 4 – Applying VBA Code to Move Data from Row to Column in Excel
Steps:
- Open the Developer tab.
- Select the Visual Basic command.
- The Visual Basic window will open.
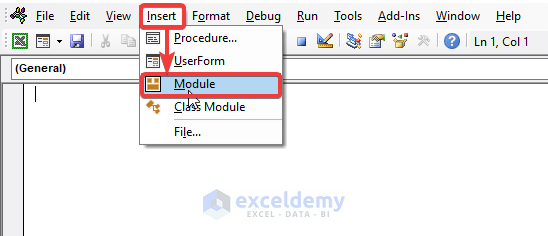
- From the Insert option, choose the new Module to write a VBA code.
- Enter the following VBA code into the Module:
- Click the “Run” button or press F5.
Sub MoveData_From_RowToColumn()
'Declaring variables
    Dim DataRange As Range
    Dim SelectRange As Range
'Setting the Data Range
    Set DataRange = Application.InputBox(Prompt:="Choose the range to transpose", Title:="Transpose Rows to Columns", Type:=8)
'Setting the cell where we will put our transposed data
    Set SelectRange = Application.InputBox(Prompt:="Choose the upper left cell of the selected range", Title:="Transpose Rows to Columns", Type:=8)
'Copying the Data Range
    DataRange.Copy
'Select the cell
    SelectRange.Select
'Paste the Data in selected cell
    Selection.PasteSpecial Paste:=xlPasteAll, Operation:=xlNone, SkipBlanks:=False, Transpose:=True
    Application.CutCopyMode = False
End Sub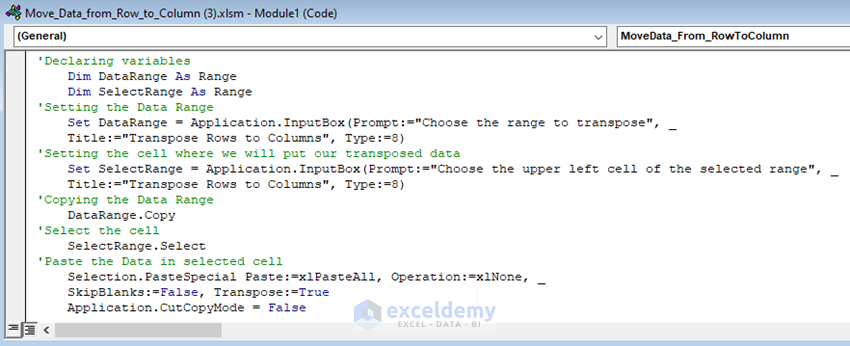
VBA Code Breakdown
- Firstly, we specify a name for the subject as
MoveData_From_RowToColumn()- Secondly, we declare the variables as
    Dim DataRange As Range
Dim SelectRange As Range- Now, we set the data range as
   Set DataRange = Application.InputBox(Prompt:="Choose the range to transpose", _
Title:="Transpose Rows to Columns", Type:=8)- Now, we set the cell where we would like to put our transposed data as
Set SelectRange = Application.InputBox(Prompt:="Choose the upper left cell of the selected range", _
Title:="Transpose Rows to Columns", Type:=8)- Besides, we will copy the data range as
DataRange.Copy- Besides, we will select the data range as
SelectRange.Select- Finally, we paste the data into the selected cell as
Selection.PasteSpecial Paste:=xlPasteAll, Operation:=xlNone, _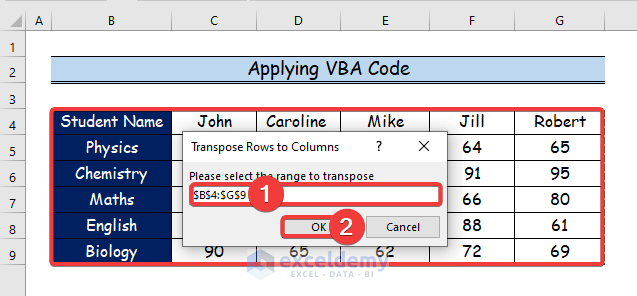
SkipBlanks:=False, Transpose:=True- Select the data range from B4 to G9 first.
- Click OK.
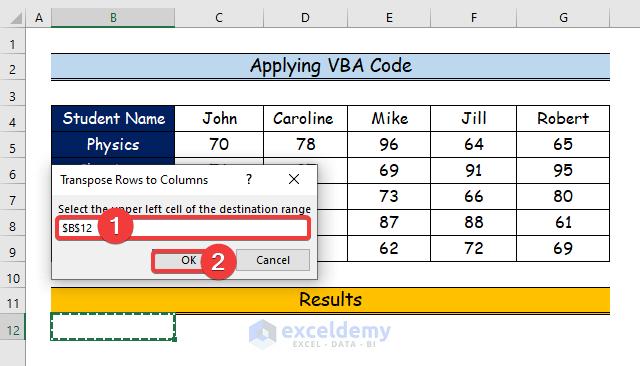
- Select the upper cell of the destination range where you want to transpose your data.
- Click OK.
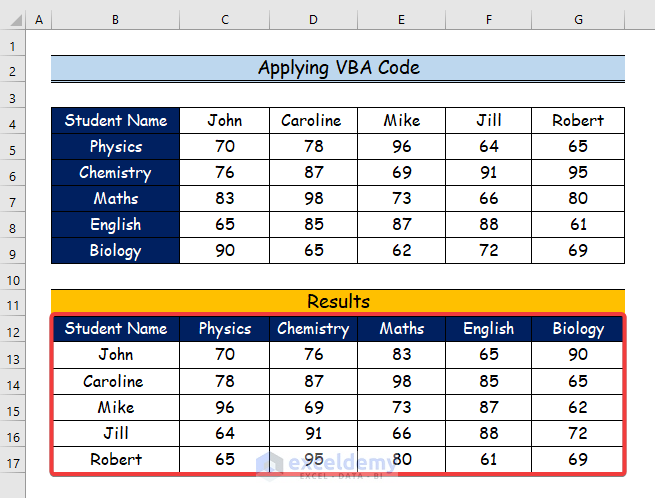
- We will get the results of transposed data from row to column, as in the below image.
Download the Practice Workbook
Download the following Excel workbook to practice.
Related Articles
- Excel VBA to Transpose Array
- How to Transpose Multiple Columns to Rows in Excel
- VBA to Transpose Multiple Columns into Rows in Excel
- How to Change Vertical Column to Horizontal in Excel
- How to Paste Link and Transpose in Excel
<< Go Back to Transpose Data in Excel | Learn Excel
Get FREE Advanced Excel Exercises with Solutions!
