The generic syntax of transposing an Array with VBA is:
WorksheetFunction.Transpose(Arg1)Arg1 = It is a required argument which is a range of cells that will be transposed.
Example 1 – VBA to Transpose a One-Dimensional Array in Excel
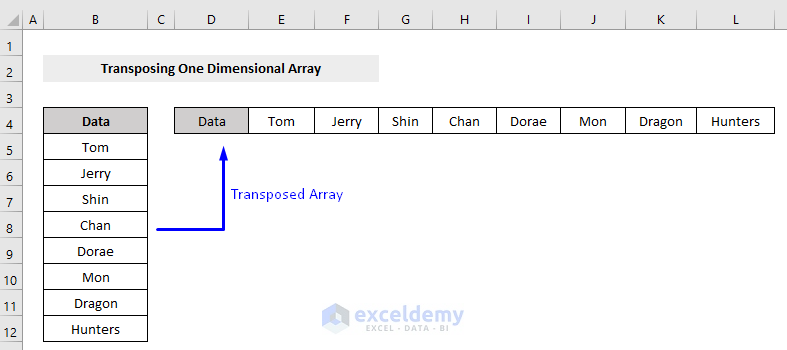
Consider the following dataset of a one-dimensional array which we will be using as our example of transposing.
![]()
Steps:
- Press Alt + F11 on your keyboard or go to Developer and select Visual Basic to open Visual Basic Editor.
![]()
- In the pop-up code window, from the menu bar, click Insert and select Module.
![]()
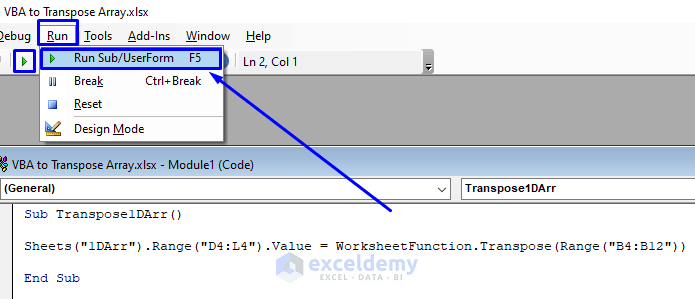
- Copy the following code and paste it into the code window.
Sub Transpose1DArr()
Sheets("1DArr").Range("D4:L4").Value = WorksheetFunction.Transpose(Range("B4:B12"))
End Sub- Press F5 on your keyboard or select Run and Run Sub/UserForm. You can also just click on the small play icon in the sub-menu bar to run the macro.
Here’s the result.
Code Breakdown:
- Sub Transpose1DArr() -> Initiating a Sub Procedure named Transpose1DArr
- Sheets(“1DArr”).Range(“D4:L4”).Value = WorksheetFunction.Transpose(Range(“B4:B12”))
-
- Sheets(“1DArr”).Range(“D4:L4”).Value -> The Range.Value function is for storing value. We stored the range of our array in the sheet named “1DArr”, in the cell range of “D4:L4”.
- Transpose(Range(“B4:B12”)) -> The generic VBA syntax of transposing array under the WorksheetFunction object, here we set the range of the array (“B4:B12“) as the argument that we want to transpose.
-
- End Sub -> Ending the procedure
Read More: VBA to Transpose Multiple Columns into Rows in Excel
Example 2 – VBA to Transpose a Two-Dimensional Array in Excel
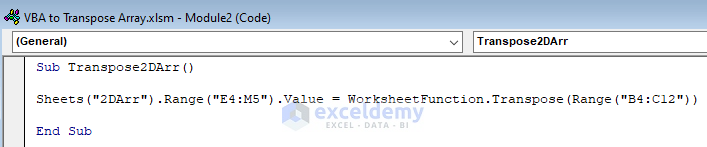
Here’s a dataset of a two-dimensional array.
![]()
Steps:
- Open the Visual Basic Editor from the Developer tab and insert a module in the code window.
- Copy the following code and paste it into the module.
Sub Transpose2DArr()
Sheets("2DArr").Range("E4:M5").Value = WorksheetFunction.Transpose(Range("B4:C12"))
End Sub
Your code is now ready to run.
- Run the code and go back to the worksheet.

Code Breakdown:
- Sub Transpose2DArr() -> Initiating a Sub Procedure named Transpose2DArr
- Sheets(“2DArr”).Range(“E4:M5”).Value = WorksheetFunction.Transpose(Range(“B4:C12”))
-
- Sheets(“2DArr”).Range(“E4:M5”).Value -> The Range.Value function is for storing value. We stored the range of our array in the sheet named “2DArr”, in the cell range of “E4:M5”.
- Transpose(Range(“B4:C12”)) -> The generic VBA syntax of transposing array under the WorksheetFunction object, here we set the range of the array (“B4:C12“) as the argument that we want to transpose.
-
- End Sub -> Ending the procedure
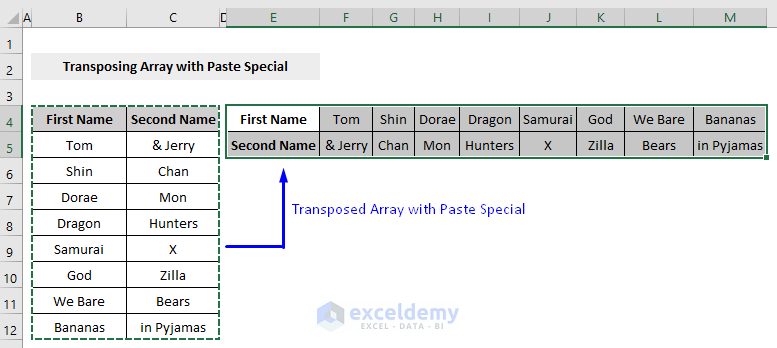
Example 2 – VBA to Transpose Array with the Paste Special Method in Excel
We’ll consider the same data as we have used in the previous example.
![]()
Steps:
- Open the Visual Basic Editor from the Developer tab and insert a module in the code window.
- Copy the following code and paste it into the module.
Sub TransposeArrPasteSpecial()
Dim InputArr As Excel.Range
Dim ResultArr As Excel.Range
Set InputArr = Sheets("PasteSpecialArr").Range("B4:C12")
Set ResultArr = Sheets("PasteSpecialArr").Range("E4:M5")
InputArr.Copy
ResultArr.PasteSpecial Paste:=xlPasteValues, Operation:=xlNone, SkipBlanks:=False, Transpose:=True
End Sub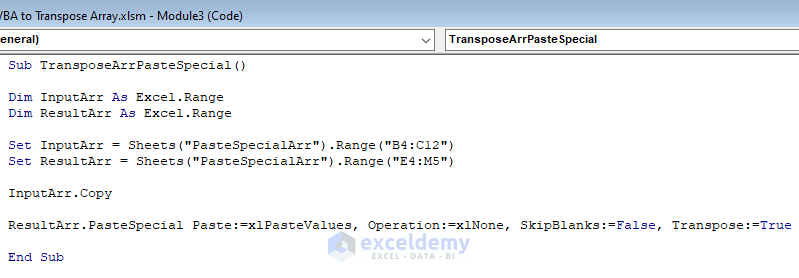
- Run the code and go back to the worksheet.
Code Breakdown:
- Sub TransposeArrPasteSpecial() -> Initiating a Sub Procedure named TransposeArrPasteSpecial
- Dim InputArr As Excel.Range -> Defining a new variable InputArr to store the input data array.
- Dim ResultArr As Excel.Range -> Defining a new variable ResultArr to hold the result array range.
-
- The type of these variables is defined as Range, because we wanted to transpose the data which is an array range.
-
- Set InputArr = Sheets(“PasteSpecialArr”).Range(“B4:C12”) -> Setting the input array range “B4:C12” from the sheet “PasteSpecialArr” in our defined input array variable (InputArr) using Range function.
- Set ResultArr = Sheets(“PasteSpecialArr”).Range(“E4:M5”) -> Setting the target array range “E4:M5” (where we will store our transposed array) in our defined result array variable (ResultArr) using Range function.
- InputArr.Copy -> Using the command Copy to copy the input array range from the worksheet.
- PasteSpecial Paste:=xlPasteValues, Operation:=xlNone, SkipBlanks:=False, Transpose:=True -> Using the PasteSpecial function on the result variable ResultArr to save the transposed values in the target range (E4:M5) in the worksheet, without skipping blanks.
- End Sub -> Ending the procedure
Download the Practice Workbook
Further Readings
- How to Convert Multiple Rows to Columns in Excel
- How to Transpose Multiple Columns to Rows in Excel
- How to Flip Data from Horizontal to Vertical in Excel
- How to Paste Link and Transpose in Excel
- How to Move Data from Row to Column in Excel
- How to Change Vertical Column to Horizontal in Excel
<< Go Back to Transpose Data in Excel | Learn Excel
Get FREE Advanced Excel Exercises with Solutions!
