There are a lot of built-in tools in Excel which make our work easier and increase the work speed. If we use names, we can make your formulas much easier to understand and maintain. We can define a name for a cell range, function, constant, or table. If you get used to the practice of using names in your workbook then you can easily update and manage these names. In this article, I’ll introduce you to the Create from Selection tool of Excel to define names.
What Is Create from Selection Tool in Excel?
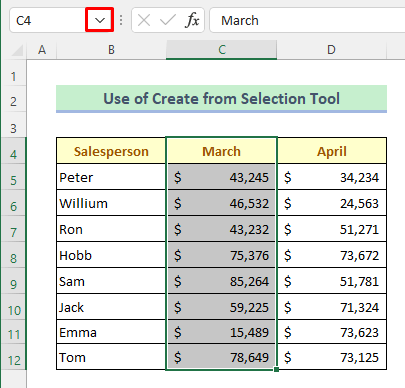
Create from Selection tool is used to define the names of a data range. We can create a name for a cell or a range of cells in Excel manually. But if our range of cells has headers then we can easily set the name using Create from Selection tool from the Formula ribbon and the defined name will be the header name. Let’s see how to do it. For that, I have made a dataset that represents some salespersons’ sales of two consecutive months.
For a column:
Step 1:
➥ Select the data range of the column including the header.
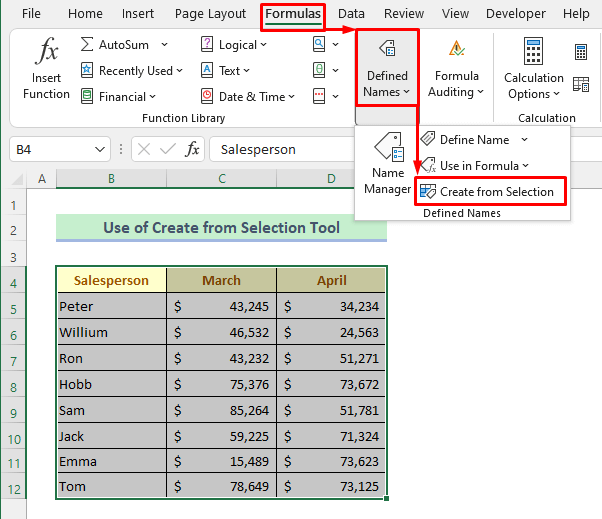
➥ Then click as follows: Formulas > Defined Names > Create from Selection

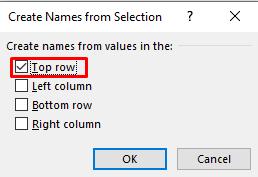
A dialog box will appear and it will tell you to select the option from where it will pick the name. Basically, Excel detects it automatically.
Step 2:
➥ Now just press OK as our header is in the top row which is marked already.
Step 3:
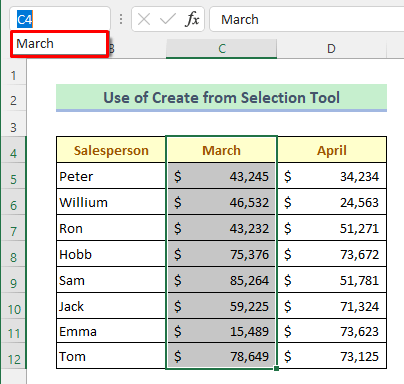
➥ Later, press the drop-down sign from the cell name box.
Take a look that it is showing the name for the column.
To do it for a row is like the same just select a row instead of selecting a column and the rest of the steps are quite the same.
For a whole dataset:
Step 1:
➥ Select the dataset B4:D12
➥ Again click: Formulas > Defined Names > Create from Selection
Step 2:
➥ Mark on the options which you want to select as names.

Step 3:
➥ Then click the drop-down icon and it will show all the defined names.

Read More: How to Name a Column in Excel
Create from Selection Tool in Excel: 2 Examples
After creating the name of a data range using Create from Selection tool we can use the defined names directly to a formula rather than using cell references which will save a lot of time.
Example 1:
In the first example, I’ll calculate the average sales of March with the AVERAGE function using the defined names created by the Create from Selection tool. The AVERAGE function is used to evaluate the average value of a data range.
Steps:
➥ By activating Cell D14 type the formula given below-
=AVERAGE(March)➥ Then hit the Enter button to get the result.
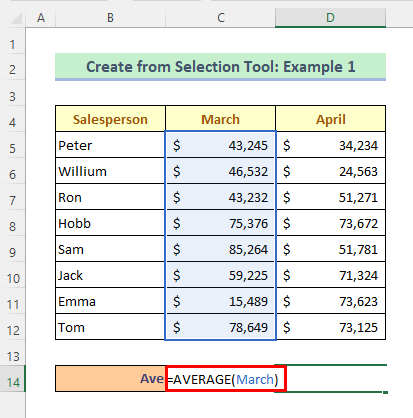
Here’s the calculated average-

Read More: Excel Reference Named Range in Another Sheet
Example 2:
Now let’s find the sum with the SUM function for Ron using the defined name. The SUM function is used to calculate the sum for a data range.
Steps:
➥ Activate Cell D14
➥ Type the formula given below-
=SUM(Ron)➥ Finally, just hit the Enter button.

Soon after you will see the sum of Rons’ total sales is calculated.

Read More: How to Use Dynamic Named Range in an Excel Chart
Download Practice Book
You can download the free Excel template from here and practice on your own.
Conclusion
I hope all of the methods described above will be good enough to use create from selection tool in Excel. Feel free to ask any question in the comment section and please give me feedback.
Related Articles
- How to Create Dynamic Named Range in Excel
- How to Use Named Range in Excel VLOOKUP Function
- Excel INDIRECT Function with Named Range
- How to Ignore Blank Cells in Named Range in Excel
<< Go Back to Named Range | Excel Formulas | Learn Excel
Get FREE Advanced Excel Exercises with Solutions!
