Method 1 – Format Numbers in Excel
- Select cell C5 to write this formula and press Enter.
=TEXT(B5,"$###,###.00")
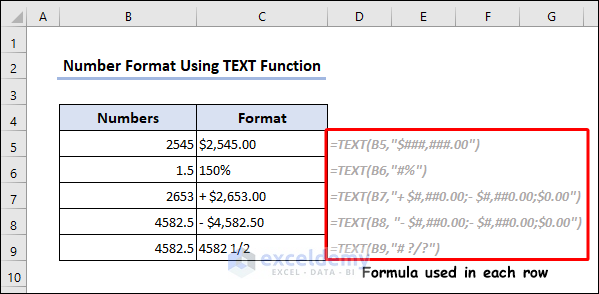
You can see that other number formats are shown in the rest of the rows of the Format column.
Method 2 – Combine Text and Date
- Select cell D5 to write this formula combining CONCATENATE and TEXT functions and press Enter.
=CONCATENATE(B5," ",TEXT(C5,"DD MMM,YYYY"))
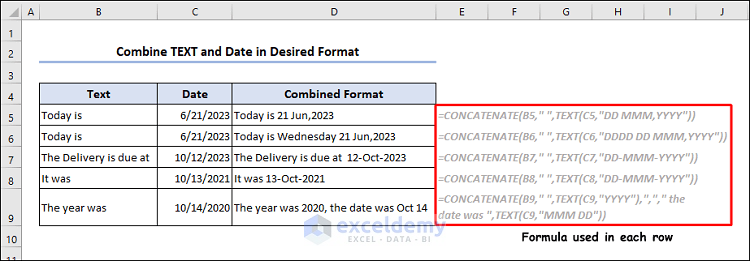
Each row in column D demonstrated different date formats.
Method 3 – Combine Text and Number
- Select cell D5 to write this formula combining CONCATENATE and TEXT functions and press Enter.
=CONCATENATE(B5," ",TEXT(C5,"$###,###.00"))
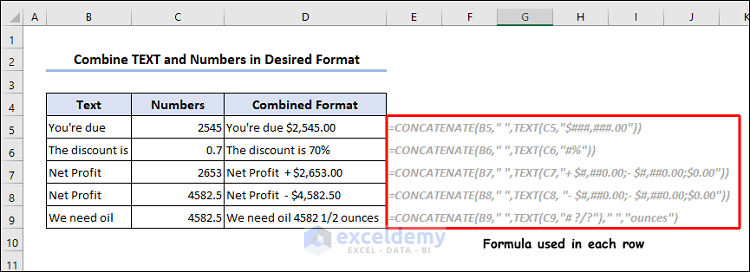
Each row in column D demonstrates different number formats.
Method 4 – Add Leading Zeros Using TEXT Function
- Select cell C5 to write this formula and press Enter.
=TEXT(B5,"00000")
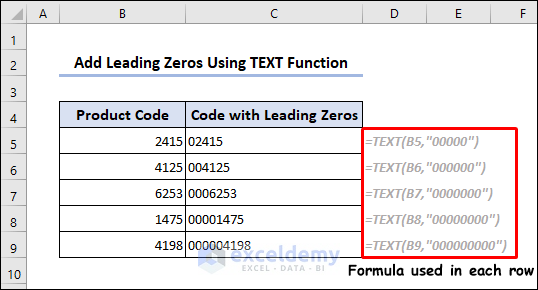
Each row in column C demonstrates various numbers of leading zeros. You can set up the number of digits using TEXT function
Note:
While putting the number of zeros inside the inverted comma, consider 2 things.
1. The length of your original number.
2. The number of leading zeros you want.
Method 5 – Converting Phone Numbers
- Select cell C5 to write this formula and press Enter.
=TEXT(B5,"(##) ### ### #####")

We have formatted the phone numbers based on different formats used by different countries.
How to Format Text in Excel
Method 1 – Change Fonts
- Select cell B5 and from Font group, select Aharoni font from the drop-down list.
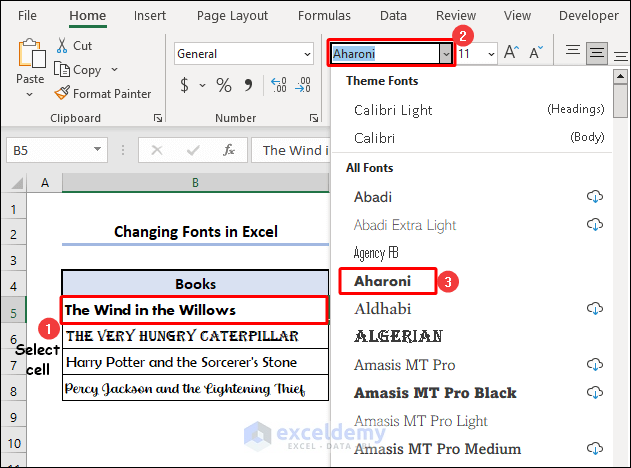
You can select any font from the shown list.
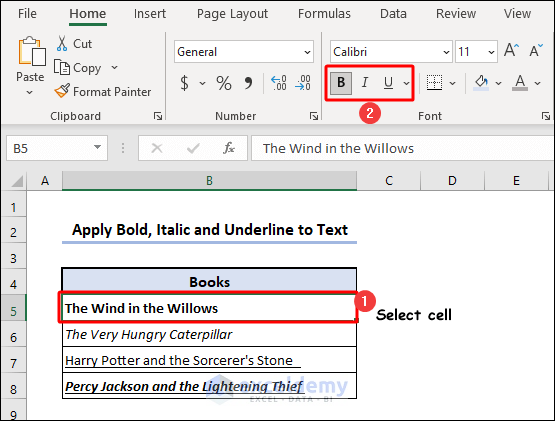
Method 2 – Apply Bold, Italic, or Underline to Data
- Select cell B5 and from Font group, click B to bold the selected values.
- Press the Italic and Underline icons to make the text have an italic font style and be underlined.
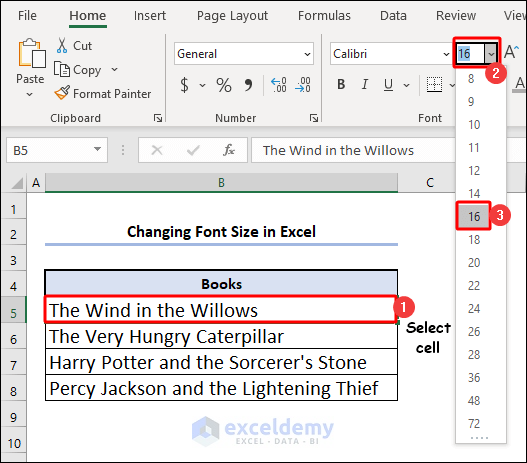
Method 3 – Change Font Size
- Select cell B5 and from Font group, choose the drop-down box beside the font types.
- Select font size 16.
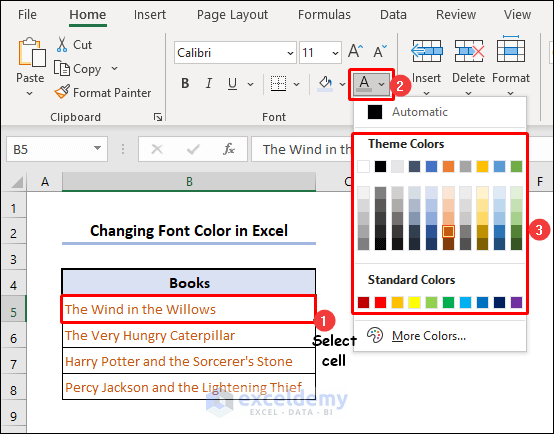
Method 4 – Change Font Color
- Select cell B5 and from Font group, choose Font Color button.
- Choose your preferred color.
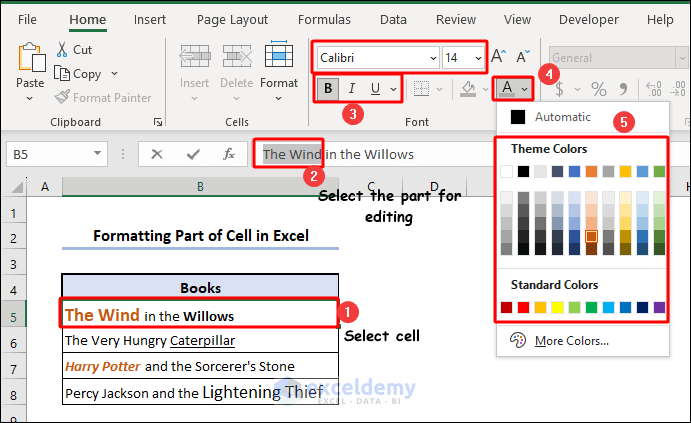
Method 5 – Format Part of a Cell
- Select cell B5 and make this cell editable.
- Select the text you wish to format from the Formula Bar.
- Select the text formatting you want to use and press Enter.
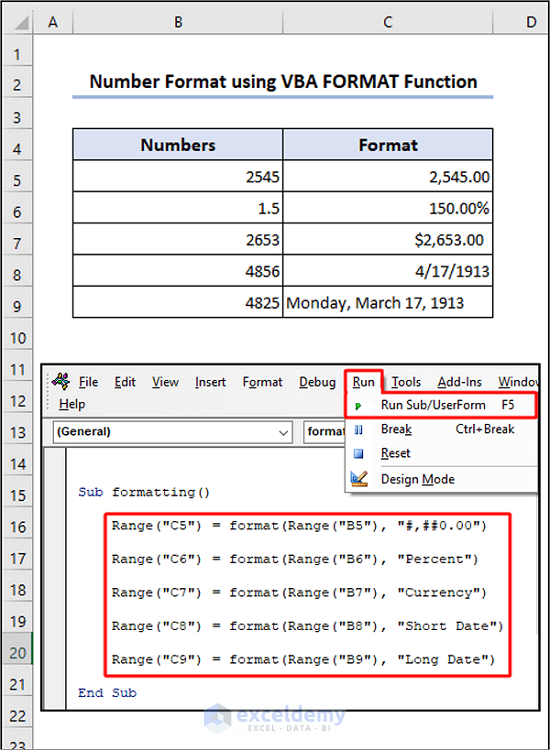
How to Format Text Using VBA FORMAT Function
The VBA Format function formats an expression according to a given format and outputs the result as a string.
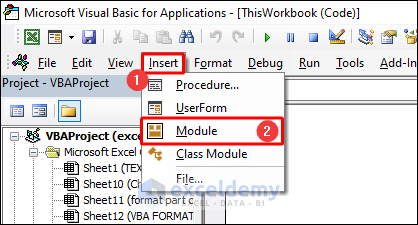
- Access the Visual Basic Editor by pressing Alt + F11 on your keyboard.
- Create a Module in the Visual Basic Editor from the Insert tab.
- Write this code in the module.
Sub formatting()

    Range("C5") = format(Range("B5"), "#,##0.00")

    Range("C6") = format(Range("B6"), "Percent")

    Range("C7") = format(Range("B7"), "Currency")

    Range("C8") = format(Range("B8"), "Short Date")

    Range("C9") = format(Range("B9"), "Long Date")

End Sub- Press F5 or from Run tab, choose Run Sub/Userform to run the code.
[Fix] Excel TEXT function Not Working
1. If Format code in the formula’s format_text argument is not enclosed in inverted commas, #NAME? error can appear. So, ensure that the format code is properly encapsulated within inverted commas.
2. There’s region-specific formatting can be troublesome. The TEXT function in Excel relies on region-specific date and time format codes. Consequently, using a format code that works in English may produce a #VALUE error in other locales.
Things to Remember
- Only numeric values are allowed.
- Use inverted commas for the formatting code.
Frequently Asked Questions
1. How can I add a thousands separator to a number using the TEXT function?
Ans: To add a thousand separator to a number using the TEXT function in Excel, use the format code #,##0 in the format_text argument. For example, if the number is in cell A1, the formula would be like this.
=TEXT(A1, "#,##0")
This will display the number with commas as thousand separators and makie it easier to read and interpret.
2. Is it possible to extract specific characters or substrings from a text string using the TEXT function?
Ans: No, the TEXT function in Excel is used to format the value of a cell as text according to a specific format code. It is not designed to extract specific characters or substrings from a text string. To extract characters or substrings, you can use other functions like LEFT, RIGHT, MID, or FIND, which are specifically designed for text manipulation in Excel.
3. How do I align text within a cell using the TEXT function?
Ans: The TEXT function in Excel does not have the capability to align text within a cell. Text alignment is a formatting feature not directly controlled by the TEXT function. To align text within a cell, you can use the alignment options available in the cell formatting settings, such as Left alignment, Right alignment, or Center alignment. These options can be accessed through the Alignment tab in the Format Cells dialog or the toolbar options.
Excel Text Format: Knowledge Hub
- Insert and Remove Carriage Return
- Suffix and Prefix in Excel
- Add New Line
- Wrap Text in Excel
- Excel Address Format
- How to Wrap Text in Excel
Download Practice Workbook
Download this file to practice with the article.
<< Go Back to Learn Excel
Get FREE Advanced Excel Exercises with Solutions!
