Method 1 – Adding a Space at a Certain Position with the Ampersand, LEFT, and RIGHT Functions
Steps:
- In cell C5, insert the following formula and press Enter to get the result.
=LEFT(B5,3)&" "&RIGHT(B5,5)- Use the Fill Handle icon to copy the same formula for the rest of the cells of this column.
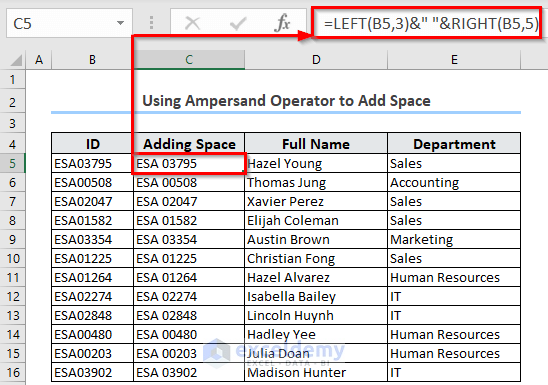
The LEFT function will take the 3 leftmost characters from the B5 cell. The RIGHT function will take 5 rightmost characters from the cell. The ampersand operator (&) will join them with a space.
Read More: Add Space Between Text in a Cell
Method 2 – Use the REPT Function to Add Multiple Spaces in Excel
The REPT function repeats a text. Here’s its basic use.

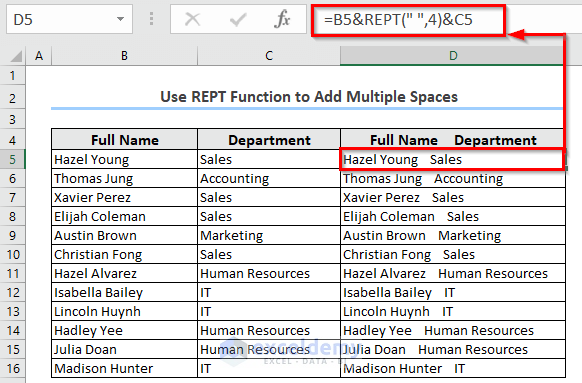
We will preserve the employee’s name and department in one cell.
- Use the following formula in the target cell, hit Enter, and apply AutoFill to fill in the column.
=B5&REPT(" ",4)&C5Here, the REPT function will repeat a blank space 4 times. Ampersand will join these spaces with B5 and C5 cell values.
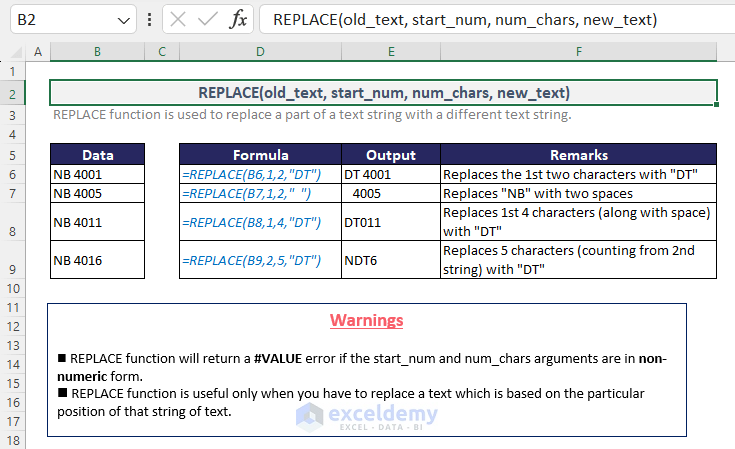
Method 3 – Applying the REPLACE Function to Add Spaces Between Text in Excel
The REPLACE function replaces a portion of a text with another. We have attached an overview of the REPLACE function here:
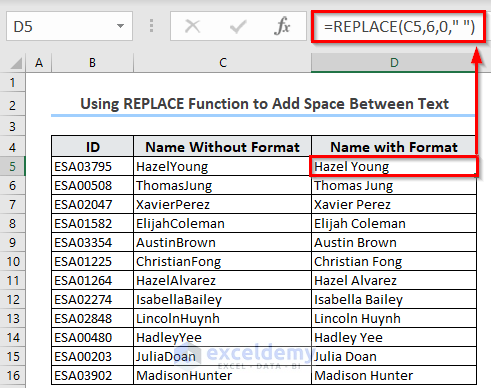
- To get a single space between text, use this formula in the D5 cell.
=REPLACE(C5,6,0," ")- Press Enter to get the target output in C5 cell.
The above formula will add a space after the 6th character. But in other cells, our target positions are different. You have to manually copy the formula and then change the start_num argument accordingly.
Read More: Add Blank Space Using Excel Formula
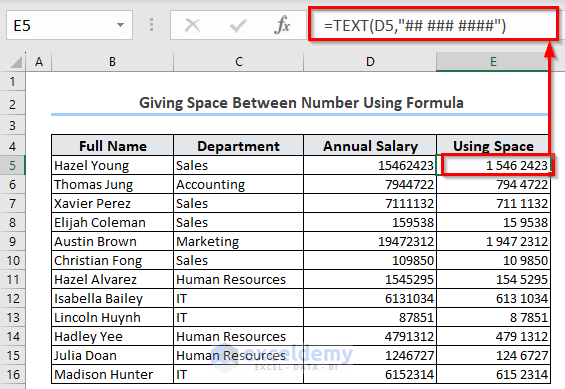
Method 4 – Add a Space Between Numbers Using TEXT Function
The TEXT function converts a value to certain formats of text. We can use this format feature to get a space in those values.
- To create space after certain digits, use the following formula in Excel.
=TEXT(D5,"## ### ####")The TEXT function will include a space after 4 digits from the right, and then another space after the next 3 digits.
- Press Enter to get the output and drag the Fill Handle icon down for the rest of the cells.
Read More: Add Space between Numbers
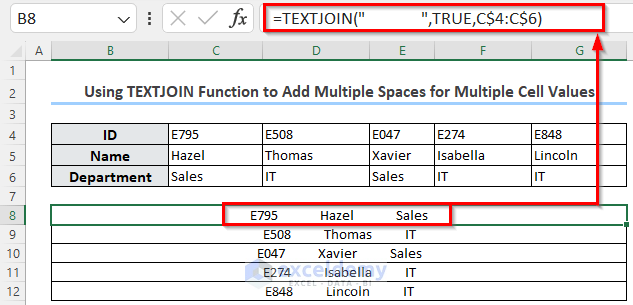
Method 5 – Adding Multiple Spaces to Combine Multiple Cell Values with the TEXTJOIN Function
We have some IDs, employee names, and their departments. We have to join these values along with multiple spaces to make them understandable.
- We’ve merged B8:G8 cells to store the output.
- In B8, use the following formula to connect multiple cell values.
=TEXTJOIN(" ",TRUE,C$4:C$6)In this formula, multiple spaces act as the link delimiter. The “TRUE” value of the ignore_empty argument will ignore all the empty values. This TEXTJOIN function will join C4 to C6 cell values using the given delimiter.
How to Remove Spaces in Excel?
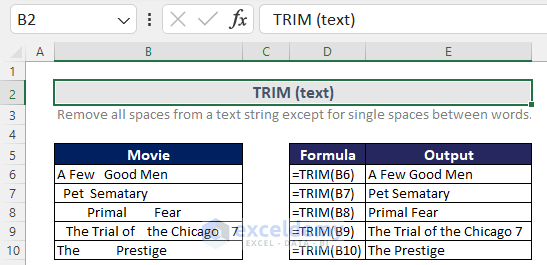
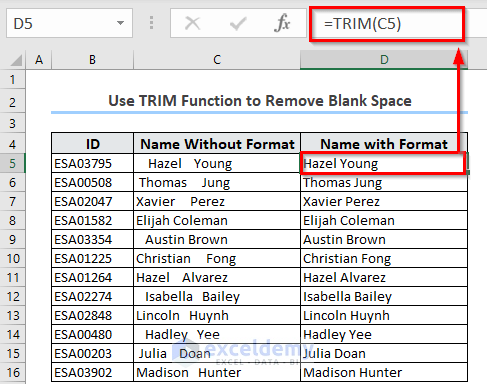
Method 1 – Use the TRIM Function to Remove Blank Spaces (Leading/Trailing Spaces) in Excel
By default, the TRIM function removes extra spaces in any value.
- Enter the following formula.
=TRIM(C5)This TRIM function will remove all extra spaces, and only keep a single space between words.
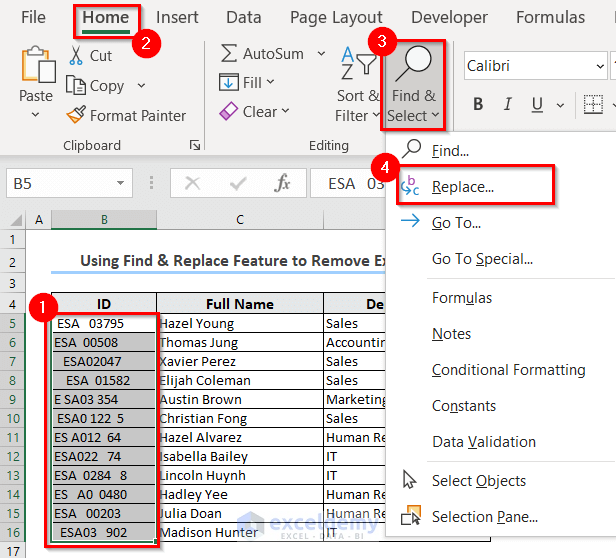
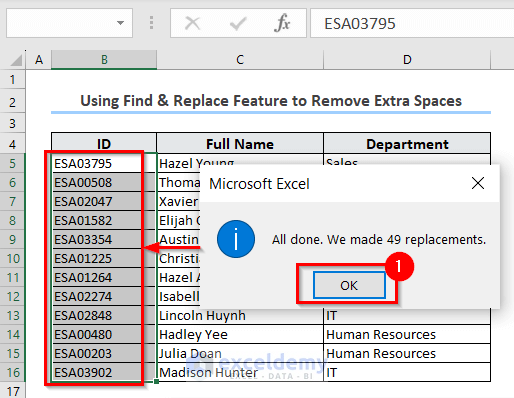
Method 2 – Using Find and Replace to Remove All Spaces
- Select the cells you need to remove spaces from.
- From the Home tab, go to Find & Select and choose Replace.
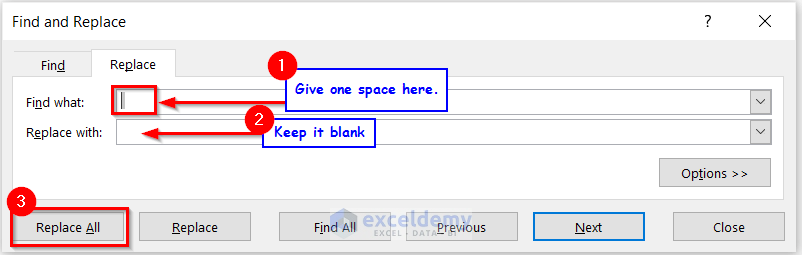
You will see a dialog box named Find and Replace.
- Put a Space at Find what.
- Keep the Replace with box blank.
- Press Replace All.
- You will get a confirmation message. Press OK.
- Press OK in the Find and Replace dialog box.
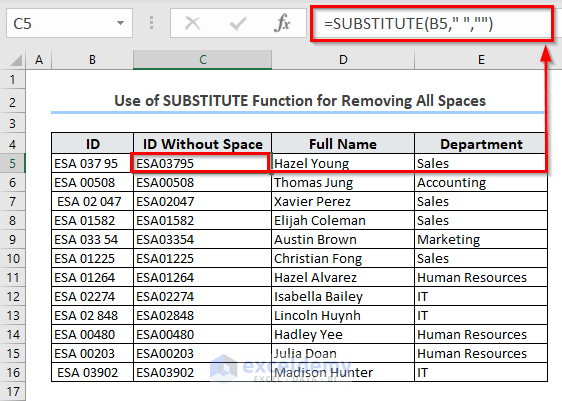
Method 3 – Use the SUBSTITUTE Function for Removing All Spaces
Here’s an overview of the SUBSTITUTE function.
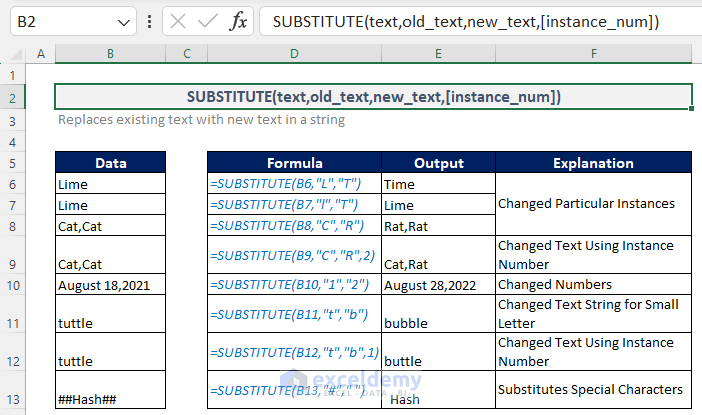
- To remove any space from a cell, enter the following formula.
=SUBSTITUTE(B5," ","")Here, the SUBSTITUTE function will convert all spaces into null values.
- You can use the Fill Handle icon for the rest of the cells.
How to Change Line Spacing with the Format Cells Feature in Excel?
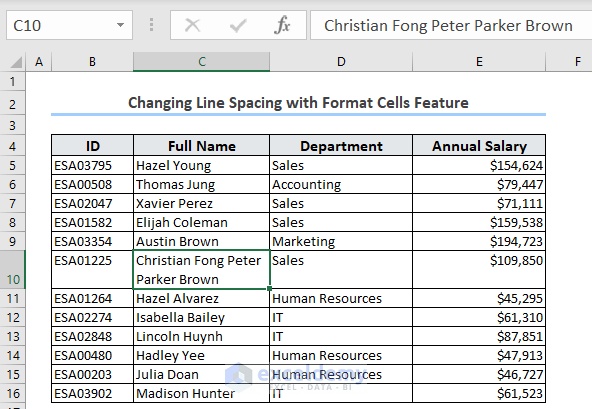
The main idea is to use the Alignment options of the Format Cells feature to our advantage. If you use spaces to line up numbers and text in columns, keeping things neat then it will be easier to make the data understandable to others.
See the following image. One employee has the largest name. To make that cell visible, the column width is increased.
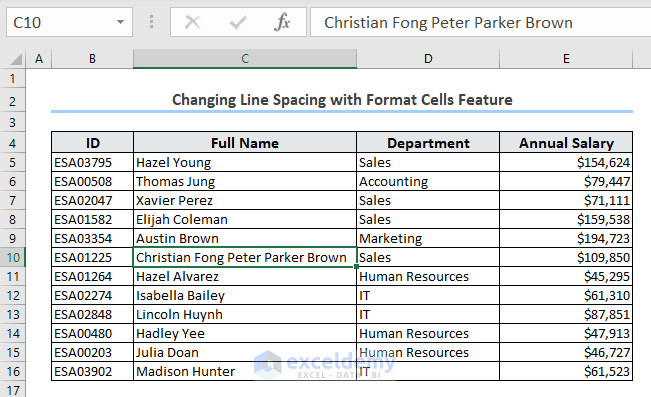
- Press Ctrl + 1.
- You will get the Format Cells dialog box.
- Go to Alignment section, choose Justify under the Vertical option, and press OK.
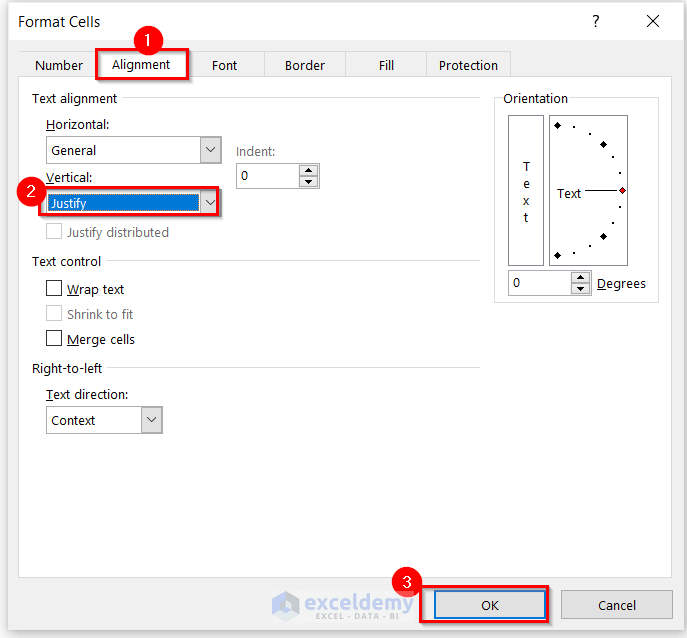
- You will get the wrap text format for that cell.
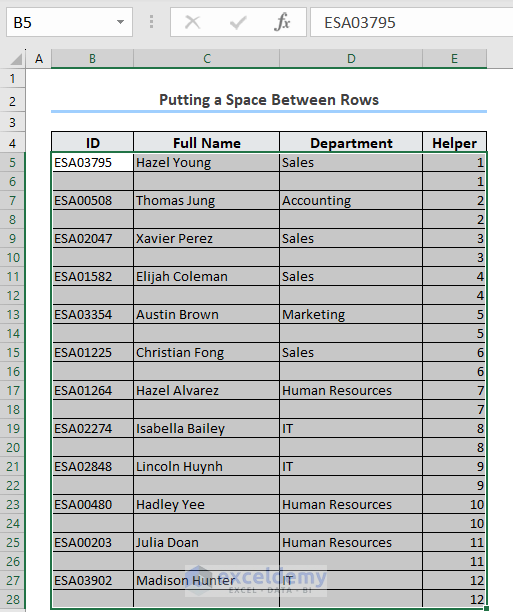
How to Put a Space Between Rows in Excel
- Create a helper column.
- Write 1, 2, and so on in the cells or use a sequence formula.
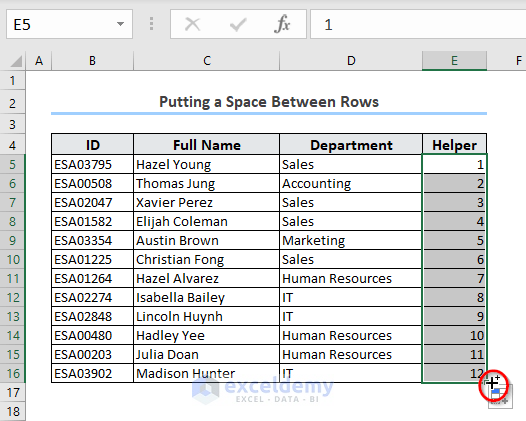
- Copy the numbers and paste them in the same column but below.
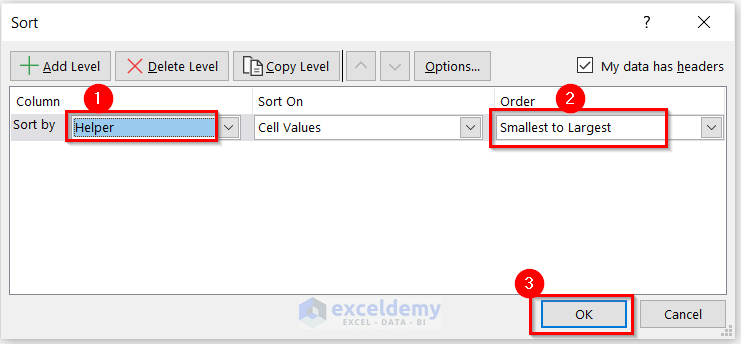
- From the Home tab, go to Sort & Filter and choose Custom Sort.
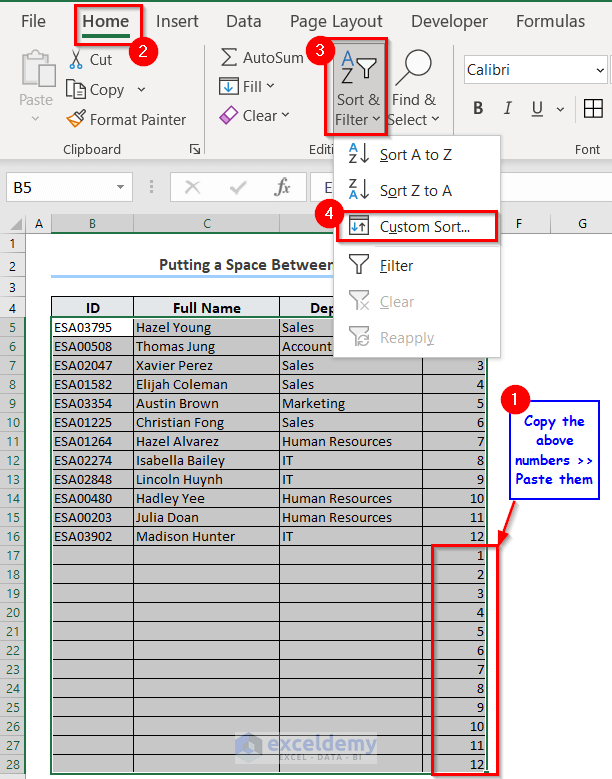
- A dialog box named Sort appears.
- Select Helper in the Column Sort by.
- Select Smallest to Largest in the Order box.
- Press OK.
- You will get the output below. You can delete the Helper column now.
Read More: Add Space between Rows in Excel
Frequently Asked Questions
What is cell spacing?
In Excel, cell spacing denotes the space between cells of a worksheet. We know the text values remain on the left side of the cell, and date/number values remain on the rightmost side of the cell. Thus, it looks like they are attached to the cell wall. So, you can change the Indent from Format Cells option to increase cell spacing.
To change the Indent angle: Go to +Format Cells >> Alignment >> Horizontal >> Left/Right (Indent) >> increase the Indent angle manually.
How do I add a space between rows in a table in Word?
In Microsoft Word, select the table >> go to Layout ribbon >> from Table Properties >> go to Table menu >> click on Options >> then from Table Options dialog box >> change the Default cell margins.
How do I count spaces as characters in Excel?
To count all the characters of a cell including spaces, you should use the LEN function. Go to a cell >> write =LEN(cell_reference) >> press ENTER.
How to remove spaces, line breaks, and nonprinting characters in Excel?
For removing line breaks and nonprinting characters, you can combine the CLEAN function along with the TRIM function. For instance, you have a text having a line break and a nonprinting character in cell A1. Now, go to an empty cell (B1) >> write =TRIM(CLEAN(A1)) >> press ENTER.
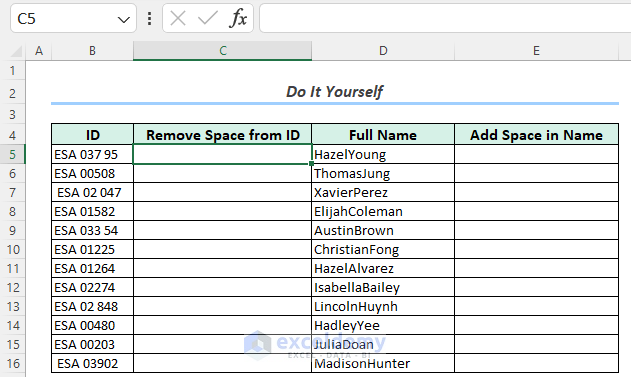
Practice Session
We’ve included a practice dataset where you can test these methods.
Download the Practice Workbook
Space in Excel: Knowledge Hub
- How to Space Rows Evenly in Excel
- Space Columns Evenly in Excel
- Space out Cells in Excel
- Insert Tab in Excel Cell
<< Go Back to Text Formatting | Learn Excel
Get FREE Advanced Excel Exercises with Solutions!
