Looking for ways to know how to add time in Excel automatically? Sometimes, we want to add the time when the file was last edited, or any value was inserted in Excel. Here, you will find 5 ways to add time in Excel automatically.
How to Add Time in Excel Automatically: 5 Easy Ways
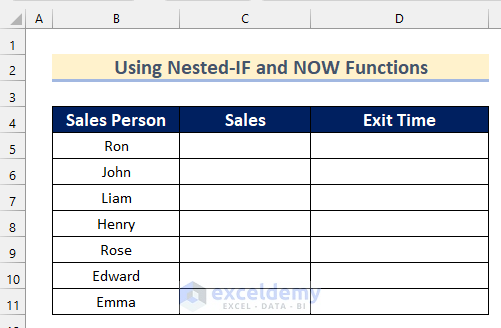
Here, we have a dataset containing the names of Sales Person and Sales. Now, we will show you how inserting the Sales value will automatically add time in Excel using this dataset.

1. Using Nested-IF and NOW Functions to Add Time in Excel Automatically
In the first method, we will use the Nested-IF and Now functions to add time in Excel automatically. The Nested-IF function is used to check multiple conditions in Excel and the NOW function returns the current date and time.
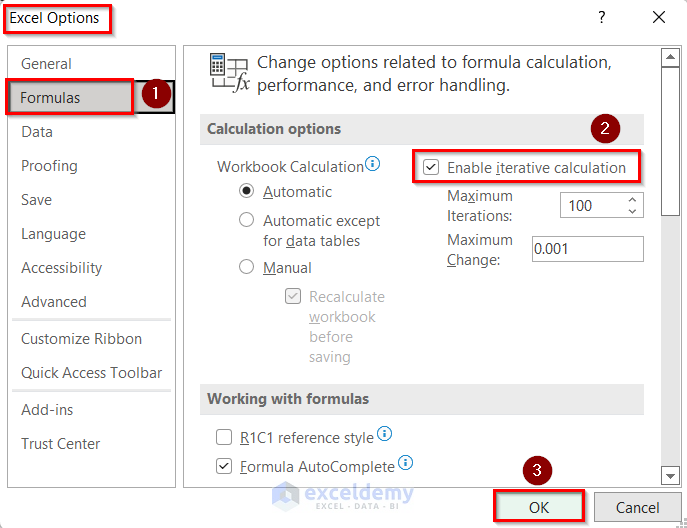
Step-01: Enabling Iterative Calculation
Here, we will show you how you can enable iterative calculation to add time in Excel automatically. Follow the steps given below to do it on your own.
- Firstly, click on the File tab.

- Then, click on Options.

- Now the Excel Options box will open,
- After that, go to the Formula tab >> turn on Enable iterative calculation option.
Step-02: Using Nested-IF and NOW Functions
Next, we will show you how to use the Nested-IF and Now functions to add time automatically in Excel. Go through the steps to do it on your own dataset.
- In the beginning, select Cell D5.
- After that, insert the following formula.
=IF(C5<>"",IF(D5<>"",D5,NOW()),"")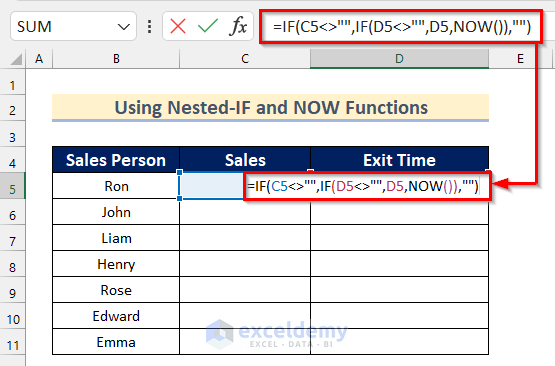
Here, in the IF function, first, we checked if Cell C5 is not equal to Blank then another IF function will execute, or else it will return Blank. The second IF function will check if Cell D5 is not equal to Blank. If the value is TRUE then it will return Cell C5 or Else it will execute the NOW function.
- Next, press ENTER.
- Then, drag down the Fill Handle tool to AutoFill the formula for the rest of the cells.

- Now, if you insert a value in the Sales Column, time will add automatically in Exit Time Column.

Step-03: Formatting Cell
Finally, we will show you how to change the Cell Format in Excel. Follow the steps given below to do it on your own.
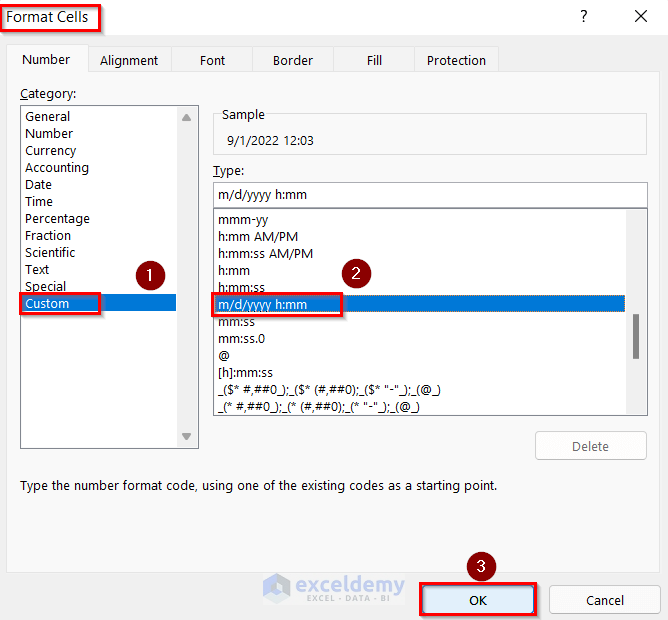
- Firstly, select Cell D5 and Right-click on it.
- After that, click on Format Cells.

- Now, the Format Cells box will appear.
- Then, go to the Custom option >> select m/d/yyyy h:mm.
- Next, click on OK.
- After that, you will see that the Format of Cell D5 has changed.

- Similarly, time will add automatically for the rest of the cells in Exit Time Column when the value will be inserted in Sales Column.

Read More: How to Copy Same Date in Excel
2. Use of Combined Functions to Add Time in Excel with Updates
Now, we will show how you can add time in Excel automatically with updates using the ADDRESS, ROW, COLUMN, CELL, NOW, and IF functions. Go through the steps to do it on your own dataset.
Steps:
- In the beginning, select Cell D5.
- After that, insert the following formula.
=IF(C5<>"",IF(AND(D5<>"",CELL("address")=ADDRESS(ROW(C5),COLUMN(C5))),NOW(),IF(CELL("address")<>ADDRESS(ROW(C5),COLUMN(C5)),D5,NOW())),"")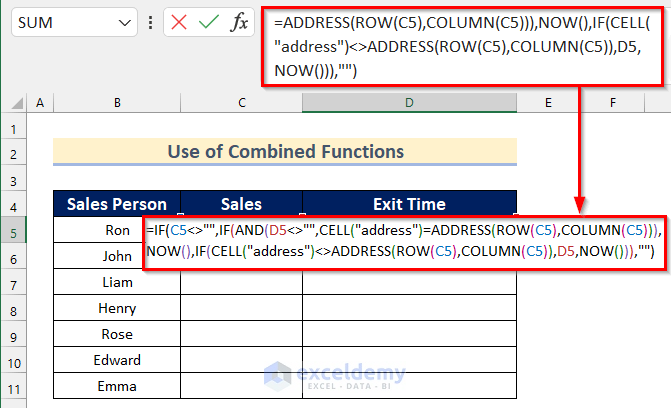
Formula Breakdown
- ROW(C5)—–>The ROW function returns the row number of a specific Cell.
- Output: {5}
- COLUMN(C5)—–>The COLUMN function returns the column number of a specific Cell.
- Output: {3}
- ADDRESS(ROW(C5),COLUMN(C5))—–>The ADDRESS function returns the address of the given Cell.
- ADDRESS({5},{3})—–> turns into
- Output: {“$C$5”}
- ADDRESS({5},{3})—–> turns into
- CELL(“address”)=ADDRESS(ROW(C5),COLUMN(C5))—–>The CELL function returns information of a specific given Cell.
- CELL(“address”)=ADDRESS({5},{3}))—–> turns into
- Output: {FALSE}
- CELL(“address”)=ADDRESS({5},{3}))—–> turns into
- CELL(“address”)<>ADDRESS(ROW(C5),COLUMN(C5))—–> turns into
- Output: {TRUE}
- AND(D5<>””,CELL(“address”)=ADDRESS(ROW(C5),COLUMN(C5)))—–>The CELL function returns information of a specific given Cell.
-
- AND(D5<>””,{FALSE})—–> turns into
- Output: {FALSE}
- AND(D5<>””,{FALSE})—–> turns into
- IF(CELL(“address”)<>ADDRESS(ROW(C5),COLUMN(C5)),D5,NOW())),””—–> The IF function returns a value if the condition is TRUE and returns a different value if it is FALSE.
- IF({TRUE},D5,NOW())—–> turns into
- Output: {44805.5189866898}
- IF({TRUE},D5,NOW())—–> turns into
- IF(AND(D5<>””,CELL(“address”)=ADDRESS(ROW(C5),COLUMN(C5))),NOW(),IF(CELL(“address”)<>ADDRESS(ROW(C5),COLUMN(C5)),D5,NOW())),””)—–> turns into
- IF(C5<>””,{44805.5189866898},””))—–> turns into
- Output: {44805.5189866898}
- IF(C5<>””,{44805.5189866898},””))—–> turns into
- Next, press ENTER.
- Then, drag down the Fill Handle tool to AutoFill the formula for the rest of the cells.

- Now, if you insert a value in the Sales Column, time will add automatically in Exit Time Column.

- After that, change the format of Cell D5 by going through the steps shown in Method1.

- Finally, if you insert a value in the Sales Column, time will add automatically in the Exit Time Column using the Combined functions.
Read More: How to Use IF Formula with Dates
3. Use of Keyboard Shortcut to Add Time in Excel Automatically
In the third method, we will show you how to add time in Excel automatically using Keyboard Shortcut. Follow the steps given below to do it on your own dataset.
Steps:
- Firstly, insert a value in Cell C5.
- Then, select Cell D5.
- After that, press CTRL+SHIFT+;

- Now, the time will be added automatically in Cell D5.

- Similarly, you can add time in Excel after inserting values in Sales Column using Keyboard Shortcut.

Read More: Making a List of Countries by Time Zone in Excel
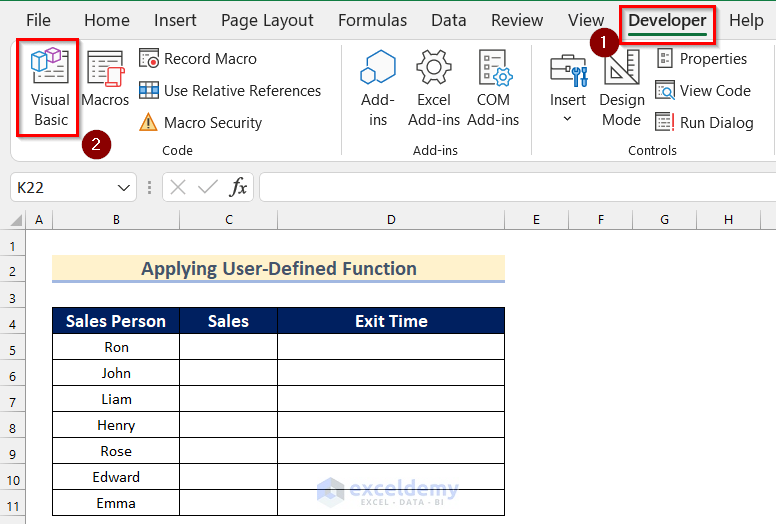
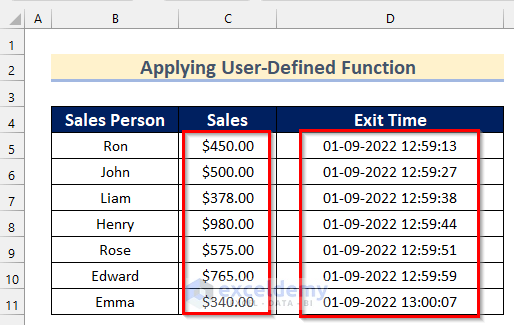
4. Applying User-Defined Function to Add Time Automatically
We can also add time in Excel automatically by applying User-Defined Function. Go through the steps to do it on your own dataset.
Steps:
- In the beginning, go to the Developer tab >> select Visual Basic.
- Now, Microsoft Visual Basic for Application box will open.
- After that, click on Insert >> select Module.
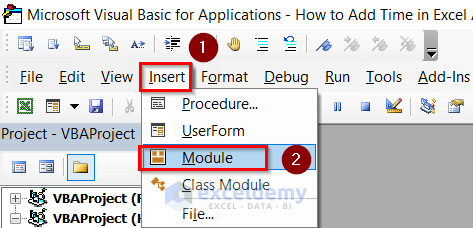
- Then, write the following code in your Module.
Function Add_Time(Sales As Range)
If Sales.Value <> "" Then
Add_Time = Format(Now, "dd-mm-yyyy hh:mm:ss")
Else
Add_Time = ""
End If
End Function
Code Breakdown
- Firstly, we created a Function named Add_Time and set Sales as Range.
- Then, we used the If Statement where we checked if the Sales range is not equal to Blank using the Value method.
- After that, we set Add_Time equal to the value of the NOW Function and format the cell as “dd-mm-yyyy hh:mm:ss” if the value is TRUE.
- Otherwise, it will be Blank.
- Next, click on the Save button and go back to your worksheet.

- After that, Select Cell D5.
- Now, insert the following formula.
=Add_Time(C5)
- Next, press ENTER.
- Then, drag down the Fill Handle tool to AutoFill the formula for the rest of the cells.

- Finally, if you insert a value in the Sales Column, time will add automatically in the Exit Time Column.
Read More: How to Calculate Due Date with Formula in Excel
5. Using VBA to Add Time in Excel Automatically
In the final method, we will show you how to add time in Excel automatically using VBA. Follow the steps given below to do it on your own dataset.
Steps:
- Firstly, select the Sheet tab of the particular Sheet where you want to insert the code and Right-click on it.
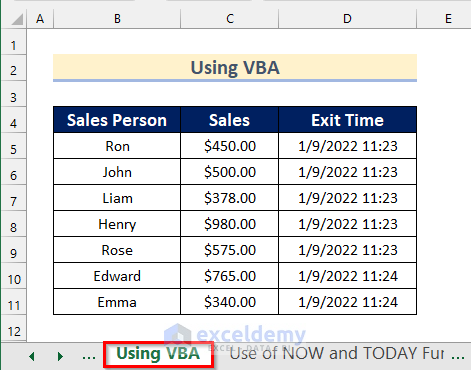
- Then, select View Code.

- Now, write the following code in your Sheet.
Private Sub Worksheet_Change(ByVal Sales As Range)
On Error GoTo Handler
If Sales.Column = 3 And Sales.Value <> "" Then
Application.EnableEvents = False
Sales.Offset(0, 1) = Format(Now(), "dd-mm-yyyy hh:mm:ss")
Application.EnableEvents = True
End If
Handler:
End Sub
Code Breakdown
- To create Private Sub firstly selected the Worksheet from General and Change as a Declaration. Whenever any changes occur in that worksheet code will run by itself.
- Next, we set On Error GoTo Handler.
- Then, we used the IF function where we checked if the Sales range is not equal to Blank using the Value method and also if Column number is 3 using the Column method.
- Now, we set Application EnableEvents as False.
- After that, we set the offset (0,1) to insert the Time in by offsetting 1 column. the value of
- Here, the NOW Function will give the recent time and format will be as “dd-mm-yyyy hh:mm:ss” if the value is TRUE.
- Finally, we set Application EnableEvents as True.
- Next, Save the code and go back to your worksheet.
- Finally, if you insert a value in the Sales Column, time will add automatically in the Exit Time Column.

Read More: How to Create World Time Zone Clock in Excel
Use of NOW and TODAY Functions to Add Time in Excel
Additionally, here, we will show you how to use the NOW and TODAY functions to add time in Excel. Follow the steps given below to do it on your own.
Steps:
- Firstly, insert a value in Cell C5.
- Then, select Cell D5.
- After that, insert the following formula.
=TODAY()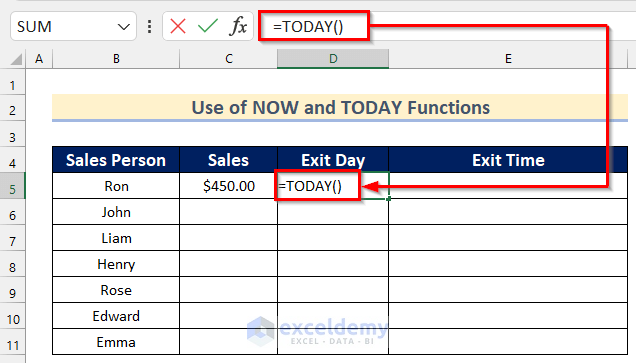
- Now, press ENTER to get the value of Current Date.

- Next, select Cell D5.
- Then, insert the following formula.
=NOW()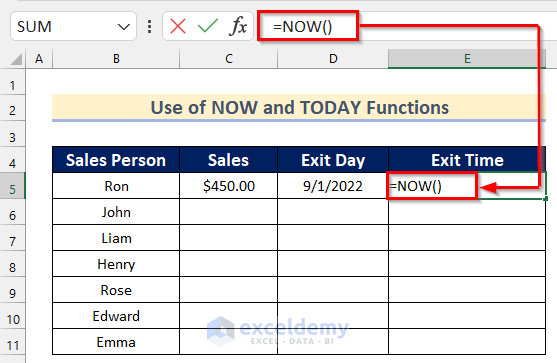
- After that, press ENTER to get the value of Current Time.

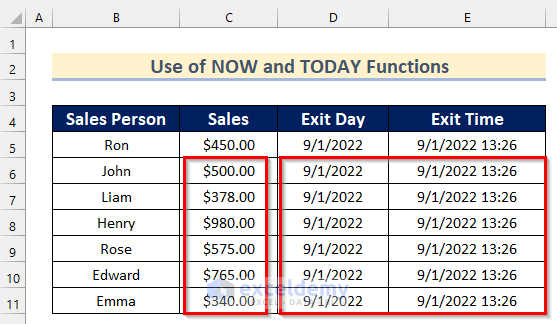
- Similarly, after inserting a value in the Sales Column, you can add time in the Exit Day and Exit Time Columns using the Now and TODAY functions.
Read More: How to Use Excel Date Shortcut
Practice Section
In this section, we are giving you the dataset to practice on your own and learn to use these methods.

Download Workbook
Conclusion
So, in this article, you will find 5 ways to add time in Excel automatically. Use any of these ways to accomplish the result in this regard. Hope you find this article helpful and informative. Feel free to comment if something seems difficult to understand. Let us know any other approaches which we might have missed here.
Related Articles
<< Go Back to Timestamp | Date-Time in Excel | Learn Excel
Get FREE Advanced Excel Exercises with Solutions!

HOW DO I ADD UP TIME IN MILITARY TIME TO GET A TOTAL VALUE OF HOURS WORKED?
Dear Perry,
Thanks for your comment. Unfortunately, Excel does not have a Military time format. However, we can use the custom format feature in Excel to display military time. Follow the steps below to do so:
First, store the military time in text format. I store them as text format in cell C3 and C4 by selecting the cells and selecting “Text” from the Number group on Home tab.
Then, to add the times, use the following formula in cell B4:
=TEXT((TIME(LEFT(C2,2),RIGHT(C2,2),0)+TIME(LEFT(C3,2),RIGHT(C3,2),0)),”hhmm”)
Formula Breakdown:
LEFT(C2,2) and RIGHT(C2,2): Extract the hours and minutes from cell C2.
LEFT(C3,2) and RIGHT(C3,2): Extract the hours and minutes from cell C3.
TIME(…): Create time values for the extracted hours and minutes.
TIME(LEFT(C2,2),RIGHT(C2,2),0)+TIME(LEFT(C3,2),RIGHT(C3,2),0): Add the times
TEXT(…, “hhmm”): Format the time difference as Military Times.
Note: Ensure that cells C2 and C3 are formatted as text to prevent Excel from automatically converting the time values. If Excel interprets them as time values, it may not work as expected. Also, if the total time exceeds 24 hours, it will not return the correct result. To address the issue, we have to create a custom function that requires VBA coding. If this solution does not meet your requirements, you can ask for a a customized solution on our Exceldemy Service.
Regards
Aniruddah
Team Exceldemy