We can easily visualize data if we group them. This can save us a ton of time. There are many ways to group Dates. We will show you 4 ways to group Dates in Excel Slicer.
How to Group Dates in Excel Slicer: 4 Handy Approaches
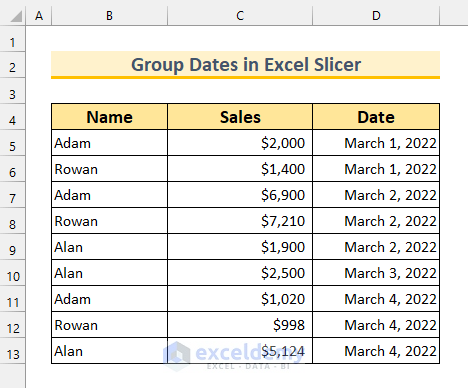
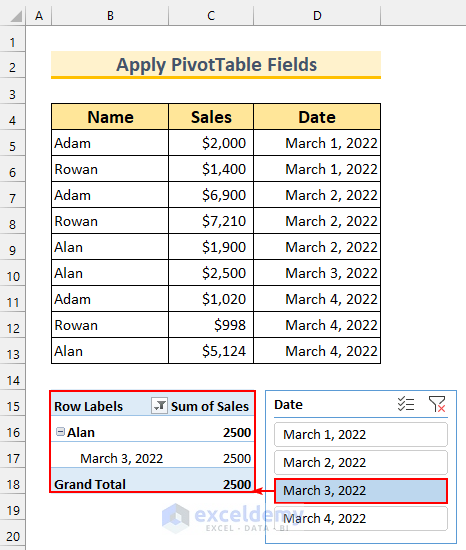
To demonstrate our methods, we have selected a dataset with 3 columns: “Name”, “Sales”, and “Date”. Our goal is to group the data using the Dates.
1. Use PivotTable Analyze to Group Dates in Excel Slicer
We will convert our data to a Pivot Table for the first method. Then, we will use a Slicer from the PivotTable Analyze tab, we add a Slicer to group Dates.
- To begin with, we will create a PivotTable.
- Then, select the cell range B4:D13.
- Next, from the Insert tab >>> select PivotTable.
- So, the “PivotTable from table or range” dialog box will pop up.
- Afterward, select “Existing Worksheet” and cell B15 as the output location.
- Then, press OK.

- Thus, it will create an empty PivotTable. Moreover, for more clarity, we have moved the PivotTable Fields box closer to our PivotTable.
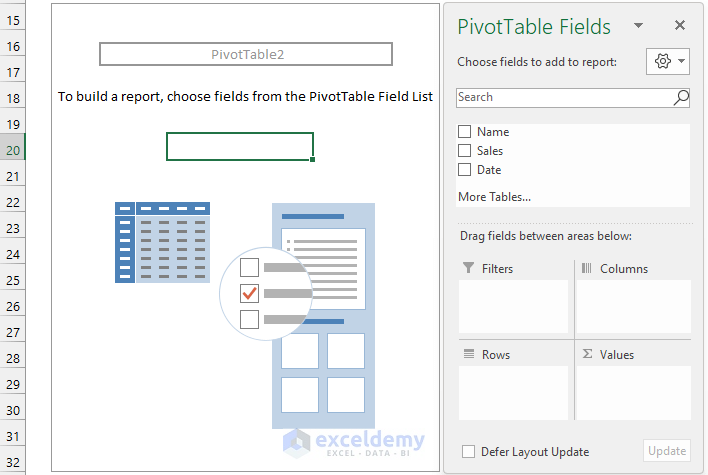
- After that, we will add fields to our Table.
- So, just click on the three fields – “Name”, “Sales”, and “Date”.
- Then, Excel will automatically arrange those fields in the PivotTable. In case, yours is not in the right Columns or Rows or Values areas; you can drag and drop the fields to re-allocate them.
- Next, what our PivotTable looks like, we can see it side by side.

- Up to this point, the steps are the same for methods 2 and 3. Hence, we will refer to this section.
Then, we will add Slicer in Excel.
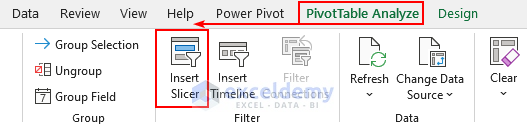
- First, we need to select anywhere inside our PivotTable.
- Then, from the PivotTable Analyze tab >>> select Insert Slicer.
- So, the Insert Slicers box will appear.
- Then, select Date and press OK.

- Therefore, we can see the Date Slicer.
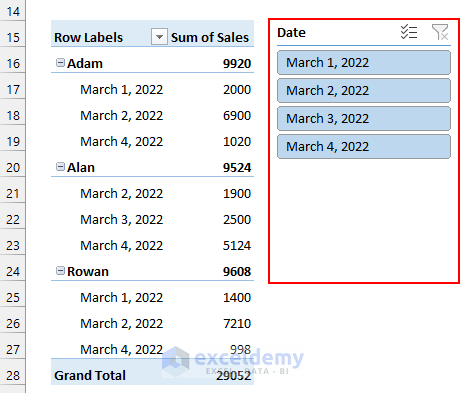
- Lastly, select “March 1, 2022” in the Slicer, to group Dates in Excel.

Read More: How to Make Excel Slicer with Search Box
2. Apply PivotTable Fields to Group Dates in Excel Slicer
Now, this method is similar to the first method. We will add the Slicer from the PivotTable Fields this time around.
Steps:
- As shown in the first method, bring up the PivotTable.
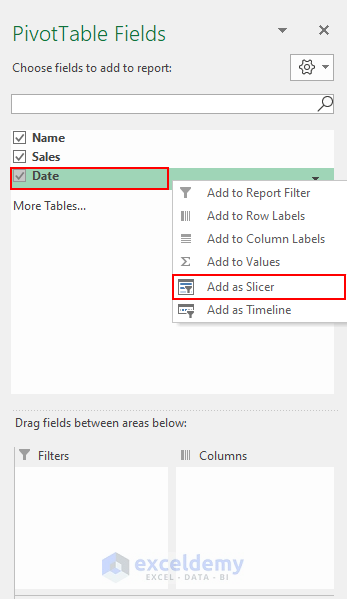
- Next, right-click on the Date field and bring the Context Menu.
- Then, select Add as Slicer.
- By doing so, it will add the Slicer.
- Lastly, select “March 3, 2022” to group Dates in the Excel Slicer.
3. Use of Timelines to Group Dates in Excel Slicer
In this section, we will use the Timeline feature to group Dates in Excel. A timeline is just like a Slicer, however, the Timeline is specifically created for Dates. Remember, this feature is only available in Excel version 2013 and later.
Steps:
- As shown in the first method, bring up the PivotTable.
- First, we need to select anywhere inside our PivotTable.
- Then, from the PivotTable Analyze tab >>> select Insert Timeline.

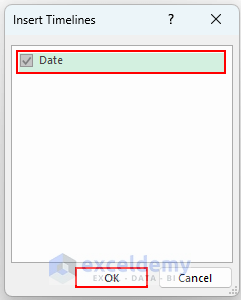
- Then, a dialog box will appear.
- Afterward, select Date and press OK.
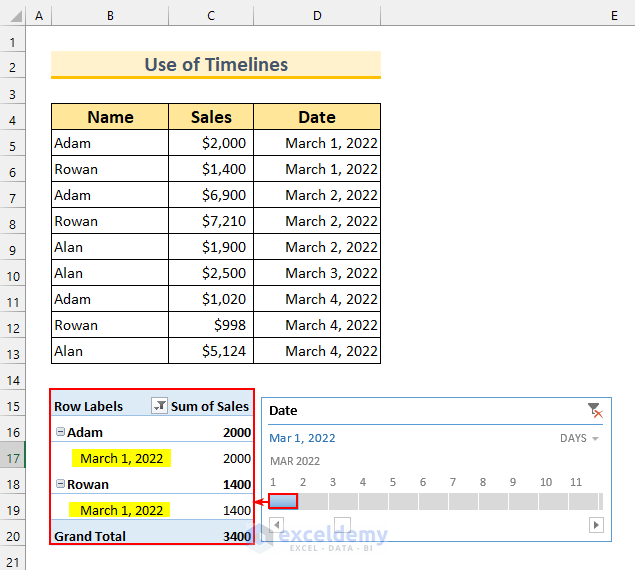
- After that, the Date Timeline will be set as MONTHS.
- So, click on that Drop Down List and select DAYS.

- Then, select the date “March 1, 2022” to group the Dates using Excel Timeline.
Read More: How to Create Timeline Slicer with Date Range in Excel
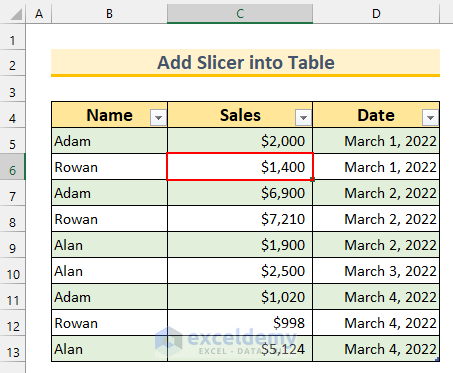
4. Add Slicer into Table to Group Dates
For the last method, we will convert our dataset into a normal table. Then, we will add a Slicer from the Table Design tab to group Dates.
Steps:
- First, select the cell range B4:D13.
- Then, from the Insert tab >>> select Table.
- So, the “Create Table” dialog box will pop up.
- Next, select “My table has headers”, if it is not selected by default.
- Afterward, press OK.

- Then, we will see Filter triangles indicating our dataset is now a table.
- Next, select anywhere inside the table.
- After that, from the Table Design tab >>> select Insert Slicer.

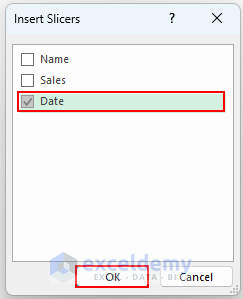
- Again, the Insert Slicer dialog box will appear.
- Then, select Date and press OK.
- Lastly, if you click on any of the Slicers, then it will group the Dates.

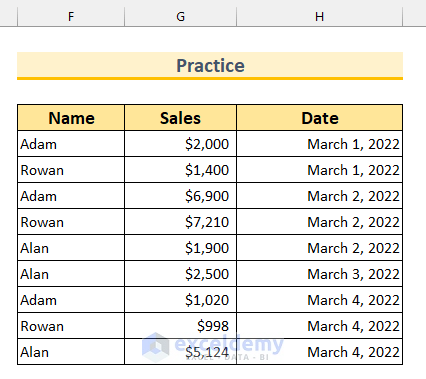
Practice Section
We have added a practice dataset for each method in the Excel file. Therefore, you can follow along with our methods easily.
Download Practice Workbook
Conclusion
We have shown you 4 handy approaches to how to group Dates in Excel Slicer. If you face any problems regarding these methods or have any feedback for me, feel free to comment below.
Thanks for reading, keep excelling!
Related Articles
- How to Create Slicer Drop Down in Excel
- How to Use Slicers to Filter Data in Excel
- How to Custom Sort Slicer in Excel
- Excel Slicer Vs Filter (Comparison & Differences)

