While working in Microsoft Excel, it may be necessary to change the background color of a cell based on its value. In fact, this adds visual depth and clarity to the information. For this purpose, this article demonstrates 6 convenient ways of changing background color based on the value in Excel.
How to Change Background Color Based on Value in Excel: 6 Ways
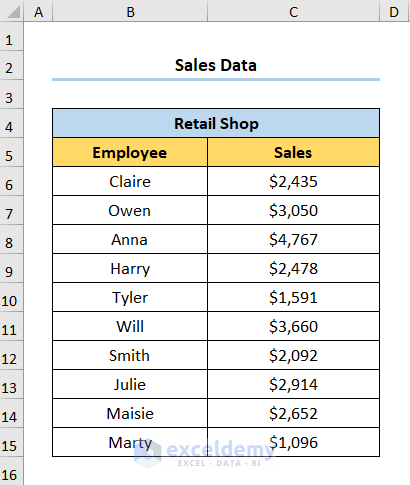
Let’s say, we have the Sales Data shown in the B4:C14 cells. Here, the dataset shows the Employee names and their Sales in USD respectively. So, without further delay, let’s see the methods one by one.
We have used the Microsoft Excel 365 version here, you can use any other version according to your convenience.
Method-1: Changing Background Color Based On Cell Value
We’ll start things with the most obvious way to change the background color of cells based on value. Yes, you’re right, we’ll use the Conditional Formatting option. So, let’s begin.
Steps:
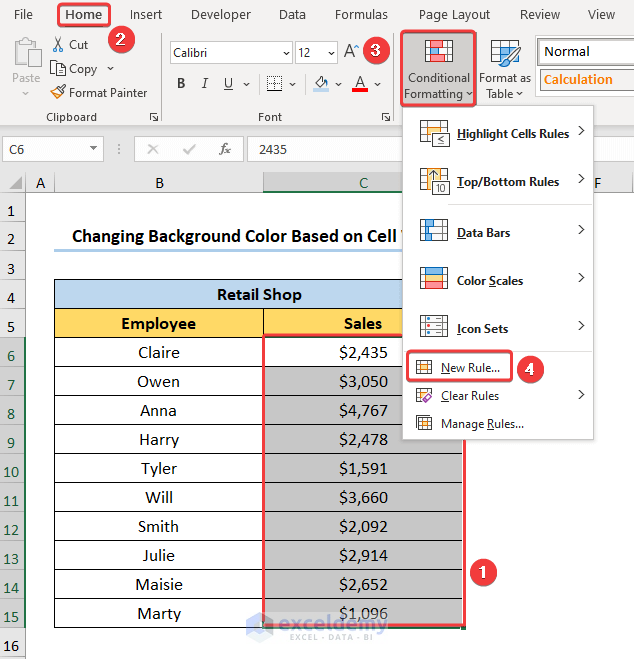
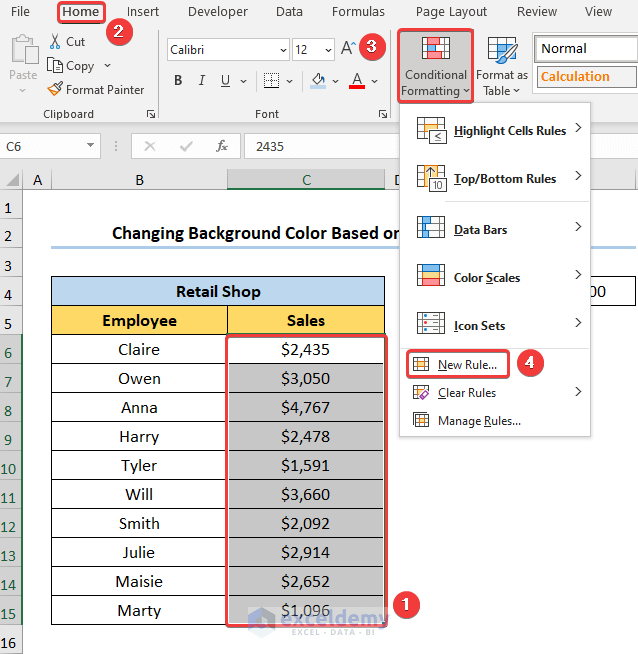
- Initially, select the range of cells C6:C15 >> under the Home tab, click the Conditional Formatting drop-down >> select the New Rule option.
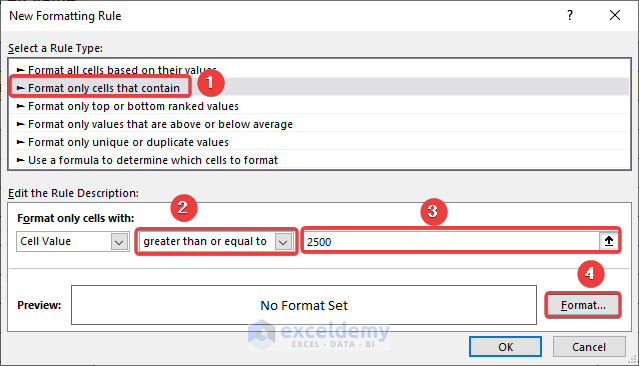
This opens up the New Formatting Rule dialog box.
- Now, choose the Format only cells that contain the option under Select a Rule Type.
- Next, in the Rule Description select the greater than or equal to condition, and type in the value 2500.
- Then, click on the Format box to specify the cell color.
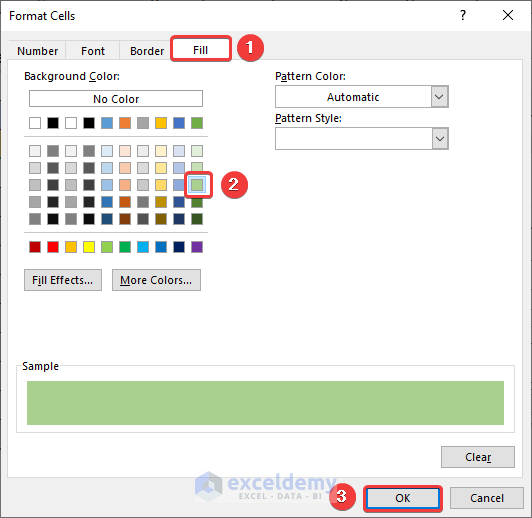
After completing the previous step the Format Cells wizard pops up.
- Following this, navigate to the Fill tab >> select a color of your choice (we have used Green, Lighter 40%) >> press the OK button.
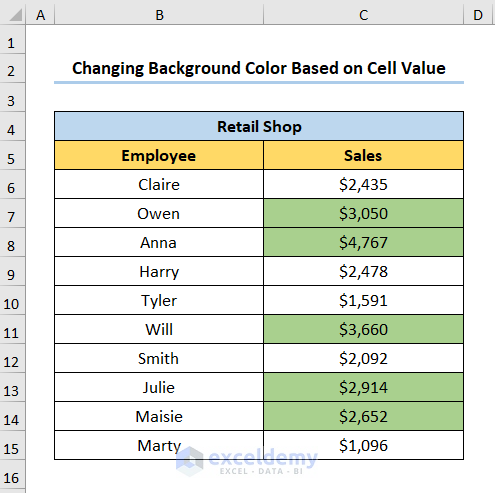
That’s it you’ve changed the background color of the cell. It’s that simple!
Method-2: Utilizing Quick Analysis Toolbar
Now, I know what you’re thinking. Is there a shortcut? Then you are looking in the right place since our next method describes just that. So, just follow these simple steps.
Steps:
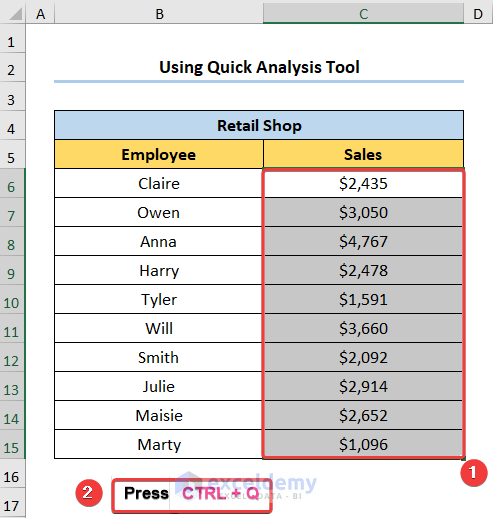
- At the very beginning, select the range of cells C6:C15 >> Now press CTRL + Q on your keyboard.
After completing the above step, the Quick Analysis toolbox appears.
- Next, select the Greater Than option as shown in the image below.
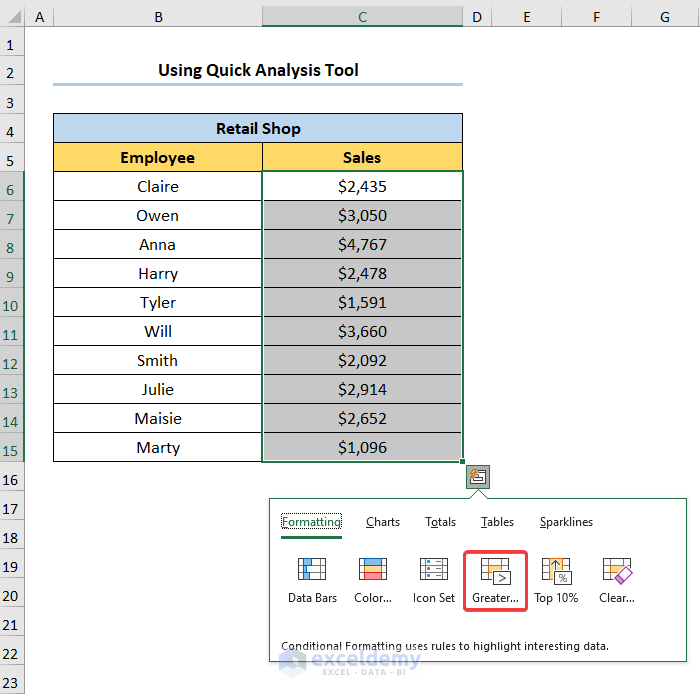
- Then, enter a value in the Format cells that are GREATER THAN box. In this case, we’ve chosen $2500.
- After this, choose Custom Format from the drop-down after with and then press OK.

After this, the Format Cells dialog box appears.
- Lastly, select a color, for instance, light green from the Fill tab, and press OK.

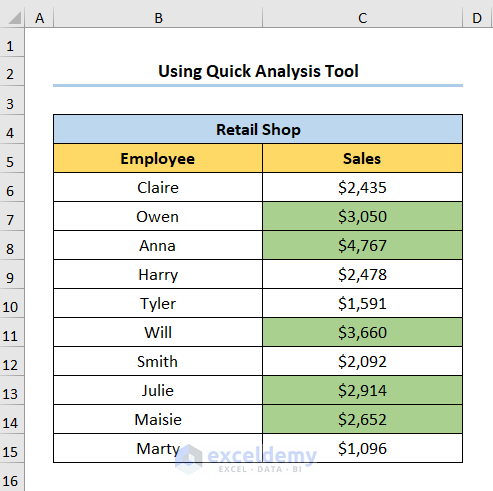
The results should look like the picture given below.
Read More: How to Change Background in Excel Sheet
Method-3: Changing Background Color Based on the Value of Another Cell
What if you want to change the background color based on the value of a different cell? Lucky you! The following method provides the answer to your question. So, let’s see the process in detail.
Steps:
- To start, select the range of cells C6:C15 >> go to the Home tab >> Conditional Formatting drop-down >> choose the New Rule option.
After this step, the Edit Formatting Rule wizard opens up.
- Secondly, select the Format only cells that contain the option.
- In turn, choose the greater than or equal to condition, and enter the cell reference $F$4. Here, the F4 cell refers to the Sales Target.
- Then, click on the Format box to specify the cell color. For example, we’ve chosen a light green color.

Your output should look like the screenshot given below.

Method-4: Using Formula with Conditional Formatting
If you’re one of those people who enjoy using Excel formulas then our next method has you covered. Allow me to demonstrate the process in step-by-step.
Steps:
- To begin, select the range of cells B6:B15 >> under the Home tab, click the Conditional Formatting drop-down >> select the New Rule option.

In an instant, the New Formatting Rule wizard pops up.
- Next, choose the Use a formula to determine which cells to format option.
- Then, in the Rule Description enter the following formula.
=C6>=2500
Here, the C6 cell refers to the value of $2435 in the Sales column.
- Then, click on the Format box to specify the cell color. For example, we have chosen a light green color.
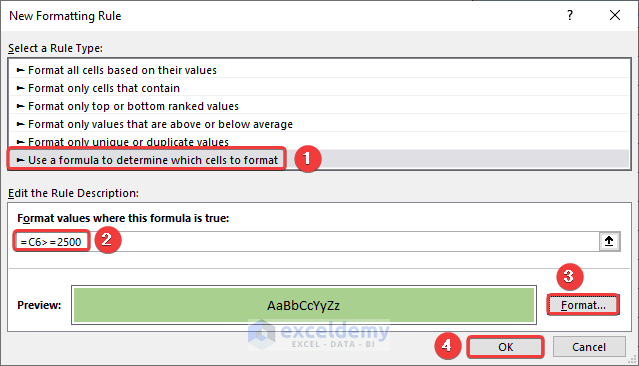
- In the last step, click OK, and the Employee names with Sales exceeding $2500 are colored.

Read More: How Do I Change the Default Background Color in Excel
Method-5: Using Find and Select Option to Permanently Change Background Color
You can also use the Find and Select option to change the background color. However, this change will be static, simply put, the color will remain the same until you change it manually. Let’s see it in action.
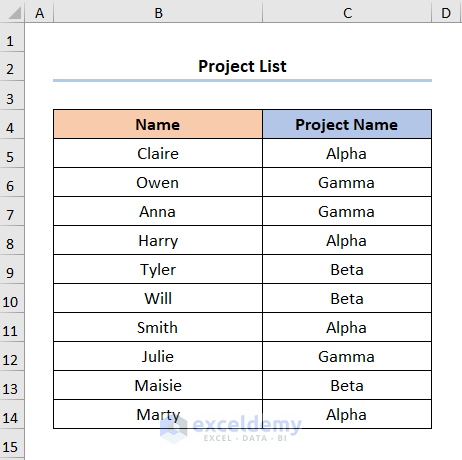
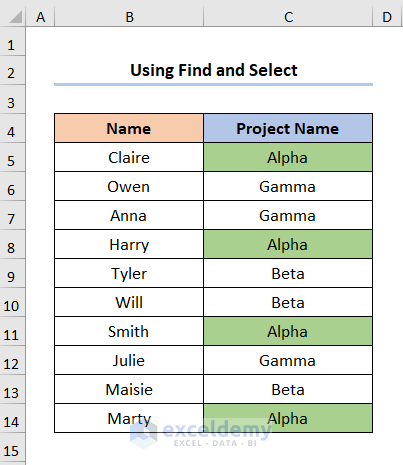
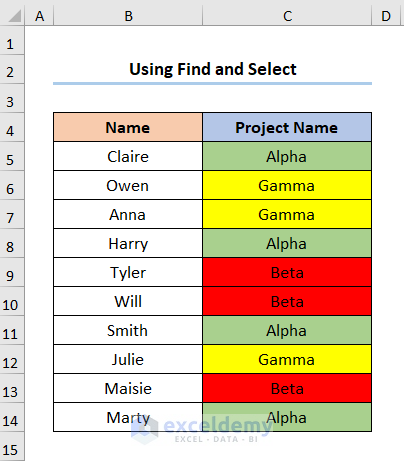
Considering the dataset shown in the B4:C14 cells below. Here the dataset shows the Names of the staff and their Project Names respectively.
Steps:
- Firstly, navigate to the Find & Select drop-down under the Home tab >> click the Replace option from the drop-down.
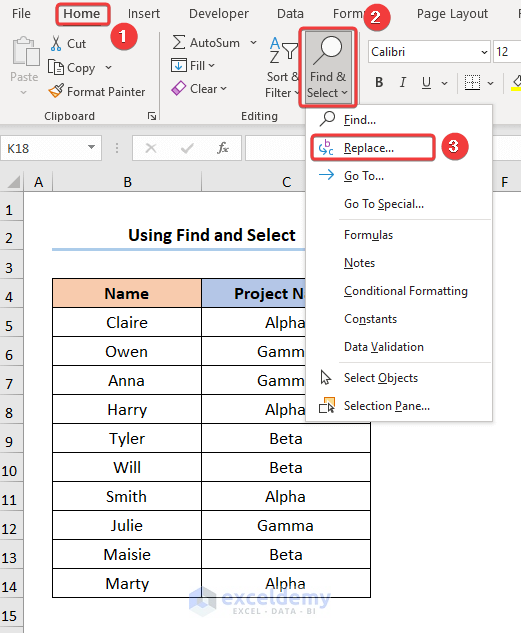
Now, a Find and Replace dialog box pops up.
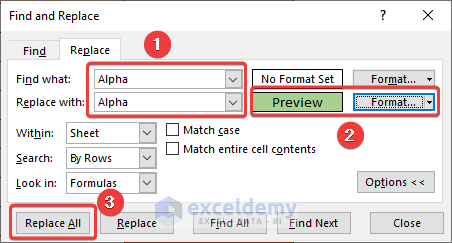
- Secondly, enter the same Project Name (here, it is Alpha) in the Find what and Replace with boxes respectively.
- Thirdly, click on the Format box to choose a color.
- Finally, click the Replace All button.
All the cells with the Project Name Alpha should look like the image shown below.
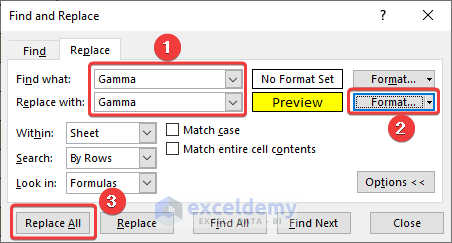
- Similarly, repeat the same process for the Project Name Gamma.
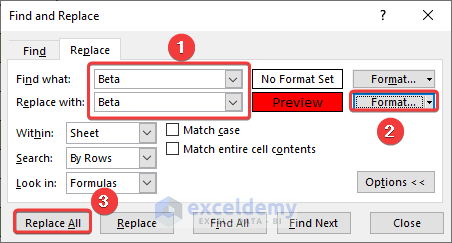
- Likewise, repeating the procedure for Beta.
Eventually, the result should appear like the screenshot given below.
Read More: How to Change Background from Black to White in Excel
Method-6: Applying VBA Code
If you often need to change the background color of cells based on value, then you may consider the VBA code below. It’s simple & easy, just follow along.
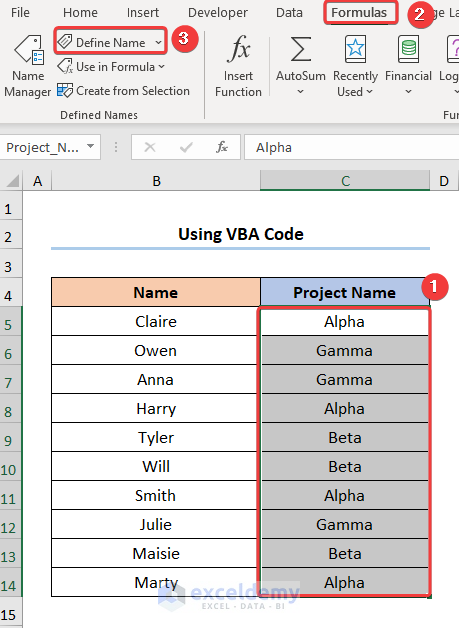
Step-01: Define Named Range
- Firstly, select the range of cells C5:C14 >> go to the Formulas tab in the top Ribbon >> click on the Define Name drop-down.
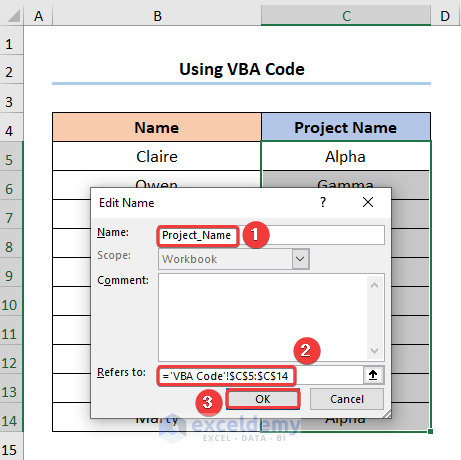
This opens up the Edit Name dialog box
- Now, enter a name in the Name field and click OK. For instance, we’ve entered Project_Name for the Named Range.
- Moreover, Excel automatically populates the Refers to box.
Step-02: Open Visual Basic Editor
- Firstly, navigate to the Developer tab >> click the Visual Basic button.

This opens the Visual Basic Editor in a new window.
Read More:
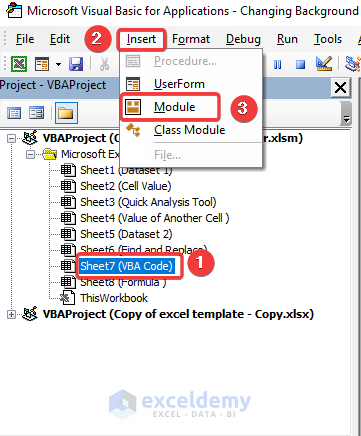
Step-03: Insert VBA Code
- Secondly, choose the Sheet where you want to insert a Module. In this case, we chose Sheet7 (VBA Code).
- Next, go to the Insert tab >> select Module.
For your ease of reference, you can copy the code from here and paste it into the window as shown below.
Sub Change_Cell_Color()
Dim cell_value As Range
Dim project As String
Dim rng As Range
Set rng = Range("Project_Name")
For Each cell_value In rng
project = cell_value.Value
Select Case project

    Case "Alpha"
    cell_value.Interior.Color = RGB(0, 255, 0)

    Case "Gamma"
    cell_value.Interior.Color = RGB(255, 255, 0)

    Case "Beta"
    cell_value.Interior.Color = RGB(255, 0, 0)

End Select
Next cell_value
End Sub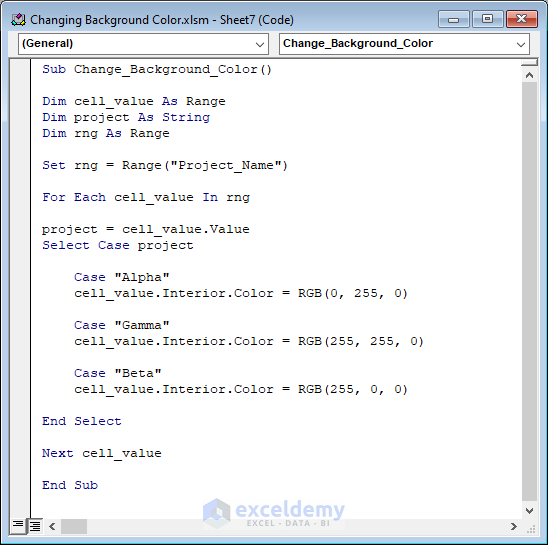
Code Breakdown:
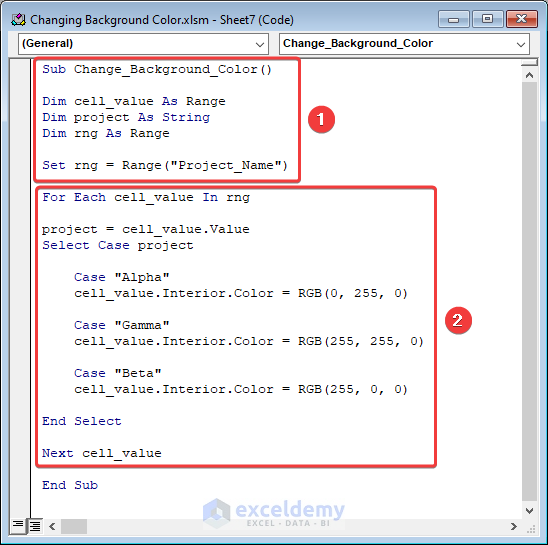
Now, I will explain the VBA code for changing the background color. In this case, the code is divided into two steps.
- Firstly, in the first portion, the sub-routine is given a name.
- Next, define the variable cell_value, project, and rng.
- Then, assign a Range and String data type to each variable.
- Following this, insert the Named Range object in the rng variable.
- Secondly, in the later part use the For Loop statement and the Select Case statement to iterate through each of the three cases Alpha, Gamma, and Beta.
- Lastly, use the Color property to change the background color of the cells. Here, the RGB(0, 255, 0) is the Green color, the RGB(255, 255, 0) is the Yellow color, and RGB(255, 0, 0) indicates the Red color.
Step-04: Running VBA Code
- Now, press the F5 key on your keyboard.
This opens the Macros dialog box.
- Following this, click the Run button.

Subsequently, the background color appears according to the Project Names.

Read More: How to Change Background Color in Excel
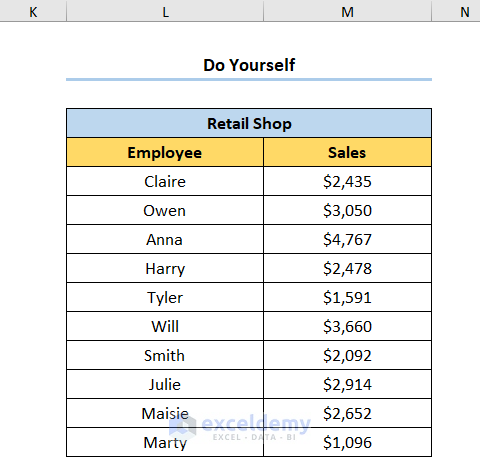
Practice Section
For doing practice by yourself we have provided a Practice section like below in each sheet on the right side. Please do it by yourself.
Download Practice Workbook
You can download the practice workbook from the link below.
Conclusion
This article provides quick and easy answers on how to change the background color based on a value in Excel. Make sure to download the practice files. Hope you found it helpful. Please inform us in the comment section about your experience. Keep learning and keep growing!
Related Articles
- How to Change Background Color to Grey in Excel
- [Fixed!] Background Color Not Changing in Excel
- How to Remove Background in Excel
- How to Remove Background Color in Excel
<< Go Back to Excel Background | Learn Excel
Get FREE Advanced Excel Exercises with Solutions!
