We often need to copy and paste our data into Excel but it can get irritating when you are dealing with a large database. In this situation, Excel auto-fill features are the best solution to save time and work efficiently. You can do many things using this feature that you were probably doing manually. Today in this article we will discuss some of the methods to autofill the cell based on another cell in Excel.
How to AutoFill Cell Based on Another Cell in Excel: 5 Easy Methods
In this section, we will show you five of the most effective ways to auto-fill cells based on another cell. To demonstrate the approaches, we will consider the employee data of a company.
📚 Note:
All the operations of this article are accomplished by using the Microsoft Office 365 application.
1. Autofill to End-of-Data
In this method, we are going to autofill the cell using the Fill Handle icon. We have a set of names in the “Name” column. We need to put their “ID” serially. The steps of this approach are given as follows:
📌 Steps:
- First of all, select cell C5.
- Now, write down the first ID in that cell. Here, we write down 1.
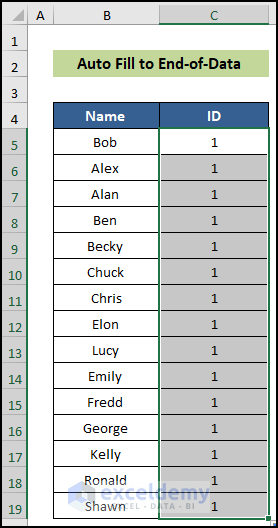
- Then, double-click the Fill Handle icon to fill in all the relevant cells in a column.
- You may notice that it is showing the same number in all cells.
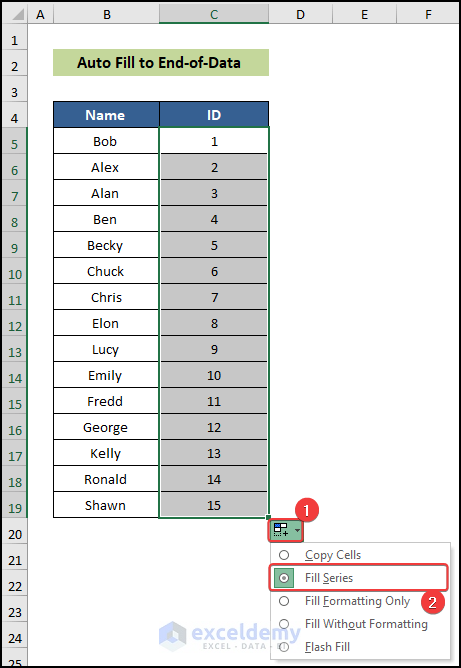
- After that, click on the Auto Fill Options icon and choose the Fill Series option.
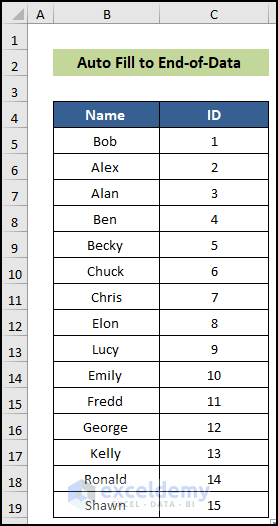
- You will notice Excel will autofill the cell automatically.
Thus, we can say that our procedure works perfectly, and we are able to autofill the cell based on another cell through the Fill Handle tool in Excel.
Read More: How to Apply AutoFill Shortcut in Excel
2. Using CONCATENATE Function
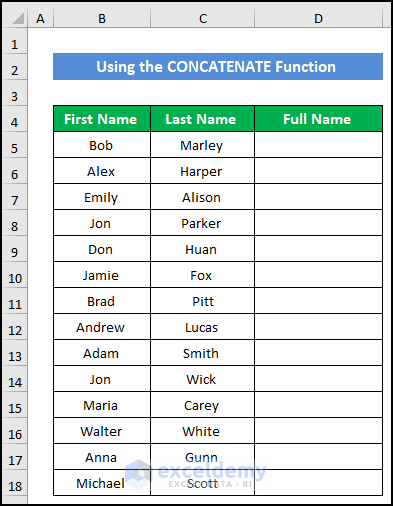
In this approach, we will use the CONCATENATE function to autofill the cell. We have an employee name dataset in separate columns, and we are going to fill the cell of column D.
The steps of this process are given below:
📌 Steps:
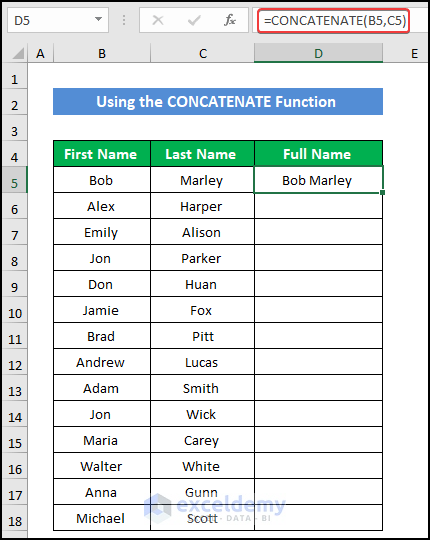
- At first, select cell D5.
- After that, write down the following formula in the cell.
=CONCATENATE(B5,C5)
- Press Enter.
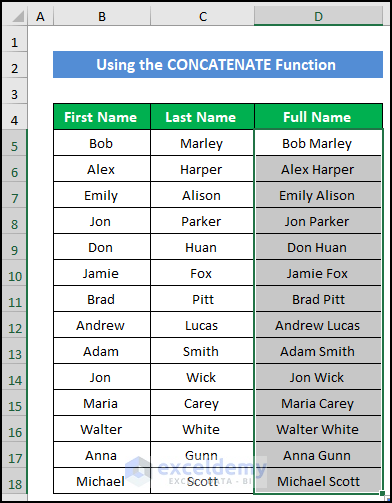
- Now, double-click on the Fill Handle icon to copy and repeat the formula up to cell D18.
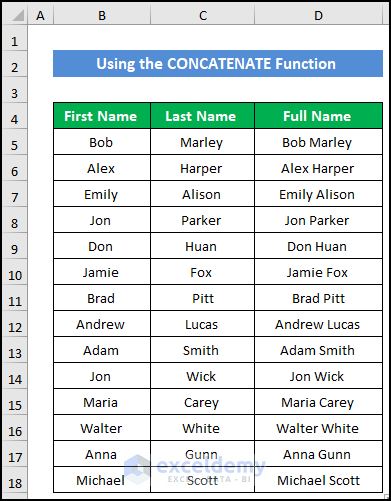
- You will figure out that the formula will autofill the cells of column D.
Hence, we can say that our formula works effectively, and we are able to autofill the formula in the cells.
3. AutoFill the Blank Cells Based on Another Cell
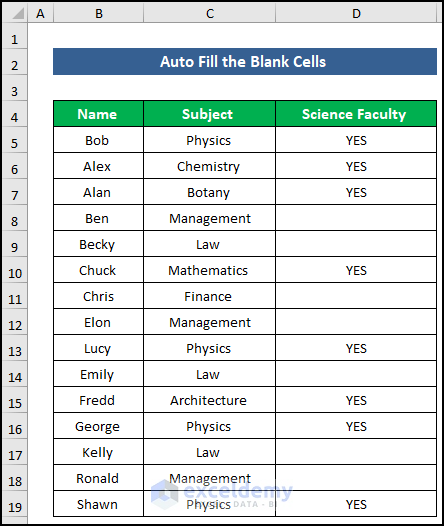
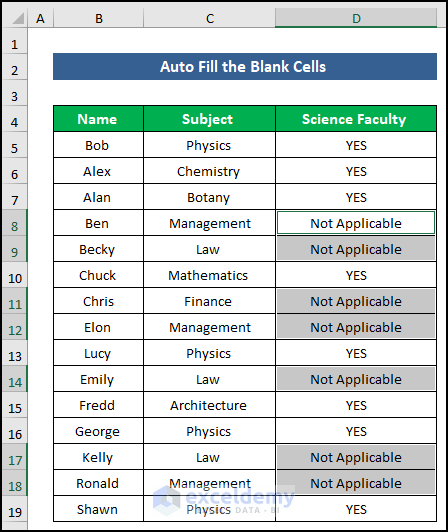
In this process, we are going to fill cells with the help of blank cells. For that, we have given the “Name” and “Subject” of some students. Most of them are from the “Science Faculty” and are given “YES”. Those who are not from the “Science Faculty” are given blank cells. We are going to auto-fill those cells with appropriate words.
The procedure of this process is given below step-by-step:
📌 Steps:
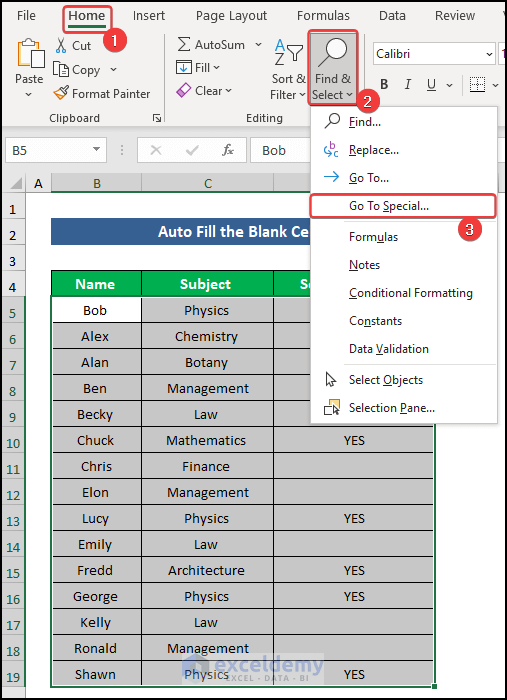
- First, select the range of cells B5:D19.
- Now, in the Home tab, click on the drop-down arrow of the Find & Select > Go To Special option from the Editing group.
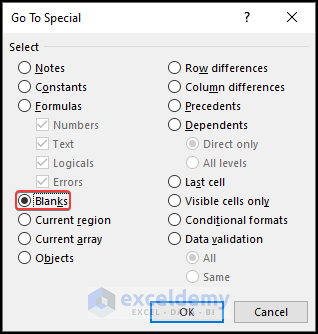
- As a result, a small dialog box called Go To Special will appear.
- Then, select the Blanks option and click OK.
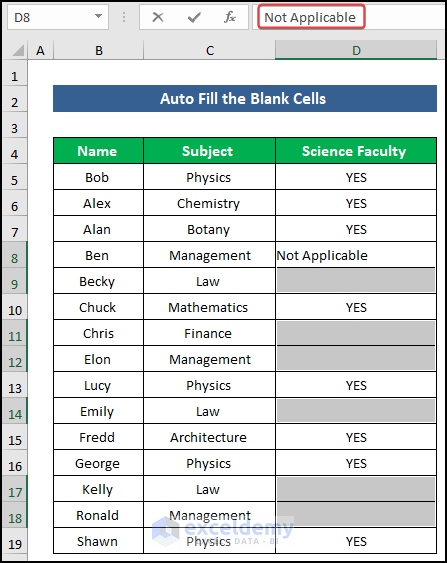
- You will see all the blank cells will show selected.
- After that, write down the appropriate word. We write down Not Applicable.
- Finally, press ‘Ctrl+Enter’.
- You will notice all the blank cells will fill with our desired text.
Therefore, we can say that our method works precisely, and we are able to autofill the cell based on another cell.
Read More: Fix: Excel Autofill Not Working
4. Utilizing IF function
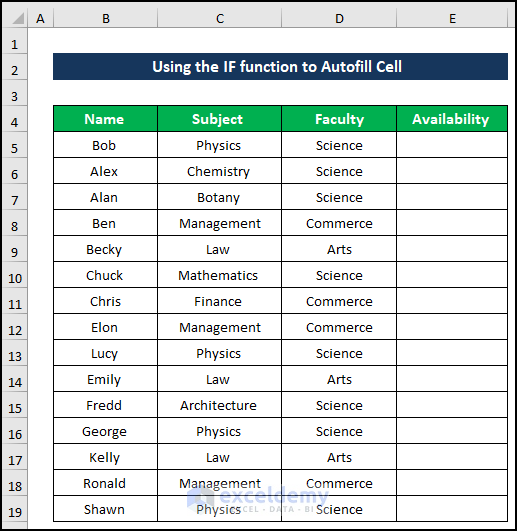
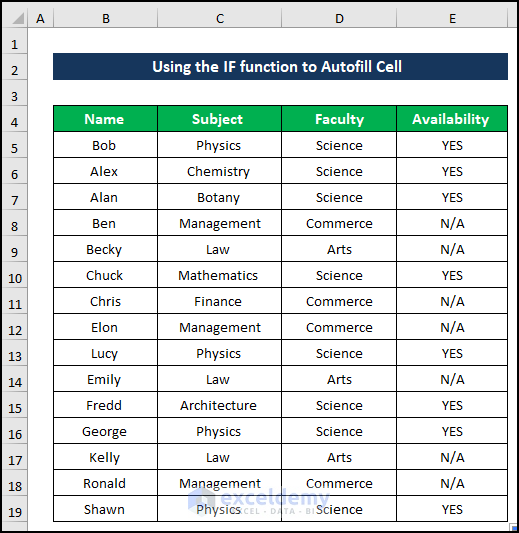
In the following case, we will use the IF function to autofill our cell based on another cell. We have a dataset with the “Name” of some students, their “Subject”, “Faculty”, and “Availability” of these subjects. The formula will show us the result of either YES or N/A in the Availability column.
The steps of this procedure are given below:
📌 Steps:
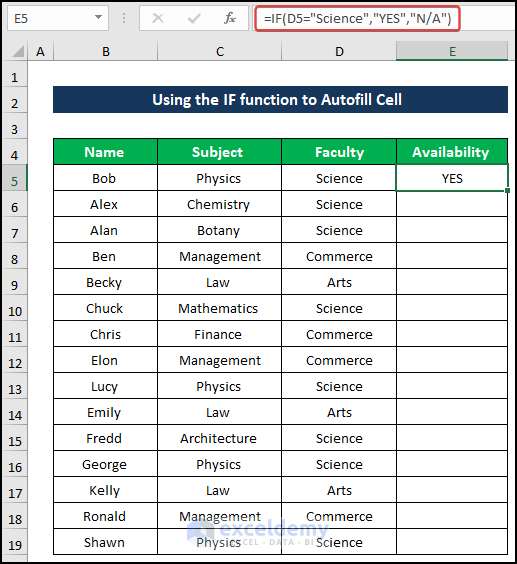
- Firstly, select cell E5.
- Afterward, write down the following formula in the cell.
=IF(D5="Science","YES","N/A")
- Then, press Enter.
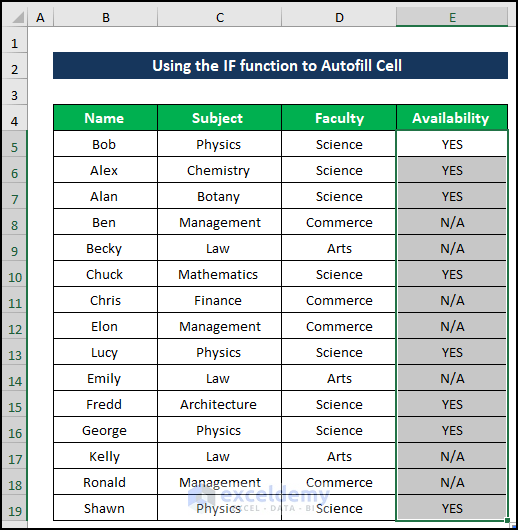
- Next, double-click on the Fill Handle icon to copy the formula up to cell D19.
- You will find that the formula will autofill the Availability column with our desired result.
At last, we can say that our formula works fruitfully, and we are able to autofill the cell based on another cell using our formula.
5. Applying VLOOKUP function
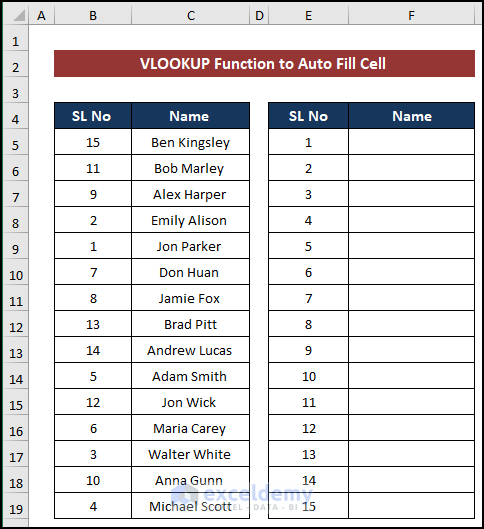
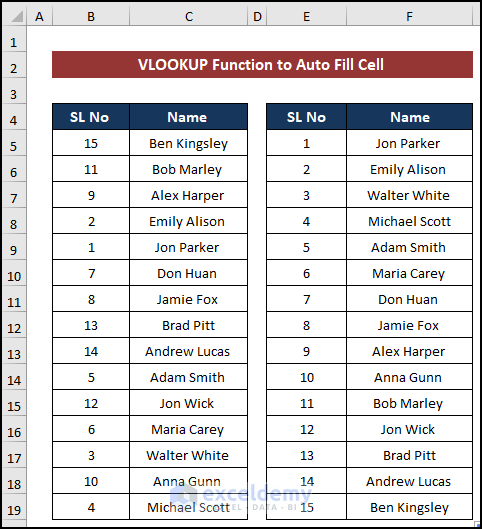
In the last method, the VLOOKUP function will help us to autofill our cell based on another cell. We have a dataset with a scattered format. We are going to sort this and fill the cell of column F based on column E.
The steps of this approach are shown as follows:
📌 Steps:
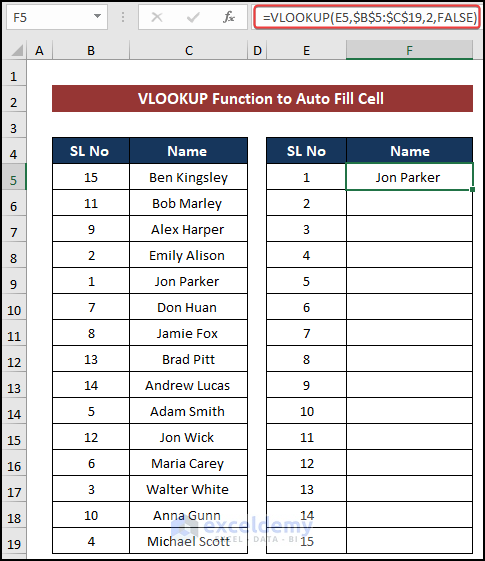
- In the beginning, select cell F5.
- Next, write down the following formula in the cell. Make sure that you add the Absolute Cell Reference for the range of cells B5:C19.
=VLOOKUP(E5,$B$5:$C$19,2,FALSE)
- Press Enter.
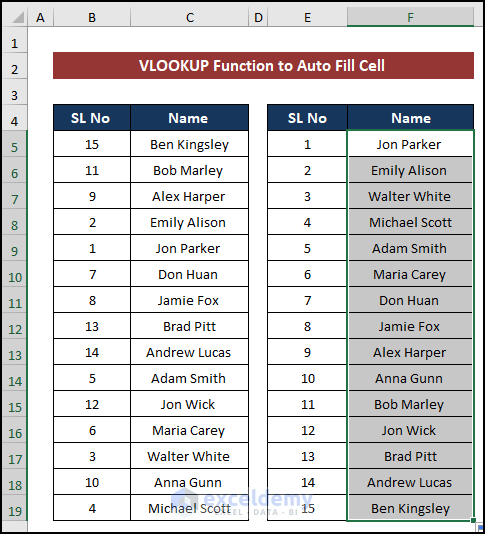
- Now, double-click on the Fill Handle icon to copy the formula up to cell F19.
- You will get your desired result.
Finally, we can say that our formula works successfully, and we are able to autofill the cell based on another cell by the VLOOKUP function.
Things to Remember
➤ In auto-fill to end-of-data, first, fill up 2 or 3 numbers manually to auto-fill in series. If you insert only one data, Excel then won’t understand the series.
➤When you select your “Table_Array” you have to use the absolute cell references ($) to block the array.
Download Practice Workbook
Download this practice workbook for practice while you are reading this article.
Conclusion
That’s the end of this article. I hope that this article will be helpful for you and you will be able to autofill a cell based on another cell in Excel. Please share any further queries or recommendations with us in the comments section below if you have any further questions or recommendations.
Keep learning new methods and keep growing!
Further Readings
- [Fixed!] Auto Fill Options Not Showing in Excel
- [Fixed!] AutoFill Formula Is Not Working in Excel Table
- How to AutoFill Sequential Letters in Excel
- How to AutoFill from List in Excel
- How to Turn Off AutoFill in Excel
- How to Create a Custom AutoFill List in Excel
- [Solved:] Excel Double Click AutoFill Not Working
<< Go Back to Excel Autofill | Learn Excel
Get FREE Advanced Excel Exercises with Solutions!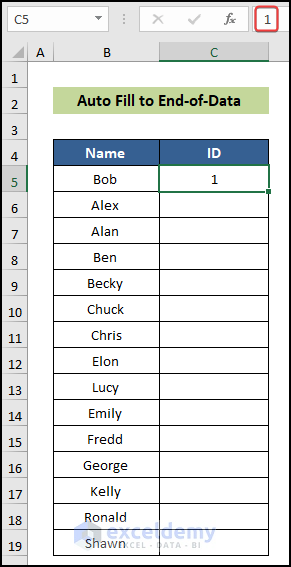


Thanks for the info- very helpful!! I also need assistance with: transfering gender and language from one column to another in the same row, but am have trouble finding the formula to do this. Any assistance available for that?
Hi HAZEL,
I am assuming that you want to transfer Gender and Language from one column to another without changing the row position.
In that case, you can insert a new column to the left of the Gender and Language column.
To do so,
● Select the Gender column.
● Then, right-click your mouse to bring the context menu.
● After that, select Insert.
● Excel will add a new column and transfer the Gender and Language column.\
There is another solution to this problem. You can use the OFFSET function. The advantage of this function is that you can transfer any portion of the columns to anywhere in the Excel sheet.
Suppose, I want to transfer B8:C10 to E8:F10. To do so,
● Go to E8 and write down the following formula
=OFFSET(B4,4,0,3,2)
● Then, press ENTER. Excel will move the cells.
● If you use earlier versions of Excel, you have to select E8:F10, then write down the formula and finally press CTRL+SHIFT+ENTER, since the OFFSET function is an array function.
And lastly, you can copy the cells and paste them to transfer columns.
I hope it helps. If it does not satisfy you, please let us know.
Thank you. Have a great day.