Looking for ways to know how to protect Excel Cells with password? This is the right place for you.
There are times when you just need to protect a particular cell or cells with a password so that the viewer can’t edit those cells. Or you simply don’t need to change the supposed constant values or formulas in those cells that may affect the other values. And if any change is necessary, only the owner with a password can change it.

The general idea to protect Excel cells with a password is to lock the cells first. Then proceed to protect the sheet using a password. To lock the cells you first need to format the cells. So this is a combination of formatting cells and protecting sheets. In this tutorial, you can learn how to protect Excel cells with password.
How to Protect Excel Cells with Password: 5 Suitable Examples
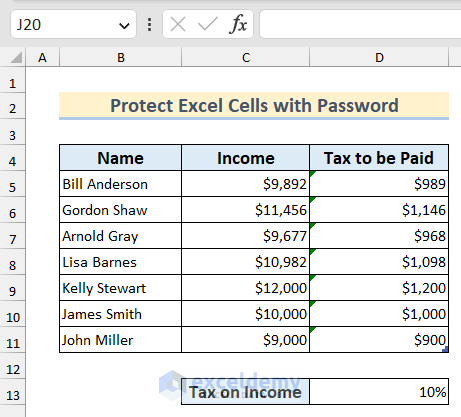
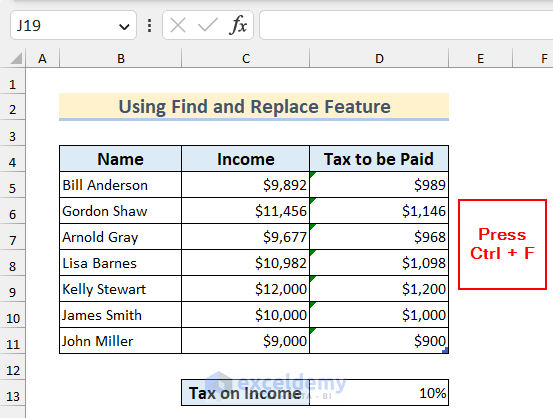
Suppose we have a dataset containing the Name, Income and Tax to be Paid of some employees. Now using this dataset we will show you how to protect cells with your desired password in Excel.
1. Protect All Excel Cells with Password Using Keyboard Shortcut
First, we will see how you can protect all Excel cells from being edited in a spreadsheet with a password. To do this select all cells before formatting and protecting them.
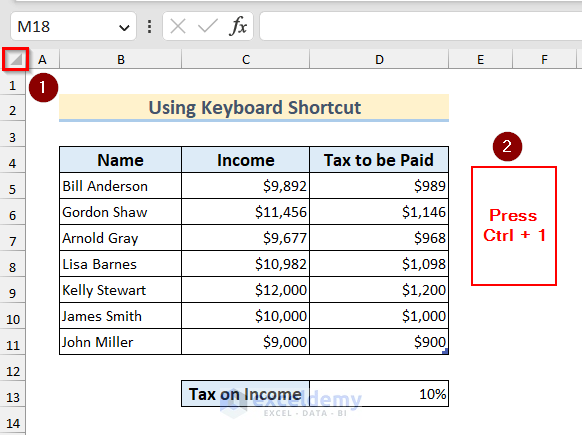
- First, select all cells by clicking the triangular sign where the column headers and row headers meet.
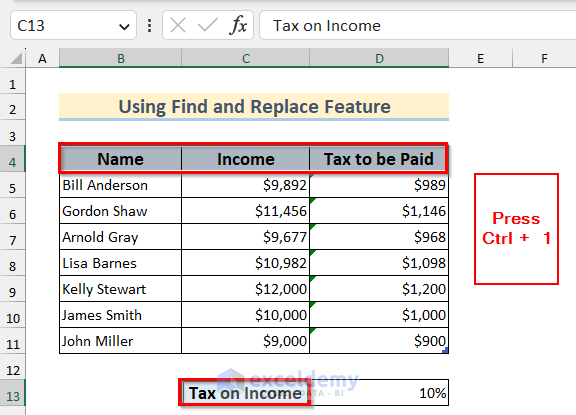
- Press Ctrl+1 on your keyboard.
- Now, in the Format Cells box, go to the Protection tab >> check the Locked option if it is not checked >> click on OK.

How to Protect Worksheet with Password
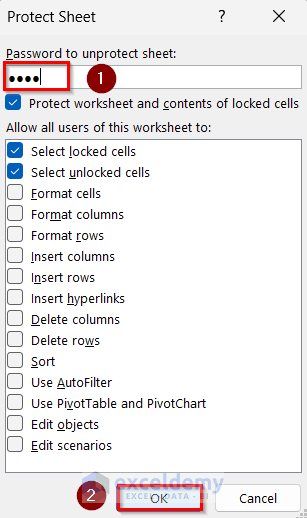
Now, you will have to protect your worksheet with your desired password. Here, we will use 1234 as the password to protect our worksheet.
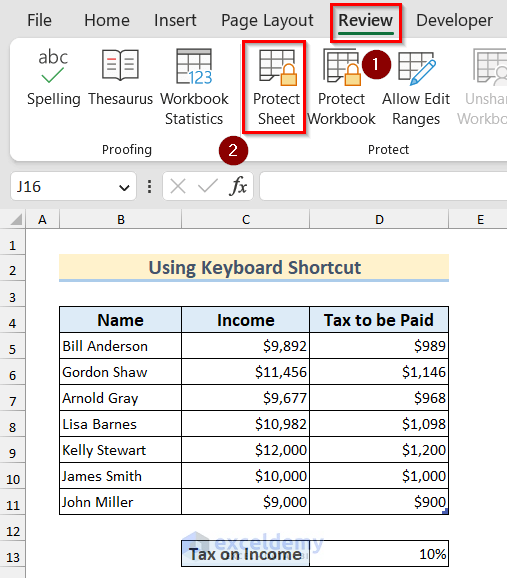
- Go to the Review tab >> select Protect Sheet from the Protect group.
- Type the password in Password to unprotect sheet.
- Then, check the Protect worksheet and contents of locked cells option if it is not checked.
- Finally, click on OK.
- Re-enter the password in the Confirm Password box to confirm >> click on OK.

- As a result, all cells in the spreadsheet will be protected with a password from now on. If you want to edit any cells, a warning box will appear.
- For further editing, unprotect the sheet with the password you have just entered.
Read More: How to Protect Excel Cells with Formulas
2. Select Specific Cells to Protect with Password in Excel
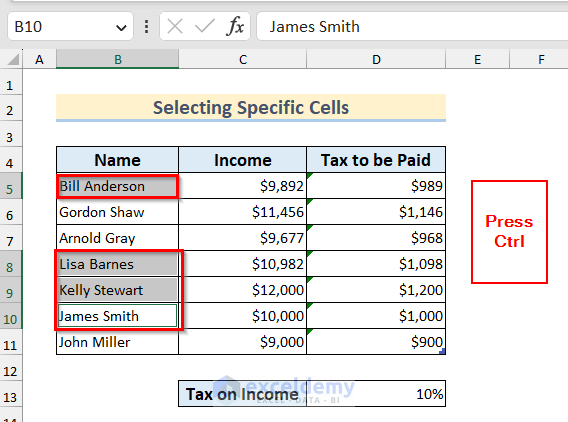
There are certain conditions where you have to protect just some specific cells so that only you have the authority to edit them. For example, we may need to protect the first, fourth, fifth and sixth entries of the Name column from the dataset to prevent editing from third parties.
To do that, you may need to check if all the cells are unlocked first and then lock and protect your desired specific cells.
- Select all cells from the worksheet and then open the Format Cells box by pressing Ctrl + 1 on your Keyboard.
- Go to the Protection tab >> uncheck the Locked option if it is checked >> click on OK.

- Next, select your desired cells by pressing Ctrl on your keyboard.
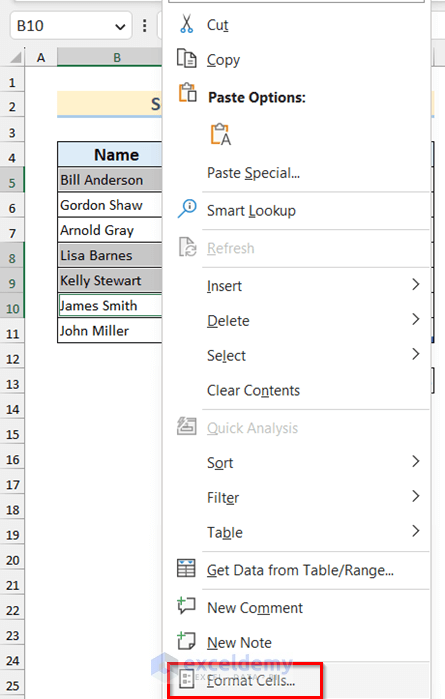
- Then, right-click on it and select the Format Cells option.
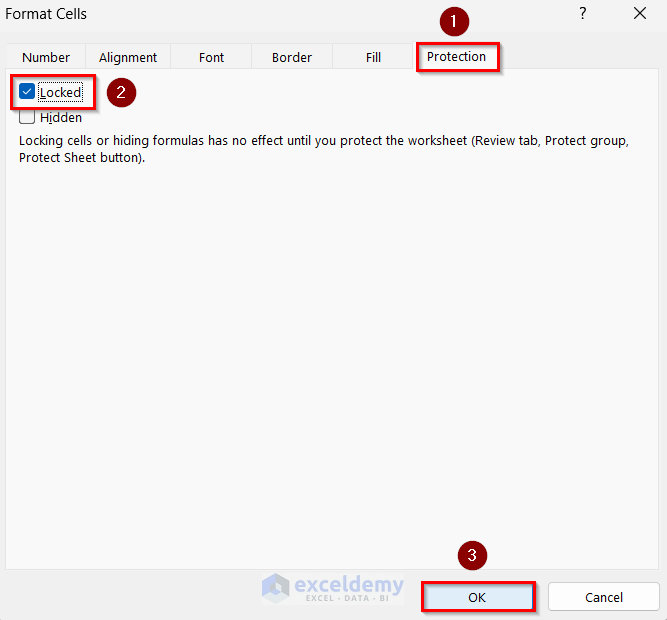
- In the Format Cells box, go to the Protection tab >> check the Locked option and click on OK.
- Next, protect your worksheet with a password by going through the steps
Review tab >> select Protect Sheet >> Type password in Password to unprotect sheet >> check Protect worksheet and contents of locked cells option >> OK
- If you want to edit these particular cells, you will see a warning box. If you want to edit these cells again, then unprotect the sheets with the password to do so.

Read More: How to Protect Excel Cells from Deletion
3. Use Lock Cell Feature from Home Tab to Protect Specific Row or Column in Excel
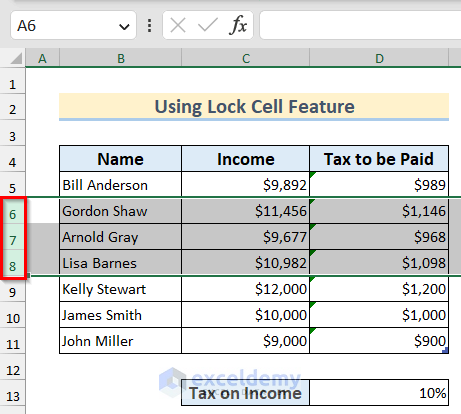
Sometimes, while making a worksheet you may need to protect the whole column or row from viewers to edit further. For example, we may need to protect the sixth, seventh and eighth rows in the dataset with a password. To protect all excel cells with a password in a row or column, follow these steps.
- Check if all the cells are unlocked and if not unlock them following the steps.
Select all cells >> press Ctrl + 1 to open Format Cells box >> Protection tab >> uncheck the Locked option >> OK.
- Now, select the entire row or column by clicking on the row or column header. I have selected the sixth, seventh and eighth rows here by clicking on 6, 7, and 8 on the row headers on the left.
- Another way to open the Format Cells box is to go to the Home tab >> click on Format >> select Lock Cell.
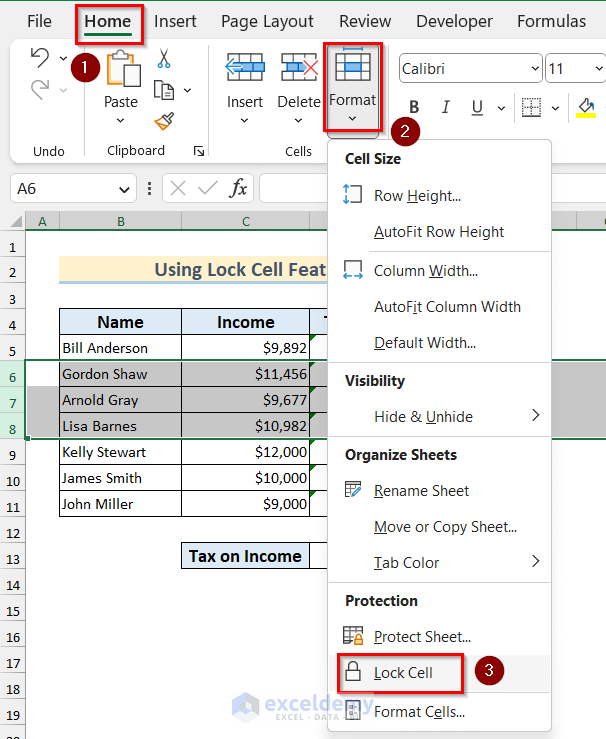
- Thus, the selected cells will be locked.
- To protect your worksheet with a password go through the steps
Review tab >> select Protect Sheet >> Type password in Password to unprotect sheet >> check Protect worksheet and contents of locked cells option >> OK
- As a result, this will protect Excel cells in entire rows with a password. If you want to edit the cells from those rows from now on, you will see a warning box appear.

Read More:How to Lock Cell Value Once Calculated in Excel
4. Apply Go to Special Feature to Protect Formula Cells with Password in Excel
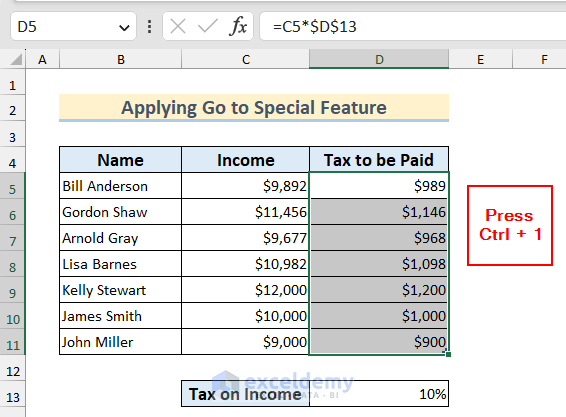
There are situations where you have to protect the cells that contain formulas. For example, the Tax to be Paid column in the mentioned dataset is determined by a formula. We may want to secure these cells in such a way that the values will change depending on the values from other cells only using the formula but we cannot change it manually to be a random value.
For a large dataset where cells containing formulas are randomly distributed, follow these steps to select and protect Excel cells with a password.
- Check if all the cells are unlocked and if not unlock them following the steps.
Select all cells from the worksheet >> press Ctrl + 1 to open the Format Cells box >> Protection tab >> uncheck the Locked option >> OK.
- Go to the Home tab >> select Find & Select option from the Editing group >> select Go To Special.
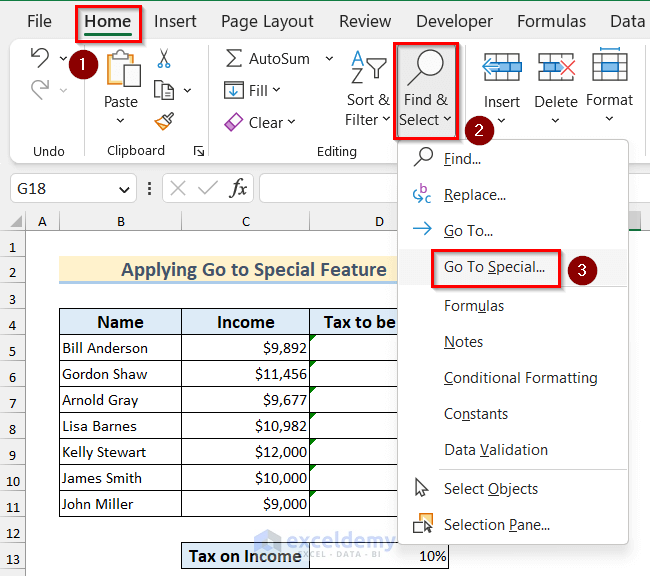
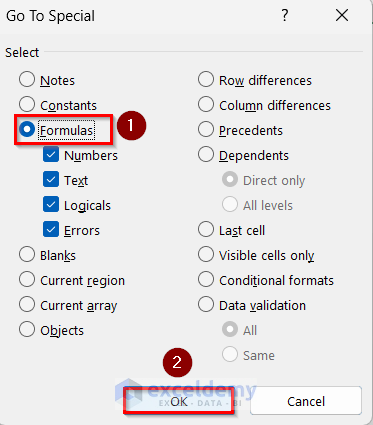
- Select the Formulas option from Go to Special box and click on OK.
- As a result, this will automatically select all the cells with the formulas. If you have a large dataset, this method to select the cells with formulas will be particularly helpful.
- Open the Format Cells box again by pressing Ctrl+1 on your keyboard.
- After that, go to the Protection tab and check Locked >> click on OK.

- To protect your worksheet with a password go through the steps
Review tab >> select Protect Sheet >> Type password in Password to unprotect sheet >> check Protect worksheet and contents of locked cells option >> OK
- Now you can’t enter random values in the cells that contain formulas. If you attempt to edit one, the warning box will pop up preventing you from doing so.

5. Protect Excel Cells with Password Using Find and Replace Feature If Cells Contain Specific Formatting
Now, suppose you want to protect cells that have a certain type of formatting. You can do that by using the Find and Replace feature.
Here, we want to protect the cells containing the heading of our dataset and have specific formatting. Follow the steps given below to do that.
- Check if all the cells are unlocked and if not unlock them following the steps.
Select all cells >> press Ctrl + 1 to open the Format Cells box >> Protection tab >> uncheck the Locked option >> OK.
- Press Ctrl + F to open the Find and Replace box.
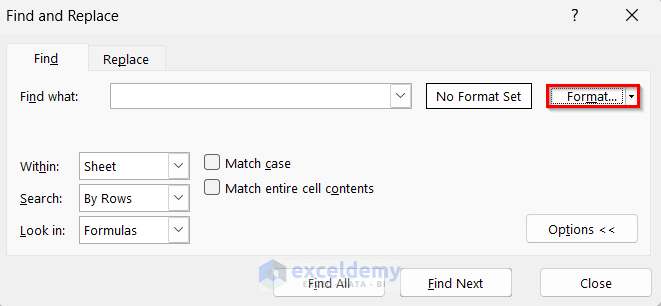
- Then, click on Format to find a specific type of formatted cells.
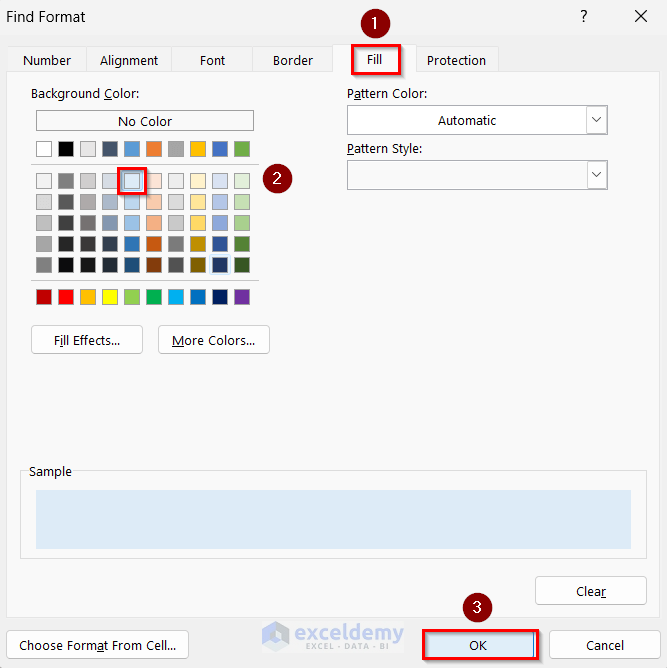
- Here, our headings have a specific type of Fill color, so we will go to the Fill tab and select that color.
- Select the formatting you are looking for in your dataset and then click on OK.
- Click on Find All to find all the cells with that formatting all at once and press Ctrl + A to select them all.
- After that, close that box.
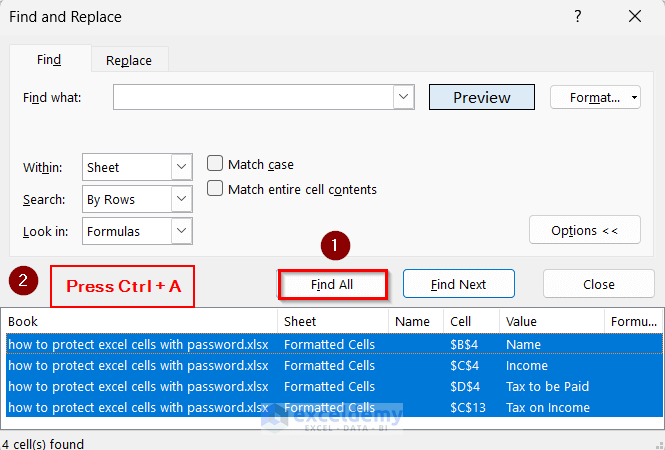
- Now, you will see that all the cells have been selected with that specific type of formatting.
- Open the Format Cells box again by pressing Ctrl+1 on your keyboard.
- Go to the Protection tab >> check the Locked option >> click on OK.

- To protect your worksheet with a password
Go to Review tab >> select Protect Sheet >> Type the password in Password to unprotect sheet >> check Protect worksheet and contents of locked cells option >> OK
- Now you can’t enter random values in the cells that contain that specific formatting. If you attempt to edit one, the warning box will pop up preventing you from doing so.

How to Disable Selection of Excel Locked Cells
Usually, we lock cells to restrict the user to insert any value in those cells in Excel. If you disable the selection of those cells they will not be able to select those cells to insert any value. This is a more convenient way to avoid errors.
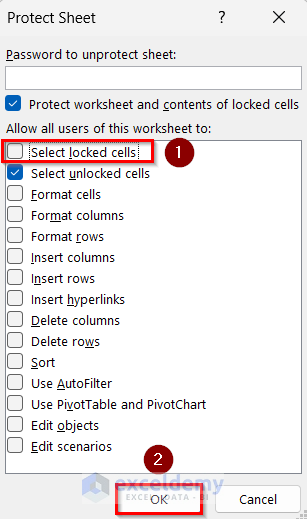
- To disable the selection of locked cells, go to the Review tab >> select Protect Sheet.
- Then, uncheck the Select locked cells option.
Read More: How to Unlock Cells without Password in Excel
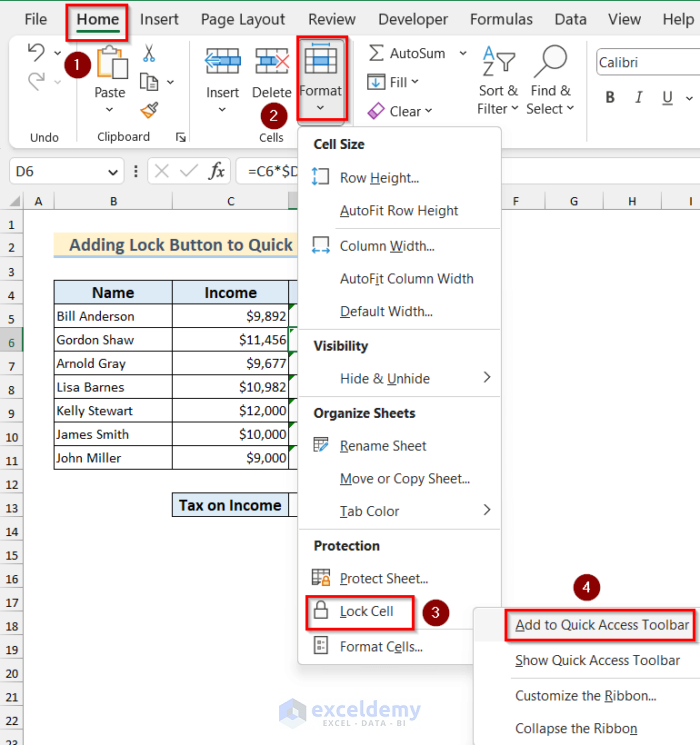
How to Add Lock Button to Quick Access Toolbar in Excel
If you add the Lock button to Quick Access Toolbar in Excel you can lock any cell by just selecting that cell and then clicking on the button. It will make your task easier.
- Go to the Home tab >> click on Format >> select Lock Cell and right-click on it >> select Add to Quick Access Toolbar option.
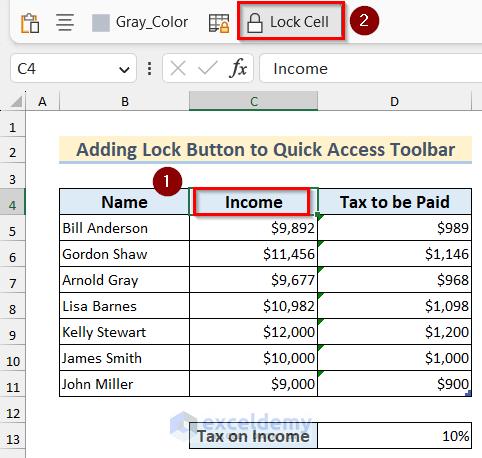
- Now, you can simply select a cell and click on the Lock Cell button to lock that cell in Excel.
Download Practice Workbook
You can download the Excel workbook that we’ve used to prepare this article.
Conclusion
These were all different situations and guides on how to protect Excel cells with password. Hope you find this guide helpful and informative. If you have any questions or suggestions, let us know your thoughts below.
Related Articles
- How to Lock Multiple Cells in Excel
- How to Lock a Cell in Excel Formula
- Protect Excel Cells But Allow Data Entry
- How to Protect Cells Without Protecting Sheet in Excel
<< Go Back to Protect Excel Cells | Excel Protect | Learn Excel
Get FREE Advanced Excel Exercises with Solutions!
