The article will show you how to change the printing scale so all columns will print on a single page. Sometimes your Excel workbook can have too many columns to fit on one page while printing the dataset. In that case, you cannot print out the worksheet with each column that you need. In this article, you will see some very effective and efficient methods to print an Excel sheet with all the columns in it.
Download Practice Workbook
7 Ways to Change the Printing Scale So All Columns Will Print on a Single Page
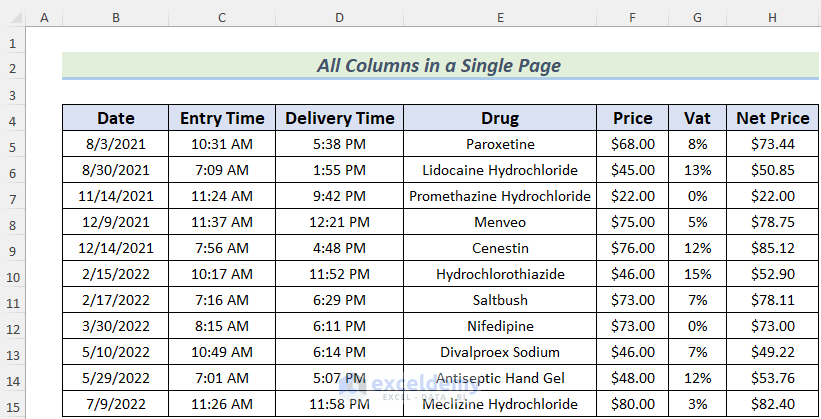
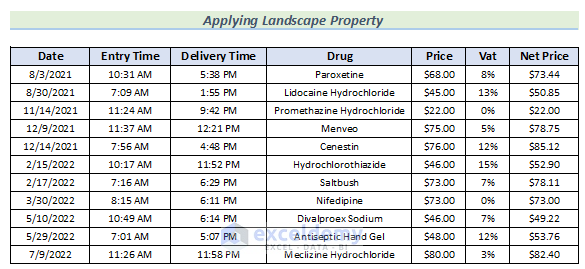
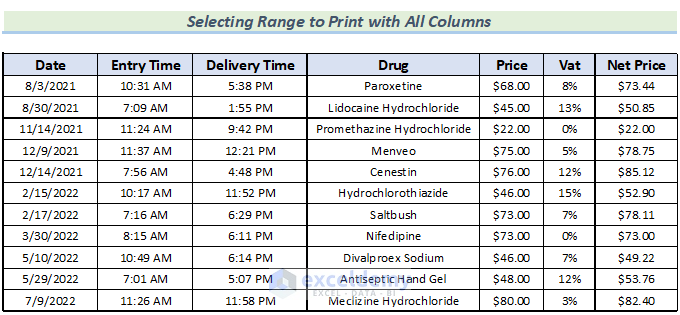
In the dataset, we have sales information about some drugs. The dataset consists of 7 columns. All the methods that we will describe in the following parts of this article are pretty quick and simple.
1. Changing the Printing Scale from File Menu
In this section, I’ll show you how to apply the Scale property to change scaling and fit all the columns in one page while printing. Let’s go through the description below.
Steps:
- First, go to the File menu >> Print or just press CTRL+P to open printing options. You will see that not all the columns appear in the preview section. It’s because we did not set any scaling.

- After that, set the scaling to Fit All Columns on One Page. You can now see all the columns of the dataset in the preview section. Although it’s not clear to see.
- To show you the print preview properly, I activated the printing process by selecting Print.
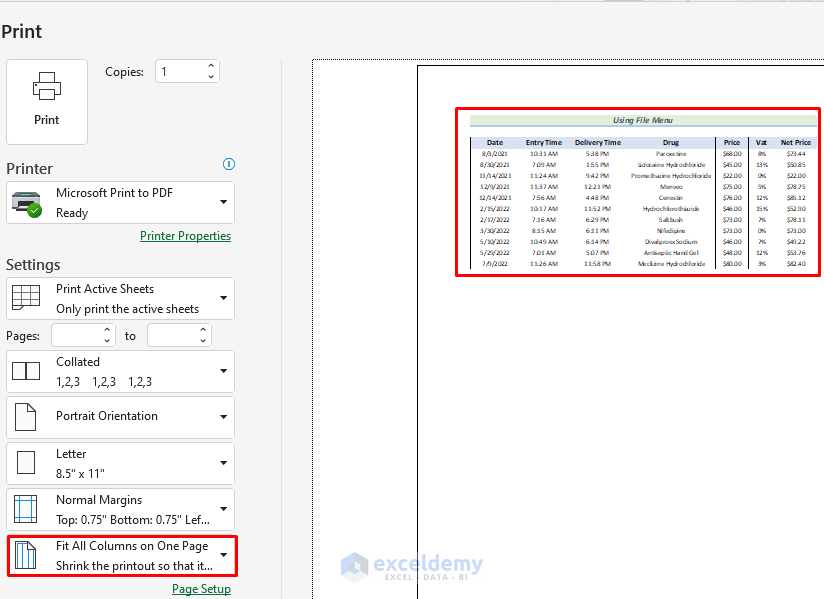
- Next, the Save Print Output As window will appear. It’s convenient to save files as PDF, so I selected .pdf and gave the file a name.
- After that, click on Save.

- Now, go to the File location and open it. You will get a clear view of your printing copy.

Thus, you can change the printing scale so all columns will print on a single page.
Note:
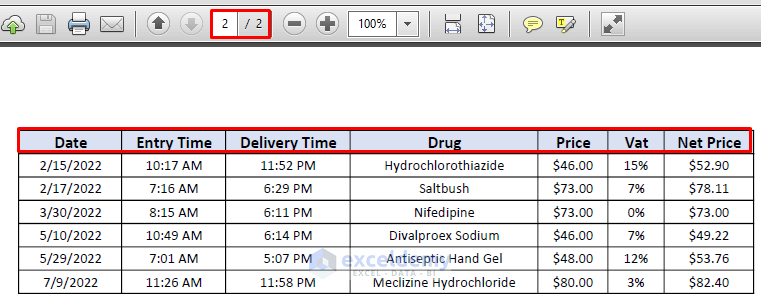
You can process this easy technique to fit all the columns in your printing copy. However, if your sheet has too many rows to fit on one page, there’s one more thing you might need to do. The column header should appear on every page. And for that reason, we are going to follow the steps given below.
- Go to the Page Layout Tab and then select the Page Titles ribbon from the Page Setup group. I added some more rows to the dataset.
- After that, select Sheet and select the header row to appear on top repeatedly on each page. In my case, the headers are in the 4th row, so I selected it.
- Next, click OK.

- Just like before, print the copy and save it as a PDF Document. I opened the file and went to the 2nd You can see that the headers are also on that page.
Read More: Why Is My Excel Sheet Printing So Small (Reasons and Solutions)
2. Using Page Layout Tab to Change the Printing Scale
We can also change the printing scale from the Page Layout Tab and fit all the columns of the datasheet on one page for printing copies. Let’s read the description below.
- First, select the Page Layout Tab and click on the Page Setup icon at the right bottom corner of the Page Setup group.
- After that, just set the Scaling Fit to 1 Page and click on Print.

- Next, save the file like we did in Method 1 and open the file. You will see the preview of the print copy.
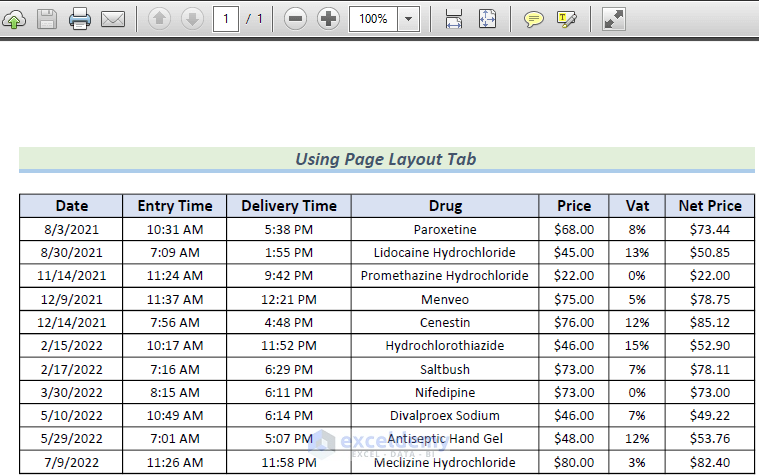
Thus, you can change the printing scale so all columns will print on a single page by using the Layout Tab.
Read More: How to Stretch Excel Spreadsheet to Full Page Print (5 Easy Ways)
3. Applying Landscape Property to Change the Printing Scale
Another feasible way to change the printing scale is to apply the Landscape property instead of the Portrait one. Let’s follow the instructions given below.
Steps:
- First, open the Page Setup window following Method 2.
- After that, select Page and change the Orientation from Portrait to Landscape.
- Make sure your Scaling is Adjusted to 100% normal size.
- Next, select Print or Print Preview as you wish.

In the preview section, you can see all the columns are on the same page.
By following this approach, you can change the printing scale so all columns will print on a single page by applying the Landscape Property.
Read More: How to Adjust Page Size for Printing in Excel (6 Quick Tricks)
4. VBA to Change the Printing Scale to Print All Columns on a Single Page
We can also effectively use Microsoft Visual Basic for Applications (VBA) for printing all the columns. We don’t necessarily need to scale the printing area while using VBA because VBA will automatically fit the print area after we run the corresponding Macro. Let’s get to the procedure below for a better understanding.
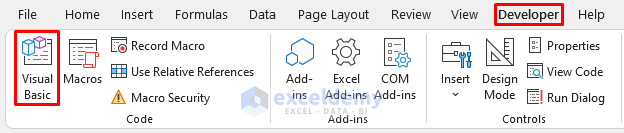
- First, go to the Developer Tab and select Visual Basic.
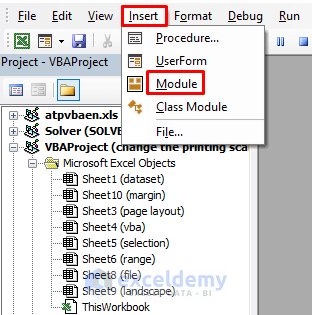
- After that, the VBA editor will open up. Select Insert >> Module to open a VBA Module.
- Next, type the following code in the VBA Module.
Sub PrintRangeFromSheet()
Application.PrintCommunication = False
With Sheets("vba").PageSetup
.FitToPagesWide = 1
.FitToPagesTall = False
End With
Application.PrintCommunication = True
Sheets("vba").PrintPreview
'Sheets("vba").PrintOut
End Sub
Here, we used the VBA Sheets.PrintOut property to print the ‘vba’ sheet. The .FitToPagesWide and .FitToPagesTall are used to fit all the columns in one page. Here, we want to show you the preview, so I commented out the PrintOut property and used the PrintPreview property. You can just remove the line with the PrintPreview property and the apostrophe comma (‘) from the line with the PrintOut property if you want to directly print the range.
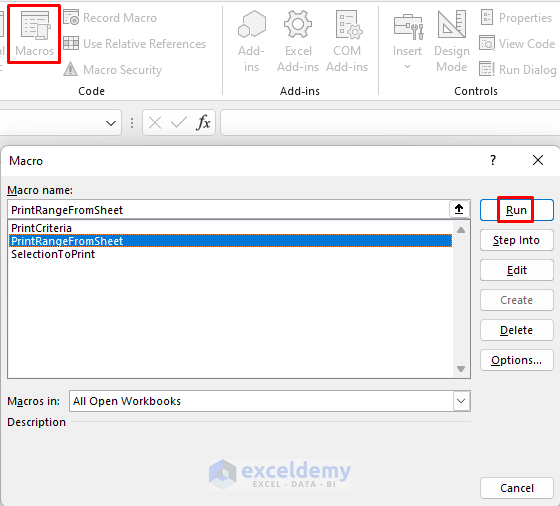
- Thereafter, go back to your sheet and run the Macro named PrintRangeFromSheet as it is the name of our current Macro.
Next, you will see the preview of the printing copy.

Thus, you can include all the columns on a single page by applying VBA for the printing purpose.
5. Changing the Printing Scale by Range Selection
We can also select the range of cells that we want to print with all the columns on one page. Here we will also apply VBA for this purpose. Let’s go through the following description for a better perspective.
Steps:
- First, follow the steps to open a VBA Module from Method 4.
- Next, type the following code in the Module.
Sub SelectionToPrint()
Application.PrintCommunication = False
With ActiveSheet.PageSetup
.FitToPagesWide = 1
.FitToPagesTall = False
End With
Application.PrintCommunication = True
Selection.PrintPreview
'Selection.PrintOut
End Sub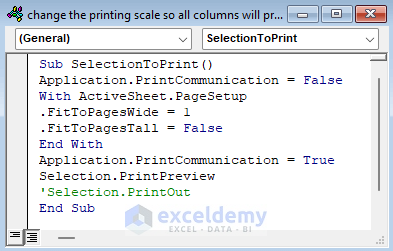
Here, we used the VBA Selection property to select a specific range of cells to print. Other properties are for fitting all the columns on one page of the printing copy.
- Now, go back to your sheet, select the range of printing data and run the Macro named SelectionToPrint.

After that, you will see the preview of the print copy as we enable the PrintPreview property instead of the PrintOut property.
Thus, you change the printing scale so all columns will appear on a single page by selecting the range.
6. Using Range Property
As we are using VBA now, we can also do the same thing by using the Range property of VBA. Let’s follow the instructions below.
Steps:
- First, follow the steps to open a VBA Module from Method 4.
- Next, type the following code in the Module.
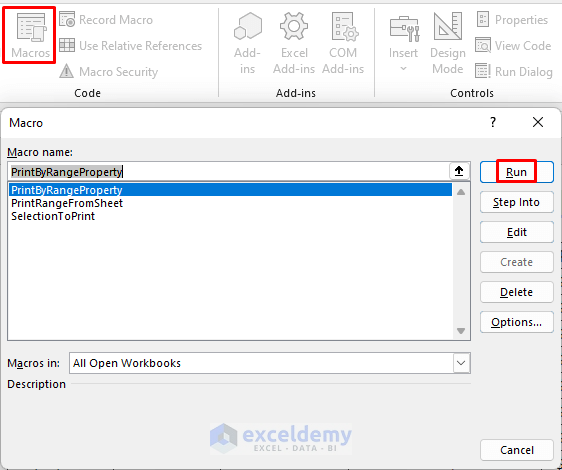
Sub PrintByRangeProperty()
Application.PrintCommunication = False
With ActiveSheet.PageSetup
.FitToPagesWide = 1
.FitToPagesTall = False
End With
Application.PrintCommunication = True
Range("B2:H15").PrintPreview
'Range("B2:H15").PrintOut
End Sub
Here, we used the VBA Range property to define a specific range of cells to print. As our printing data covers the range B2:H15, we use this range in the property. Other properties are for fitting all the columns on one page of the printing copy.
- Now, go back to your sheet and run the Macro named PrintByRangeProperty.
After that, you will see the preview of the print copy as we enable the PrintPreview property instead of the PrintOut property.

Thus, you change the printing scale and print your copy with all columns of the dataset by using the VBA Range property.
7. Using Custom Margin
There is another way to change the printing scale of your print copy if you want to customize the copy on your own. And the way to do this is to use the Custom Margin. You may not be able to fit all the columns if your dataset contains a lot of columns. Let’s see how this works.
Steps:
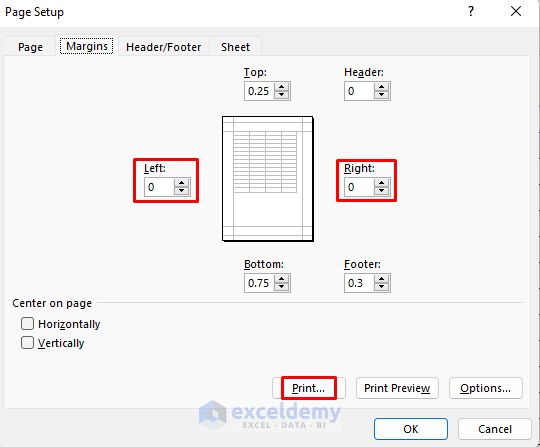
- First, open the Page Setup window following Method 2.
- After that, select Margin and change the marginal values according to your convenience. Here I used the narrowest margin possible by making both Left and Right marginal values 0 (zero).
- Thereafter, select Print to print your copy.
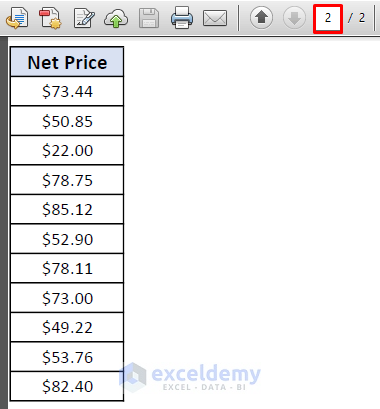
- Next, save the file following Method 1 and open the file. You will see that one column is missing from the 1st page of the printing copy.

However, you will get the other column on the next page.
This method is not as efficient as the previous methods. However, if your dataset contains a moderate amount of columns, this method may work. It’s not feasible for larger datasets.
Read More: Excel Fit to Page Scale/Preview Looks Small (5 Suitable Solutions)
Practice Section
Here, I’m giving you the dataset of this article so that you can practice these methods on your own.

Conclusion
In the end, this article will provide you with the best possible outcomes to change the printing scale so all columns will print on a single page. If you have any better methods or questions or feedback regarding this article, please share them in the comment box. This will help me enrich my upcoming articles. For more queries, kindly visit our website ExcelDemy.
Related Articles
- How to Fit Excel Sheet on One Page in Word (3 Simple Ways)
- Add Legal Paper Size in Excel
- How to Add A3 Paper Size in Excel (2 Quick Ways)

