In Excel, the VLOOKUP function is a very popular one for fetching data among large datasets. But sometimes we face difficulties when VLOOKUP does not calculate automatically. There are several reasons behind this occurrence. Therefore, go through this article thoroughly where we will describe 7 possible solutions when Excel VLOOKUP is not calculating automatically.
VLOOKUP Function Is Not Calculating Automatically in Excel: 7 Solutions
To illustrate the process, here is a sample dataset that has Product ID, Product Names, and Sales amount of 5 types of products.

Now, we want to find the product name and sales value of id 203 with the VLOOKUP function.
=VLOOKUP(C11,B5:D9,2)
But, when we apply the AutoFill command we get the #N/A error in the case of the Sales amount, whereas we were supposed to get an auto-calculated result.

So, let us find out the reasons behind this issue and try to solve it.
1. Enable Automatic Calculation for Calculating with VLOOKUP
You have to check the Calculation Options before running a formula to successfully run the calculation with VLOOKUP.
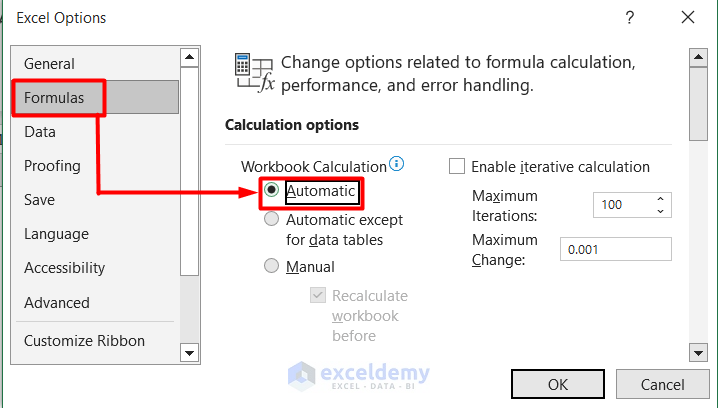
- First, go to the Formulas tab and select Calculation Options.
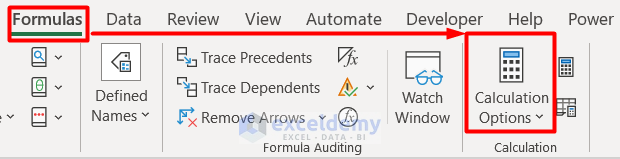
- Then, select the Automatic option in the drop-down menu.

- Finally, you will see that VLOOKUP is calculated automatically.

- Otherwise, you can also get this command from File > Options > Formulas > Automatic section.
2. Format Cells to Automatically Calculate Using VLOOKUP in Excel
Another reason for faulty calculation or error values is that the reference cells may not be in the required format. To solve this, follow the process below.
- First, check the values in the Cell range D5:D9 and you will see that they are in Text format.

- To change this, select them and right-click on any of the cells.
- Then, select Format Cells from the Context Menu.

- Afterward, select Accounting from the Number tab.
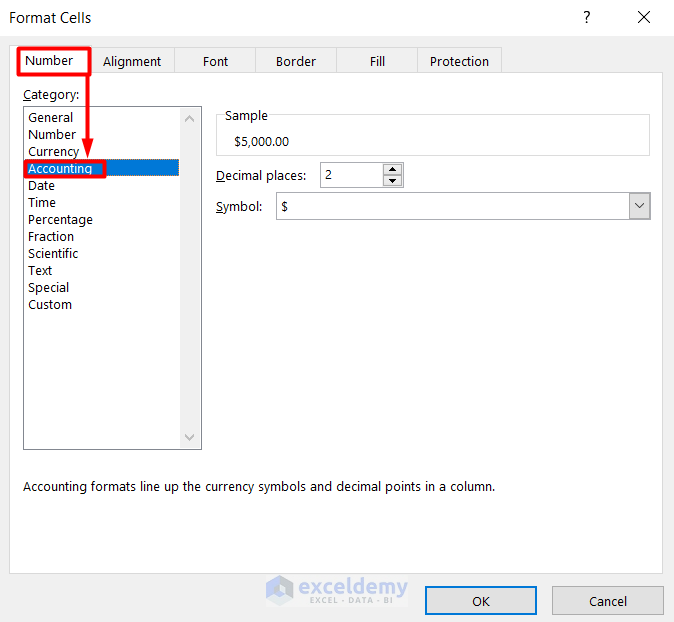
- Lastly, press OK and you will successfully calculate with VLOOKUP.
Read More: [Fixed!] Excel VLOOKUP Not Working Due to Format
3. Turn Off “Show Formulas” Feature to Automatically Compute with VLOOKUP
Another reason why VLOOKUP is not calculating automatically is that the formulas might be visible in the cell. Let’s see how it happens and how to solve this.
- First, go to the Formulas tab and you will see that the Show Formulas option is turned on.
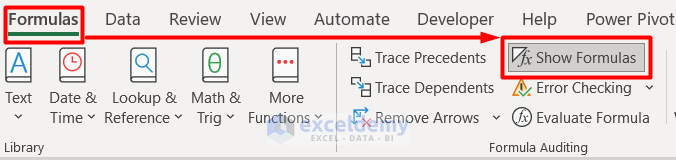
- Therefore, you will see the VLOOKUP formula is not calculating. Rather it is only showing the value.

- To solve this, simply turn off the Show Formulas command and you will get your required result.

4. Provide Exact Match When VLOOKUP Is Not Calculating Automatically
One of the common mistakes while calculating with the VLOOKUP function is that we often forget to provide an Exact Match while concluding the formula.
- To solve this try this formula instead in Cell C13.
=VLOOKUP(C11,B5:D9,3,FALSE)
- Afterward, hit Enter and you will get the perfect value.

5. Insert Absolute Cell Reference Inside VLOOKUP Formula to Calculate Automatically
The necessity of Absolute Cell Reference is undeniable during auto calculation with VLOOKUP. Let’s see what happens with and without it.
- First, type this formula to find the Product Name for Product ID 203 in Cell C12.
=VLOOKUP(C11,B5:D9,2,FALSE)
- Then, hit Enter and you will get the accurate result.

- Now, drag the bottom corner of Cell C12 to Cell C13 to find the Sales value.
- After this, you will see that it is showing an error.
- To find out the reason, check this formula carefully in Cell C13.
=VLOOKUP(C12,B6:D10,3,FALSE)
- From the formula, you can see that as soon as we applied the AutoFill command the formula gets a copy but the cell reference changes automatically.
- Therefore, provide the Absolute Cell Reference in this formula.
=VLOOKUP($C$11,$B$5:$D$9,3,FALSE)
- Finally, hit Enter and VLOOKUP will provide the calculation automatically.

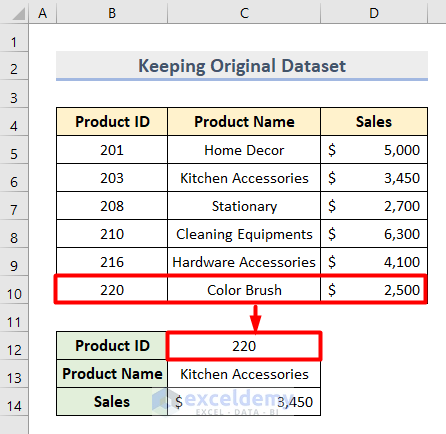
6. Keep Original Dataset Constant for Automatic VLOOKUP Calculation
Changes in the original dataset also block automatic calculation with VLOOKUP in Excel. Let’s see what happens when we insert new columns and rows separately. Also, we will try to find a solution for each.
6.1. Avoid Inserting New Column
- First, select any column in between your dataset.
- Then, right-click on it and select Insert.
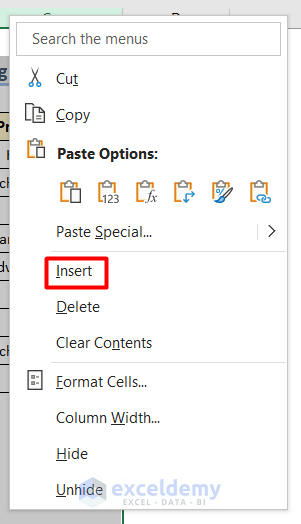
- Afterward, you will notice a new column in the original dataset.
- As a result, the result turns to 0 like this despite giving the correct formula.

- Therefore, it is suggested to not hamper the original dataset. If it is required to provide a new column with values, you should create another table for this and apply the VLOOKUP function for that new dataset.
6.2. Avoid Inserting New Row Values
So now we know the problems when inserting a new column, let us find out what happens if we insert new rows in our original dataset.
- In the beginning, insert a new row with values below the previous dataset.
- Then, find out the Product Name and Sales amount of ID 220.
- As a result, you will see that despite giving an accurate formula, it is showing an incorrect result.
- To solve this, first, select the dataset.
- Then, go to the Home tab and select Format as Table.

- Next, provide a preferable Table Name in the Table Design tab.

- Now, insert this formula in Cell C13 and press Enter to calculate automatically with accurate output.
=VLOOKUP(C12,Table1,2,FALSE)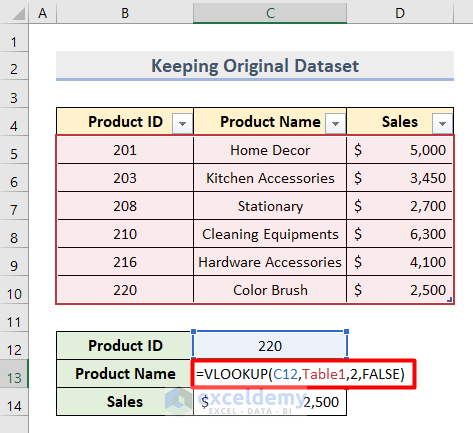
- Similarly, apply the same formula in Cell C14 and you will see the correct result.

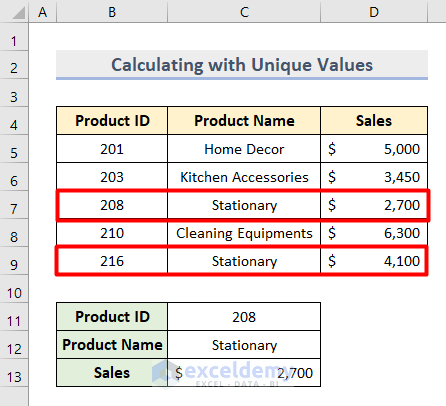
7. Use VLOOKUP with Unique Values to Calculate Automatically
The last reason VLOOKUP not calculating automatically is that there are duplicate values in the dataset as shown below.
Follow a couple of solutions to solve this.
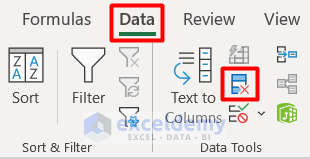
- Firstly, you can select Remove Duplicate from the Data tab if the repetitive values are not mandatory.
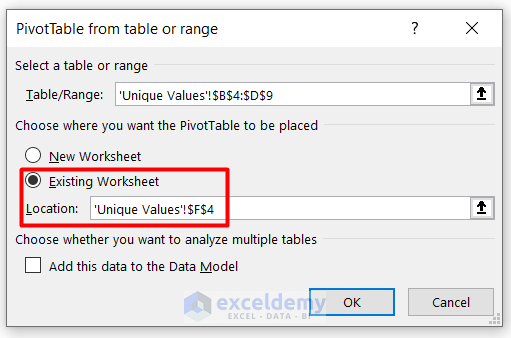
- Otherwise, you have to create a Pivot Table because in this case, VLOOKUP will not work.
- For this, select Table/Range in the PivotTable section of the Insert tab.

- Then, provide the Location where to get the Pivot Table.
- Afterward, place each category under the required PivotTableFields as shown below.

- Finally, you will get the cumulative result of the Product “Stationary” like this.

Additional Tips
- A limitation of VLOOKUP is that it cannot look left to return information. So if you want to fetch a value from any left-side column, you should use the INDEX-MATCH function instead of the VLOOKUP function.
- If you are calculating with VLOOKUP referring to another workbook, then you must keep open that workbook. Otherwise, it will not calculate automatically.
Download Practice Workbook
Get this sample file and practice by yourself.
Conclusion
We tried to cover 7 possible solutions if VLOOKUP not calculating automatically. Let us know if you face any difficulties apart from these.
Related Articles
- [Fixed!] VLOOKUP Not Working Between Sheets
- [Solved]: Excel VLOOKUP Not Working with Numbers
- VLOOKUP Not Picking up Table Array in Another Spreadsheet
- [Fixed!] Excel VLOOKUP Drag Down Not Working
<< Go Back to Issues with VLOOKUP | Excel VLOOKUP Function | Excel Functions | Learn Excel
Get FREE Advanced Excel Exercises with Solutions!
