AutoSave can save your document every few seconds while you are editing the document. This function can lessen the risk of losing data when power failure or system hanging occurs. In this tutorial, you will learn 3 handy ways to turn on autosave in Excel.
3 Ways to Turn On Autosave in Excel
1. Save File to OneDrive or SharePoint
If you want to turn on AutoSave, you need to save your document to your OneDrive or SharePoint Folder from the Office app. Just follow the steps below to do this.
Steps:
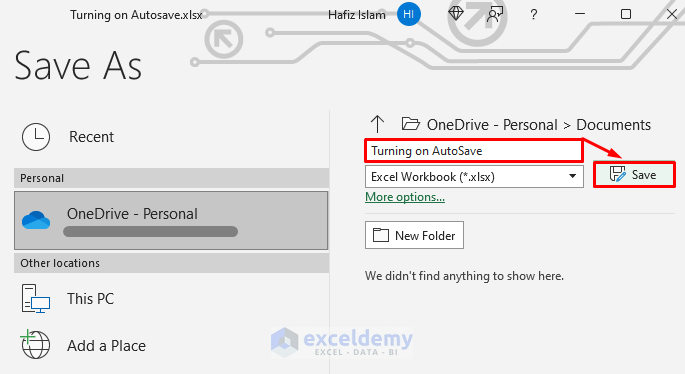
- Go to the File tab.

- Now, click on Save As option >> select your OneDrive personal/work/school account. After that, select your sub-folder from the list (In this example, documents).

- Then, enter a file name (In this example, Turning on AutoSave), and finally, click on Save.
Notes:
If you don’t see the OneDrive account, you should sign in first. Again, if you select an existing file, it will allow AutoSave for that file.
1.1 Enable AutoSave by Opening File with OneDrive or SharePoint
In order to ensure AutoSave is on immediately after you start working on your file, you need to open your file in the following way.
Steps:
- First, go to the File tab >> click on Open >> select your OneDrive account >> click on the file you want to open.
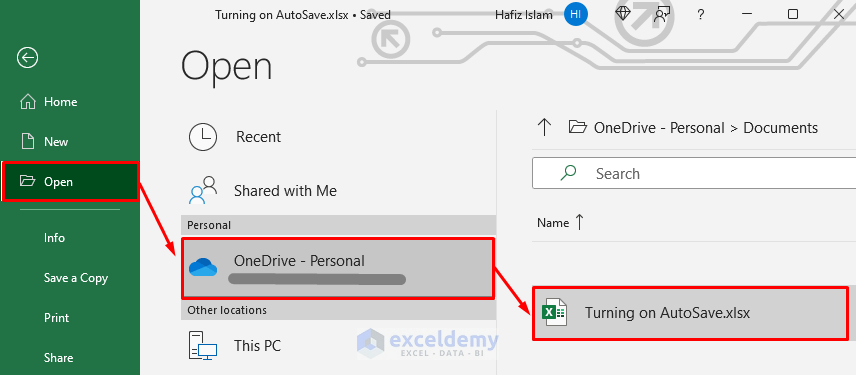
Note: Once you open your file in this way, you don’t need to keep saving your file every time. Every change that you make is saved automatically.
1.2 Adding AutoSave to Quick Access Toolbar (QAT)
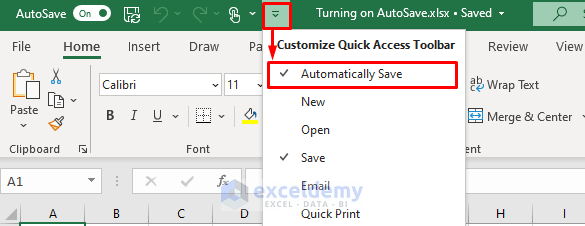
After adding your file to OneDrive or SharePoint, the QAT will enable you to autosave (In OneDrive or SharePoint) with a single click.
Just click on the Customize Quick Access Toolbar icon, then select the Automatically Save option.
Note:
Save As vs Save a copy
After saving the file in OneDrive or SharePoint and enabling AutoSave, you no longer see the Save As option. Because, when AutoSave is on, your file is being saved every few seconds, it will not be possible to make any changes and save it as a new document.
However, you see the Save a Copy option by which you can generate a copy and then make the changes.
When your files are not on OneDrive or SharePoint, you can see a Save As option.
Read More: Why Does Excel Autosave Keep Turning Off
2. Turn On AutoSave by Customizing Excel Save Options
You can turn on AutoSave and AutoRecover options for all the workbooks in Excel from the Options dialog box. Just follow the steps below to apply this.
Steps:
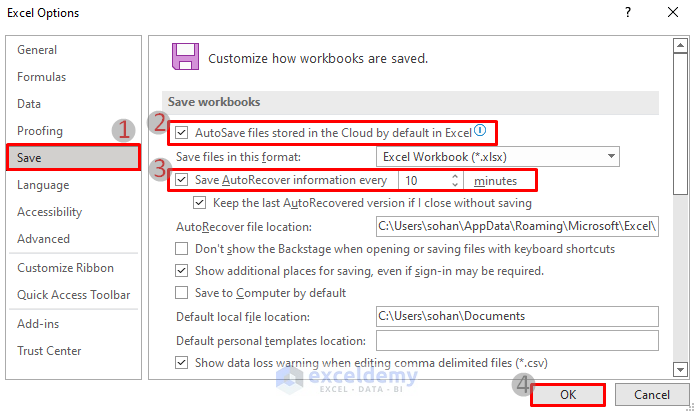
- First, go to File tab >> Options. An Excel Options dialog box will pop up.

- Under the Save section, check the tick mark on the AutoSave files stories in the Cloud by default in Excel. And then, put the time span (in this example, 10 minutes) in the Save AutoRecover information every box. Finally, click on OK.
Note:
Other useful options from this dialog box, you can use the following 2 options. Such as,
- Keep the last AutoRecovered version if I close without saving: By enabling this option will make you ensure that you won’t lose the data even in between those 10 minutes (In case there is a power cut or system crashes). When enabled, you will see the option to Auto-recover any unsaved files/data.
- AutoRecover File Location: This is the location where Excel saves unsaved documents. You cannot change this location if you are not the administrator.

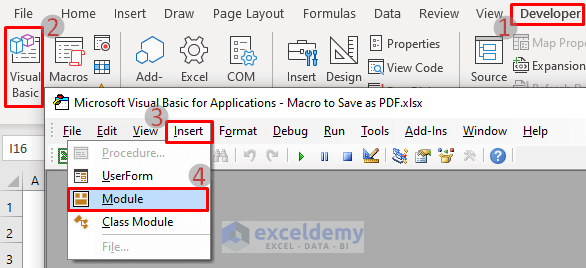
3. Use a Simple VBA Code
Another amazing option you can use is a simple VBA code that will save your file before closing the file. Follow the steps below to do this.
Steps:
- First, go to Developer tab >> Visual Basic >> Insert >> Module. A module window will pop up.
- Now, copy the following code and paste it into the module window, and then, close the window.
Private Sub SaveWorkbook_BeforeClose(Cancel As Boolean)
ThisWorkbook.Save
End Sub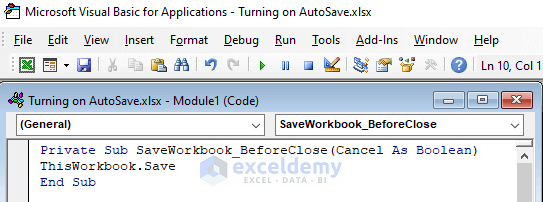
Note:
This method will make sense when you are using an older version. As you can easily use the first two ways to turn on autosave in Office 365 with OneDrive or SharePoint.
Conclusion
In this tutorial, I have discussed 3 handy ways to turn on autosave in Excel. I hope you found this article helpful. You can visit our website ExcelDemy to learn more Excel-related content. Please, drop comments, suggestions, or queries if you have any in the comment section below.
Related Articles
- How to See Where Excel Autosave Files Are Stored
- How to Change Autosave Time in Excel
- How to Turn Off Autosave in Excel
<< Go Back to Excel Autosave | Excel Files | Learn Excel
Get FREE Advanced Excel Exercises with Solutions!
