Fortunately, many of us use Excel in our business organizations. In any business organization, we use Excel to organize data as per need and make databases for the future. Moreover, one interesting thing is that we can transpose arrays easily in Excel for better operation. However, I have used Microsoft Office 365 for the purpose of demonstration, and you can use other versions according to your preferences. In this article, I will show you 3 suitable ways to transpose an array in Excel. Hence, read through the article to learn more and save time.
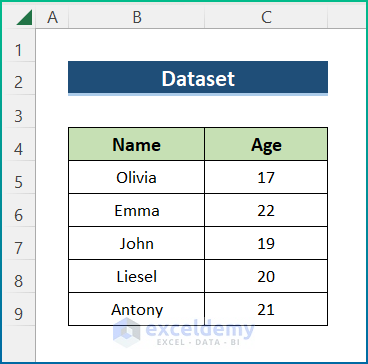
Sometimes, we need to transpose rows into columns and columns into rows in Excel. Fortunately, knowing how to perform this operation provides us with a ton of flexibility while working with a dataset. Moreover, there are several ways to convert columns of data into rows and vice versa. However, some of these techniques are static while some of these are dynamic. Here, I have used 3 different methods to make you understand the scenario properly. For the purpose of demonstration, I have used the following sample dataset.
1. Transposing Array with Paste Special Feature in Excel
In general, this is a simple technique to transpose an array in Excel. But this one is static. Moreover, if you change the value within a particular cell, it doesn’t get updated automatically in the transmuted array. However, you can follow this technique if such scenarios don’t cross your path. So, let’s see if it works.
1.1 Exchanging Columns with Rows
For instance, we will transpose columns into rows in Excel. However, the process is quite easy. Hence, go through the following steps.
📌 Steps:
- Firstly, select the area of the cells that you want to transpose. Here, I have selected B4:C9.
- Secondly, right-click on the selection area and click on Copy.

- Thirdly, select a cell to paste it.
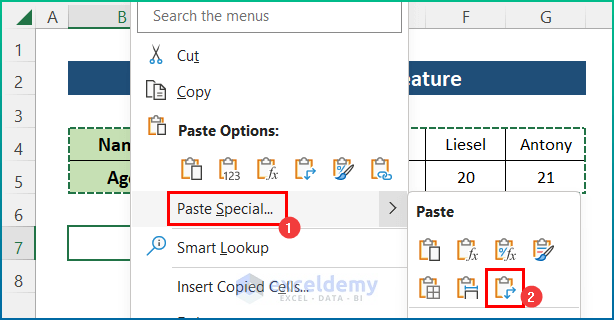
- Fourthly, right-click on it to open the Context Menu and then go to Paste Special.
- After that, select Transpose from the list.
![]()
- Finally, you will get your desired result.
![]()
1.2 Transposing Rows into Columns
In this part, we will see the process of transposing rows into columns. However, the process is similar to before. Hence, follow the steps mentioned below.
📌 Steps:
- Similarly, Copy the dataset and paste it using Paste Special.
- Lastly, You will get the final result as the image below.
![]()
Read More: Excel Paste Transpose Shortcut: 4 Easy Ways to Use
Similar Readings
- How to Transpose Duplicate Rows to Columns in Excel (4 Ways)
- Transpose Multiple Columns into One Column in Excel (3 Handy Methods)
- How to Reverse Transpose in Excel (3 Simple Methods)
- Convert Columns to Rows in Excel Using Power Query
2. Inserting Excel TRANSPOSE Function to Interchange Array
Furthermore, Excel has a built-in function called the TRANSPOSE function to transpose rows into columns and vice versa. However, this is a dynamic method as this one uses functions to operate. Without further discussion, let’s have a look at how to use this function in order to complete the task.
2.1 Converting Columns into Rows
In addition, you can transpose columns into rows by utilizing the TRANSPOSE function in Excel. However, you need to read through the steps below to complete the operation properly.
📌 Steps:
- Initially, enter the following formula in cell B11.
=TRANSPOSE(B4:C9)
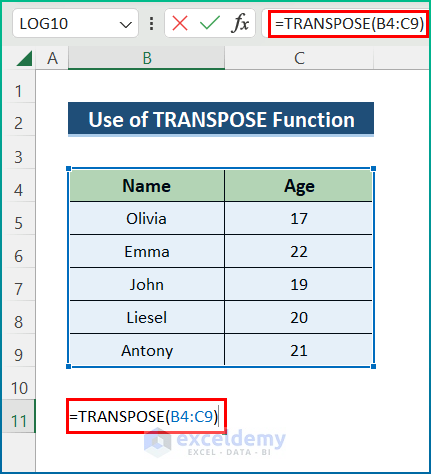
- Afterward, hit the Enter key and the output will appear as below after some modifications.
![]()
2.2 Transposing Rows into Columns
Moreover, you can complete the reverse process with the function and the process is simple as before. Hence, go through the following steps in order to transpose rows into columns.
📌 Steps:
- In the beginning, select cell B7 and insert the formula below.
=TRANSPOSE(B4:G5)
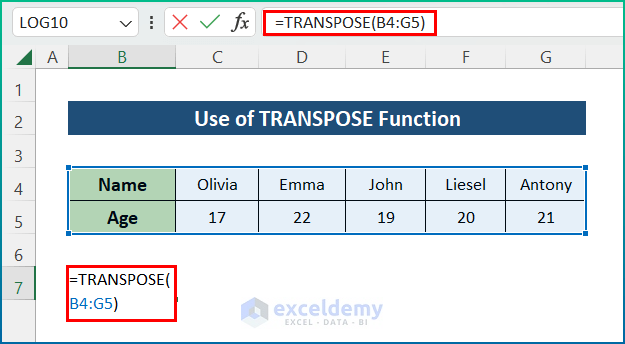
- In the end, press Enter to get a similar output as before.
![]()
Read more: Transpose Multiple Rows in Group to Columns in Excel
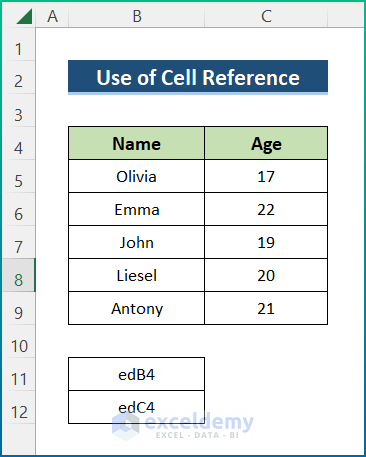
3. Using Cell Reference in Excel for Transposing Array
Last but not least, you can use a cell reference for transposing the array. Additionally, this method is also a dynamic one and it is tricky. However, you can use a cell reference to copy data, and then you can manually convert columns into rows and vice versa. But that seems so intimidating. So, we will use a trick instead of the conventional cell reference method.
📌 Steps:
- First, type edB4 in cell B11 and edC4 in cell B12. Here, “ed” is a random prefix that refers to Exceldemy. However, you can use anything you might like.
- Then, B4 and C4 are the beginning of the cell area that we want to convert and B11 and B12 are the beginning of cells where we will put the transposed values.
- Next, select edB4, and edC54, and drag the Fill Handle icon up to edB9 and edC9.
![]()
- After that, press CTRL + H to get the Find and Replace window.
- Now, type “ed” in the Find What bar and “=” in the Replace With bar.
- Subsequently, click on the Replace All option.
![]()
- Lastly, close the window and you will get your desired output as below.
![]()
Read More: Excel Transpose Formulas Without Changing References (4 Easy Ways)
Things to Remember
- First, method 1 is static.
- Second, methods 2 and 3 are dynamic.
- Third, the destination area should be properly matched in terms of cell numbers with the source area of data in the case of methods 2 and 3.
- Finally, you can change the dataset according to your preference.
Download Practice Workbook
You can download the workbook used for the demonstration from the download link below.
Conclusion
These are all the steps you can follow to transpose an array in Excel. Overall, in terms of working with time, we need this for various purposes. I have shown multiple methods with their respective examples, but there can be many other iterations depending on numerous situations. Hopefully, you can now easily create the needed adjustments. I sincerely hope you learned something and enjoyed this guide. Please let us know in the comments section below if you have any queries or recommendations.
For more information like this, visit Exceldemy.com.
Further Readings
- Data clean-up techniques in Excel: Changing vertical data to horizontal data
- How to Swap Rows in Excel (2 Methods)
- Excel VBA: Transpose Multiple Rows in Group to Columns
- How to Transpose Rows to Columns Using Excel VBA (4 Ideal Examples)
- Excel Transpose Formulas Without Changing References (4 Easy Ways)
- How to Transpose Every n Rows to Columns in Excel (2 Easy Methods)
- How to Convert Column to Comma Separated List With Single Quotes

