This tutorial will show you how to make address labels in Word from Excel. Labelling is essential in terms of marketing a product, tagging the address of a person to deliver a product and many more. Microsoft Excel provides us the feature to make labels and preview the labels before we print. We can make address labels in Excel with a combination of Microsoft Excel and Microsoft Word. The mail merge feature of Microsoft Word collaborates with Microsoft Excel to make address labels.
Here is the overview of our today’s article.
How to Make Address Labels in Word from Excel: With Easy Steps
The total process of making address labels in Excel with the assistance of Microsoft Word is very simple but a little bit lengthy. So, for your convenience to understand easily we will demonstrate this method to you in five steps.
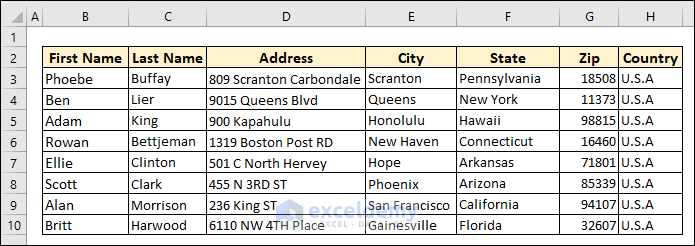
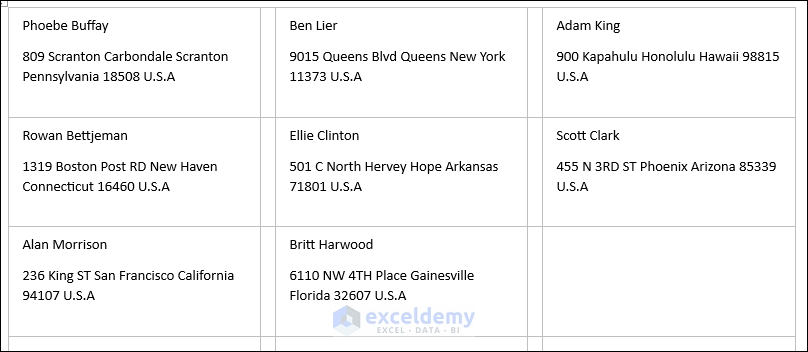
Step 1: Create Dataset with Proper Parameters in Excel
Here we will create address label data in an Excel worksheet from which we will make address labels. In the following dataset, we have taken the First Name, Last Name, Address, and Country of five presidents. From this dataset, we will make address labels for individual people. Each label will have the First Name, Last Name, Address City, State, Zip code and Country of several persons.
Step 2: Use Labels Feature in Word Worksheet
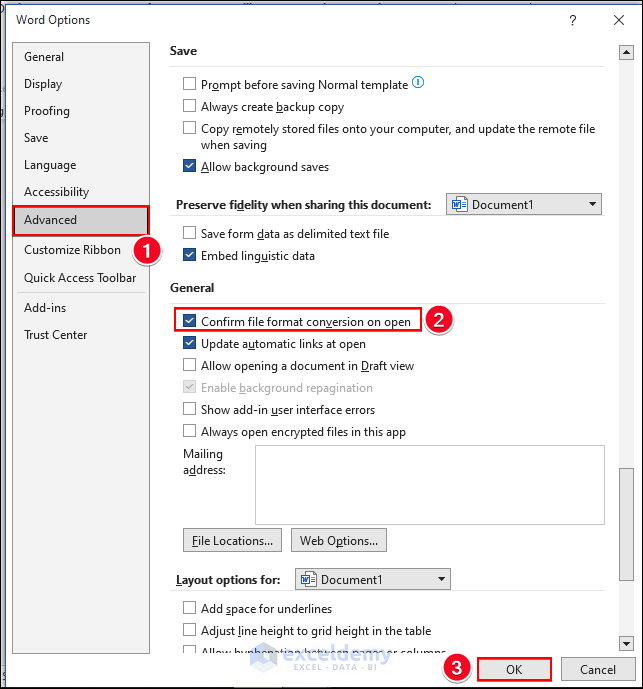
Now, we will check the File format conversion. It allows us to open any file in any format. To make address labels in Word from Excel we need to check the confirm file format conversion option. Then we will arrange address labels in Word documents to input values from our Excel worksheet.
- Open a new document in Microsoft Word >> Go to the File tab >> Select Options

- Hence, a Word Options dialogue box pops up >> Select Advanced feature, Scroll down and check the option Confirm file format conversion on open from the General section >> Click OK
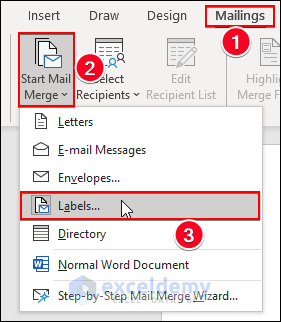
- Now, go to the Mailings tab >> from the Start Mail Merge group select the Start Mail Merge feature >> Choose Labels option.
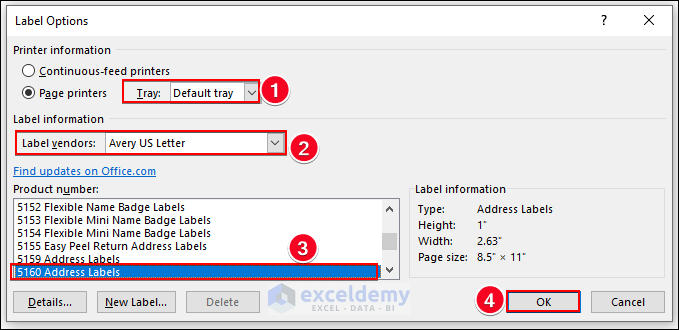
- A new dialogue box named Label Options will appear >> From the dialogue box select the options as shown in the figure >> Press OK.
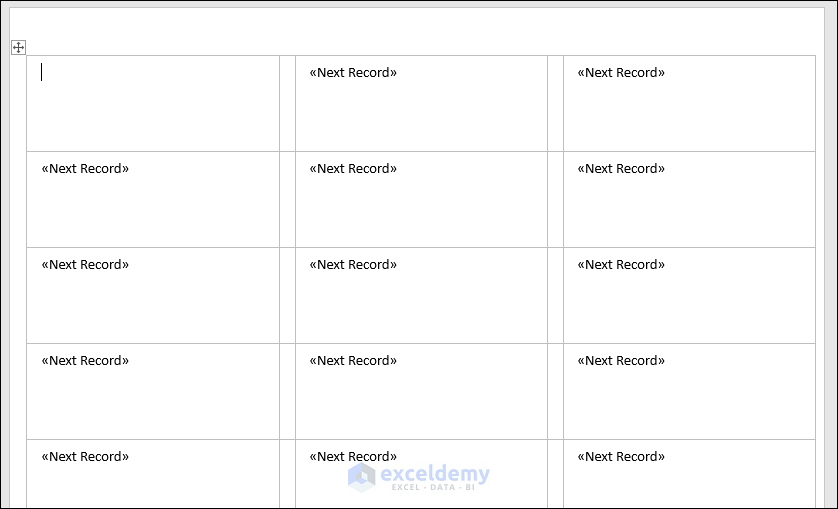
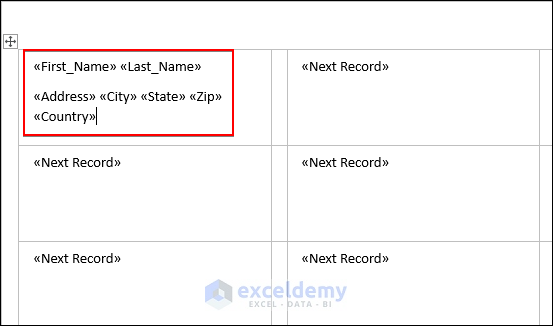
- Hence, we will get a new page like the following image.

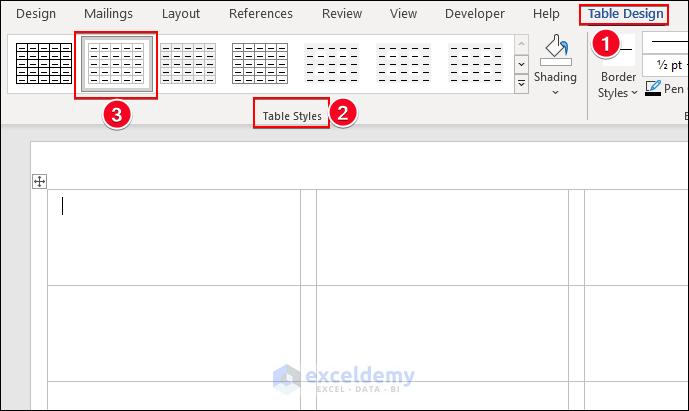
- After that, to design the appearance of labels go to the Table Design tab and select any style from the available Table Styles group.
- As a result, we can see a table format on the new page.
Read More: How to Mail Merge from Excel to Word Envelopes
Step 3: Import Excel Data Into Microsoft Word Document
In this section, we will input data in the above table from an Excel worksheet to make address labels in Word. To do this we have to import Excel data into our Microsoft Word document. Let’s follow the instructions below to import data from an Excel file.
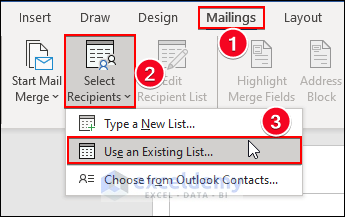
- Select the Mailings tab >> From the Start Mail Merge group select the Select Recipients feature >> Choose the Use an Existing List
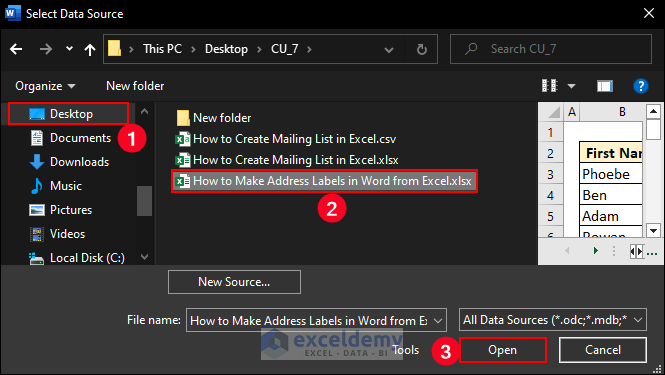
- Now, browse and select the Excel file. Click on Open to import data.
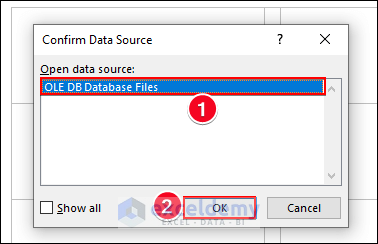
- A new dialogue box named ‘Confirm Data Source’ will appear. Select OLE DB Database File >> Press OK.
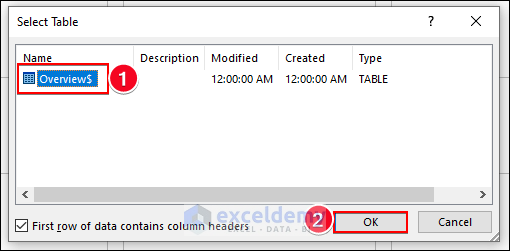
- The above command will open one more dialogue box named Select Table. From that dialog box, click on Overview$ >> Hit OK.
- Lastly, the above command will give you a table like the following one. It links the Word file with the Excel worksheet.
Read More: Macro to Populate a Mail Merge Document from Excel
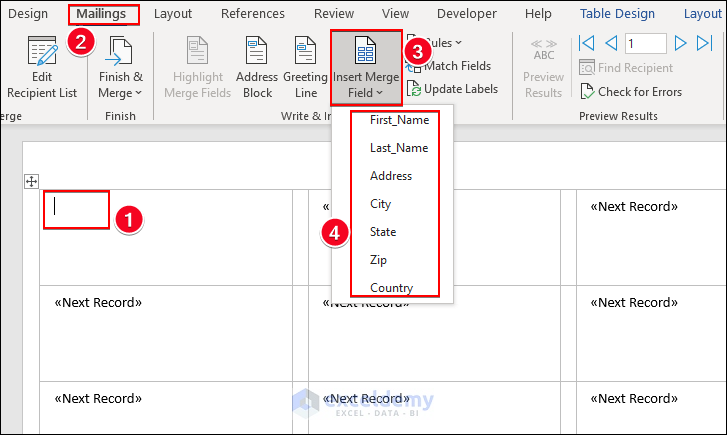
Step 4: Place Mail Merge Fields in Microsoft Word
Now we need to add mail merge fields to make address labels in Word from Excel. We will use input data from the Excel worksheet in the final table of Step 4 to create labels. Let’s see how we can insert mail merge fields.
- Select the first label field from the table and from the Mailings tab, go to,
Mailings → Write & Insert Fields → Insert Merge Field → First_Name
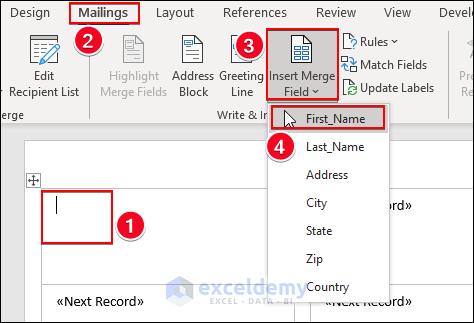
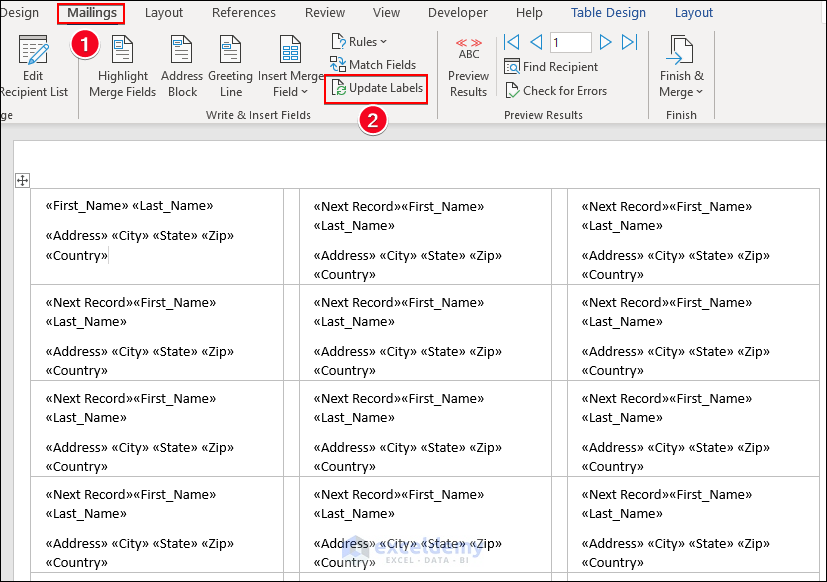
- Now, the field First_Name appears in the first box of the table.
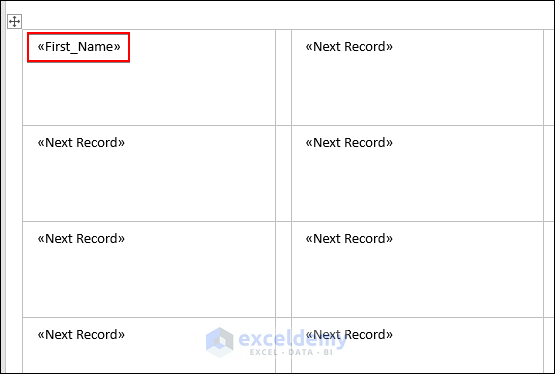
- Like the previous step, input all the labels one by one.
- To apply this change in the remaining records of the table select the option ‘Update Labels’ from the Mailings We get a page like the following one.
Step 5: Consolidate Word File and Excel Worksheet
In this step, we will connect our Word file with the Excel worksheet to make address labels. Let’s see how we can do this:
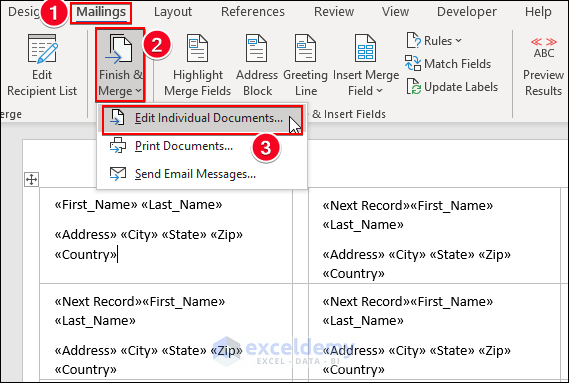
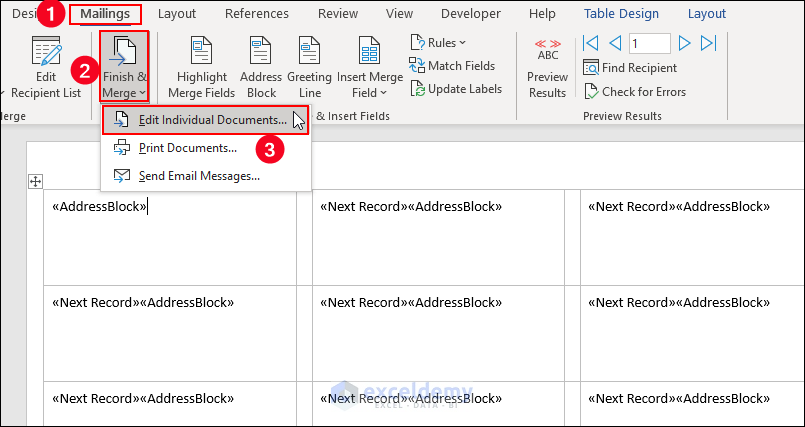
- Go to the Mailings tab >> Select the Finish & Merge option from the Finish group >> Choose the Edit individual Documents option.
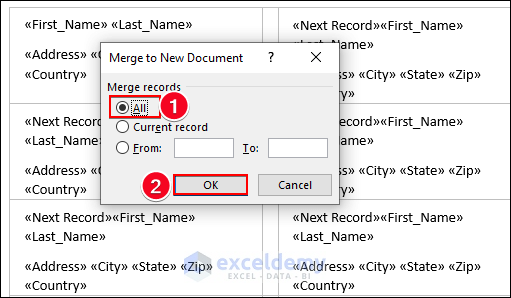
- A new dialog box will appear named Merge to New Document. After that, Check the All option >> Click on OK.
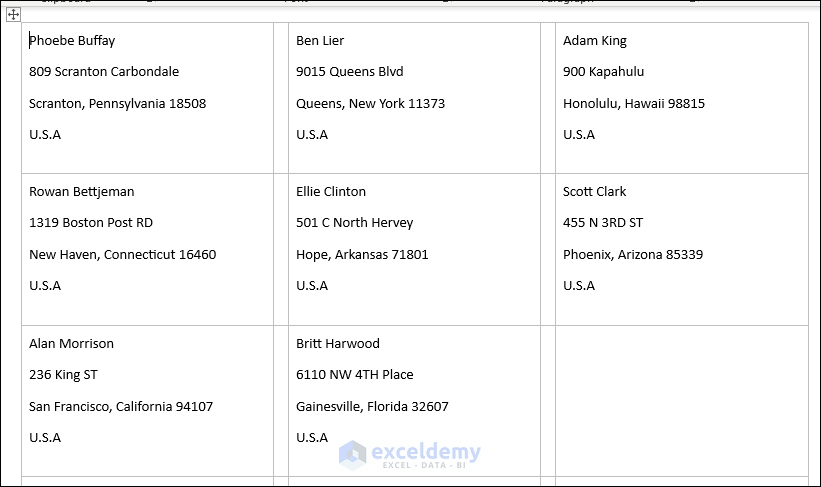
- Finally, a new document for labels will open. We can see that the labels are inserted one by one on the page in the format we wanted.
Read More: How to Insert Merge Fields in Word from Excel
How to Create a Custom Layout of Mailing Labels in Excel
In case the predefined options in the Address Block do not meet your requirements, you have the option to design a personalized layout for your address labels. Let’s follow the instructions below to learn!
- Repeat the above step-by-step procedures example. Customize the options from the Insert Merge Field feature. We will select the option as we want. We will choose the First_Name, Last_Name, and Address from the Insert Merge Field feature in step 4.
How to Add Missing Address Elements in Excel
The address elements displayed in the Preview section may not correspond with the chosen address pattern. In this section, we will learn how to add the missing Address elements in Word from Excel. Let’s follow the instructions below to learn!
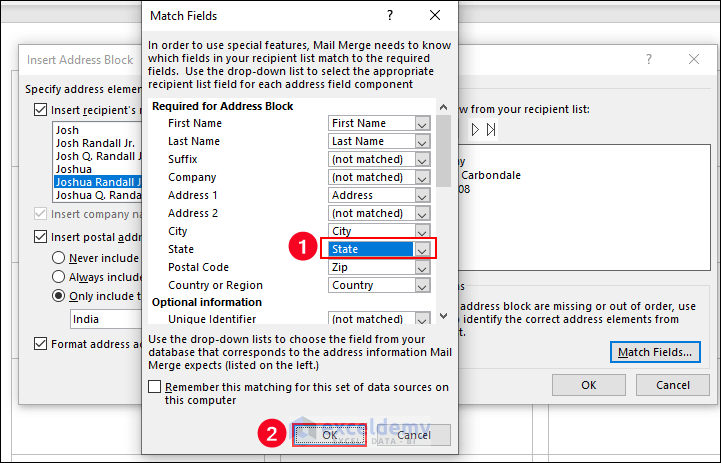
- Import the Excel data into Word like step 3. Hence, do like the below image. In the below screenshot, we see that the State name is missing in the preview To add the State name simply press the Match Fields button.

- Choose the State in the State drop-down list >> Press OK.
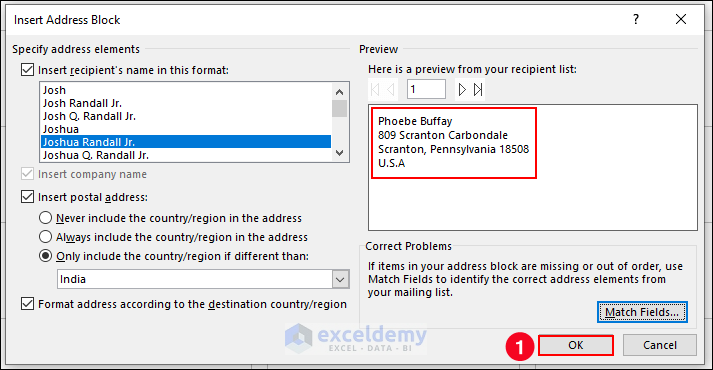
- As a result, you will see the state name in the preview section, again press OK.
- Select the Mailings tab >> Select the Finish & Merge option from the Finish group >> Choose the Edit individual Documents option.
- Here is the final output after adding the missing address.
Read More: [Solved]: Word Mail Merge Not Working with Excel
How to Create a Mailing List in Excel
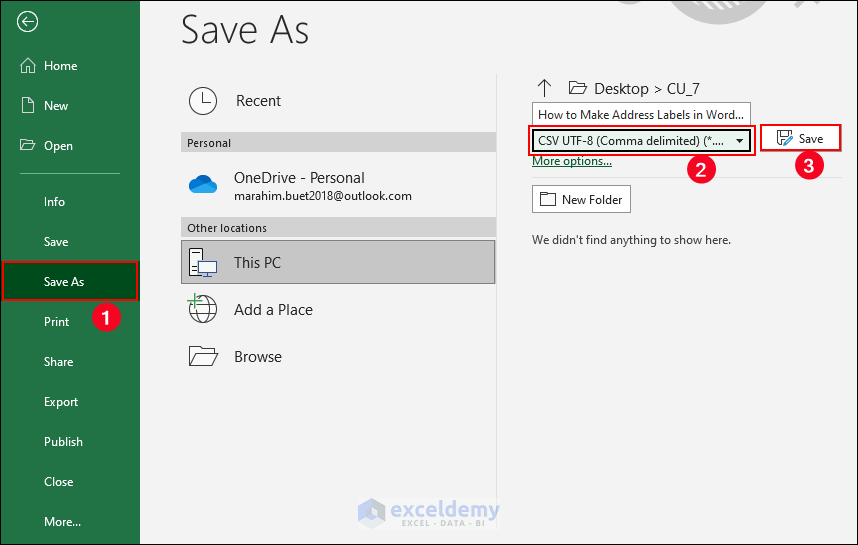
In this section, we used Microsoft Word to create a mailing list. However, Microsoft Outlook also offers an option to create a mailing box just by importing a certain data type file (i.e., CSV file type).
As we have a data file of customers’ addresses in Excel, we just convert the file in CSV format using Excel’s Save As feature. The file conversion is depicted in the below picture (Go to File > Save As > Select CSV from the offered formats> Click Save).
After converting the Excel file into CSV file format, follow the below steps to create a mailing list using Microsoft Outlook.
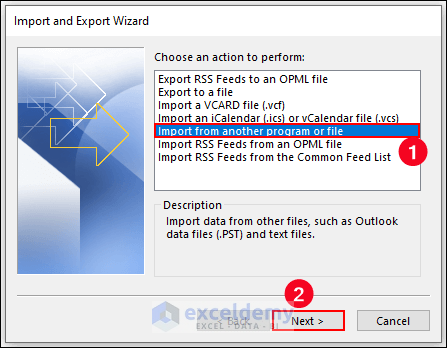
- Open Microsoft Outlook. Select File >> Choose Open & Export > Click on Import/Export.

- The Import and Export Wizard In the wizard, Choose Import from another program or file option >> Hit Next.
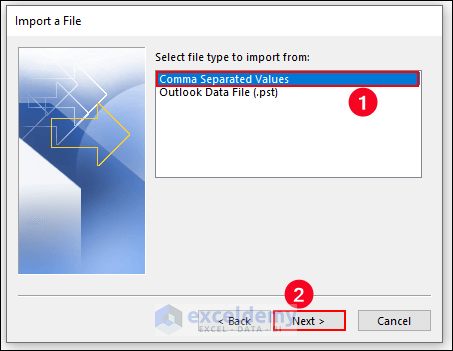
- Import a File command box opens. Select Comma Separated Values (CSV) as Select the file type to import from >> Click Next.
- Now, in the Import a File command box, Click on Browse to import a file (previously saved CSV file).

- Choose the previously saved CSV file from the computer directory and Click OK.

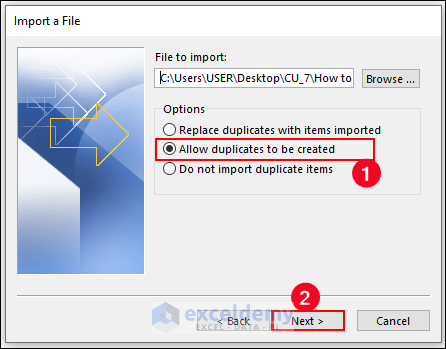
- Outlook loads the file imported and displays it. Check the Allow duplicate to be created option and then go to Next.
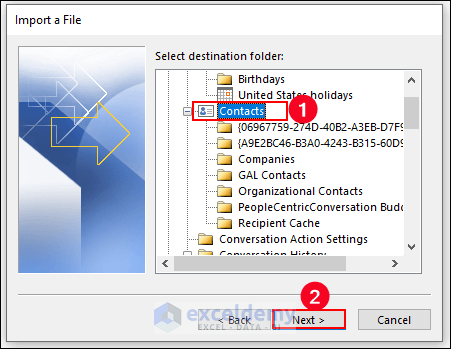
- You have to select the location (i.e., Contacts) where the imported file has to be extracted then click on the Next.
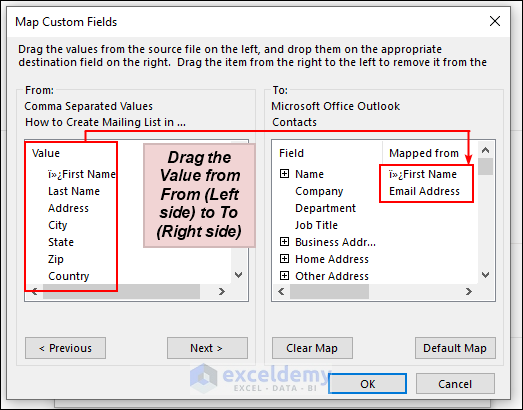
- To match the fields, you have to tell Outlook what items it will take as Name, Company, or Email Address. As a result, click on Map Custom Fields.

- Drag the First Name value from From (Left side) to To (Right side) to assign them as the same. Repeat the dragging process for Email Address after that Click
- You can also change the file destination. If there is no need for such actions, click on Finish.

- Outlook takes a second then loads all the contacts. If you want to check the imported contacts, Go to Contacts and all the imported contacts will appear as it does in the following picture.

You can count or cross-check the First Names with the source data. This Outlook creates a mailing list from which you can easily mail each of them instantly.
Things to Remember
- Remember to save the labels for later use after making them.
- Rows or columns with blank cells produce incorrect results. To avoid them, do your best.
- For each label, use one column at a time. Otherwise, this approach won’t be effective.
Frequently Asked Questions
1. How do I print the address labels in Word?
Answer: To print the address labels in Word, click on Finish & Merge on the Mailings tab and then select Print Documents. In the Merge to Printer dialog box, you can choose the specific records you want to print and select the printer you want to use. You can then click OK to print your labels.
2. Can I print only a subset of the labels from my Excel spreadsheet in Word?
Answer: Yes, you can print only a subset of the labels from your Excel spreadsheet in Word. To do this, you will need to select the specific records you want to include in your labels. In the Select Recipients dialog box, choose Edit Recipient List. You can then select the specific records you want to include by checking the boxes next to each record.
3. Can I format the labels in Word once I have imported the Excel spreadsheet?
Answer: Yes, you can format the labels in Word once you have imported the Excel spreadsheet. To format the labels, select the “Label Options” button on the “Labels” tab. You can change the font, size, and alignment of the text on the labels.
Download Practice Workbook
Download this practice workbook for practice while you are reading this article.
Conclusion
In conclusion, this tutorial was a complete guide on how to make address labels in Word from Excel. Download the practice worksheet that comes with this article to put your skills to the test. If you have any questions, please leave a comment in the box below. We’ll do our best to respond as soon as possible.
Related Articles
<< Go Back To Mail Merge Excel | Learn Excel
Get FREE Advanced Excel Exercises with Solutions!
