Scenario
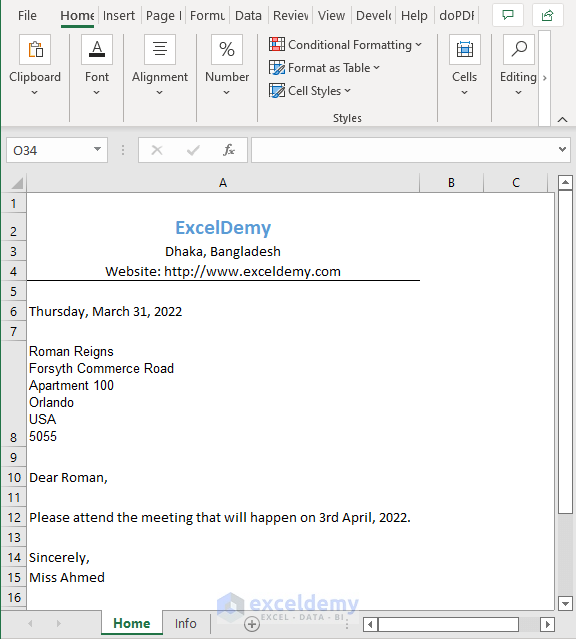
In the following image we have an email format in the Home sheet of our Excel workbook.
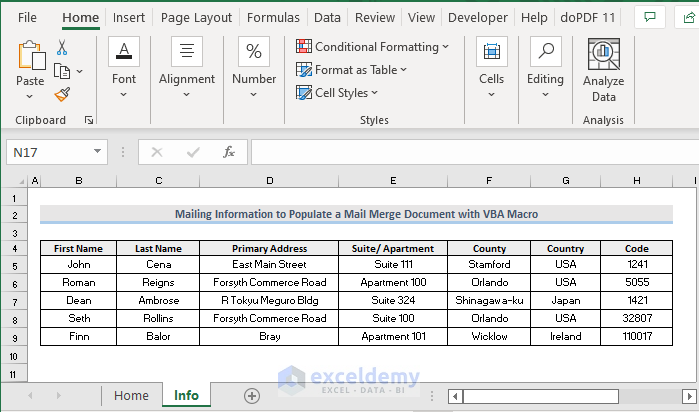
There is another sheet named Info in our workbook that holds the contact details of a number of people.
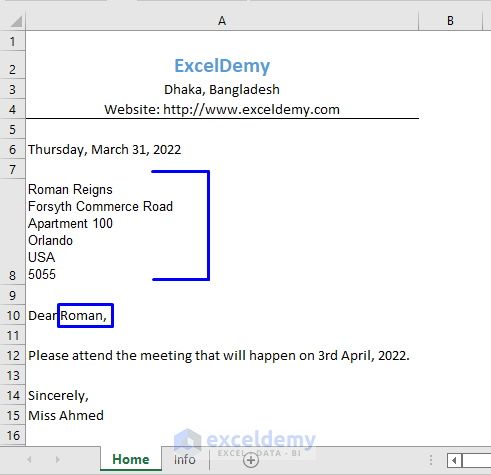
We want to keep the email format the same while sending it to multiple people at once, changing only the contact details. For clarity, in the following image we have indicated which parts we would like to change while sending emails to multiple people.
Basically, we need to populate a mail merge with this document from another sheet in Excel using a VBA macro. This can be done by simply clicking a button and Excel will do the rest of the task for us. We just need to provide the record numbers from the Info sheet and Excel will automatically populate a mail template for each record by merging the contact documents.
Let’s break down the steps to populate a mail merge document from Excel using a VBA macro. This approach allows us to maintain a consistent email format while dynamically inserting contact details from another sheet. Here’s how we can achieve this:
Step 1 – Create a Button
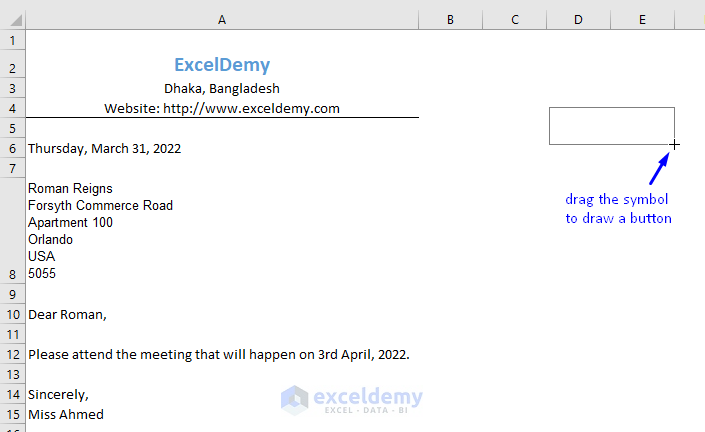
- Open your Excel workbook.
- Go to the Developer tab (if it’s not visible, enable it from Excel options).
- Click on Insert and select Button from the Form Controls group.
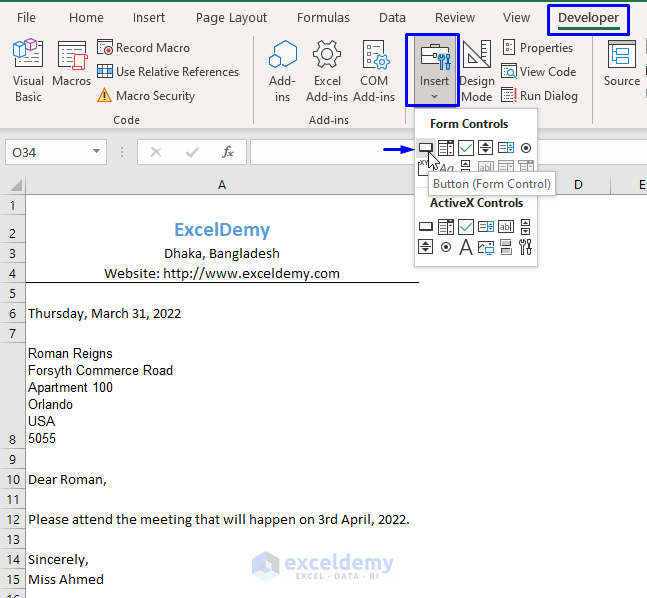
- Drag the button to any location on your spreadsheet.
Step 2 – Assign a Macro to the Button
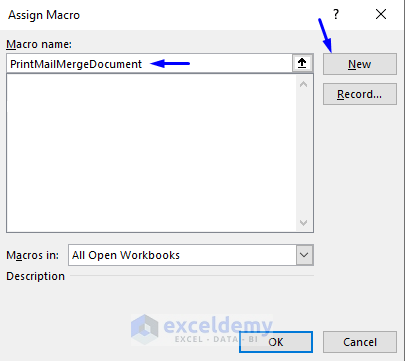
- After placing the button, a pop-up box named Assign Macro will appear.
- Enter a name for your VBA macro (e.g., PrintMailMergeDocument).
- Click New since it’s a new VBA macro.
- Click OK.
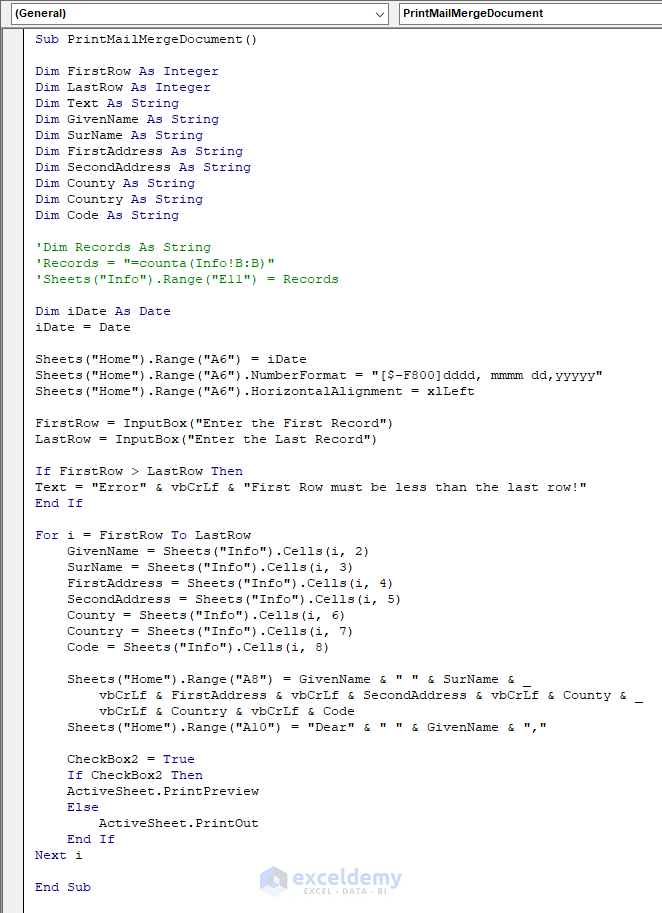
- You will be taken to an auto-generated VBA code window.
- Copy and paste the following VBA code into the code window:
Sub PrintMailMergeDocument()
Dim FirstRow As Integer
Dim LastRow As Integer
Dim Text As String
Dim GivenName As String
Dim SurName As String
Dim FirstAddress As String
Dim SecondAddress As String
Dim County As String
Dim Country As String
Dim Code As String
'Dim Records As String
'Records = "=counta(Info!B:B)"
'Range("E9") = Records
Dim iDate As Date
iDate = Date
Sheets("Home").Range("A6") = iDate
Sheets("Home").Range("A6").NumberFormat = "[$-F800]dddd, mmmm dd,yyyyy"
Sheets("Home").Range("A6").HorizontalAlignment = xlLeft
FirstRow = InputBox("Enter the First Record")
LastRow = InputBox("Enter the Last Record")
If FirstRow > LastRow Then
Text = "Error" & vbCrLf & "First Row must be less than the last row!"
End If
For i = FirstRow To LastRow
    GivenName = Sheets("Info").Cells(i, 2)
    SurName = Sheets("Info").Cells(i, 3)
    FirstAddress = Sheets("Info").Cells(i, 4)
    SecondAddress = Sheets("Info").Cells(i, 5)
    County = Sheets("Info").Cells(i, 6)
    Country = Sheets("Info").Cells(i, 7)
    Code = Sheets("Info").Cells(i, 8)
    Sheets("Home").Range("A8") = GivenName & " " & SurName & vbCrLf & FirstAddress & vbCrLf & SecondAddress & vbCrLf & County & vbCrLf & Country & vbCrLf & Code
    Sheets("Home").Range("A10") = "Dear" & " " & GivenName & ","
    CheckBox2 = True
    If CheckBox2 Then
    ActiveSheet.PrintPreview
    Else
        ActiveSheet.PrintOut
    End If
Next i
End Sub- Customize the code to extract contact details from the Info sheet and populate your mail template.
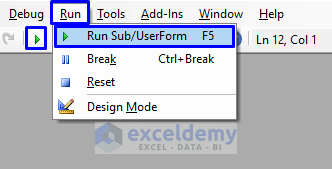
- Press F5 or select Run and choose Run Sub/UserForm. (You can also just click on the small Run icon in the sub-menu bar to run the macro.)
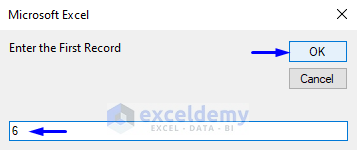
- A pop-up box requests the first record stored in the Info sheet that you want to send the email to.
- Enter the record number in the input bar. In our scenario, we want to populate a mail merge document to the contact stored in row number 6 in our Info sheet. Enter 6 in the box.
- Click OK.
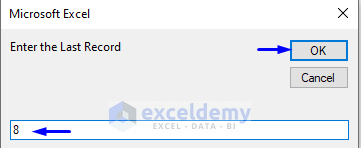
- Another pop-up box will appear, asking you to enter the last record stored in the Info sheet that you want to send the email to.
- Enter the record number in the input bar. In our scenario, we want to populate a mail merge document to the contact stored in row number 8 in our Info sheet. Enter 8 in the box.
- Click OK.
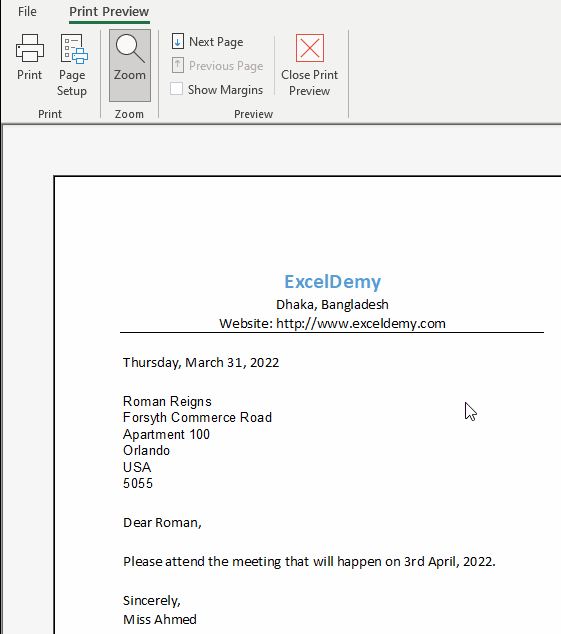
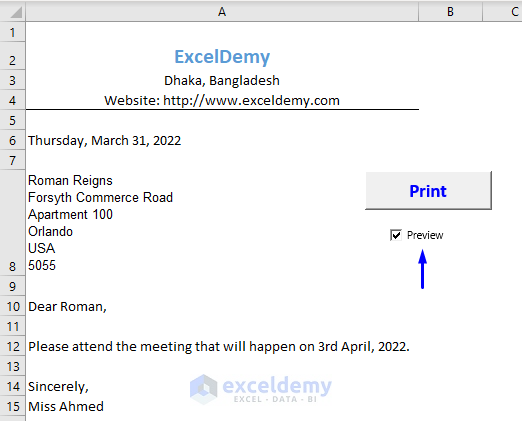
A Print Preview of the generated mail merge document will be displayed. Look at the following image. We inserted 6 as our first record; in row 6, we have the contact details of Roman. So, as a first mail merge document, we got the email format that will be suitable for sending to Roman.
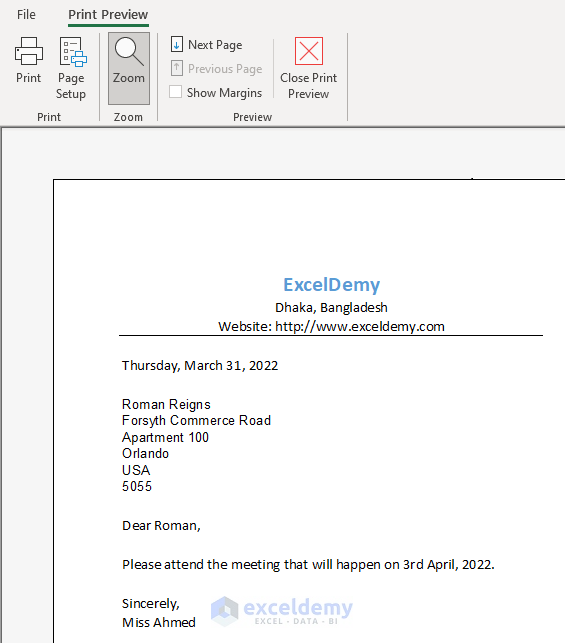
If you click the Close Print Preview option, the next record will display.
To preview all records, every time you run a macro to populate a mail merge document from Excel, is kind of a tedious way to get the job done. That is why we created a button to populate a mail merge document.
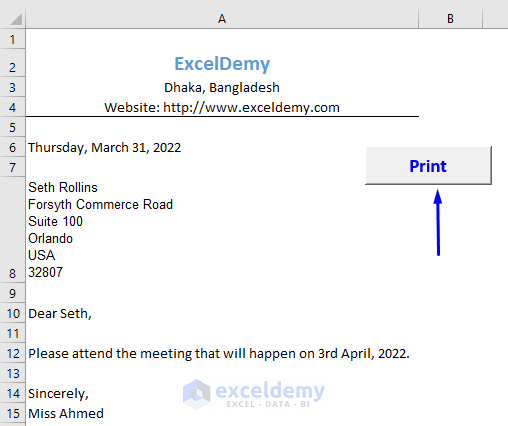
Step 3 – Format the Button
- Double click on the text of the button. It will go to Edit mode. Name the button Print.
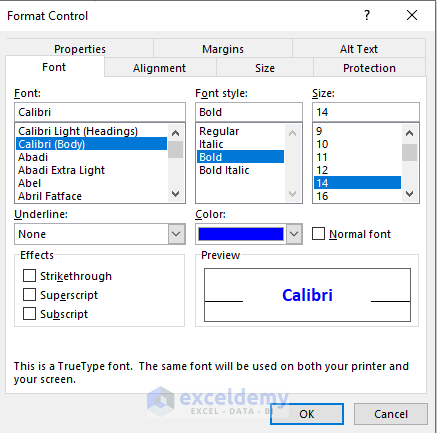
- Right-click on the button and select Format Control…
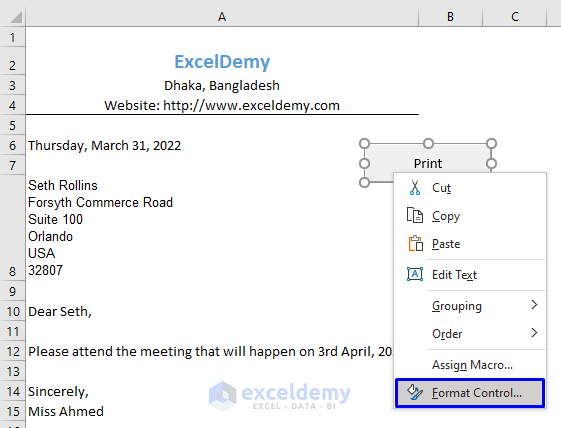
- From the Format Control pop-up window, modify the button (style the text in Bold font and make the size 14, and choose a color).
- Click OK.
Below is an image of our formatted Button:
Read More: How to Mail Merge from Excel to Word Envelopes
Step 4 – Create a CheckBox
Let’s create a CheckBox for executing the Print Preview option. Keeping the CheckBox checked ensure that there is a Preview of the email before printing. Unchecking the CheckBox will result in the email being printed without previewing it.
- Go to the Developer tab.
- Click Insert and select the CheckBox under the Form Controls group.
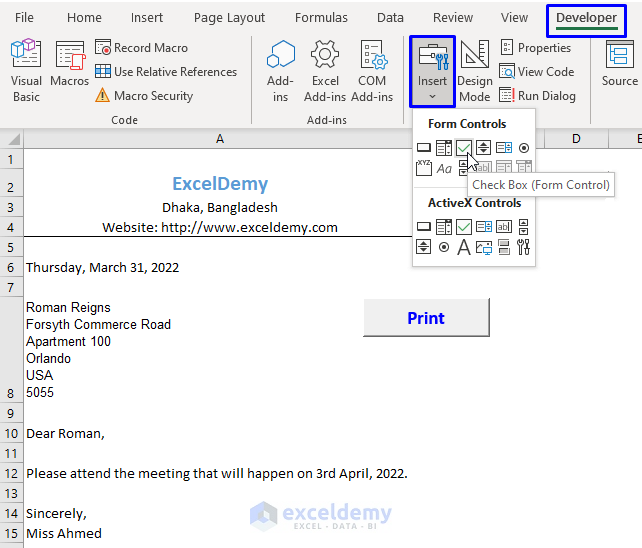
- Drag the symbol to create a CheckBox in any size, anywhere in the spreadsheet.
- Format the CheckBox from the Edit mode, as we did for the button. Name the CheckBox Preview.
- Below is an image of our CheckBox:
Step 5 – Test the Macro
- Save your workbook.
- Click the button you created to run the macro.
- Excel will automatically populate the mail template for each record based on the specified contact details.
VBA Code Explanation
Dim FirstRow As Integer
Dim LastRow As Integer
Dim Text As String
Dim Records As String
Dim GivenName As String
Dim SurName As String
Dim FirstAddress As String
Dim SecondAddress As String
Dim County As String
Dim Country As String
Dim Code As String
Defining the variables.
Dim iDate As Date
iDate = Date
Defining and storing date values.
Sheets("Home").Range("A6") = iDate
Sheets("Home").Range("A6").NumberFormat = "[$-F800]dddd, mmmm dd,yyyyy"
Sheets("Home").Range("A6").HorizontalAlignment = xlLeft
Setting and formatting the worksheet and the range; the date value is stored there.
FirstRow = InputBox("Enter the First Record")
LastRow = InputBox("Enter the Last Record")
Storing the first and last record number; it will be inserted in the input box after running the macro.
If FirstRow > LastRow Then
Text = "Error" & vbCrLf & "First Row must be less than the last row!"
End If
If the first row number is greater than the last row number then there will be an error message.
For i = FirstRow To LastRow
    GivenName = Sheets("Info").Cells(i, 2)
    SurName = Sheets("Info").Cells(i, 3)
    FirstAddress = Sheets("Info").Cells(i, 4)
    SecondAddress = Sheets("Info").Cells(i, 5)
    County = Sheets("Info").Cells(i, 6)
    Country = Sheets("Info").Cells(i, 7)
    Code = Sheets("Info").Cells(i, 8)
Starting the iteration of scanning through the whole dataset of the Info sheet and passing and storing appropriate values in the variables.
Sheets("Home").Range("A8") = GivenName & " " & SurName & vbCrLf & FirstAddress & vbCrLf & SecondAddress & vbCrLf & County & vbCrLf & Country & vbCrLf & Code
Sheets("Home").Range("A10") = "Dear" & " " & GivenName & ","
The values in cells A8 and A10 will be modified and displayed based on the iteration.
CheckBox2 = True
    If CheckBox2 Then
    ActiveSheet.PrintPreview
    Else
        ActiveSheet.PrintOut
    End If
Next i
End the If statement and go to the next iteration.
Download Workbook
You can download the practice workbook from here:
Related Articles
- Mail Merge in Excel without Word
- How to Insert Merge Fields in Word from Excel
- [Solved]: Word Mail Merge Not Working with Excel
- How to Mail Merge Pictures from Excel to Word
<< Go Back To Mail Merge Excel | Learn Excel
Get FREE Advanced Excel Exercises with Solutions!
