Adding buttons is one of those interesting features you can use in Excel VBA. Along with these buttons, you can also add functionality within the same module of the VBA. In this tutorial, we will discuss how to add a command button with different functionalities programmatically or with VBA in Excel.
Excel VBA to Add Command Button Programmatically: Step-by-Step Procedure
You can easily add buttons from the Form Controls and ActiveX Controls from the Insert option of the Controls group in the Developer tab. Then you can add a macro to them to perform different operations. But we are opting to go for VBA for the whole process.
To add different a command button programmatically that can perform different operations all with VBA in Excel, you need to use the command line ActiveSheet.Buttons.Add (particulars) in the VBA code. And the .OnAction method will define what the button will do after a click. Usually, this is linked with another code.
Keep in mind that, before performing any VBA operations or including any VBA code, we need to have the Developer tab on our ribbon.
Steps:
- First, go to the Developer tab on your ribbon.
- Then select Visual Basic from the Code group.

- As a result, the VBA window will open up.
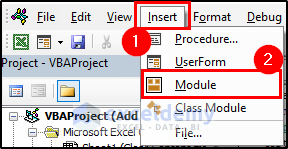
- Now select the Insert tab in it.
- After that, select Module from the drop-down menu.
- Next, select the module by double-clicking it if it isn’t selected already.
- Then insert the following code in the module.
Sub add_command_button()
  Dim Bttn As Button
  ActiveSheet.Buttons.Delete
  Dim R As Range
  Set R = ActiveSheet.Range("B4:C5")
  Set Bttn = ActiveSheet.Buttons.Add(R.Left, R.Top, R.Width, R.Height)
      With Bttn
      .Caption = "Sample Button"
      .Name = "Sample Button"
      End With
End Sub
🔎 Breakdown of the code
Dim Bttn As ButtonThis line declares the Bttn variable as a button.
ActiveSheet.Buttons.DeleteThe line of code deletes all the previously added buttons from the spreadsheet.
Dim R As RangeHere, we declared the variable R as a range.
Set R = ActiveSheet.Range("B4:C5")In this section, we declared the range B4:C5 as the value of R.
Set Bttn = ActiveSheet.Buttons.Add(R.Left, R.Top, R.Width, R.Height)Here we added a button with the height and width of the range in R and stored it within the variable Bttn.
With Bttn
.Caption = "Sample Button"
.Name = "Sample Button"
End With
With With we have applied the .Caption and .Name method in the Bttn variable.
- After that, press F5 to instantly run the code.
The button will now appear on the spreadsheet as intended in the code.
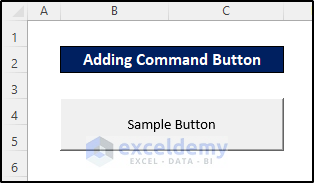
This is the procedure to add a command button programmatically in Excel using VBA.
4 Suitable Examples of Adding and Using Command Button Programmatically with Excel VBA
Previously, we have discussed just adding a button programmatically using Excel VBA. Now we will discuss different features we can use with these buttons. We will do all of these with VBA. Keep in mind that, these are just some examples. The functionality is not limited to it by any means. We will use different datasets that suit our purpose in different examples.
Follow along to see how we can do them and the breakdown of these codes.
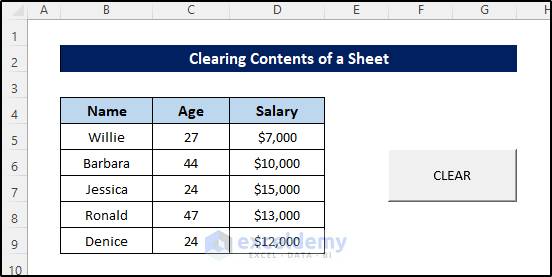
1. Clearing Contents of a Range Using Command Button
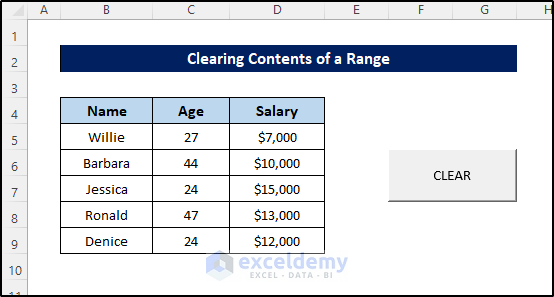
In the first example, we are going to remove selected cell contents from a spreadsheet using a button. We are also going to add the command button using Excel VBA programmatically like the discussion in the previous section. But we will situate the clearing VBA along with the button.
We are going to use the following dataset for this.

Follow these steps to see how we can do that.
Steps:
- First, go to the Developer tab on your ribbon.
- Then select Visual Basic from the Code group.
- As a result, the VBA window will open up.
- Now select the Insert tab in int.
- After that, select Module from the drop-down menu.
- Next, select the module by double-clicking it if it isn’t selected already.
- Then insert the following code in the module.
Sub clear_content_button_range()
  Dim bttn As Button
  Application.ScreenUpdating = False
  ActiveSheet.Buttons.Delete
  Dim arng As Range
    Set arng = ActiveSheet.Range("F6:G7")
    Set bttn = ActiveSheet.Buttons.Add(arng.Left, arng.Top, arng.Width, arng.Height)
    With bttn
      .OnAction = "ClearContent"
      .Caption = "CLEAR"
      .Name = "CLEAR"
    End With
  Application.ScreenUpdating = True
End Sub

Sub ClearContent()
  Selection.ClearContents
End Sub
🔎 Breakdown of the code
Dim bttn As ButtonThis line declares the btn variable as a button.
Application.ScreenUpdating = FalseWe have turned the real-time screen updating off with this line.
ActiveSheet.Buttons.DeleteThe line of code deletes all the previously added button from the spreadsheet.
Dim arng As RangeHere, we declared the variable t as a range.
Set arng = ActiveSheet.Range("F6:G7")In this section, we declared the range F6:G7 as the value of t.
Set bttn = ActiveSheet.Buttons.Add(arng.Left, arng.Top, arng.Width, arng.Height)Here we added a button with the height and width of the range in t and stored it within the variable btn.
With bttn
.OnAction = "ClearContent"
.Caption = "CLEAR"
.Name = "CLEAR"
End With
With With we have applied the .OnAction ,the .Caption and .Name method in the btn variable.
In the .OnAction method, we have called the sub named ClearContent here.
Application.ScreenUpdating = TrueFinally, we have turned on the real-time screen update in the spreadsheet now that the code is finished running.
Sub ClearContent()
  Selection.ClearContent
End Sub
This is the declaration of the sub named ClearContent which just clears the values in a selection.
- After that, press F5 to instantly run the code.
The button will now appear on the spreadsheet as intended in the code.
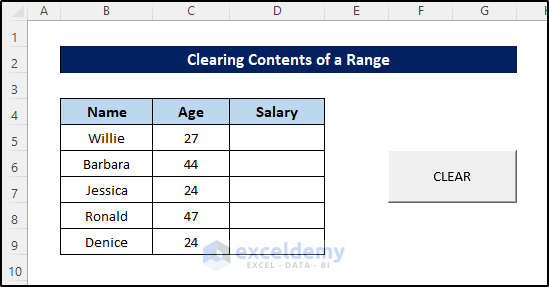
Now select a range, any range, and then click on the button. It will clear the contents of the cells in that range. For example, selecting range D5:D9 and then clicking on the button will result in this.
Read More: VBA Code for Save Button in Excel
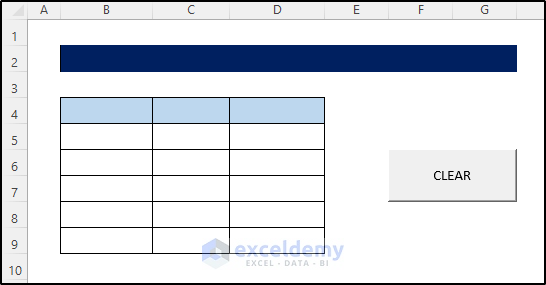
2. Clearing Contents of a Sheet Using Command Button
Similar to the previous example, we will now clear all of the contents of the sheet. For that, the code will almost be the same. There will just be a slight change in the .OnAction code as the function will vary.
Follow these steps to add such a command button programmatically using Excel VBA.
Steps:
- First, go to the Developer tab on your ribbon.
- Then select Visual Basic from the Code group.
- As a result, the VBA window will open up.
- Now select the Insert tab in it.
- After that, select Module from the drop-down menu.
- Next, select the module by double-clicking it if it isn’t selected already.
- Then insert the following code in the module.
Sub clear_content_button_sheet()
  Dim bttn As Button
  Application.ScreenUpdating = False
  ActiveSheet.Buttons.Delete
  Dim arng As Range
    Set arng = ActiveSheet.Range("F6:G7")
    Set bttn = ActiveSheet.Buttons.Add(arng.Left, arng.Top, arng.Width, arng.Height)
    With bttn
      .OnAction = "ClearContentSheet"
      .Caption = "CLEAR"
      .Name = "CLEAR"
    End With
  Application.ScreenUpdating = True
End Sub

Sub ClearContentSheet()
  ActiveSheet.Cells.ClearContents
End Sub
🔎 Breakdown of the code
Dim bttn As ButtonThis line declares the btn variable as a button.
Application.ScreenUpdating = FalseWe have turned the real-time screen updating off with this line.
ActiveSheet.Buttons.DeleteThe line of code deletes all the previously added button from the spreadsheet.
Dim arng As RangeHere, we declared the variable t as a range.
Set arng = ActiveSheet.Range("F6:G7")In this section, we declared the range F6:G7 as the value of t.
Set bttn = ActiveSheet.Buttons.Add(arng.Left, arng.Top, arng.Width, arng.Height)Here we added a button with the height and width of the range in t and stored it within the variable btn.
With bttn
.OnAction = "ClearContentSheet"
.Caption = "CLEAR"
.Name = "CLEAR"
End With
With With we have applied the .OnAction ,the .Caption and .Name method in the btn variable.
In the .OnAction method, we have called the sub named ClearContentSheet here.
Application.ScreenUpdating = TrueFinally, we have turned on the real-time screen update in the spreadsheet now that the code is finished running.
Sub ClearContentSheet()

  ActiveSheet.Cells.ClearContents
End Sub
This is the declaration of the sub named ClearContentSheet which just clears all the values in a spreadsheet.
- After that, press F5 to instantly run the code.
The button will now appear on the spreadsheet as intended in the code.
- Now click on the button and it will clear all of the values in the spreadsheet.
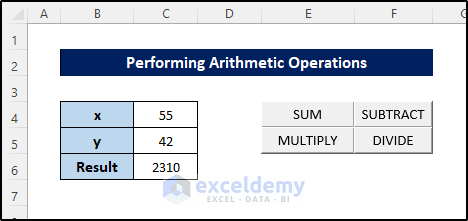
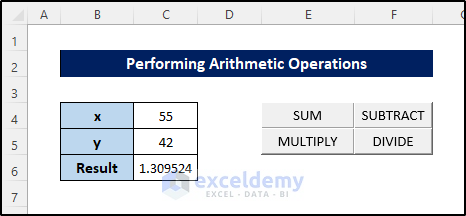
3. Performing Arithmetic Operations
Next up, we are going to make a simple calculator out of the same set of codes. For that, we are going to perform simple addition, subtraction, multiplication, and division using buttons. To add each command button we will do so programmatically with Excel VBA.
As for the dataset, we are going to use the following one.
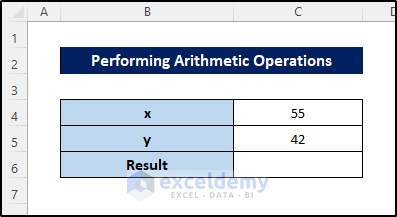
We are going to perform arithmetic operations with the values of x and y.
Follow these steps to see how we can create such buttons.
Steps:
- First, go to the Developer tab on your ribbon.
- Then select Visual Basic from the Code group.
- As a result, the VBA window will open up.
- Now select the Insert tab in int.
- After that, select Module from the drop-down menu.
- Next, select the module by double-clicking it if it isn’t selected already.
- Then insert the following code in the module.
Sub arithmetic_buttons()
  Dim bttn1, bttn2, bttn3, bttn4 As Button
  Application.ScreenUpdating = False
  ActiveSheet.Buttons.Delete
  Dim arng1, arng2, arng3, arng4 As Range
    Set arng1 = ActiveSheet.Range("E4:E4")
    Set bttn1 = ActiveSheet.Buttons.Add(arng1.Left, arng1.Top, arng1.Width, arng1.Height)
    With bttn1
      .OnAction = "Summation"
      .Caption = "SUM"
      .Name = "SUM"
    End With
    Set arng2 = ActiveSheet.Range("F4:F4")
    Set bttn2 = ActiveSheet.Buttons.Add(arng2.Left, arng2.Top, arng2.Width, arng2.Height)
    With bttn2
      .OnAction = "Subtraction"
      .Caption = "SUBTRACT"
      .Name = "SUBTRACT"
    End With
    Set arng3 = ActiveSheet.Range("E5:E5")
    Set bttn3 = ActiveSheet.Buttons.Add(arng3.Left, arng3.Top, arng3.Width, arng3.Height)
    With bttn3
      .OnAction = "Multiply"
      .Caption = "MULTIPLY"
      .Name = "MULTIPLY"
    End With
    Set arng4 = ActiveSheet.Range("F5:F5")
    Set bttn4 = ActiveSheet.Buttons.Add(arng4.Left, arng4.Top, arng4.Width, arng4.Height)
    With bttn4
      .OnAction = "Divide"
      .Caption = "DIVIDE"
      .Name = "DIVIDE"
    End With
  Application.ScreenUpdating = True
End Sub

Sub Summation()
 Dim x, y, Sum As Integer
 x = Range("C4").Value
 y = Range("C5").Value
 Sum = x + y
 Range("C6").Value = Sum
End Sub

Sub Subtraction()
 Dim x, y, Sum As Integer
 x = Range("C4").Value
 y = Range("C5").Value
 Subtr = x - y
 Range("C6").Value = Subtr
End Sub

Sub Multiply()
 Dim x, y, Sum As Integer
 x = Range("C4").Value
 y = Range("C5").Value
 Mult = x * y
 Range("C6").Value = Mult
End Sub

Sub Divide()
 Dim x, y, Sum As Integer
 x = Range("C4").Value
 y = Range("C5").Value
 Div = x / y
 Range("C6").Value = Div
End Sub
🔎 Breakdown of the code
Dim bttn1, bttn2, bttn3, bttn4 As ButtonThis line declares four variables as a button.
Application.ScreenUpdating = FalseWe have turned the real-time screen updating off with this line.
ActiveSheet.Buttons.DeleteThe line of code deletes all the previously added button from the spreadsheet.
Dim arng1, arng2, arng3, arng4 As RangeHere, we declared the variables t1, t2, t3, t4 as a range.
    Set arng1 = ActiveSheet.Range("E4:E4")
    Set bttn1 = ActiveSheet.Buttons.Add(arng1.Left, arng1.Top, arng1.Width, arng1.Height)
    With bttn1
      .OnAction = "Summation"
      .Caption = "SUM"
      .Name = "SUM"
    End With
These sets of lines are repetitive in the code. What this portion does is set a range value for t1. Then adds a button within the size of the range and situates the .OnAction, .Caption, and .Name method with the button. For the .OnAction portion, this method calls the Summation sub from below.
   Set arng2 = ActiveSheet.Range("F4:F4")
    Set bttn2 = ActiveSheet.Buttons.Add(arng2.Left, arng2.Top, arng2.Width, arng2.Height)
    With bttn2
      .OnAction = "Subtraction"
      .Caption = "SUBTRACT"
      .Name = "SUBTRACT"
    End With
This function does the same as the previous one, but for a different position and recalls the sub Subtraction.
Set arng3 = ActiveSheet.Range("E5:E5")
    Set bttn3 = ActiveSheet.Buttons.Add(arng3.Left, arng3.Top, arng3.Width, arng3.Height)
    With bttn3
      .OnAction = "Multiply"
      .Caption = "MULTIPLY"
      .Name = "MULTIPLY"
    End With
This portion also does the same as the previous two. But recalls the Multiply sub and situated the button in a different place.
    Set arng4 = ActiveSheet.Range("F5:F5")
    Set bttn4 = ActiveSheet.Buttons.Add(arng4.Left, arng4.Top, arng4.Width, arng4.Height)
    With bttn4
      .OnAction = "Divide"
      .Caption = "DIVIDE"
      .Name = "DIVIDE"
    End With
Just like the previous three blocks, this is also the same. But this block calls the Divide function from below and places the button in cell F5.
Application.ScreenUpdating = TrueFinally, we have turned on the real-time screen update in the spreadsheet now that the code is finished running.
Sub Summation()
 Dim x, y, Sum As Integer
 x = Range("C4").Value
 y = Range("C5").Value
 Sum = x + y
 Range("C6").Value = Sum
End Sub
This is the Summation sub that the first button calls. This block takes in the value of cells C4 and C5 and adds them before returning.
Sub Subtraction()
 Dim x, y, Sum As Integer
 x = Range("C4").Value
 y = Range("C5").Value
 Subtr = x - y
 Range("C6").Value = Subtr
End Sub
This is the Subtraction sub that the second button calls. This block takes in the value of cells C4 and C5 and subtracts later from the former before returning.
Sub Multiply()
 Dim x, y, Sum As Integer
 x = Range("C4").Value
 y = Range("C5").Value
 Mult = x * y
 Range("C6").Value = Mult
End Sub
This is the Multiply sub that the third button calls. This block takes in the value of cells C4 and C5 and multiplies them together before returning.
Sub Divide()
 Dim x, y, Sum As Integer
 x = Range("C4").Value
 y = Range("C5").Value
 Div = x / y
 Range("C6").Value = Div
End Sub
This is the Divide sub that the fourth button calls. This block takes in the value of cells C4 and C5 and divides the former with the later before returning.
- After that, press F5 to instantly run the code.
The button will now appear on the spreadsheet as intended in the code.

If we press the SUM button now, the value of cell C6 will be the summation of the two values.

After pressing the SUBTRACT button, the content of cell C6 will be the difference between the two.
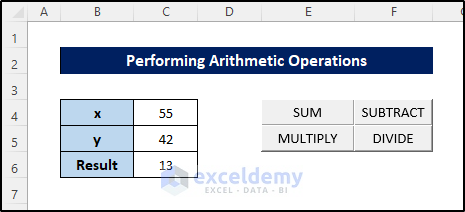
Pressing MULTIPLY will give us the multiplied value.
And pressing the DIVIDE button will give us the x/y value.
Read More: How to Use VBA Code for Submit Button in Excel
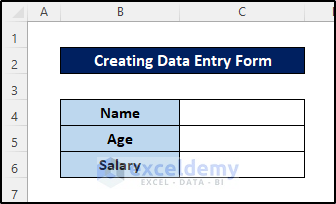
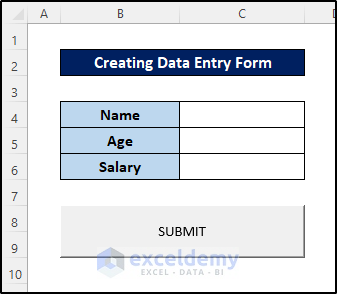
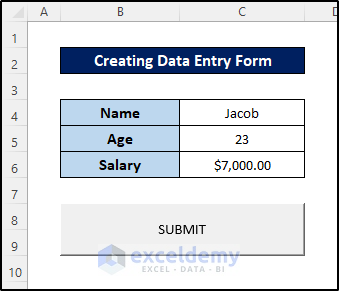
4. Creating Simple Data Entry Form with Command Button
In the final example, we are going to add a command button in a data entry form programmatically with Excel VBA that will insert the values into a different spreadsheet.
This is the form we are taking values in. The spreadsheet is also named “Form”.
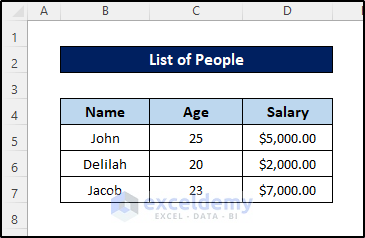
And this is the list of all the information entered in the form.

Our button will add the data in the blank cells of the “Form” spreadsheet’s cells in the list below.
Follow these steps to see how we can use the code and the breakdown of it.
Steps:
- First, go to the Developer tab on your ribbon.
- Then select Visual Basic from the Code group.
- As a result, the VBA window will open up.
- Now select the Insert tab in int.
- After that, select Module from the drop-down menu.
- Next, select the module by double-clicking it if it isn’t selected already.
- Then insert the following code in the module.
Sub data_entry_button()
  Dim bttn As Button
  Application.ScreenUpdating = False
  ActiveSheet.Buttons.Delete
  Dim arng As Range
    Set arng = ActiveSheet.Range("B8:C9")
    Set bttn = ActiveSheet.Buttons.Add(arng.Left, arng.Top, arng.Width, arng.Height)
    With bttn
      .OnAction = "Submit"
      .Caption = "SUBMIT"
      .Name = "SUBMIT"
    End With
  Application.ScreenUpdating = True
End Sub
Sub Submit()

Sheets("Form").Range("C4:C6").Copy
Sheets("Data").Select
Range("B2000").End(xlUp).Select
ActiveCell.Offset(1, 0).Select
ActiveCell.PasteSpecial Transpose:=True
Sheets("Form").Range("C4:C6").ClearContents
End Sub
🔎 Breakdown of the code
Dim bttn As ButtonThis line declares the btn variable as a button.
Application.ScreenUpdating = FalseWe have turned the real-time screen updating off with this line.
ActiveSheet.Buttons.DeleteThe line of code deletes all the previously added button from the spreadsheet.
Dim arng As RangeHere, we declared the variable t as a range.
Set arng = ActiveSheet.Range("F6:G7")In this section, we declared the range F6:G7 as the value of t.
Set bttn = ActiveSheet.Buttons.Add(arng.Left, arng.Top, arng.Width, arng.Height)Here we added a button with the height and width of the range in t and stored it within the variable btn.
With bttn
.OnAction = "Submit"
.Caption = "SUBMIT"
.Name = "SUBMIT"
End With
With With we have applied the .OnAction ,the .Caption and .Name method in the btn variable.
In the .OnAction method, we have called the sub named Submit here.
Application.ScreenUpdating = TrueFinally, we have turned on the real-time screen update in the spreadsheet now that the code is finished running.
Sub Submit()
Sheets("Form").Range("C4:C6").Copy
Sheets("Data").Select
Range("B2000").End(xlUp).Select
ActiveCell.Offset(1, 0).Select
ActiveCell.PasteSpecial Transpose:=True
Sheets("Form").Range("C4:C6").ClearContents
End Sub
This is the declaration of the sub named Submit which copies the value from the sheet Form and pastes them in transpose below the list.
- After that, press F5 to instantly run the code.
The button will now appear on the spreadsheet as intended in the code.
Now let’s try our newly created button with new data. For that, we have entered the following data in the sheet.
After pressing the SUBMIT button, the values in this sheet will clear. And if we look at the next sheet containing the list (the sheet named “data”), it will be like this.
Download Practice Workbook
You can download the workbook used for the demonstration from the download link below.
Conclusion
This concludes our discussion on how to add a command button programmatically in Excel using VBA. Hopefully, you have grasped the concept of adding buttons and adding macros to them. I hope you found this guide helpful and informative. If you have any questions or suggestions, let us know in the comments below.
Related Articles
- Text Alignment with VBA Command Button in Excel
- How to Make a Calculate Button in Excel
- How to Create a Stopwatch in Excel

