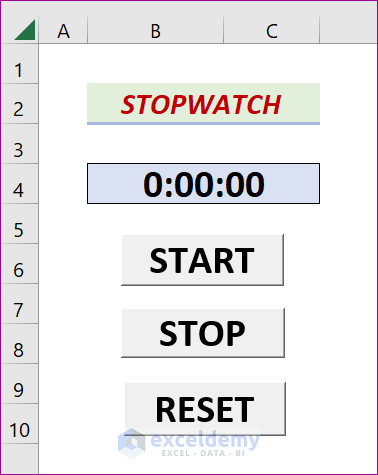
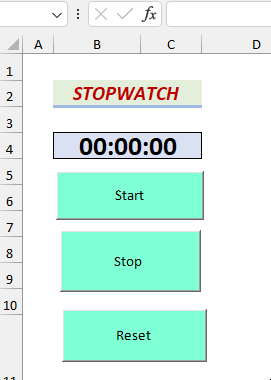
Step 1 – Display Stopwatch Clock in Excel
- Select the desired cell range, e.g., B4:C4.
- Navigate to the Home
- Choose the Merge and Center option from the Alignment group and select Middle and Center align.
- From the Font group, select the fill color as Blue Lighter 80%. Select Bold and All Border.
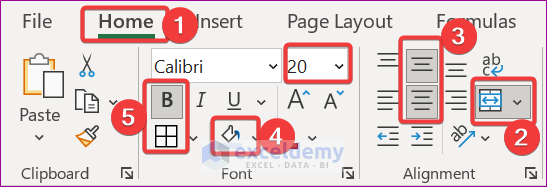
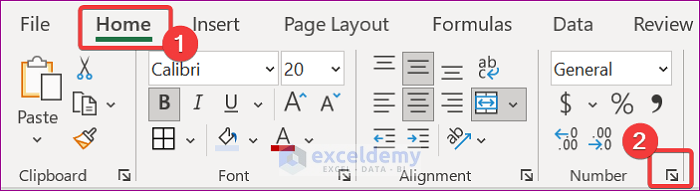
- From the Home tab, click the Expand icon from the Number group.
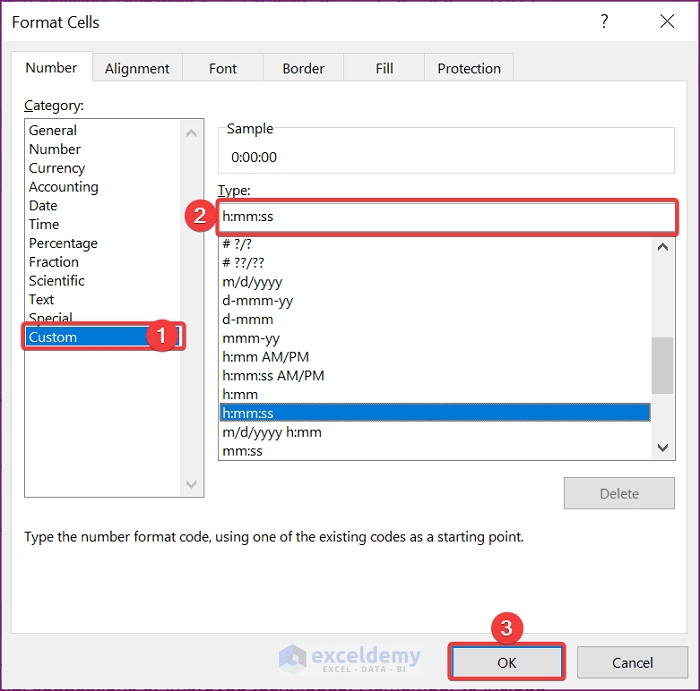
- The Format Cells will appear.
- From the Format Cells window, select Custom and select h:mm:ss from the options in the Type box.
- Click OK.
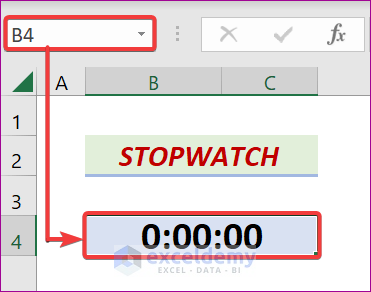
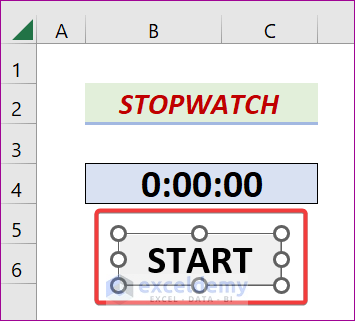
- Select B4 cell and enter 0:00:00.
- Press Enter. A stopwatch will appear on the sheet.
Read More: How to Add Command Button Programmatically with Excel VBA
Step 2 – Establish VBA Macro to Start Stopwatch
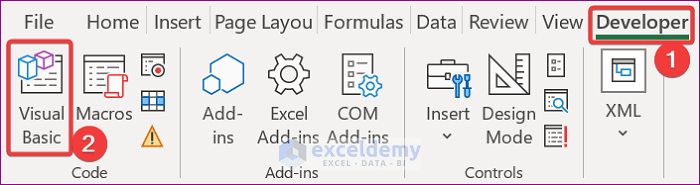
- Go to the Developer tab and click on Visual Basic.
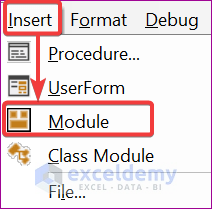
- Click Insert and select Module.
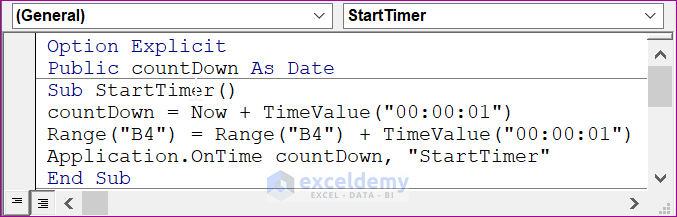
- Enter the following code in the Module Box.
Option Explicit
Public countDown As Date
Sub StartTimer()
countDown = Now + TimeValue("00:00:01")
Range("B4") = Range("B4") + TimeValue("00:00:01")
Application.OnTime countDown, "StartTimer"
End Sub- Enter the Procedure Name in the StartTimer. The Stopwatch App will start up when you run this Macro.
- Press Ctrl + S.
Step 3 – Generate Another Macro to Reset Time-Tracker
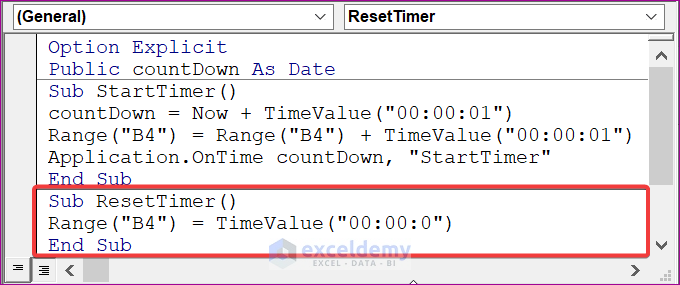
- Open the Module.
- Enter the following code in the Module Box.
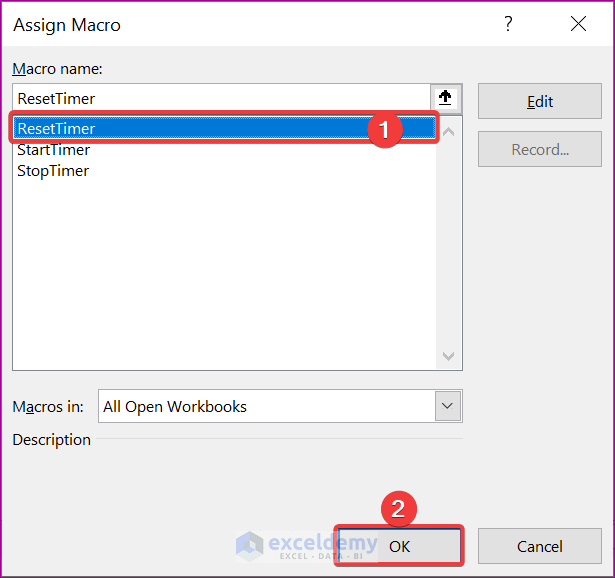
Sub ResetTimer()
Range("B4") = TimeValue("00:00:0")
End Sub- ResetTimer is the Procedure Name. This Macro can reset the Clock.
- Press Ctrl + S.
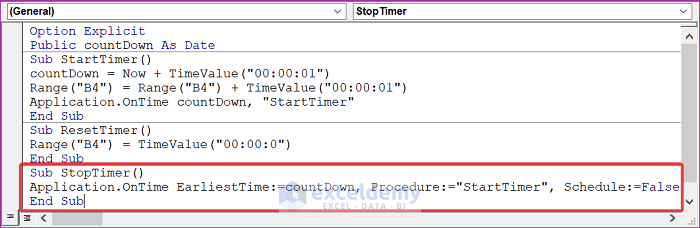
Step 4 – Build Last Macro to STOP Stopwatch in Excel
- Open the Module.
- Enter the following code into the Module Box.
Sub StopTimer()
Application.OnTime EarliestTime:=countDown, Procedure:="StartTimer", Schedule:=False
End Sub- This Macro is to stop the Time-tracker App.
- Press Ctrl + S.
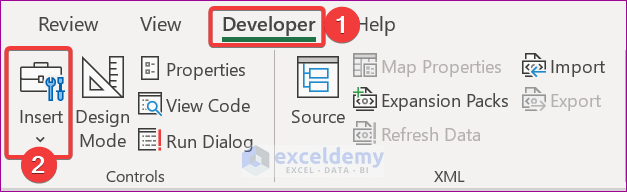
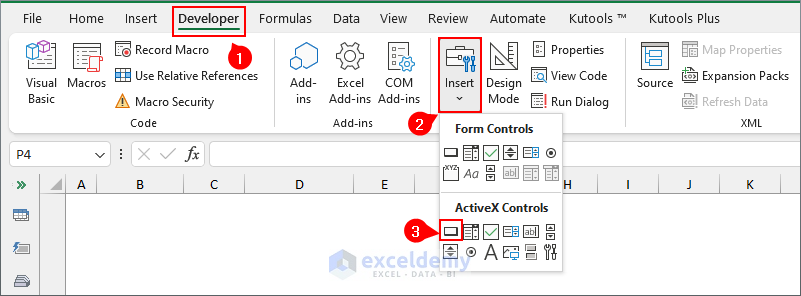
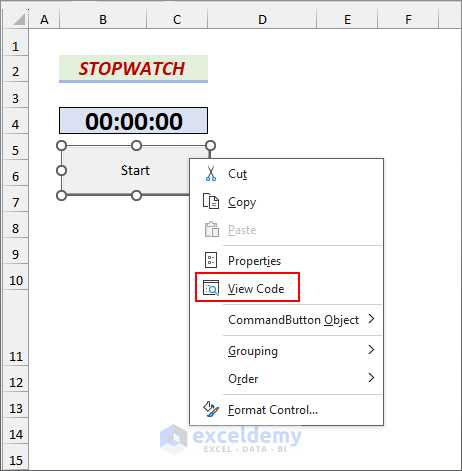
Step 5 – Implement Buttons for Stopwatch
- Go to the Developer tab.
- From the Controls group, click on the Insert icon.
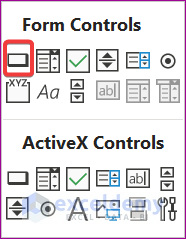
- In Form Controls, choose the following Button symbol.
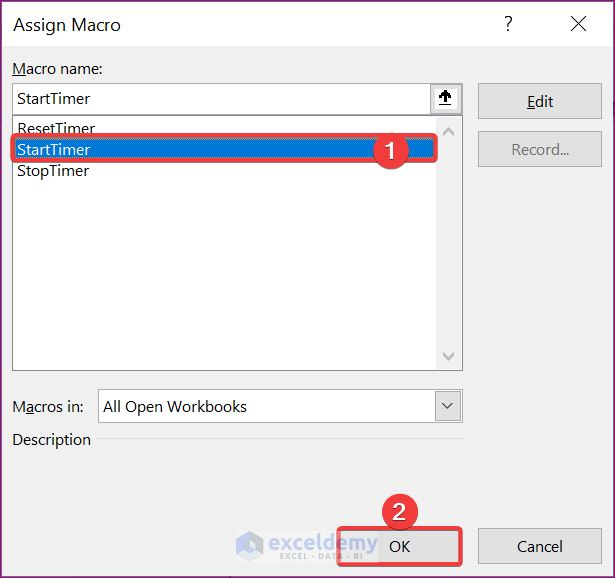
- Insert the rectangle symbol right below cell B4.
- Choose the StartTimer procedure from the Assign Macro. Click OK.
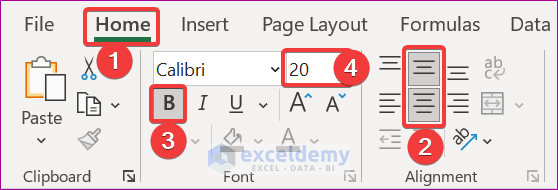
- Click on the button’s text area and click on the Home tab.
- Choose Middle and Center align from the Alignment group.
- Click on the B icon and change the font size to 20.
- Change the name of the button. We have named it START.
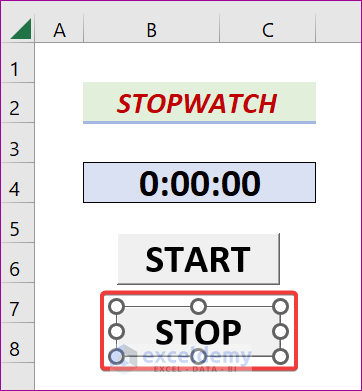
- Make another button to stop or pause following the same procedure.
- Draw this button and place it below Button1.
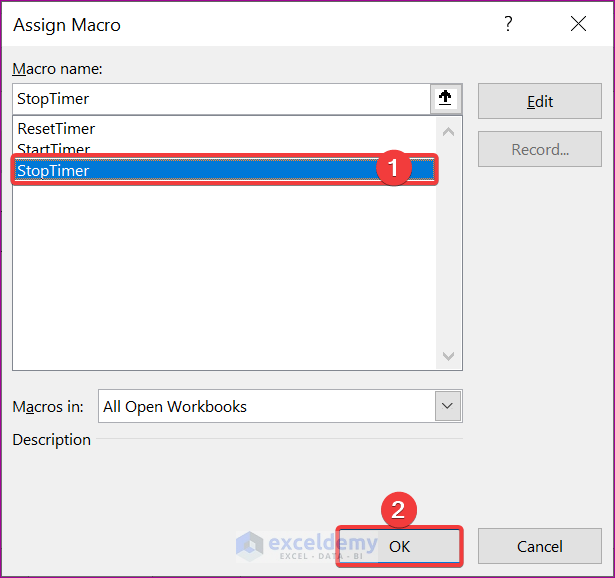
- Choose StopTimer option from the Assign Macro window and click OK.
- Click on the text area of the button and go to the Home tab.
- Click the B icon and change the font size to 20.
- In the Alignment group, choose Middle and Center align.
- Label the button. We have labelled it STOP.
- Make another button to reset.
- Draw the button and place it below the Button2.
- The Assign Macro window will appear.
- In the Assign Macro window, choose ResetTimer from the options. Click OK.
- Click the button’s text area and go to the Home tab.
- Click the B symbol and change the font size to 20.
- In the Alignment section, choose Middle and Center align.
- Change the button’s name. We have labelled it RESET.
Read More: How to Make a Calculate Button in Excel
Step 6 – Check Stopwatch Timer
- Click the Reset button.
- Press START.
- Tap the STOP button when you are done.
- Click the Reset button to set the Stopwatch Timer back to Zero.
- Press START.
- Press STOP when you are done.
- Tap the RESET button to reset it to zero.
Download Practice Workbook
Related Articles
- Text Alignment with VBA Command Button in Excel
- VBA Code for Save Button in Excel
- How to Use VBA Code for Submit Button in Excel


Hi, thanks and its useful. However, when i click on the stop button after i already stop the timer. i hit error. how can i solve this? please advise. thanks
Hello JAMIE
Your appreciation means a lot to us. Thanks for your nice words!
You often click the stop button after you have already stopped the timer. That results in an Error. Thank you once again for noticing the issue. Your claim is correct.
However, I am delighted to inform you that the issue can be avoided with the help of an Error Handler called On Error Resume Next.
All you need to do is to modify the StopTime sub-procedure to fulfil your requirement.
Modified Excel VBA Code:
Good luck!
Regards
Lutfor Rahman Shimanto
Thank you for this useful code.
How can I add a 2nd instance?
I simply attemted to copy and rename the macros and target another cell.
The 2nd instance sarts ans then stops immediately… The reset works.
Thanks for help.
Sub StartTimer2()
countDown = Now + TimeValue(“00:00:01”)
Range(“F4”) = Range(“F4”) + TimeValue(“00:00:01”)
Application.OnTime countDown, “StartTimer”
End Sub
Sub ResetTimer2()
Range(“F4”) = TimeValue(“00:00:0″)
End Sub
Sub StopTimer2()
On Error Resume Next
Application.OnTime EarliestTime:=countDown, Procedure:=”StartTimer”, Schedule:=False
End Sub
Hello BIC
Thanks for reaching out and posting an interesting problem. You want to create a 2nd instance of the existing stopwatch code.
Excel VBA Code (2nd Instance):
2nd Instance of stopwatch code
OUTPUT:
Hopefully, the idea will fulfil your requirements. Good luck!
Regards
Lutfor Rahman Shimanto
Hi,
Whilst the stop watch is running and I try to switch tabs to another sheet in the workbook it generates a Run-time error ’13’ type mismatch. How can I resolve this?
Thanks
Adam
Hello ADAM INGLETON
Thanks for reaching out and posting an exciting query. You are right about the run-time error “13” Type mismatch. This is because the active sheet contains text value within cell B4.
I am delighted to inform you that I have developed other improved sub-procedures that have overcome the issue you mentioned by modifying the previous code. To be specific, I have taken a worksheet object to avoid this error.
Raised Error on Your End:
Improved Sub-procedures:
OUTPUT of Applying the Improved Sub-procedures:
Hopefully, the idea will resolve your problem. Good luck!
Regards
Lutfor Rahman Shimanto
Hi Lutfor,
Thanks for you help with this much appreciated
Thanks,
Adam
Hello Adam Ingleton,
You are most welcome.
Regards
ExcelDemy
Good Afternoon,
Do you know if it is possible to make the clock work in metric time (100 minute clock?)
Thanks,
Adam
Dear ADAM,
Thanks for your comment. Unfortunately, Excel’s current time formatting does not support metric time display.
Regards
Aniruddah
Team Exceldemy
Hi, Is it possible to change the colour of the buttons?
Thanks
Adam
Dear Adam,

Thank you for your concern. You can not change the color of Excel button but you can use Command Button to change the button color.
You can follow the steps below to color your command button:
1. use Developer tab > Insert > ActiveX Controls > Command Button.
2. A command will appear and right click on it.
3. Choose CommandButton Object > Edit.
Name the button as Start.
4. Now right click on the command button and choose View Code.
5. Then write code below for starting.
Finally the button color has been added.

6. Now create a stop buttom and use the code below:
7. Write down the code for reset button:
Finally, you will have colored command button. You can change the color by changing color code 13959039.
How to make multiple stop watch on one sheet
Hello RAMI
Thanks for visiting our blog and sharing your queries. You want to create multiple stopwatches in a sheet. Of course, the requirement is very much achievable.
I have displayed four stopwatches in the B4, F4, B15, and F15 cells.
OUTPUT OVERVIEW:
Follow these steps:
I hope you have learned how to create multiple stopwatches in a sheet. I am also attaching the solution workbook for better understanding; good luck.
DOWNLOAD SOLUTION WORKBOOK
Regards
Lutfor Rahman Shimanto
Excel & VBA Developer
ExcelDemy
Can the times be saved into a column in the same spreadsheet?
Hello Jacquelyn Luna,
To save stopwatch times into a column in the same spreadsheet, you can modify the VBA code in Excel. You will need to modify the StopTimer() subroutine to save the stopwatch times into a column in Excel.
First, go to the module and update the code of Stop button.
Add the following code to save the time into the next available row in a specific column:
The lastRow variable finds the next empty row in column A. Sheets(“Sheet1”).Cells(lastRow, 1).Value = Range(“B4”).Value saves the current stopwatch time from cell B4 into column A.
This will store each time result when you stop the timer. Adjust the sheet and cell references as needed for your workbook.
Regards
ExcelDemy
Hi Lutfor,
can you tell me please, if is it possible to make an excel app, whith for work registartion? I mean have a start and stop time of a work phase, and save a time past from teh start till stop in one row in this database?
Thank you.
Tibor
Hello Tibor,
Yes, it’s absolutely possible to create an Excel application for work registration with start and stop times. You can achieve this using Excel formulas or VBA macros for automation.
Simple Approach with Formulas
Use three columns: Start Time, Stop Time, and Duration
Use the formula:
=B2-A2
This will calculate the time difference when the start and stop times are recorded.
Automated Approach with VBA
If you want buttons to start and stop the timer automatically, you can use the following VBA script:
VBA Script for Start/Stop Button
1. Open Excel and press ALT + F11 to open the VBA Editor.
2. Click Insert > Module and paste the following code:
How It Works
1. The StartWork macro records the start time in column A.
2. The StopWork macro records the stop time in column B and calculates the time difference in column C.
3. Each work session is saved in a new row.
How to Use It
Create two buttons:
1. Assign “StartWork” to the “Start” button
2. Assign “StopWork” to the “Stop” button
3. Click “Start” at the beginning of a task, then “Stop” when finished.
This will create a simple work log in Excel.
Regards
ExcelDemy
How can I add stopwatch to track time within the same spreadsheet by row? Using for time studies which each row needs to track individual time per item.
Hello Shannon B,
You can’t directly run multiple stopwatches at the same time in Excel, but you can adapt the VBA stopwatch method so each row has its own Start/Stop buttons and records time separately. A common approach is:
1. Insert two buttons (Start/Stop) in each row, and link them to a macro that captures the system time and writes elapsed time into that row.
2. In your VBA code, use the ActiveCell.Row or Application.Caller property so the stopwatch only updates the row where the button was clicked.
3. Store the start time in a hidden column (or a named range) for each row, then calculate the elapsed time when Stop is pressed.
This way, each item in your time study gets its own independent timer without affecting other rows.
Regards,
ExcelDemy