Today we will talk about ways to add Tooltip to UDF or User Defined Function in Excel. Tooltips are small descriptions of functions when we enter the function or click on the fx sign in the sheet. Here, we will define a function, in other word UDF, and then add descriptions of the function as well as the arguments accordingly.
How to Add Tooltip to UDF: 3 Easy Ways
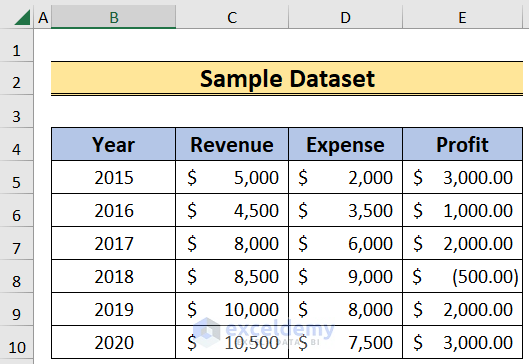
In this article, we will talk about 3 ways to add a Tooltip in UDF in Excel. Firstly, we will use a keyboard shortcut to get the arguments as Tooltip in the cell. Secondly, we will resort to a VBA Code to add description to the function. Finally, we will apply another VBA Code to add description to the arguments of the UDF. Here, we have the data of revenues and expenses by year. We will define a function named NetProfit to get the profit of each year.
1. Using Keyboard Shortcut to Show UDF Arguments
In this instance, we will develop a UDF and use a keyboard shortcut to display its arguments as Tooltip in Excel. The function will subtract expenses from revenue and return the profit.
Steps:
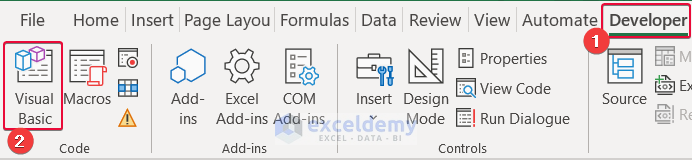
- To start with, go to the Developer tab.
- From there, choose the Visual Basic option.
- As a result, a new window will appear on the screen.

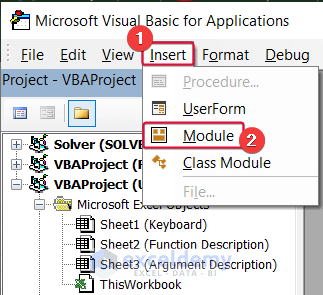
- Next, in the Visual Basic window, first, click Insert.
- Then, choose Module from the available options.
- As a result, a coding module will appear.
- In the module, write the following code and save it.
Function NetProfit(rev As Long, exp As Long) As Long
NetProfit = rev - exp
End Function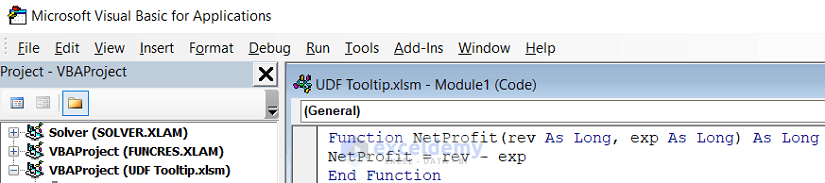
- Now, get back to the sheet and type =NetProfit( in the E5
- Then, press Ctrl+Shift+A.
- As a result, Excel will display the arguments of the function.
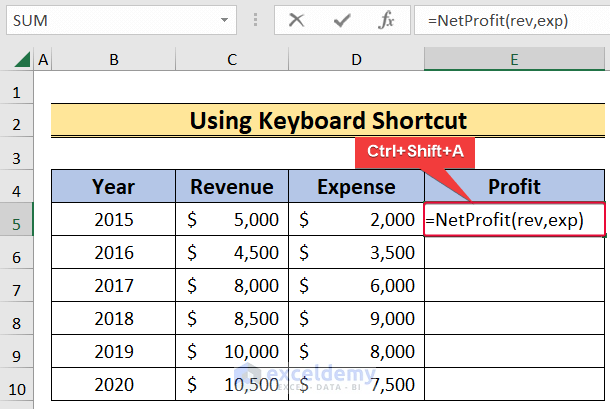
- Thereafter, write the following in the E5 cell,
=NetProfit(C5,D5)- Then, hit Enter.

- As a result, we will get the net profit for that year.
- Now, lower the cursor down to autofill the rest of the cells.

2. Adding Description of UDF Output
In this method, we will apply a VBA Code to add a description to the UDF activity. The code will give a specific description of the function and also the output it is going to give.
Steps:
- To begin with, click on the Developer tab.
- Then, choose the Visual Basic option.
- Consequently, a new window will pop-up.
- In the Visual Basic window, write down the following code below the UDF code and save it.
Sub TooltipUDF()
Dim description As String
description = " Subtracts Expenses from Revenues to give the Net Profit"
Application.MacroOptions Macro:="NetProfit", description:=description, Category:=9
End Sub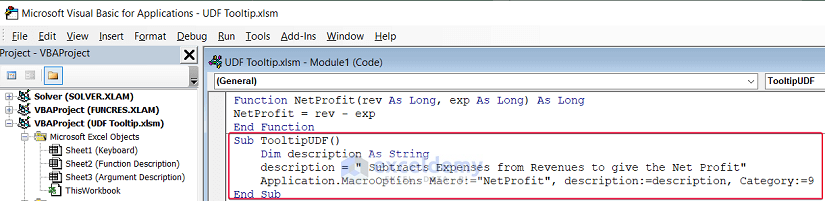
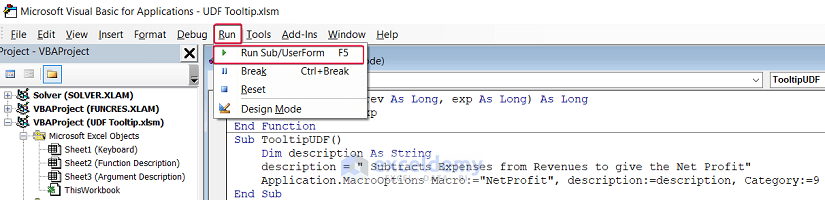
- Finally, run the code from the Run command.
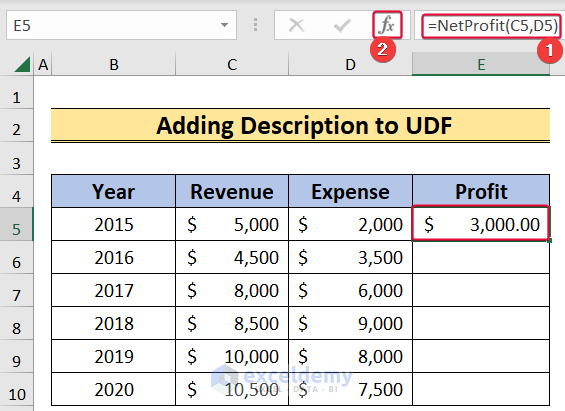
- After that, write the following formula in the E5 cell,
=NetProfit(C5,D5)- Then, press Enter.
- As a result, we will get the profit for that year.
- Next, click on the Insert Function (fx) option on the left side of the formula bar.
- Consequently, a prompt will be on the screen.
- In the prompt, we will see the description of the function.
- Finally, click OK.

- Then, move the cursor down to the last cell to autofill.

3. Inserting Description of UDF Arguments
In this final method, we will add descriptions to the arguments of the UDF. Here, we will describe the arguments and their functions properly.
Steps:
- Firstly, select the Developer tab.
- Secondly, select the Visual Basic option.
- As a result, a new window will pop-up.

- Thereafter, in the Visual Basic window, enter the following code below the UDF code and save it.
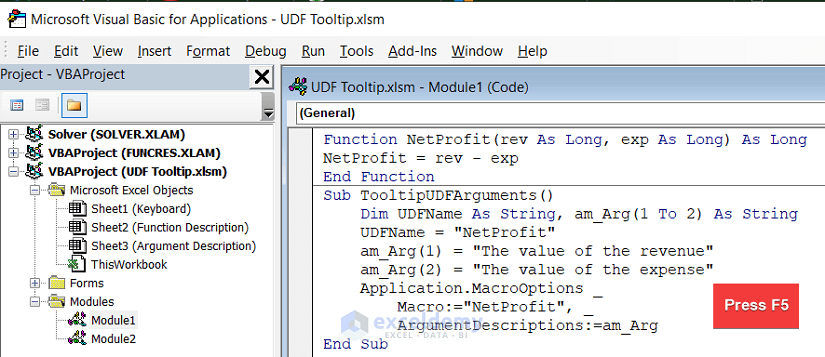
Sub TooltipUDFArguments()
Dim UDFName As String, am_Arg(1 To 2) As String
UDFName = "NetProfit"
am_Arg(1) = "The value of the revenue"
am_Arg(2) = "The value of the expense"
Application.MacroOptions _
Macro:="NetProfit", _
ArgumentDescriptions:=am_Arg
End Sub
Here, we used the Application.MacroOptions option to define the argument description in VBA. We used array data type to store the descriptions of the arguments and saved them in a variable named am_Arg.
- Finally, click on F5 to run the code.
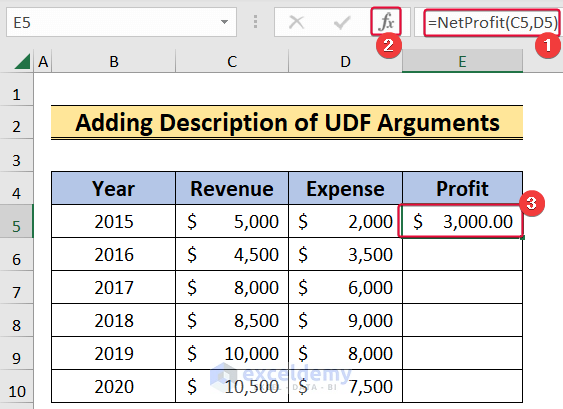
- Next, type the following formula in the E5 cell,
=NetProfit(C5,D5)- Then, press the Enter
- Consequently, we will get the profit for the particular year.
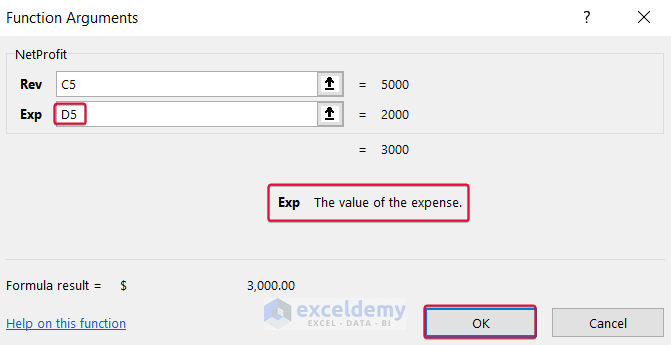
- Now, click on the Insert Function (fx) option which is to the left of the formula bar.
- As a result, a prompt will be on the screen.
- In the prompt, click on the Rev box.
- As a result, we will see the description of the argument.

- Thereafter, click on the Exp box to see the description of the argument.
- Finally, click on OK.
- Afterward, lower the cursor to autofill the values according to the UDF.

Download Practice Workbook
You can download the practice workbook here.
Conclusion
In this article, we have talked about 3 methods to add Tooltip to UDF in Excel. These methods will allow users to describe the newly created functions to other users and make it accessible. If you have any questions regarding this essay, feel free to let us know in the comments.
Related Articles
- How to Create Dynamic Tooltip in Excel
- How to Edit Tooltip in Excel
- How to Create Tooltip in Excel Chart
- How to Remove Tooltip in Excel
- Excel Button Tooltip
- How to Show Full Cell Contents on Hover in Excel
- How to Insert Excel Tooltip on Hover
- How to Display Tooltip on Mouseover Using VBA in Excel
<< Go Back to Excel Tooltip | Learn Excel
Get FREE Advanced Excel Exercises with Solutions!

The Application.MacroOptions option to define the argument description works fine. But what if I want to provide the function to someone else and create an add-on (.xlam)? I need to have the description always available.
Hello BRANISLAV,
Thank you for reading our article and for your comment.
You can easily create an add-in with the same code mentioned in this article. Kindly follow the steps mentioned below.
1. Copy and paste the code in the article in a Module.
2. Save the Excel file as a Macro Enabled Add-in (.xlam) file. For that, go to the File tab and select Save As.
Select Excel Add-in (*.xlam) from the drop-down under the file name and press Save.
3. Now go back to your Excel file. From the Developer tab, select Excel Add-ins from Add-ins group.
4. Next, Add-ins dialog box will pop up. Browse for the name of your .xlam file, select the checkbox beside it, and press OK. We have chosen Udf_Tooltip as it was the name of our .xlam file.
Now, you can access this UDF in any Excel file on your PC.
Hope this solves your problem.
Regards,
Exceldemy Team