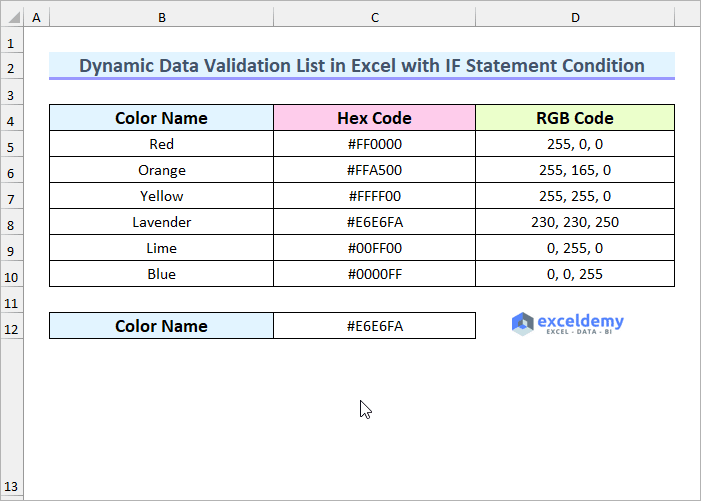
In this article, you will learn about four easy methods for creating a dynamic data validation list in Excel using the IF statement condition. We will be using Microsoft 365 to do this; however, you can use any version of Microsoft Excel and follow this tutorial.
4 Handy Approaches to Create a Dynamic Data Validation List in Excel with IF Statement Condition
There will be four methods to create a dynamic data validation list using the IF statement condition. Firstly, we will show you a single IF function to do this. Secondly, we will combine the IF and INDIRECT functions with the name range feature. Thirdly, we will employ a nested IF formula. Lastly, there will be a VBA code to achieve the objective of this article. Moreover, the following animated image shows the dynamic data validation list in action.
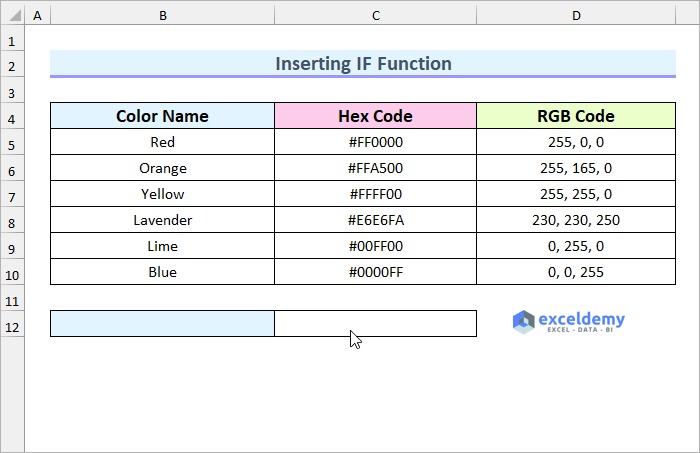
1. Inserting IF Function to Create a Dynamic Data Validation List
In this section, we will use the IF function to create a dynamic data validation list in Excel. We will create a dropdown list first. Then, we will create a dynamic dropdown list based on the first list.
Steps:
- Firstly, select cell B12.
- Secondly, select “Data Validation…” from the Data tab.
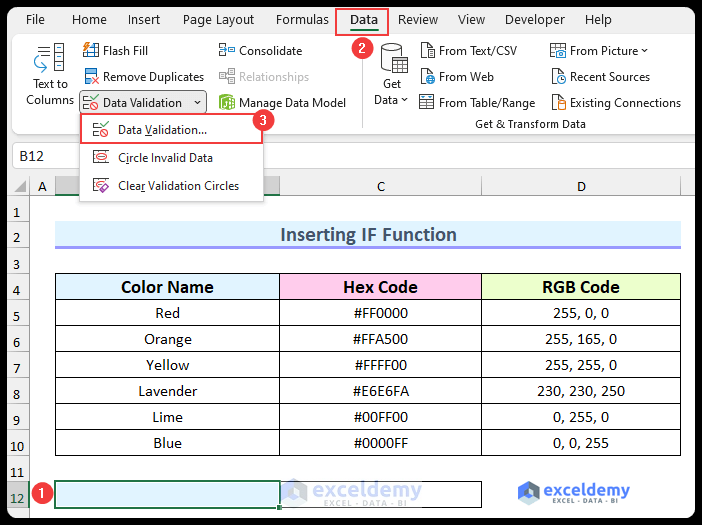
- So, a dialog box will pop up.
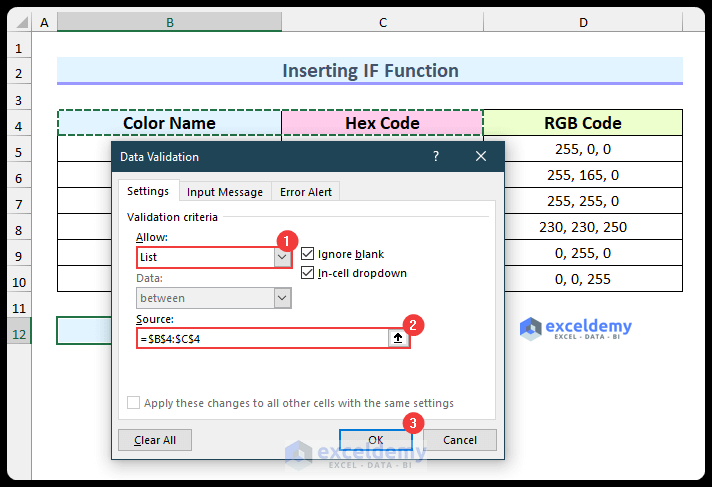
- Thirdly, select Allow List.
- Then, type the following formula in the Source field and press OK.
=$B$4:$C$4
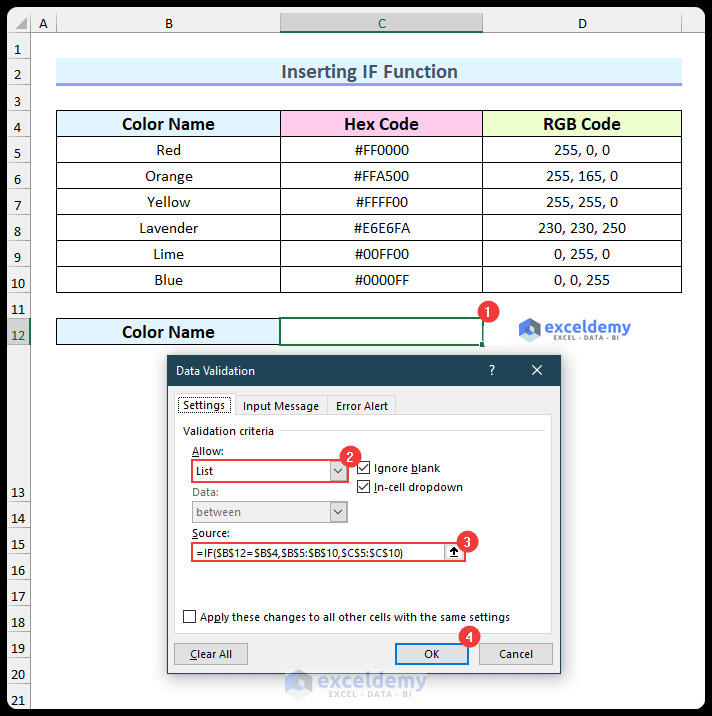
- After that, select cell C12 and repeat the previous steps.
- Then, insert the following formula and press OK.
=IF($B$12=$B$4,$B$5:$B$10,$C$5:$C$10)
- Therefore, this will complete the first method.
Read More: How to Use Multiple IF Statements in Excel Data Validation
2. Combining IF and INDIRECT Functions
We will combine the IF and INDIRECT functions to create a formula in this section. Before that, we need to use the name range feature. Without further ado, let us go through the procedures.
Steps:
- To begin with, the name ranges as follows:
- B5:B10 as Color_Name
- C5:C10 as Hex_Code
- D5:D10 as RGB_Code
- These names need to be the same as the heading in row 4.
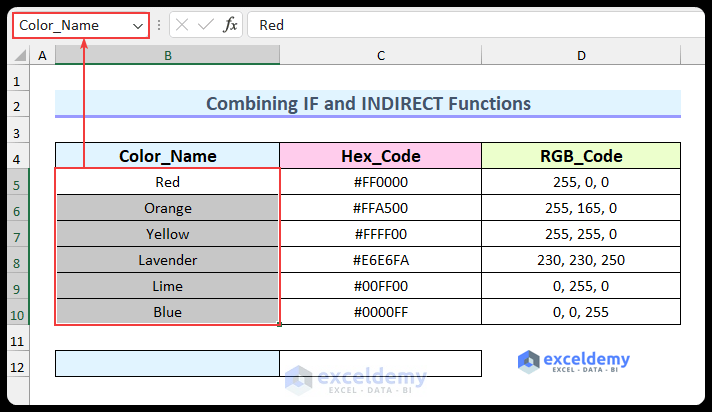
- Then, apply the data validation feature in cell B12. The allowed source is B4:D4.
- After that, use the following formula for cell C12 data validation.
=IF($B$12="",Color_Name,INDIRECT($B$12))
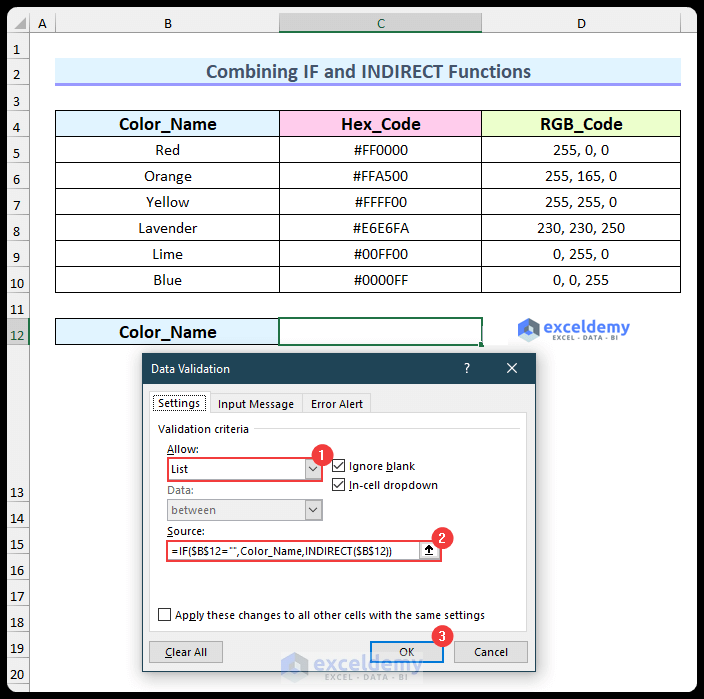
Formula Breakdown
- Firstly, when the value of cell B12 is blank, it will return the values from the Color_Name named range.
- Then, when the above condition is false, it will execute the INDIRECT function.
- The INDIRECT function will return the values from the named range.
- Thus, this formula works.
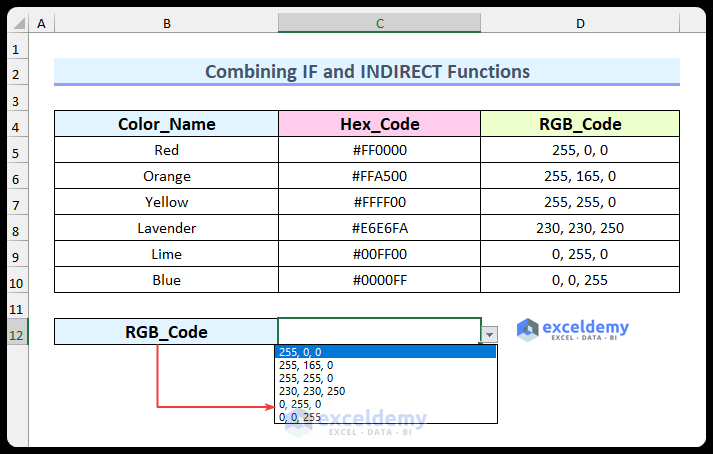
- Finally, we can see the formula works perfectly.
Read More: How to Check If Cell Contains One of Several Values in Excel
3. Using Multiple IF Statements in a Dynamic Data Validation List
In the third method, we will use multiple IF statements in a dynamic data validation list in Excel.
Steps:
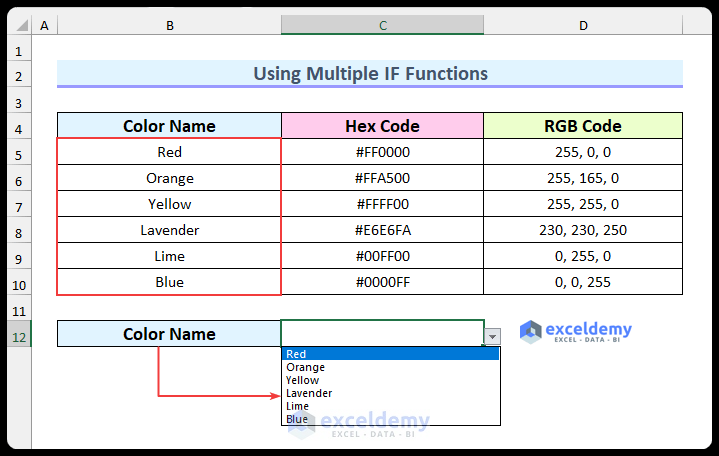
- Firstly, apply the data validation feature in cell B12. The allowed source is B4:D4.
- Secondly, use the following formula for cell C12 data validation.
=IF($B$12=$B$4,$B$5:$B$10,IF($B$12=$C$4,$C$5:$C$10,$D$5:$D$10))
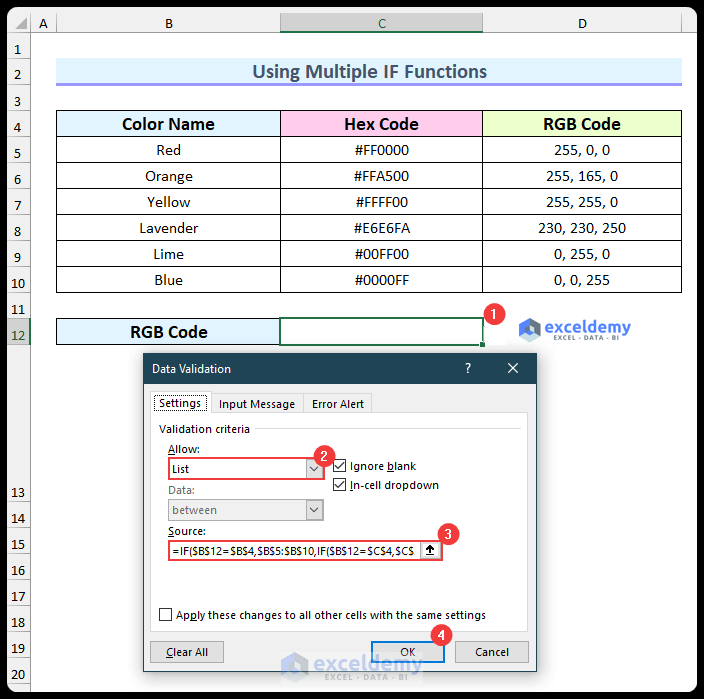
Formula Breakdown
- There are two IF functions in this formula. The first one checks if the value from cell B12 is equal to the value from cell B4, then it will return the “Color Name” values.
- IF($B$12=$C$4,$C$5:$C$10,$D$5:$D$10)
- When the value from cell B12 is equal to the value from cell C4, then it will return the “Hex Code” values.
- Else, it will return the value from the “RGB Code” values.
- Thus, this formula works.
- After doing this, the third method will be completed.
Read More: How to Use If Statement Based on Cell Color in Excel
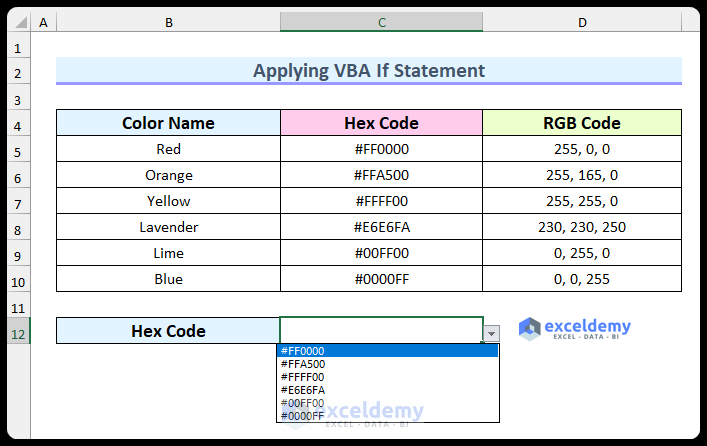
4. Applying VBA IF Statement to Create a Dynamic Data Validation List
In this last method, we will use the VBA IF statement to create a dynamic data validation list. We will apply the code inside the sheet, so there will be no need to run the code.
Steps:
- To begin with, apply data validation in cell B12. There can be three values on this from the cell range B4:D4.
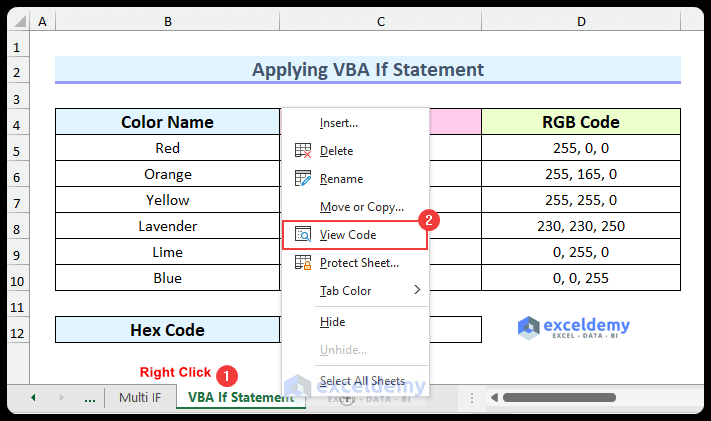
- After that, right-click on the sheet named “VBA If Statement”.
- Then, select View Code.
- After that, type the following code.
Private Sub Worksheet_Change(ByVal Target As Range)
Application.EnableEvents = True
On Error GoTo Exitsub
If Intersect(Target, Range("B12")).Value = Range("B4").Value Then
    Range("C12").Validation.Modify Type:=xlValidateList, AlertStyle:=xlValidAlertStop, _
Formula1:="=B5:B10"
ElseIf Intersect(Target, Range("B12")).Value = Range("C4").Value Then
    Range("C12").Validation.Modify Type:=xlValidateList, AlertStyle:=xlValidAlertStop, _
Formula1:="=C5:C10"
ElseIf Intersect(Target, Range("B12")).Value = Range("D4").Value Then
    Range("C12").Validation.Modify Type:=xlValidateList, AlertStyle:=xlValidAlertStop, _
Formula1:="=D5:D10"
End If
 Application.EnableEvents = True
Exitsub:
 Application.EnableEvents = True
End Sub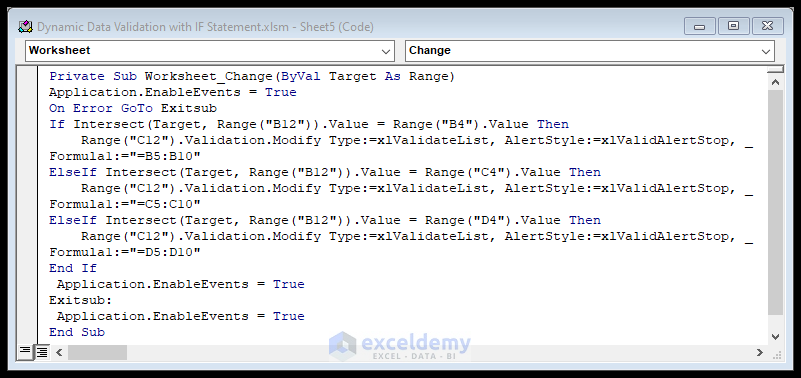
VBA Code Breakdown
Private Sub Worksheet_Change(ByVal Target As Range)
Application.EnableEvents = True
On Error GoTo Exitsub- Firstly, this code will be executed when the sheet value changes. Then, we are enabling the events. Moreover, in case of an error, the code will go to the Exitsub portion.
If Intersect(Target, Range("B12")).Value = Range("B4").Value Then
Range("C12").Validation.Modify Type:=xlValidateList, AlertStyle:=xlValidAlertStop, _
Formula1:="=B5:B10"
ElseIf Intersect(Target, Range("B12")).Value = Range("C4").Value Then
Range("C12").Validation.Modify Type:=xlValidateList, AlertStyle:=xlValidAlertStop, _
Formula1:="=C5:C10"
ElseIf Intersect(Target, Range("B12")).Value = Range("D4").Value Then
Range("C12").Validation.Modify Type:=xlValidateList, AlertStyle:=xlValidAlertStop, _
Formula1:="=D5:D10"
End If- Secondly, we are applying the data validation criteria to the cell C12. There are three criteria for the three columns.
Application.EnableEvents = True
Exitsub:
Application.EnableEvents = True
End Sub- Lastly, we are exiting this sub-procedure.
- Lastly, the code will run automatically. If we change any values the data validation list will change accordingly.
Read More: How to Use If Then Else Statement in Excel VBA
Download Practice Workbook
You can download the Excel file from the link below.
Conclusion
We have shown you four methods for creating a dynamic data validation list using the IF statement condition in Excel. Moreover, there is a practice section in the Excel file. You can use that to follow along with this article. Please leave a comment below if you have any questions or concerns about these techniques. However, remember that our website implements comment moderation. Therefore, your comments may not be instantly visible. So, have a little bit of patience, and we will solve your query as soon as possible. Thanks for reading, keep excelling!
Related Articles
- How to Use Conditional Formatting If Statement Is Another Cell
- Excel IF Statement Between Two Numbers
- How to Find Sum If Cell Color Is Green in Excel
- Prepare IF Statement Contains Multiple Words in Excel
- How to Use Wildcard with If Statement in Excel

