In this tutorial, I am going to share with you 2 simple methods to insert WordArt in Excel. You can easily apply these methods in any set of data to add both simple and complex WordArts to decorate your data representations. To achieve this task, we will also see some useful features that might come in handy in many other Excel-related tasks.
What Is WordArt in Excel?
The WordArt feature in Excel is a type of gallery that holds various text styles. To add ornamental effects to your publications, like shaded or mirrored (reflected) text, you can use these. This feature is also useful to add unique text effects to your document. For example, you can skew a text, extend a title, make a text fit a predetermined shape, or use a gradient fill. You can move or place this WordArt object in your document to add decoration or emphasis.
2 Simple Methods to Insert WordArt in Excel
1. Inserting WordArt from Insert Tab in Excel
In this first method, we will see the simplest way to insert WordArt in an Excel worksheet. Follow the steps below to do this.
Steps:
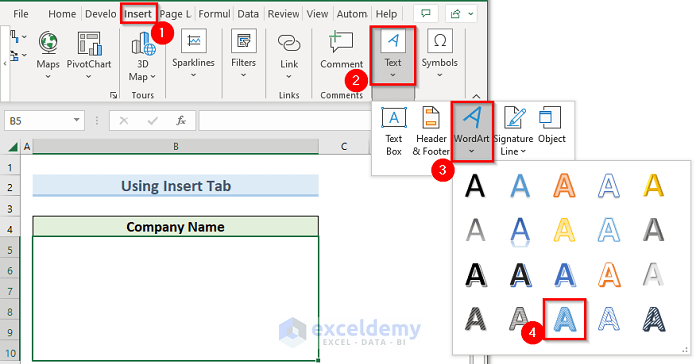
- First, go to the Insert tab and then to the Text section as in the image below.
- Now, click on a WordArt style under WordArt.
- As a result, you should get a text box with the message Your text here as you can see below.
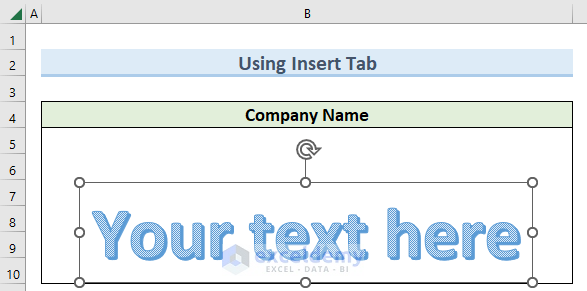
- Next, type in the text that you want inside the text box and click on any other place of the worksheet to confirm.

- After that, navigate to the Shape Format tab and click on Shape Fill.
- Here, select a fill color for your WordArt

- Finally, in this way you can format the WordArt to suit your requirements.

Read More: How to Create a Word Cloud in Excel
2. Applying VBA to Insert WordArt in Excel
If you are familiar with VBA in Excel, then you can write just a few lines of code to insert an amazing WordArt in your worksheet. Let us see how to achieve this.
Steps:
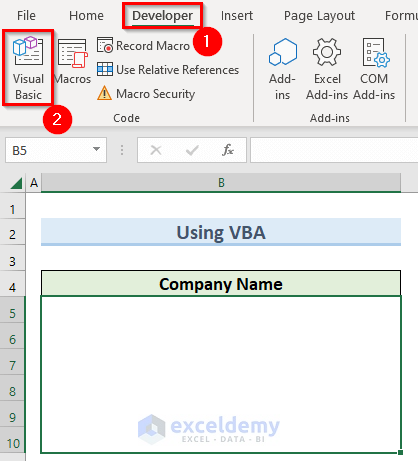
- To begin with, go to the Developer tab and click on Visual Basic.
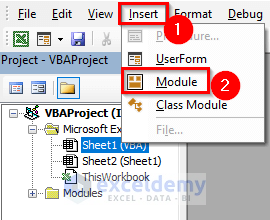
- Next, in the new window, click on Insert and select Module.
- Then, in the Module window enter the following code:
Public Sub AddWordArt()
Set Sh_myDocument = Worksheets(2)
Set Sh_newWordArt = Sh_myDocument.Shapes.AddTextEffect( _
    PresetTextEffect:=msoTextEffect1, Text:="Microsoft", _
    FontName:="Calibri", FontSize:=40, _
    FontBold:=msoFalse, FontItalic:=msoFalse, Left:=10, _
    Top:=10)
End Sub
In the above code, Worksheets(2) specifies the worksheet that we want to work with. Shapes.AddTextEffect adds a new WordArt object. Lastly, we can specify the text that we want inside the WordArt after the Text:= portion of the code.
- After that, go to the Developer tab again and click on Macros.

- Now, in the new Macro window, select the macro AddWordArt and click on Run.

- Consequently, the VBA code will a WordArt to your worksheet which you can then move and format in any way you need.

Read More: How to Insert Clipart in Excel
How to Insert Text Box in Excel
In many cases, you may need to add text boxes inside your worksheet. You can also format the text inside the text box in multiple ways. So let us see how to insert a text box in Excel.
Steps:
- To start with this method, go to the Insert tab and click on the Text Box under Text.

- Now click on the cell where you want to place the Textbox.

- As a result, this will give you an empty Textbox as in the image below.

- After that, you can insert any text that you want inside the textbox and click on any empty cell to confirm.

Read More: How to Edit Document Properties in Excel
Download Practice Workbook
You can download the practice workbook from here.
Conclusion
I hope that you were able to apply the methods that I showed in this tutorial on how to insert WordArt in Excel. As you can see, there are quite a few ways to achieve this. So wisely choose the method that suits your situation best. If you get stuck in any of the steps, I recommend going through them a few times to clear up any confusion. If you have any queries, please let me know in the comments.
Related Articles
- How to Count Alphabet in Excel Sheet
- Count Specific Words in Excel
- How to Add SmartArt Graphics in Excel
- Count Words in Excel
- How to Write a Paragraph in Excel Cell
- Overline Text in Excel
- How to Insert Digital Signature in Excel
<< Go Back to Wordart in Excel | Learn Excel
Get FREE Advanced Excel Exercises with Solutions!
