What Is Goal Seek in Excel?
Goal Seek is a built-in tool in Excel that performs What-If Analysis. It helps you find the specific input value needed to achieve a desired output in a formula. Essentially, it back-solves the problem by iteratively adjusting guesses until it reaches the solution.
When using Goal Seek, you’ll encounter three parameters:
- Set Cell (Compulsory): This is the cell containing the formula whose value you want to change.
- To Value (Compulsory): The desired target value for the output.
- By Changing Cell (Compulsory): Goal Seek adjusts the value in this cell to achieve the desired output using the formula.
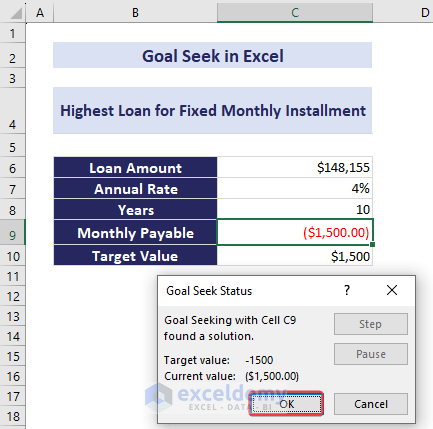
In the below overview image, we used $180,000 as the loan amount first and got a monthly payable value of $1822. Using the Goal Seek analysis, we have brought down this monthly payable amount to $1500, changing the loan amount. The final loan amount became $148,155.
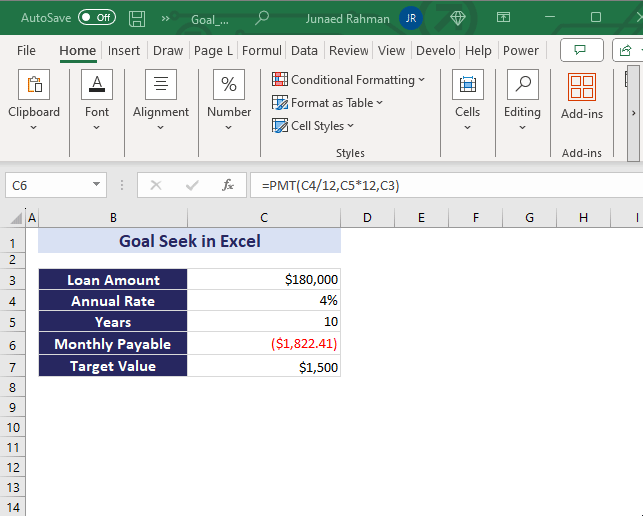
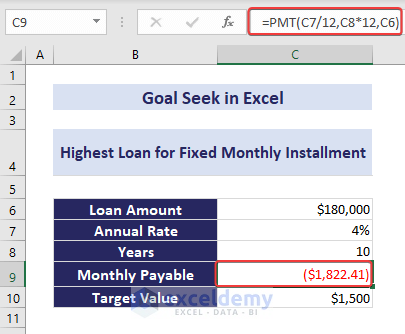
Example 1 – Loan Amount Calculation
Suppose you’ve taken a $180,000 loan from a bank with an annual interest rate of 4%. You want to pay it off over a 10-year period. Using the PMT function, you find the monthly payable amount to be $1,822.41. Now, if you wish to pay $1,500 instead, we can use Goal Seek to adjust the loan amount.
=PMT(C7/12,C8*12,C6)Now, if you wish to pay $1,500 instead, we can use Goal Seek in cell C9 to adjust the loan amount.
Follow the steps below to do this.
- Select cell C9.
- Go to the Data tab.
- Expand the What-If Analysis tools list in the Forecast group.
- Click Goal Seek to open the dialog box.
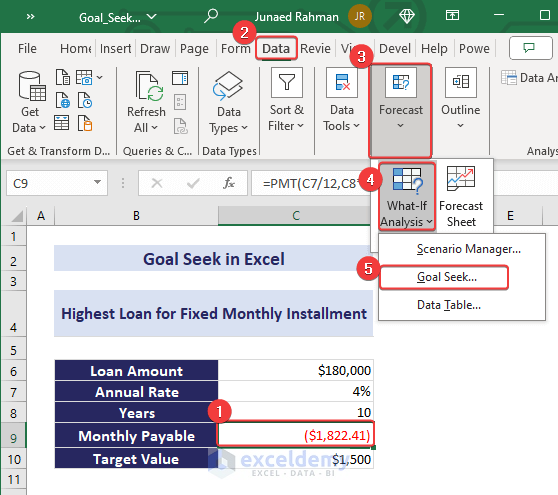
- Set the following parameters:
- Set cell: Choose the cell containing the formula result you want to achieve (e.g., C9).
- To value: Enter the desired output (e.g., -1500 for a loan payment of $1,500).
- By changing cell: Specify the cell where Goal Seek will adjust the value (e.g., $C$6 for the loan amount).
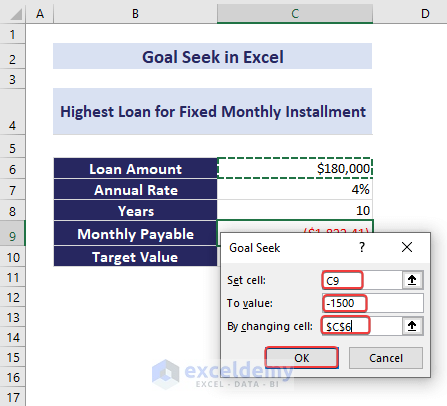
- Click OK to see the new input value that achieves the desired output.
Example 2 – Calculating Time Required for Desired Profit Return
Suppose you have a fixed deposit amount (cell C6) and want to determine the time it will take to achieve a desired profit. The return amount after 2 years is in cell C9, but you aim for a profit equal to the value in C10. Using the FV function, you can calculate the return on investment after 2 years:
=FV(C7,C8,0,-C6,0)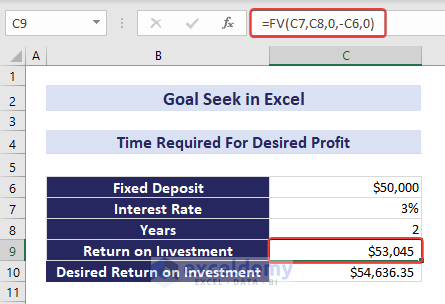
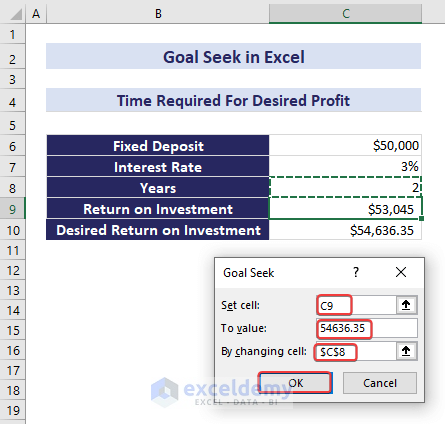
To find the required time, follow these steps:
- Select cell C9.
- Go to the Data tab, expand the What-If Analysis tools, and select Goal Seek.
- In the Goal Seek dialog box:
- Set cell: C9
- To value: 54,636.35
- By changing cell: $C$8
- Press OK.
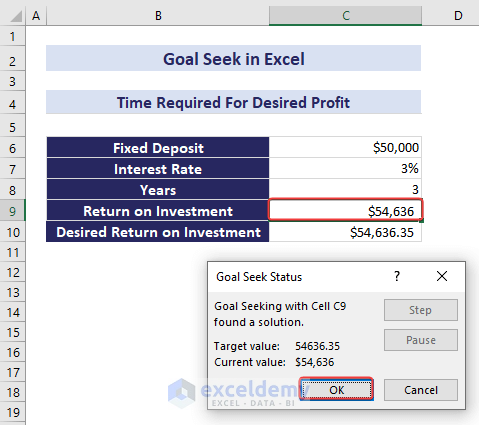
The result will show the required time (approximately 3 years).
Example 3 – Minimum Number for a Fixed Grade in Final Exam
Given exam scores in cells C12:E12 (averaged from four exams), you want all students to achieve a final grade of 75.
=AVERAGE(C7:C10)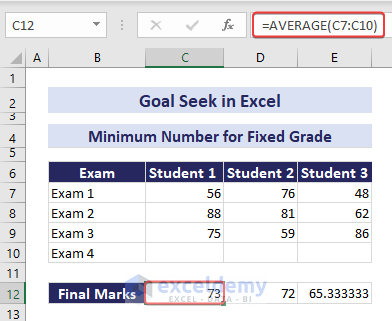
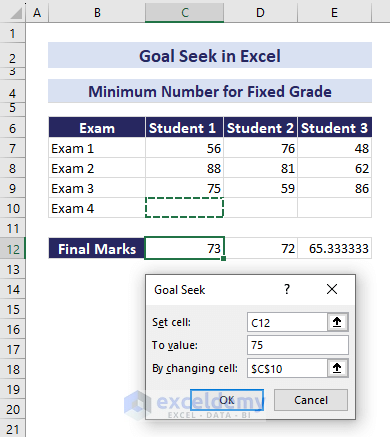
To determine the marks needed in Exam 4 (cell C10), follow these steps:
- In the Goal Seek dialog box:
- Set cell: C12
- To value: 75
- By changing cell: $C$10
- Press OK.
The required marks for Exam 4 will appear in cell C10.
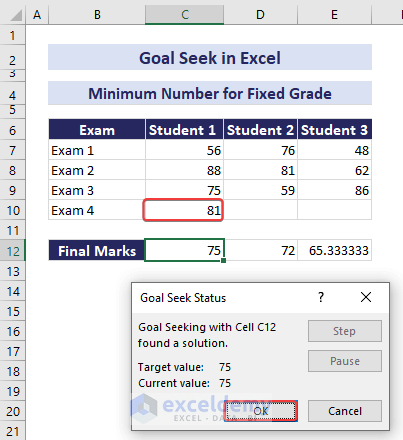
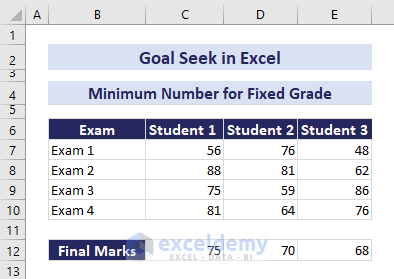
Repeat these steps for other students, adjusting final marks as needed.
Automating Goal Seek with Excel Macros
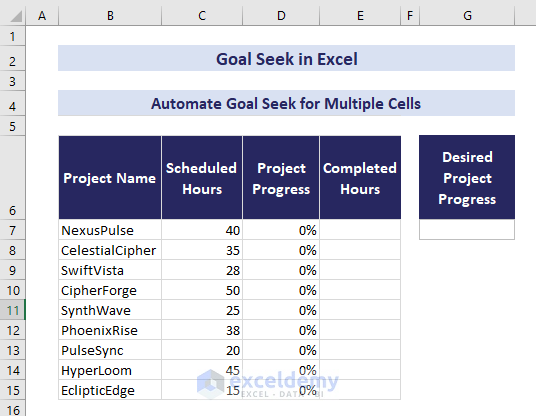
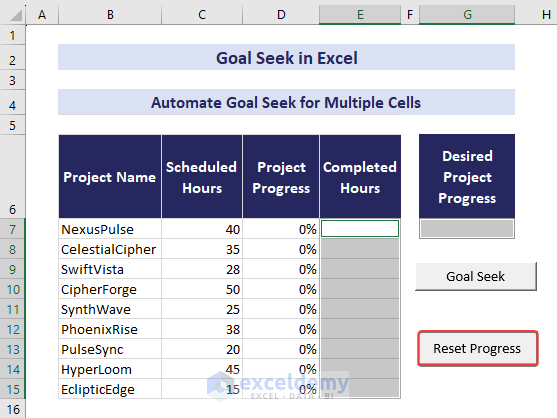
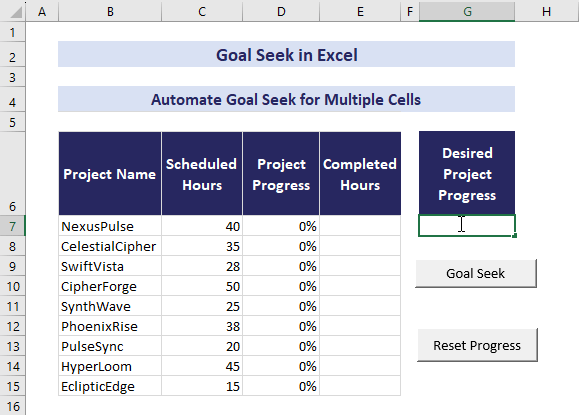
We have a dataset that contains the names of some projects in the range B7:B15 and the hours required to finish those projects in the range C7:C15. We will input the project’s progress in cell G7. The code will use Goal Seek to assign the same value in the range D7:D15. The VBA code will return the hours required to finish that percent of work in the range E7:E15.
Follow the steps below.
- Click the Developer tab.
- Insert a Button (Form Control).

- Assign the name Goal Seek to the button.
- Drag the plus icon that has appeared in your worksheet and adjust it to a suitable size.
- Click on the button, click on CTRL+C to copy and CTRL+V to paste a new button.
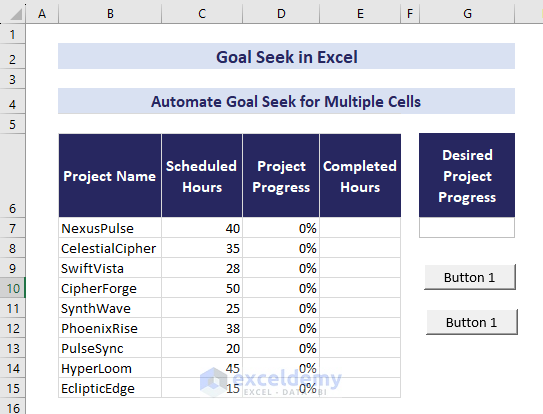
- Assign the name Reset Progress to the second button.
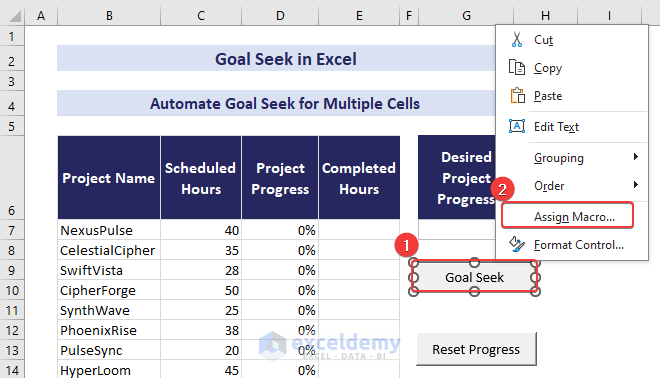
- Right-click the Goal Seek button and Assign a Macro.
- Use the following VBA code to assign values to cells D7:D15 based on the progress in cell G7:
Sub Button5_Click()
Dim m As Integer
Dim k As Integer
'Assign formula to cells D7 to D15
For m = 7 To 15
    Cells(m, "D").GoalSeek Goal:=Cells(7, "G"),
    changingCell:=Cells(m, "E")
Next m
End Sub
- Assign another macro to the Reset Progress button:
Sub Button4_Click()
 'Selecting cells and clearing contents
 Range("E7:E15,G7").Select
 Selection.ClearContents
End Sub
We have automated the Goal Seek analysis.
- Now, input 60% in cell G7 and click the Goal Seek button.
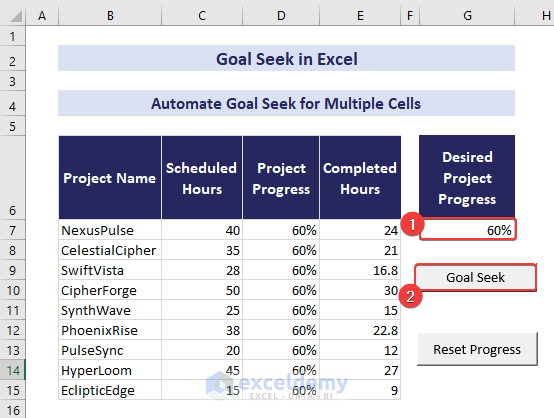
- The automation will adjust values in the range D7:E15.
- Use the Reset Progress button to clear the results.
View the gif below for an overview of the automation process.
How to Get More Precise Values Using Goal Seek
By default, Goal Seek provides results based on Excel’s default precision settings. However, if you need a more precise value, you can adjust the settings. Follow these steps:
Steps:
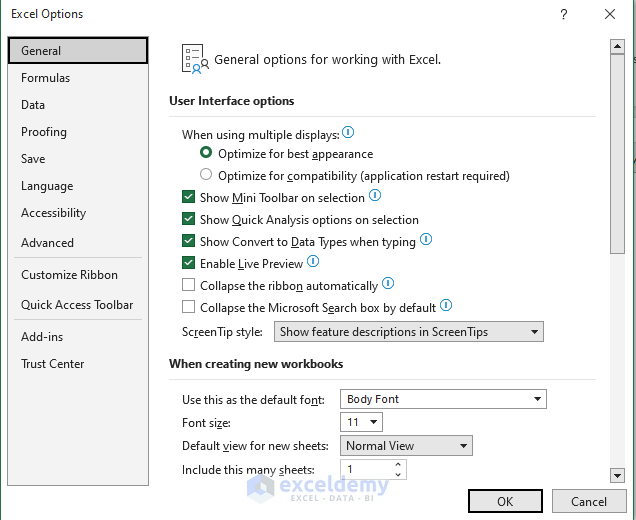
- Click File and select Options from the left pane. The Excel Options dialog box will open.
- Choose Formulas.
- Under Calculation options, change the Maximum Change value to something smaller (e.g., 0.0000001).
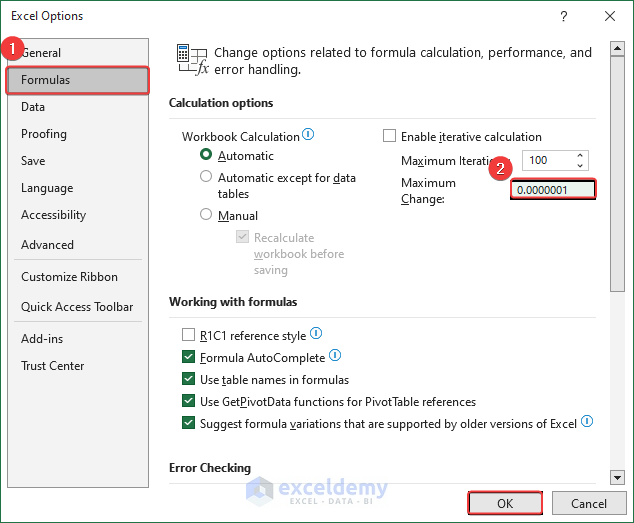
Now, when you use Goal Seek, you’ll get a more precise result.
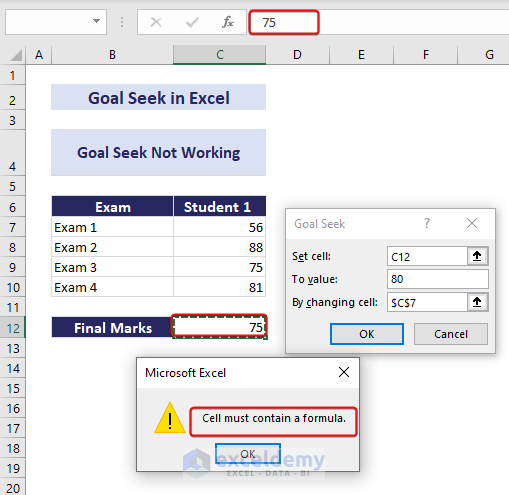
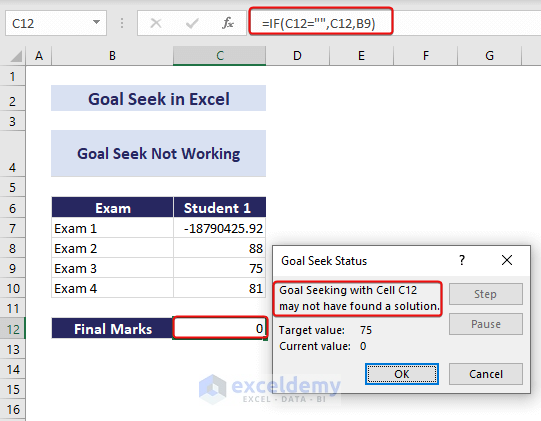
Troubleshooting If Goal Seek Is Not Working
In some cases, Goal Seek may not work as expected. Here are two common reasons:
1. Wrong Cell Reference or No Formula in Set Cell
- Ensure that the cell reference you provide in the Goal Seek parameters is correct.
- Make sure the Set Cell contains a formula. Goal Seek won’t work if the cell doesn’t have a formula.
2. Circular Reference in Cell
- If there’s a circular reference involving any cell, you’re using in Goal Seek, it won’t work.
- Check for circular references in the Goal Seek parameters.
Advantages of Goal Seek Analysis in Excel
- Input Value Determination: Goal Seek helps you find the input value needed to achieve a known output. For instance, you can calculate the product price when you know the cost and desired profit.
- Sales Target Calculation: If you have a fixed product price, Goal Seek can determine the number of products to sell for a targeted profit.
Disadvantages of Goal Seek Analysis in Excel
- Potential Inaccuracy: In some scenarios (e.g., vote casting in an election), Goal Seek may not provide accurate results.
- Extreme Input Values: When the input value is significantly above or below the desired output, Goal Seek might struggle.
- Avoid Hard Coding: Instead of hard-coding values, use cell references for flexibility.
Download Practice Workbook
You can download the practice workbook from here:
Goal Seek in Excel: Knowledge Hub
- How to Use Goal Seek in Excel
- How to Automate Goal Seek in Excel
- How to Do What-If Analysis Using Goal Seek in Excel
- How to Use Goal Seek to Find an Input Value
- Excel Macro to Goal Seek for Multiple Cells
<< Go Back to What-If Analysis in Excel | Learn Excel
Get FREE Advanced Excel Exercises with Solutions!
