Importing data means bringing the data from any external source (text file, another workbook, database, etc.) into your Excel workbook.
In this easy Excel tutorial, you will learn how to import data in your worksheet from external sources.
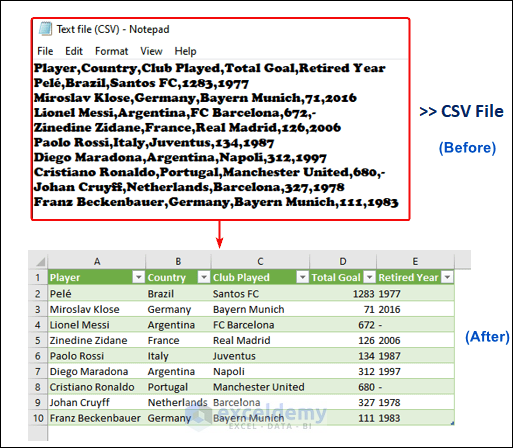
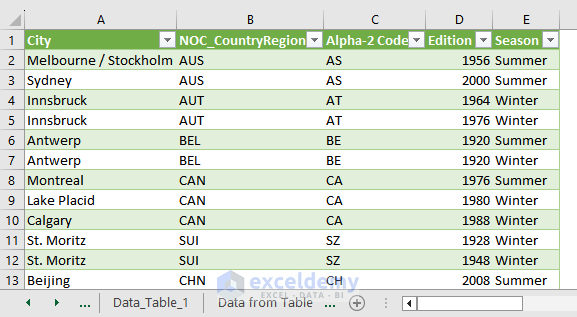
In the image above, we have a CSV (Comma Separated Values) file. We have imported it to an Excel worksheet, it looks more organized in the table in Excel.
In this blog post, you will learn how to import data from-
- any sources using the copy-and-paste feature.
- Notepad (By opening, using power query, using Text Import Wizard).
- File (another workbook, CSV file, PDF).
- Database.
- Google form.
- Other sources (Table, Web, Picture)
- Existing Connections.
- HTML.
- WhatsApp by Using the Text to Column feature.
- Another Workbook by using VBA macros.
📒Note: We have used Microsoft 365 to prepare the dataset for this article. You can apply the mentioned methods in versions from Excel 2007 onwards.
⏷What is Importing Data in Excel?
⏷1. Importing Data in Excel by Using Copy and Paste
⏷2. Importing Data from Notepad or Text File to Excel
⏵When to Import a Text File to Excel?
⏵i) Importing Text File by Opening in Excel
⏵ii) Importing Data by Connecting to Power Query
⏵iii) Importing Data by Using Text Import Wizard in Excel
⏵Tips for Importing Text Files to Excel
⏷3. Importing Data from File in Excel
⏵i) Importing Data from Another Workbook
⏵ii) Importing Data from CSV File in Excel
⏵iii) Importing Data from PDF to Excel
⏷4. Importing Data from the Database to Excel
⏷5. Importing Data from Google Forms to Excel
⏷6. Importing Data from Other Sources in Excel
⏵i) Importing Data from a Table
⏵ii) Importing Data from the Web
⏵iii) Importing Data from Picture to Excel
⏷7. Importing Data from Existing Data Connections and Maintain Automatic Updates in Excel
⏷8. Importing HTML to Excel
⏷9. Using the Text to Columns Feature to Import WhatsApp Group Contacts to Excel
⏷10. Importing Data in Excel by Using VBA Macros
⏷Importing and Creating a Data Model Relationship in Excel
⏷Pros & Cons of Importing Data in Excel
⏷Avoid Common Mistakes While Importing Data in Excel
What is Importing Data in Excel?
Importing data is simply bringing data from different sources (as a text file, CSV, PDF, etc.) into your Excel file.
1. Importing Data in Excel by Using Copy and Paste
You can simply bring the data from any source using the copy and paste feature. It is a basic way of importing data. After importing you can format the data as a table.
Suppose we want to import the Spanish LaLiga Standing 2023-2024 by using the copy-and-paste feature in Excel. The data we want to import in our worksheet looks like the image below.
To import the data by Copy and Paste-
- Open the website and select the data.> Use the keyboard shortcut Ctrl + C (Windows/Linux) to copy.> Select cell A1 in the Excel Worksheet> Paste the Data.
Copied data will look like the image below. For better presentation, we can format the data as a table.
- To format the data as a table, select the data range (A1:G21) and press Ctrl+ T.
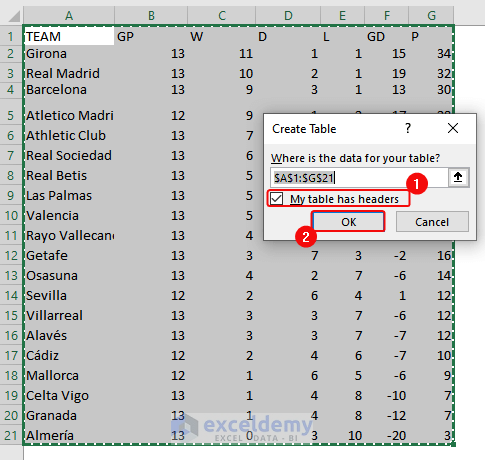
- Create Table dialogue box will appear, in there check the My table has header.> Click on OK.
- Copied data will appear as a table as shown in the image below.
2. Importing Data from Notepad or Text File to Excel
In this section, we will import data from Notepad (text file) by opening a file in Excel, connecting to Power Query, and using the Text Import Wizard.
When to Import a Text File to Excel?
You might need to import data into Excel when:
- You have information scattered across different files or sources.
- Preparing for data analysis, reporting, or collaboration.
- Dealing with regularly updated data for accurate insights.
- Extracting tables or data from websites.
- Integrating external data into your Excel workbook for a comprehensive view.
i) Importing Text File by Opening in Excel
You can import text files into your Excel workbook just by opening them in Excel. Suppose we have a text file (semicolon is used as a delimiter, File has the name “Text File(Semicolon) ) in Notepad as shown in the image below.
In the next section, we will import this file to our Excel worksheet. You can do this by following the steps mentioned.
- Open the Excel app on your PC.
- Click on Open> Browse.
- Locate the file in the Open dialogue Select the file and click on Open.
- The Text Import Wizard dialogue box will appear. There select Delimited (as the data in the text file are separated by semi-colon). >and check the “my data has headers”> Click on Next.
- Check Semicolon> Click on Next.
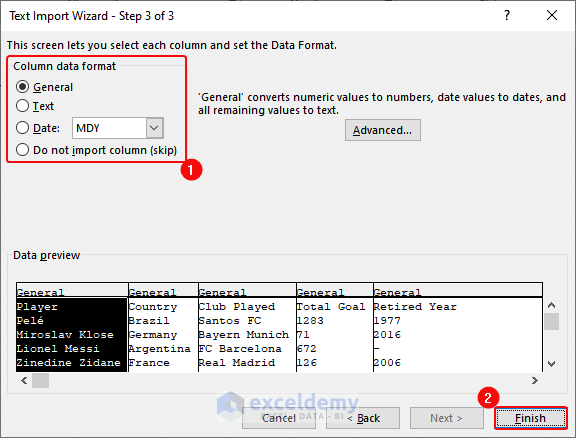
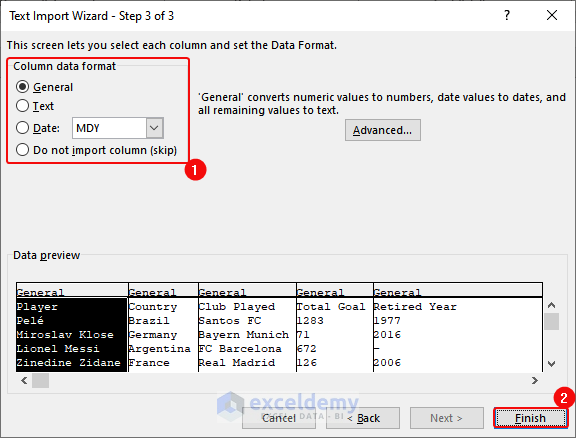
- Select Column data format as General > Click on Finish.
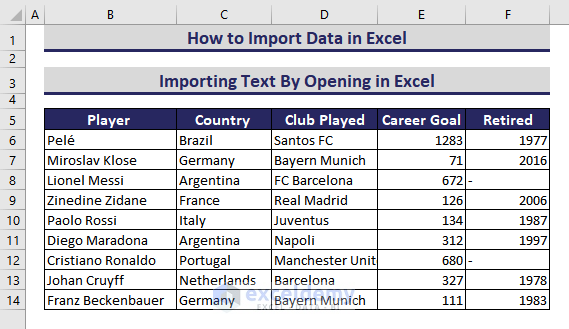
- Imported data in the dataset will appear as follows.
- Format the dataset as you prefer. The formatted dataset of the data will appear as the image below.
Download Text File (Input)
You can use as input file to practice.
ii) Importing Data by Connecting to Power Query
You can also import data from a text file by connecting it to Power Query. We will import the text file as mentioned in the previous method. To do so, you can follow the steps below.
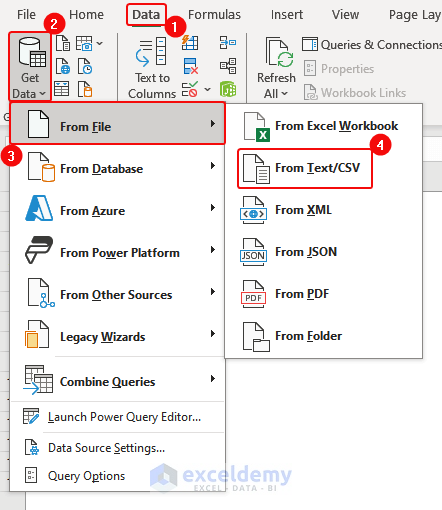
- Click on Data> Get Data> From File> From Text/CSV.
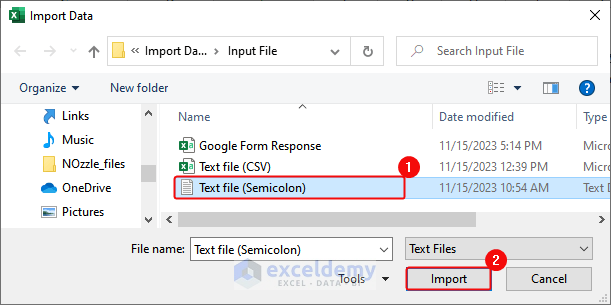
- In the Import Data dialogue box, select the text file and click on Import.
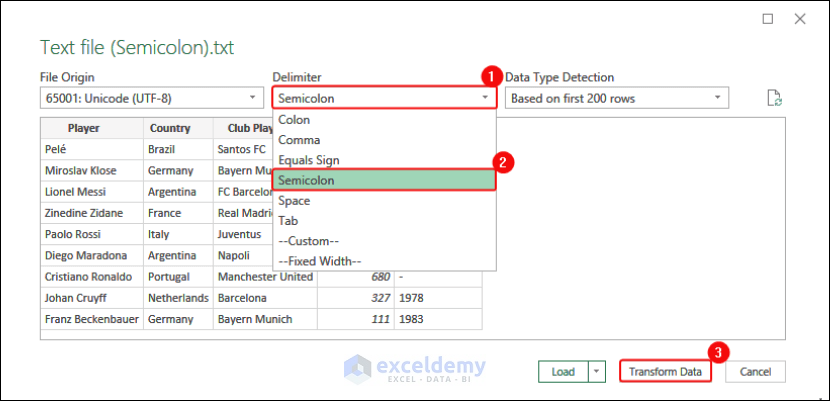
- Then, in the dialogue box as below, select Semicolon as Delimiter and click on Transform Data.
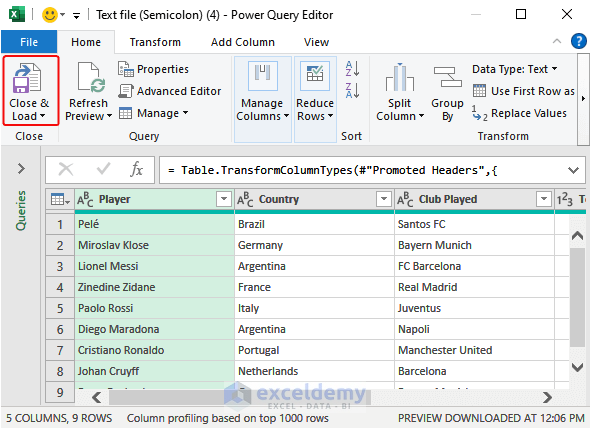
- Power Query Editor will appear as follows. In there, click on Close and Load.
- This will import the data as a table in a worksheet.
iii) Importing Data by Using Text Import Wizard in Excel
You can import data with the help of Text Import Wizard. But the recent version of Excel (2019, & 365) does not have Text Import Wizard. Don’t worry, you can still use it.
To use it, you have to enable the Wizard. Follow the steps to enable and use it.
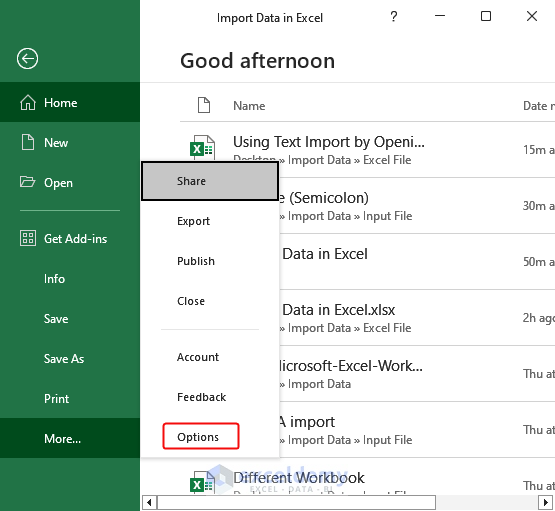
- Click on File> Options.
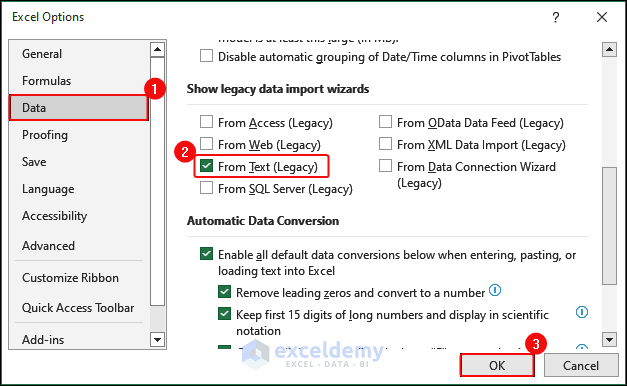
- In the Excel Options dialogue box, click on Data > Check From Text (Legacy) in the Show legacy data imports wizards> OK. This will enable the wizard.
Now, we will import the text file (semicolon is used as delimiter) as shown below into our Excel workbook using the Text Import Wizard.
You can follow the steps to import it.
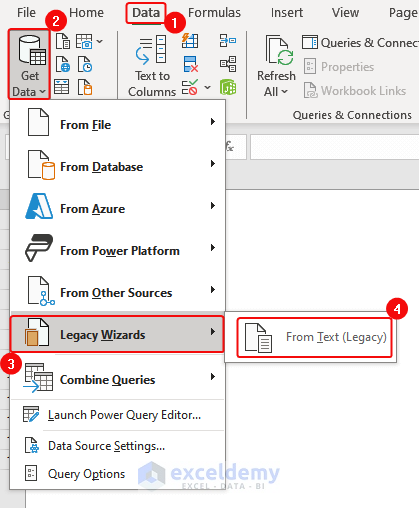
- Click on Data> Get Data> From Legacy Wizards> From Text (Legacy).
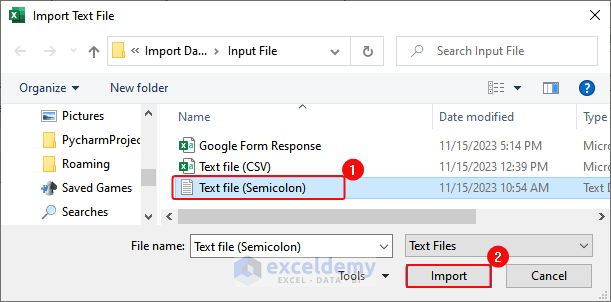
- In the Import Text File dialogue box, select the text file> Click on Import.
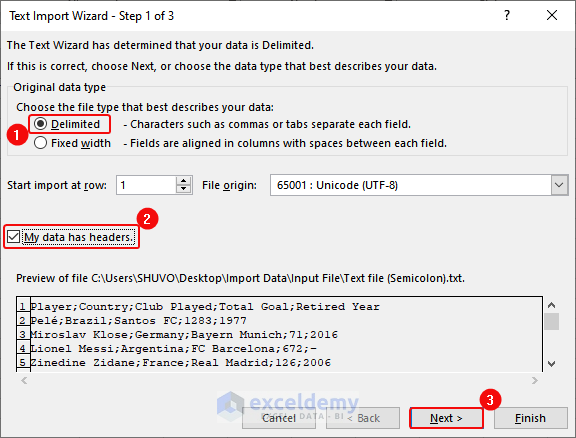
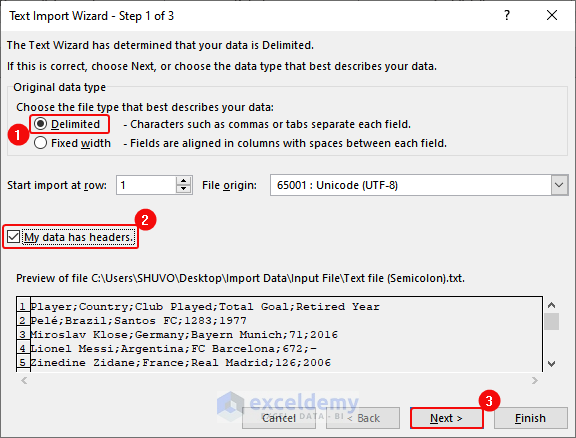
- In the Text Import Wizard dialogue box, select Delimited> Check “My data has headers”> Next.
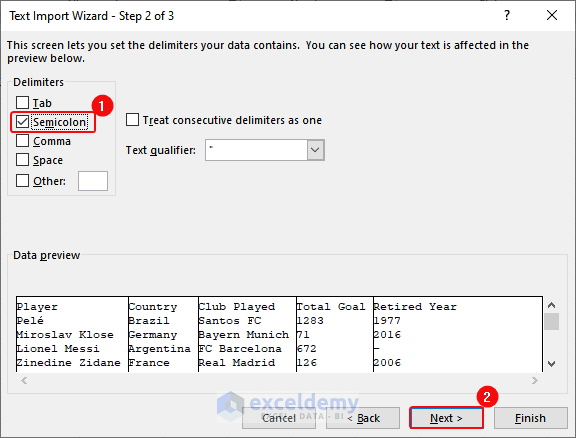
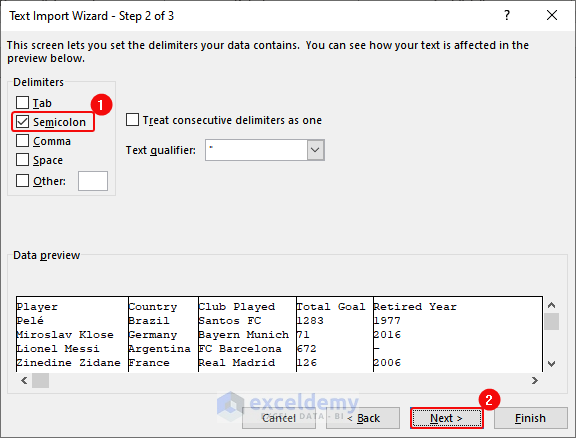
- Check Semicolon> Click on Next.
- Select Column data format as General > Click on Finish.
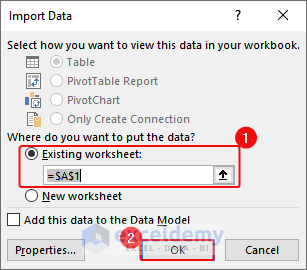
- In the Import Data dialogue box, select Existing Worksheet and cell A1> click on OK.
- The imported data from the text file will appear as follows.
- Select the data range (A1:E10) and Click on Insert> Table. The data table will appear as the image below.
Tips for Importing Text Files to Excel
Here are some important tips to remember when you are importing a text file into Excel.
- Use a text file format that Excel understands, like CSV or TXT.
- Keep your text file neat with a clear structure, especially if it has columns and rows.
- Pick the right separator (like a comma, semicolon, or tab) to divide your data into columns correctly.
- Take a quick look at your data before hitting the import button to make sure it looks right.
- If your file is massive, be patient during the import. Break it into smaller parts if needed.
- Check for any mess-ups after importing, like missing info or weird formatting. Fix them up.
3. Importing Data from File in Excel
In this portion we will import data from files like another workbook, CSV, PDF, etc.
i) Importing Data from Another Workbook
Now we have data in another workbook in Excel as shown below. We will import the data from this workbook to another.
To import data from another workbook, you can follow these steps.
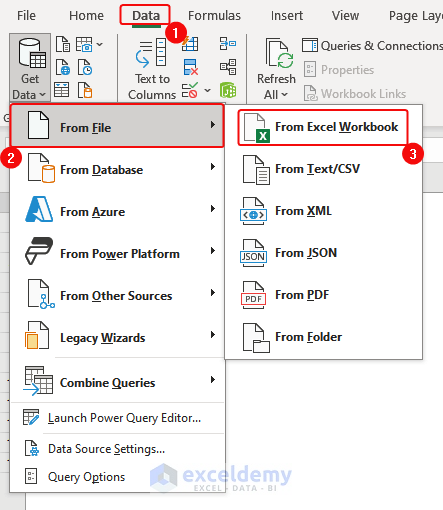
- Click on Data> From File> From Excel Workbook.
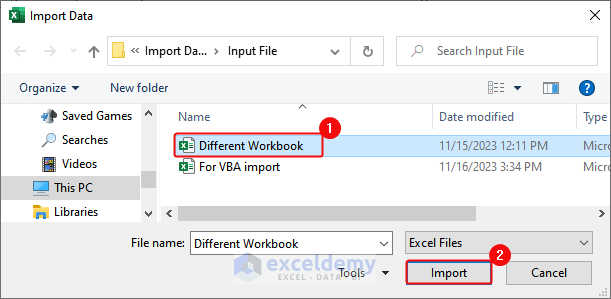
- In the Import Data dialogue box, select the desired workbook> Click on Import.
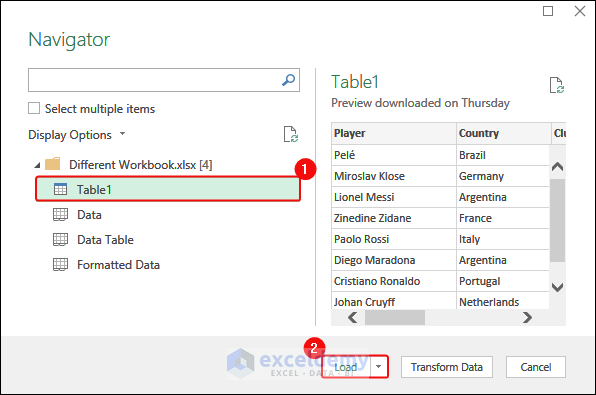
- Select Table1 (Your desired data, you can check the preview to ensure you are importing the right data)> Click on Load.
- The desired data will appear as the image below.
Download Input Workbook
You can use this workbook for practice.
ii) Importing Data from CSV File in Excel
A CSV (Comma-Separated Values) file is a simple text file where data is organized in rows and columns. Each value in a row is separated by a comma. It’s easy to read and widely used for sharing data between different programs.
CSV files don’t store formatting or formulas and can be opened by various spreadsheet programs. They’re like a table in plain text – simple and versatile.
We have a CSV file like the image below.
We will import the CSV file into Excel. To do this, you can follow the steps ahead.
- Click on Data> From File> From Text/CSV.
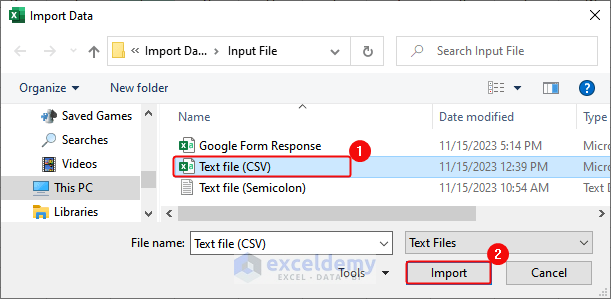
- In the Import Data dialogue box, select the CSV file> Click on Import.
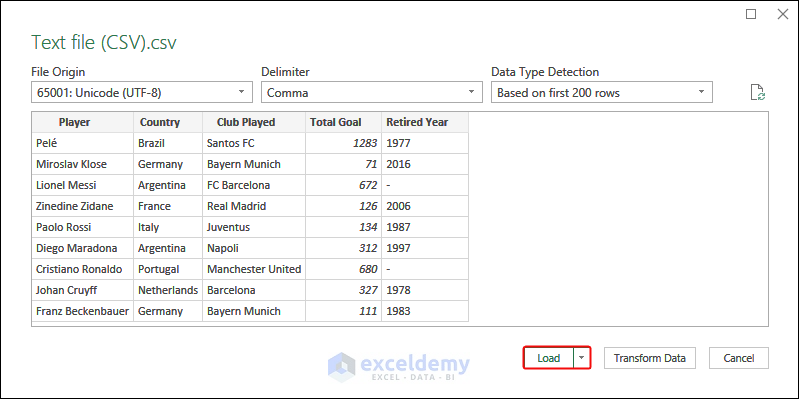
- Click on Load as shown.
- A formatted table of the data will appear as below.
Download CSV (Input)
iii) Importing Data from PDF to Excel
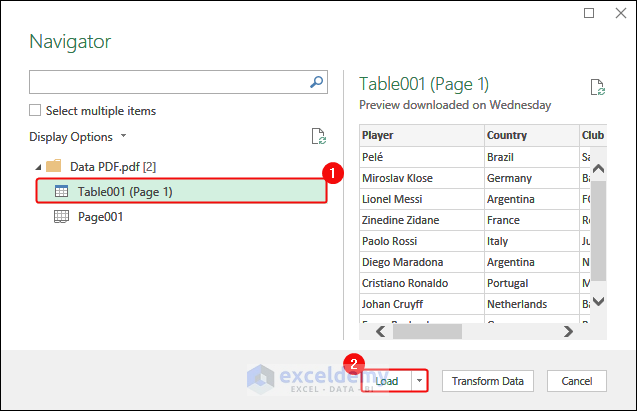
Similarly, you can also import any data from your PDF. This works better if your PDF file has organized data like a table. We will import the PDF into our Excel as the image below.
Steps below, you can follow to import data from this PDF.
- Click on Data> From File> From PDF.
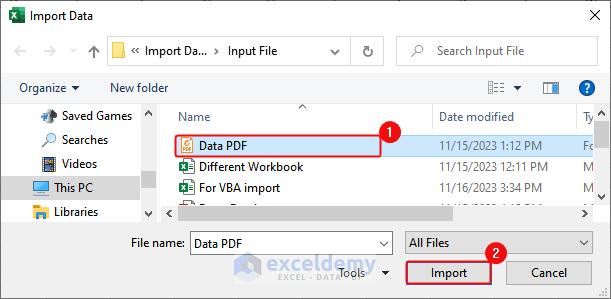
- In the Import Data dialogue box, select the PDF file> Click on Import.
- Click on Load as shown.
- A formatted table of the data will appear as follows.
By following the same steps, you can also import an XML file, or even a folder in your Excel Worksheet.
Download PDF (Input)
Read More: How to Import PDF to Excel
4. Importing Data from the Database to Excel
There are several databases (Microsoft Access, SQL Server Database, Analysis Service) that you can import into your Excel worksheet.
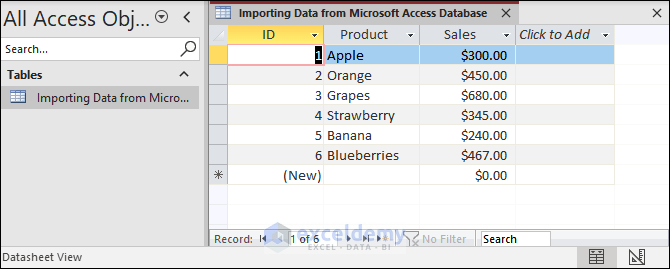
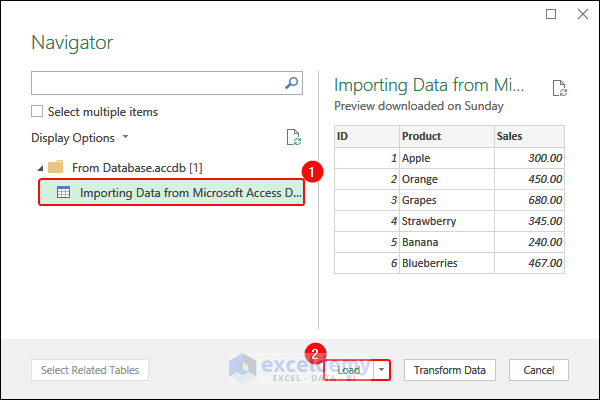
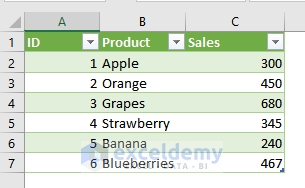
Here, We have imported data from a database named “From Database” (click here to Download) where the stored information is about “ID”, “Product”, and “Sales”.
To import this data into your Excel-
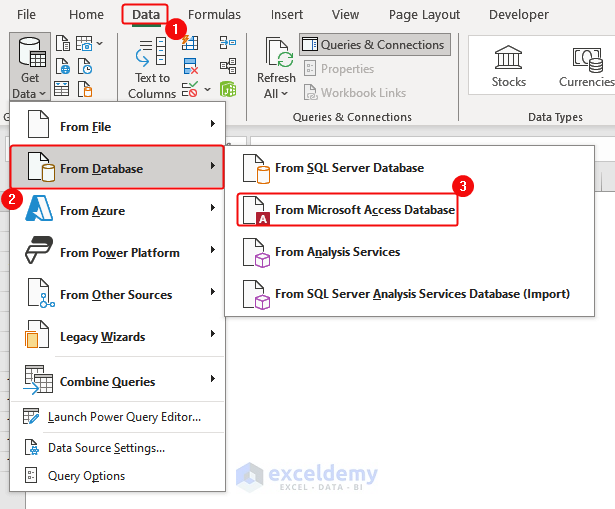
- Click on Data> From Database> From Microsoft Access Database.
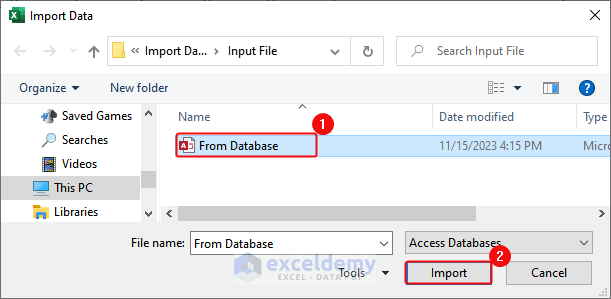
- Select the database file in the Import Data dialogue box> Click on Import.
- In the Navigator dialogue box, select the data> Click on Load.
- Excel will import data from the database as follows.
5. Importing Data from Google Forms to Excel
Google Forms is a great source of real-life data. When you have too many responses from people in Google Forms, it generates vast amounts of data. You can use this data for analysis. So it is essential to learn how you can import data from Google Forms into Excel.
Here we will discuss the process of how you can import data from Google Forms into Excel. We have 9 responses in our Google Forms. We will import these responses into our Excel. You can follow the steps below to import the data. First
- Go to your Google Forms> Click on View in Sheets.
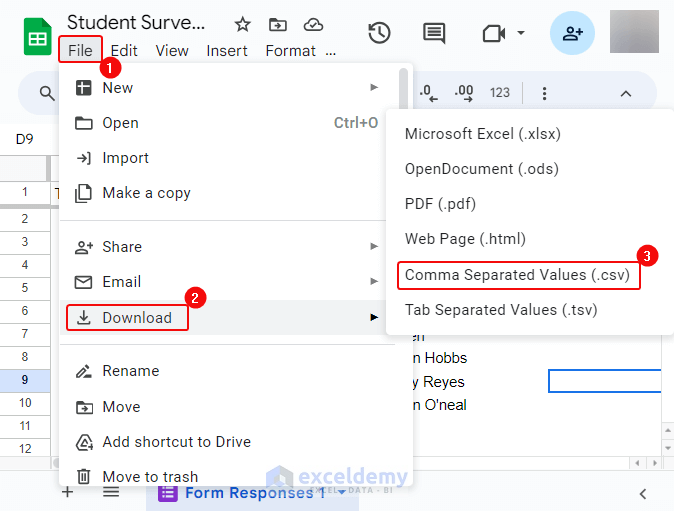
- In the Sheets, click on File> Download> Comma Separated Values(CSV). Save the CSV file.
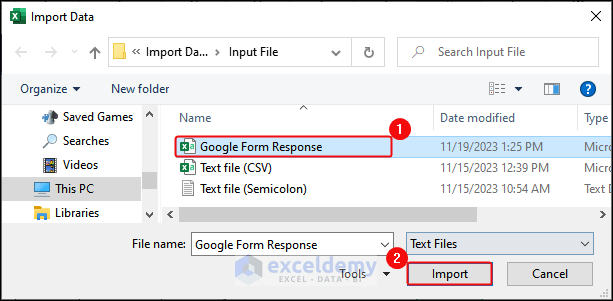
- Click on Data> From File> From Text/CSV> Select the file in the Import Data dialogue box> Click on Import.
- Click on Load in the Dialogue box.
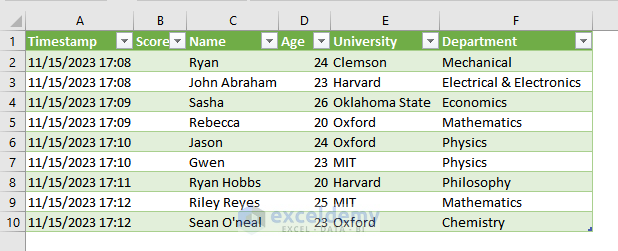
- A formatted table of the Google Forms data will appear as below.
Download CSV from Google Form (Input)
Read More: How to Create Excel Sheet from Google Form
6. Importing Data from Other Sources in Excel
There are also some other sources (Table/Range, Web, Picture) from where we can import data. Hence, we will discuss how you can import data from these sources.
i) Importing Data from a Table
Here, we will import data from a table in this method. Suppose we have a table like in the image below.
We will import this table to another worksheet in the same workbook. To import-
- Go to the worksheet that contains the desired table that we want to import. Select the whole table.
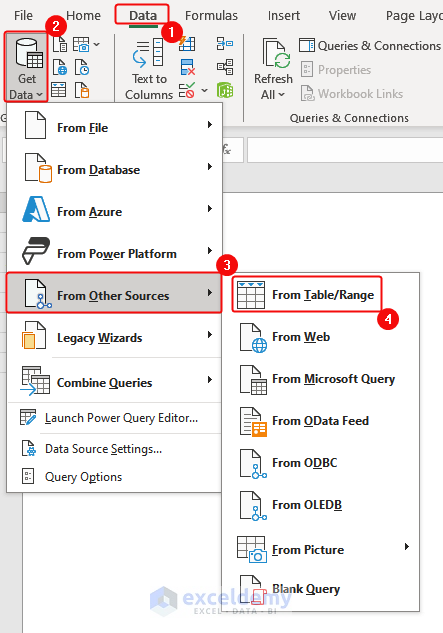
- Now, click on Data tab> Get Data option> From Other Sources> From Table/Range.
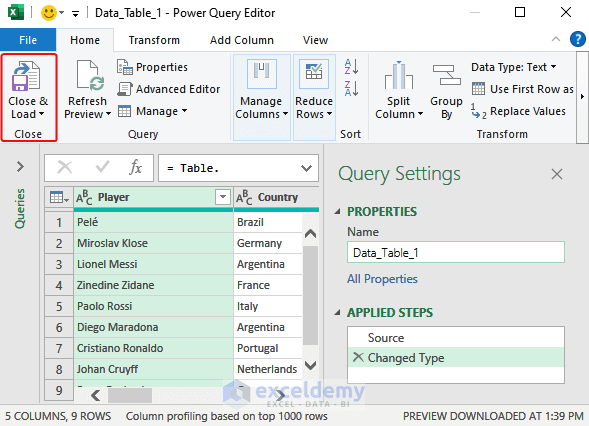
- The table will appear on the Power Editor. There, click on Close and Load.
- This will import data into another worksheet and treat the data as a table.
ii) Importing Data from the Web
If you want to import data from any Web page, you can follow the steps below to import data from that web page. In this case, we will import the table from this website as shown in the image below.
To import from the website-
- Go to the Web page and copy the link. We have imported our table from this link.
- Click on Data tab> From Other Sources> From Web.
- A dialogue box named From Web will appear. In there, paste the link in the URL box> Click on OK.
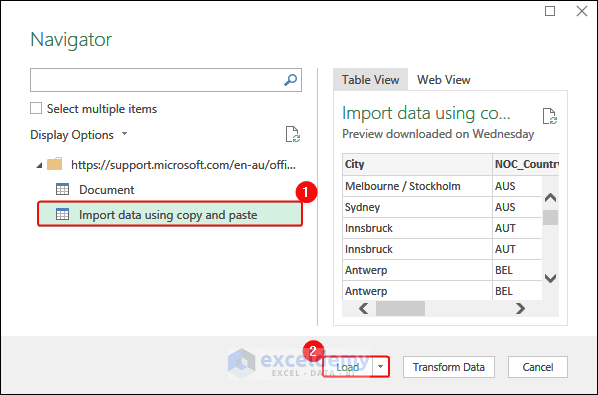
- In the next dialogue box Navigator, select the desired table> Click on Load.
- This will import the table from the web page as follows. Excel will treat this data as a table.
iii) Importing Data from Picture to Excel
Excel allows us to import data from pictures too. Here are the steps to do this. Here, we will discuss how you can import data from pictures in your computer.
In this case, we will import data from the following picture.
To import data from the Picture (Screen Shot)-
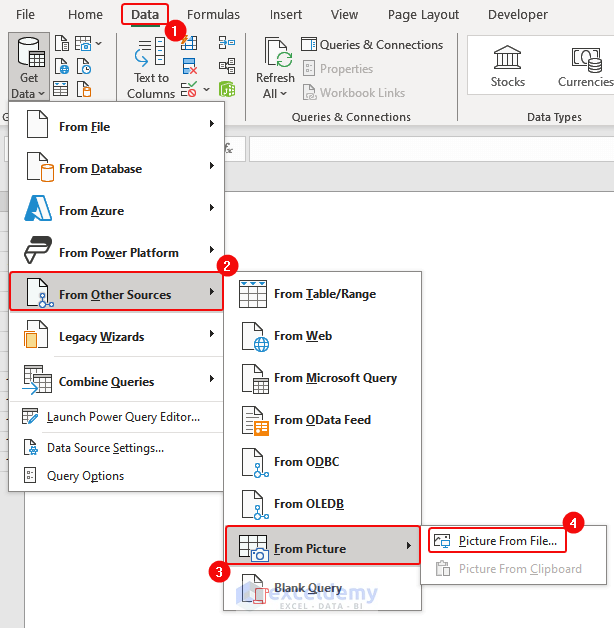
- Click on Data tab> From Other Sources> From Picture> Picture from File.
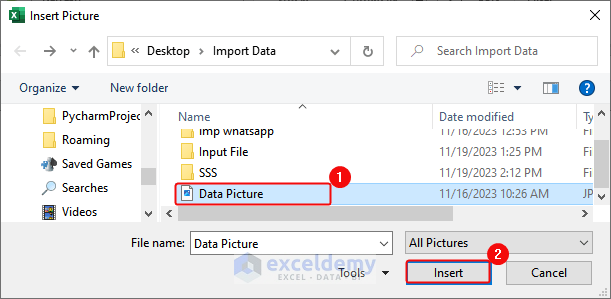
- In the Insert picture dialogue box, select the file> Click on Insert.
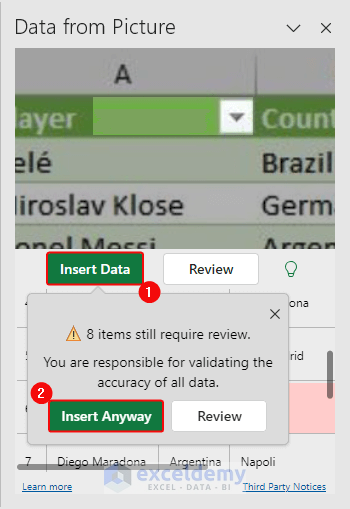
- At the right side of your worksheet, the Data from Picture box will appear. In there, Click on Insert Data> Insert Anyway.
This will import the data as the image below. But have a look, all the values are not correctly placed. Even an empty column B is added. So, while importing data from pictures we have to be careful about the data. And manually we must place the data at the correct cells.
- After the correction and review, here is the organized data from the picture.
But, if you are using a Smartphones Excel app to import data from a picture. Here is how you can do it,
⇒ Launch the Excel app on your phone.
⇒ Create a new workbook.
⇒ Click the camera icon.
⇒ Take a photo or choose one from your phone.
⇒ Adjust the pic, then hit “Continue.”
⇒ Excel does its thing. Check the data and choose what to do.
⇒ Click “Open.” See how many items to check. Review all or hit “Open Anyway.”
This will import the data into Excel.
Read More: How to Extract Data from Image into Excel
7. Importing Data from Existing Data Connections and Maintain Automatic Updates in Excel
Existing Data Connection means the data that we have already imported into our Excel worksheet. In this case, the Existing data table is Text_File_Semicolon (That we have imported in Method 2(i).
Now, we will import this existing connection to another worksheet. To import this-
- Click on the Data tab> Get Data Using an Existing Connection
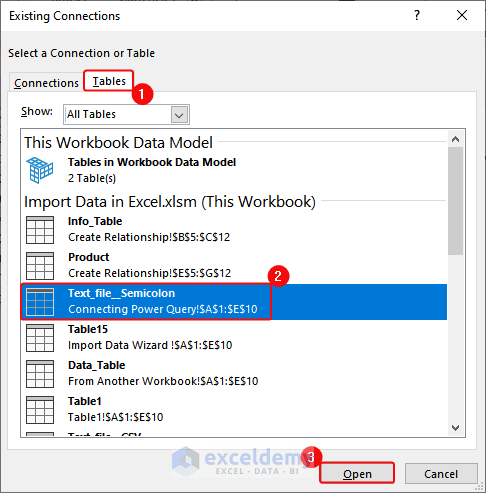
- Then, a dialogue box named Existing connection will appear. In there, click on Tables > select the existing table (i.e, Text_File_Semicolon). > Click on the OK button.
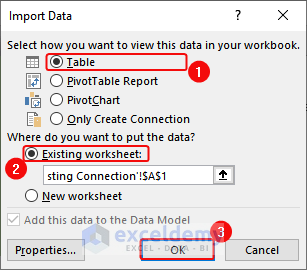
- Then, in another dialogue box named Import Data, Click on Table Option> Existing Worksheet>
- This will import data from the existing connection and the table will look like the image below.
- Now, if you want to update the data automatically, click on the Data tab> Refresh All. This will update all the data connections automatically if any change happens to the data.
8. Importing HTML to Excel
If you have the HTML code for any webpage, you can also extract and import HTML Table into your Excel worksheet. We will have to import it as Text/CSV to extract the data table.
We have the HTML code for the data below.
This data is the output of our HTML file. We will import this table from this file into our Excel. To import this-
- Click on Data> From File> From Text/CSV.
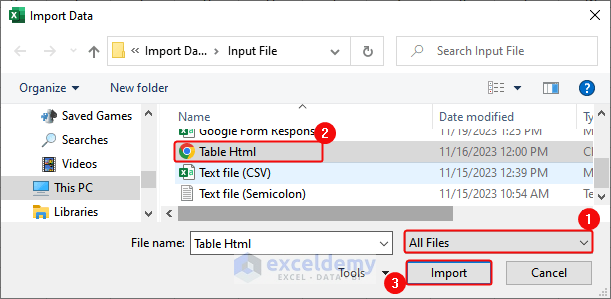
- In the Import Data dialogue box, Click on All Files at the bottom-right> select the HTML file > Click on Import.
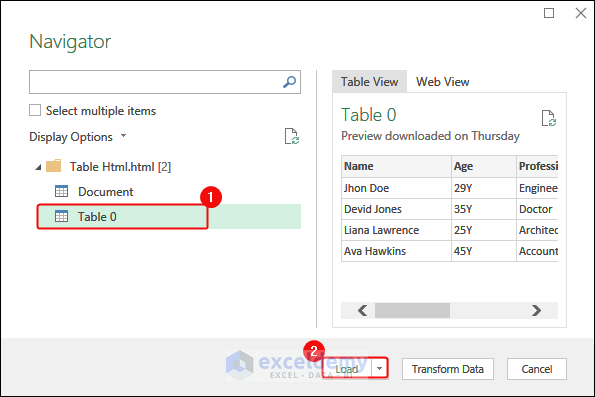
- A navigator box will appear, there select the desired table. > Click on Load.
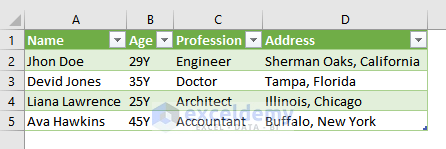
- Imported data from HTML code will appear like the image below.
9. Using the Text to Columns Feature to Import WhatsApp Group Contacts to Excel
Ever wondered how you can import all the WhatsApp contacts into an Excel worksheet? Well, we will use the Text to Columns feature to import those data.
Suppose we have a WhatsApp group named “Programming” as follows.
In this group, we have 311 participants. Now, we will import these 311 contacts into Excel. To import the contact-
- go to the web.whatsapp.com website.
- Here, you will see the one-time generated QR code.
- Then, you will scan it on your smartphone to connect it to your WhatsApp account.
- After that, you get access to a WhatsApp account on your computer.
- Then, you will select your WhatsApp group> Right-click on “Programming” WhatsApp group.>Then, click on the Inspect
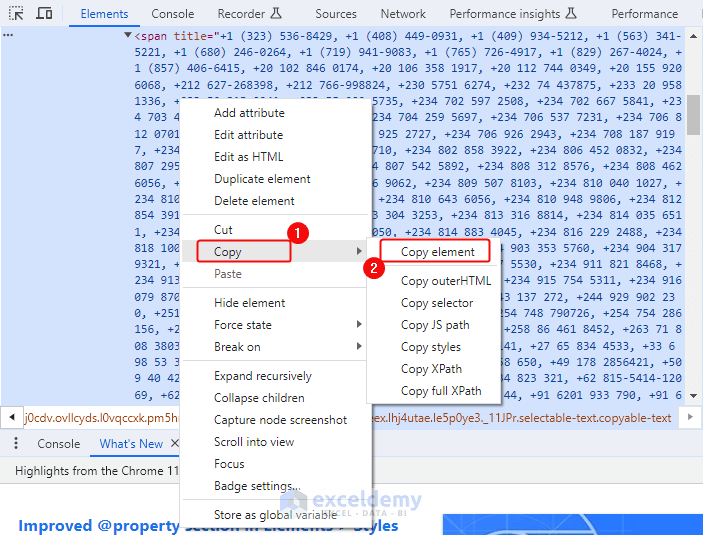
- Here, you will see the below window with the back-end codes of your WhatsApp group contacts.
- Then, go to the Elements > Choose the Copy option.> Click on the Copy element option.
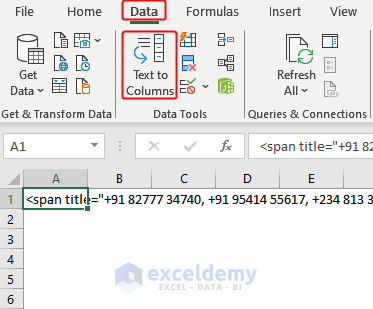
- Now, paste the back-end codes into your Excel sheet.
- Select the entire code from the Excel sheet.> Go to the Data > Click on the Text to Columns command.
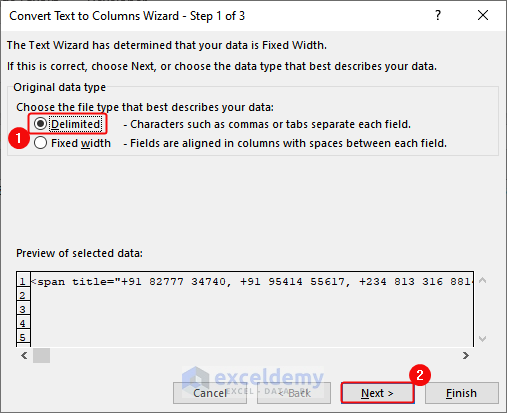
- Here, you will see the below window and select the Delimited from here.> Then, click Next.
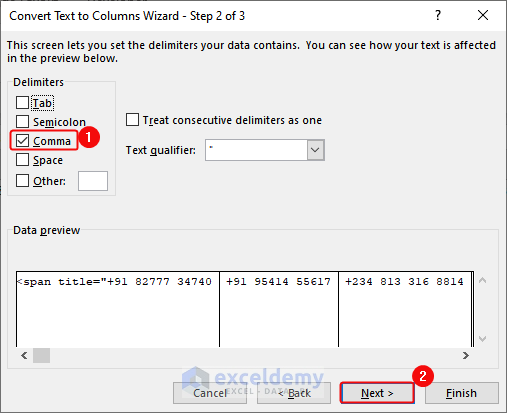
- Here, you will select Comma as delimiter> Click on Next.
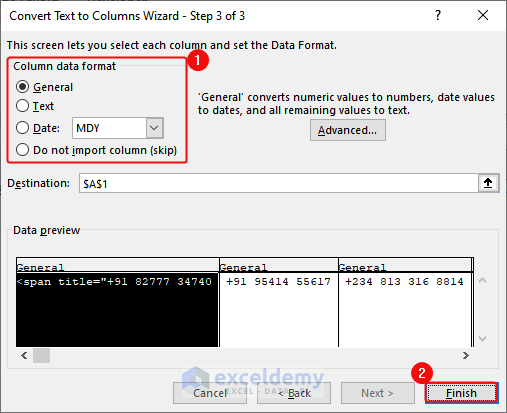
- Select General in the Column data format group> Click on Finish.
- Here, select the entire row.> Click the Copy
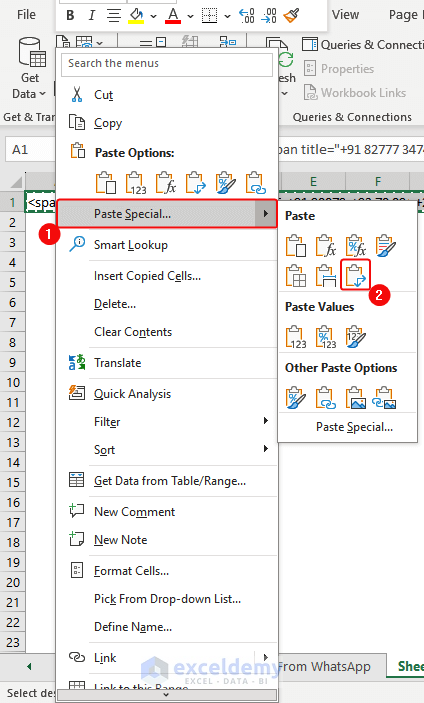
- Right-click anywhere in the Excel sheet. > Go to the Paste Special > Select the Transpose option and click it.
📒Tips: You can select an entire row by pressing Ctrl+ Shift+ (→).
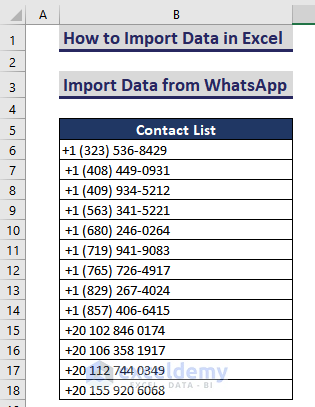
- Finally, you will get all the WhatsApp group contacts here in the below image.
- Here, we will show 13 contacts. It has 311 Contacts.
10. Importing Data in Excel by Using VBA Macros
If you are familiar with VBA Macros, we can also use VBA code to import data from any workbook. If your Excel does not have Developer tab, click here to know how to enable it.
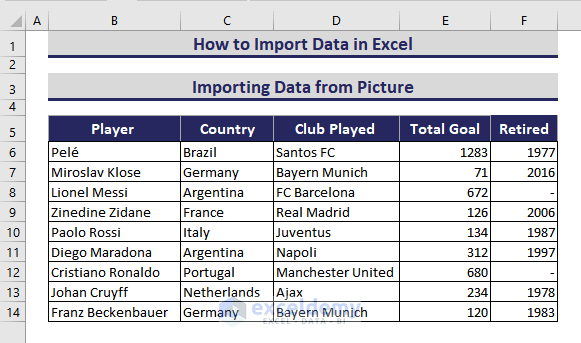
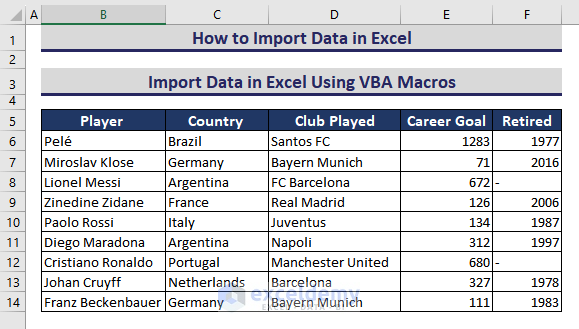
We have a dataset in another Excel workbook like the image below.
All the data are in the range B1:F14. We will import everything in this range in our worksheet. To import this using VBA-
- Click on the Developer tab> Visual Basic.
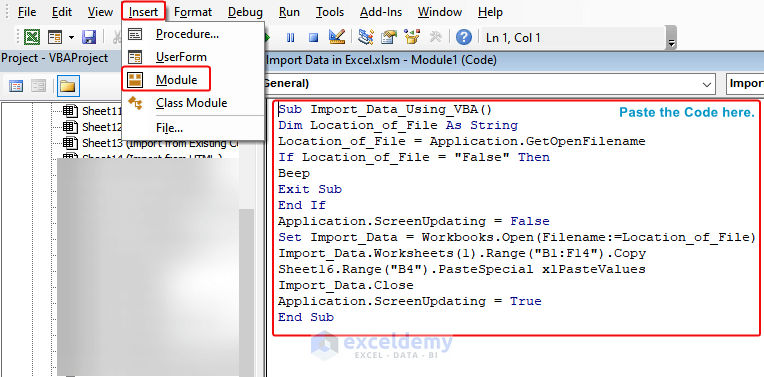
Now, the VBA Editor will appear. There, click on Insert tab> Module. Paste the following code into the module and save the file.
Sub Import_Data_Using_VBA()
Dim Location_of_File As String
Location_of_File = Application.GetOpenFilename
If Location_of_File = "False" Then
Beep
Exit Sub
End If
Application.ScreenUpdating = False
Set Import_Data = Workbooks.Open(Filename:=Location_of_File)
Import_Data.Worksheets(1).Range("B1:F14").Copy
Sheet16.Range("B4").PasteSpecial xlPasteValues
Import_Data.Close
Application.ScreenUpdating = True
End Sub- Press F5 to run the code.
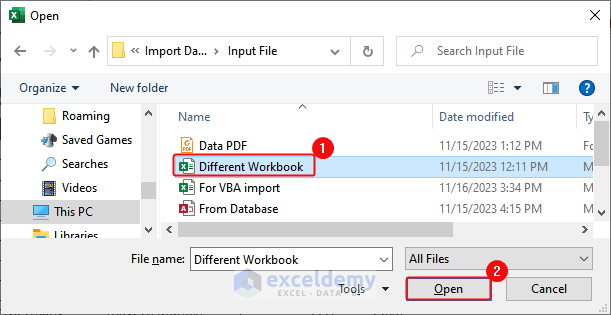
- A dialogue box named Open will appear. There, select the workbook> Click on Open.
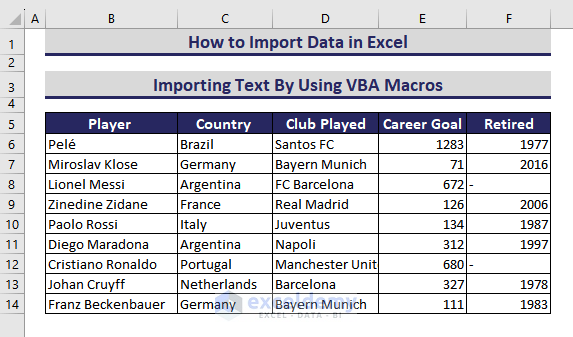
Then, imported data will appear in the worksheet as follows. Now, format it as you like.
Download Workbook (Input)
Importing and Creating a Data Model Relationship in Excel
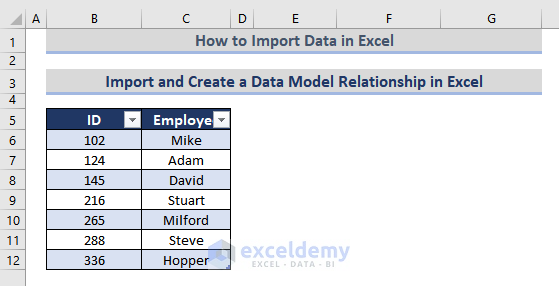
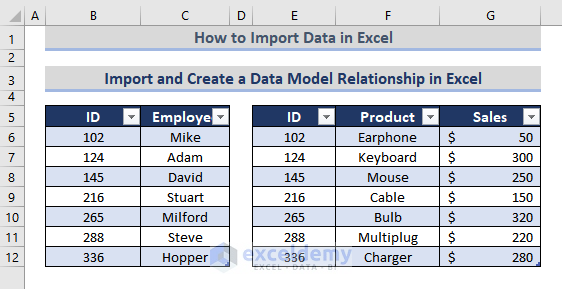
Let’s say, we have two datasets in two different worksheets. The first one gives us info about the employee ID and name of the employees of an organization.
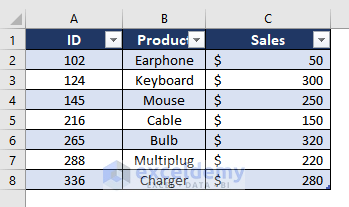
The second is in another worksheet that contains the ID of the employees, sales product, and amount by the employees.
We will import the second data table using the Copy and Paste feature into the worksheet. To import-
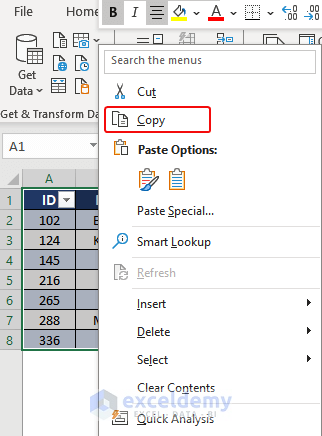
- Select the second data table(A1:C8).> Right Click on the mouse> Click on Copy.
- Place the cursor on cell E5.> Paste the table.
This will import the table in the worksheet beside the first table.
One thing that is noticeable here is that both tables contain one column in common: ID. From these tables, we want to create a relation between them using the common column existing in the two tables.
We will use the Table Relationship feature to create the relation between two tables. Follow the steps to learn the process.
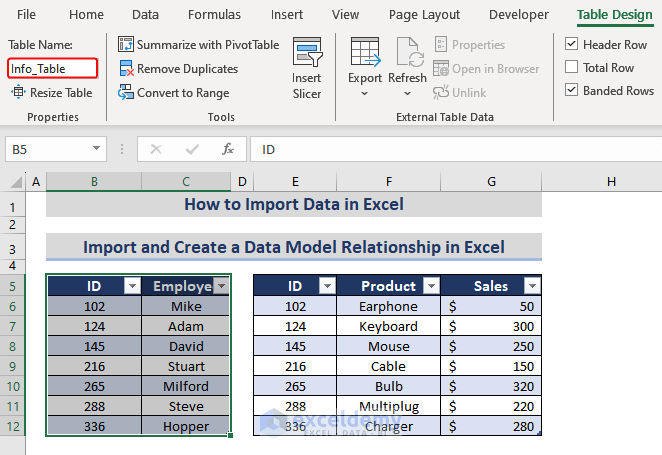
- select the table> go to the Table Design tab> double-click the Table Name
- Then, assign a name (i.e., Info_Table) to your created table so that next time you can just call these datasets by the table name.
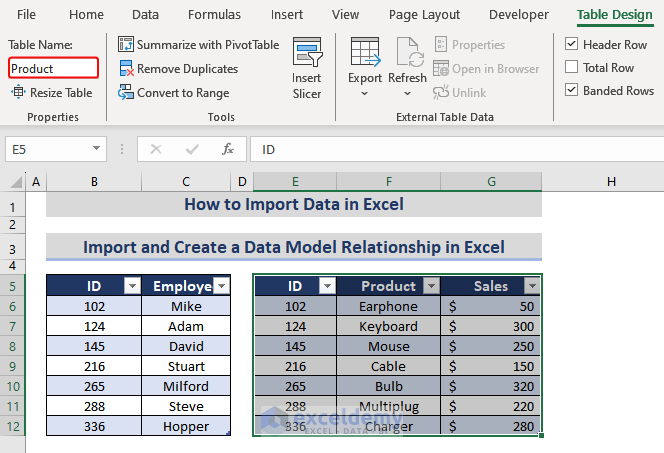
- Now, repeat the steps from the first to now for the second dataset also. Give another name to the second table (i.e., Product)
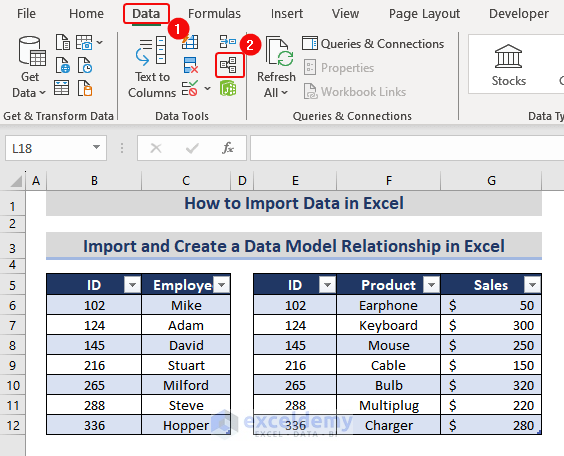
- Here, select a cell of the first table (i.e. Info_Table)> go to the Data tab> select Relationships from the Data Tools group.
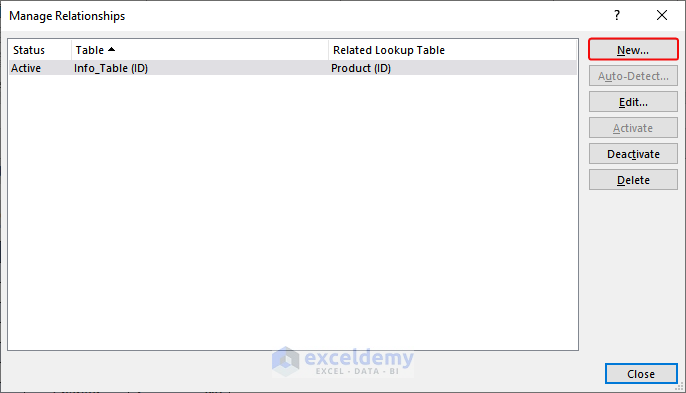
- Now, the Manage Relationships dialog box will show up. Click New
- Here, the Create Relationship command box will appear. In this box, there are 4 fields you need to fill from the dropdown option with an arrow sign at the right of the relevant field. Fill up the fields like below:
Table: First created table (i.e., Info_Table)
Column (Foreign): Common column between the tables (i.e., ID)
Related table: Another created table (i.e., Product)
Related Column (Primary): Common column between the tables (i.e., ID)
- Now, click OK.
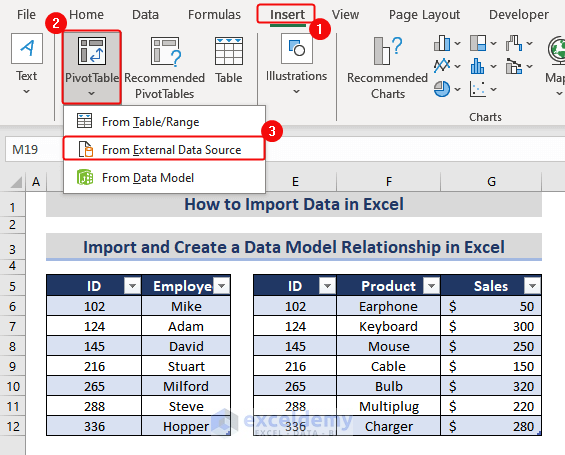
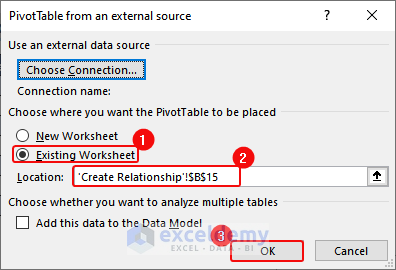
- Here, in the Excel home window, go to the Insert tab> click Pivot Table> select From External Data Source.
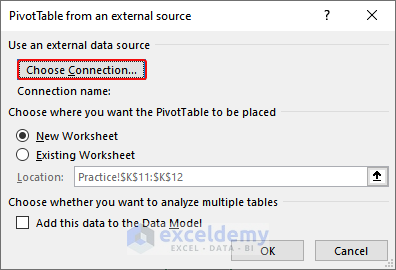
- In the PivotTable from an external source pop-up, click Choose Connection…
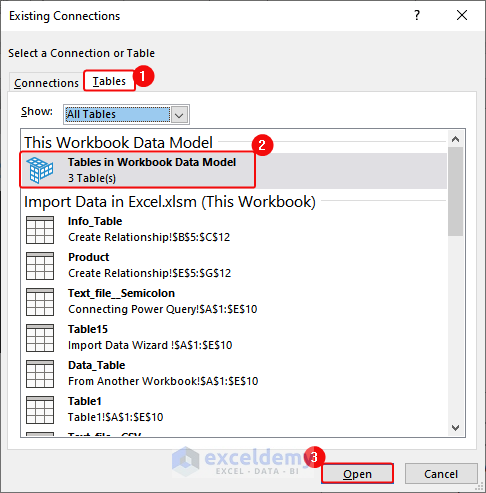
- A new prompt box named Existing Connections will now appear. From the Tables group, select Tables in Workbook Data Model > click Open.
- Now, click OK to close the PivotTable from an external data source
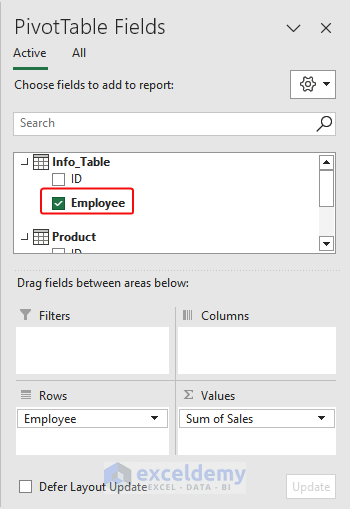
- Now, at the right corner of the Excel window, you will see Pivot Table Fields. Here, the two relevant tables will be shown. In our case, the Info table has two columns: ID, and Employee; and the Product table has 3 columns: ID, Product, and Sales. We want to create relationships by connecting Employee from the Info_Table first table and Sales from the Product
- So, drag Employee from the Info group put it to the Rows field, and put the Sales to Values field.
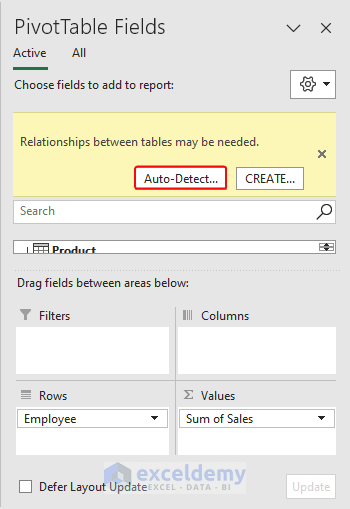
- Now, click Auto-Detect for creating Relationships.
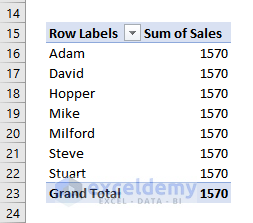
- Hence, a relationship between the two tables will be created and the two columns from the tables will be connected.
Pros & Cons of Importing Data in Excel
Pros:
- Easily organize and view data in a table format.
- Filter, sort, and manipulate data according to your needs.
- Seamlessly integrates with other Microsoft Office apps for enhanced productivity.
- Personalize data appearance, apply formatting, and create visually appealing reports.
- Convenient file sharing for collaboration and presentations.
- Automate tasks with macros, saving time and reducing errors.
Cons:
- Excel struggles with large datasets.
- Excel lacks advanced collaboration features.
- Issues may arise with different Excel versions.
- Storing sensitive data may pose security risks.
- Automation features may not be as robust as dedicated tools.
- Importing diverse data sources can lead to formatting issues.
- Changes in source data may not be updated in real time.
Avoid Common Mistakes While Importing Data in Excel
You can avoid common mistakes people make while importing data in Excel. You can follow the points to avoid those common mistakes.
- Eliminate special characters to prevent import hiccups.
- Take a quick look before importing to catch any surprises.
- Keep columns and rows in both files aligned and named similarly.
- Export a spreadsheet as a template for smooth importing.
- Break down large files if needed to avoid size-related errors.
- Import fewer than 10,000 rows at once to prevent various errors.
- Format all cells as text to avoid trimming zeros and fractions.
- Confirm column names, order, and completeness to prevent matching errors.
- Unmerge cells before importing to avoid confusion.
- Select suitable encoding during import to prevent translation errors.
- Ensure data length, formats, and values are correct before importing.
- Resolve it by checking for empty rows and recreating corrupted files if needed.
Download Workbook (All Methods)
In this tutorial, we have learned the methods of importing data in Excel. All the importing techniques like using the copy and paste feature, importing from Notepad/text file, from various files (Workbook, CSV, PDF), from other sources (Table/Range, Web, Picture), Existing Connection, HTML, WhatsApp Group, and Using VBA macros. Hopefully, this article was helpful and easy to understand those methods. Yet, if you have any problem, please drop your comments below.
Importing Data in Excel: Knowledge Hub
<< Go Back to Learn Excel
Get FREE Advanced Excel Exercises with Solutions!