Data extraction from images, a feature available on the subscription-free Excel 365 mobile app, is very effective method of importing data. Unfortunately, you cannot currently extract data from images on a laptop/desktop unless you are using a Mac with Excel 365.
Let’s use the Excel 365 mobile app to import a photo of some data into an Excel sheet.
Step 1 – Open the Mobile App
- Open the Excel app from your mobile.
- Insert a new workbook and select an empty cell where you want to place the extracted data.
- Expand the highlighted icon next to the sheet name (see screenshot).

The below panel will appear.
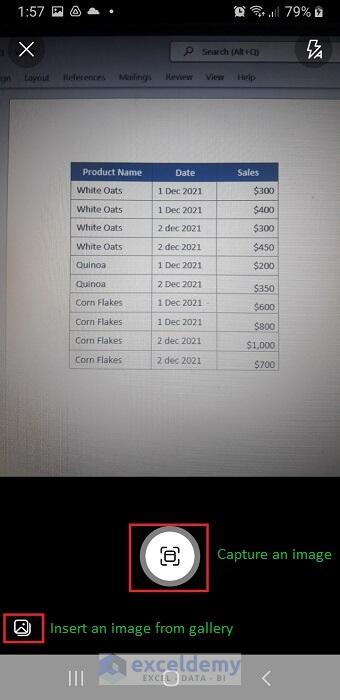
- Click on the camera icon to take an image of the data.

Step 2 – Take a Photo or Upload an Image
Once you click the camera icon, the mobile camera is ready to take photos.
- Take a photo of your data.
- Alternatively, you can use an image that is saved on your mobile. Let’s use a previously saved image from mobile storage.
- Click on the icon that is located below the photo capture icon (see screenshot).
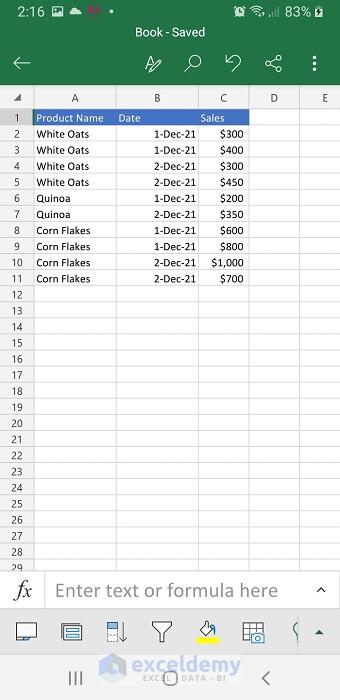
Step 3 – Image Description
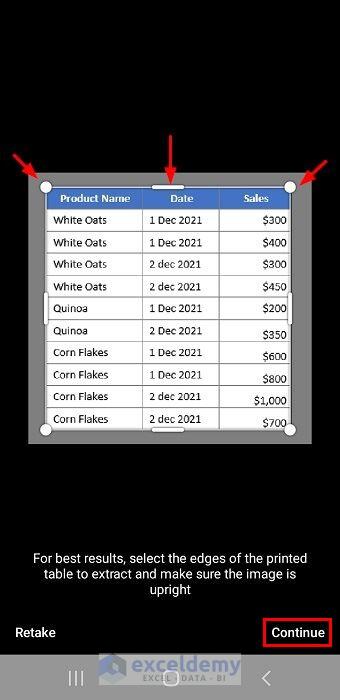
Suppose, we have selected the below image to insert in Excel.
The image contains date-wise sales data for several grocery items.

Step 4 – Insert the Image into Excel and Extract Data
- After we select the image, the mobile screen will look like the below screenshot.
- Use the pull handles to crop the image so that you can select the image area that contains only data.
- Once you are done with the selection and cropping, click Continue.
- Excel will start extracting data from the image and will return the extracted data as below.
- From this window, select any of the data to review (Copy/Edit/Ignore).
- Click Open.
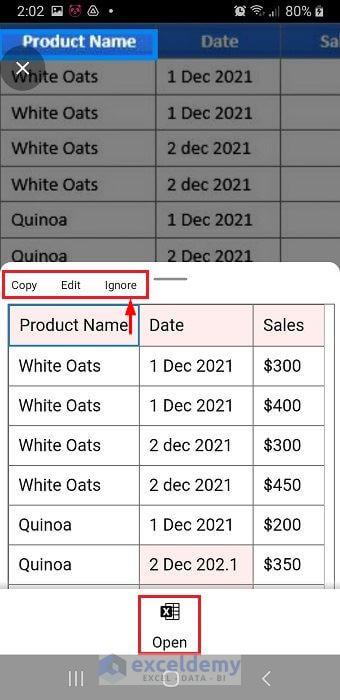
- Excel will display the total number of items that you need to review. To illustrate, from the below screenshot, we can see that 6 items need to be reviewed.
- If you want to review all 6 items click Review all. Otherwise, click on Open Anyway.

Read More: How to Copy WhatsApp Group Contacts to Excel
Step 5 -Final Extracted Data from Image into Excel
At the end of the process, all the extracted data from the given image is inserted into Excel.
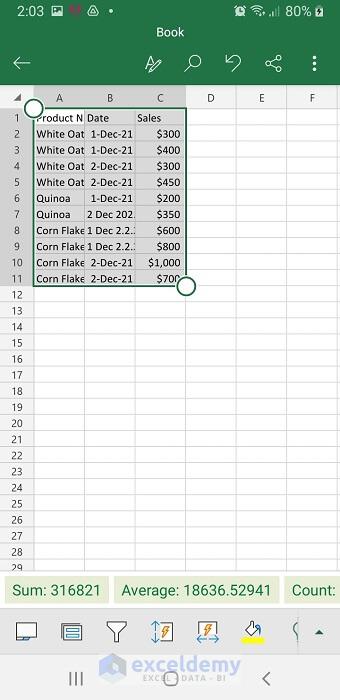
You can now customize the data and format cells as usual in Excel.
Read More: How to Link PowerPoint Chart to Excel
Things to Remember
- You can use third-party websites/tools to extract data from images into Excel.
- It is possible to convert an image into pdf format and subsequently extract data from the pdf file into Excel. However, due to data loss during the conversion process from image to PDF, these images do not generally translate accurately in Excel.
Download Practice Workbook
Download Microsoft Excel for Mobile
Related Articles
<< Go Back to Importing Data in Excel | Learn Excel
Get FREE Advanced Excel Exercises with Solutions!

This is a fantastic guide! I never knew it was so easy to extract data from images into Excel. The quick steps you provided made the process really clear. Can’t wait to try this out on my own data! Thank you!
Hello,
You are most welcome. Thanks for your insightful feedback. Keep learning Excel with ExcelDemy!
Regards
ExcelDemy