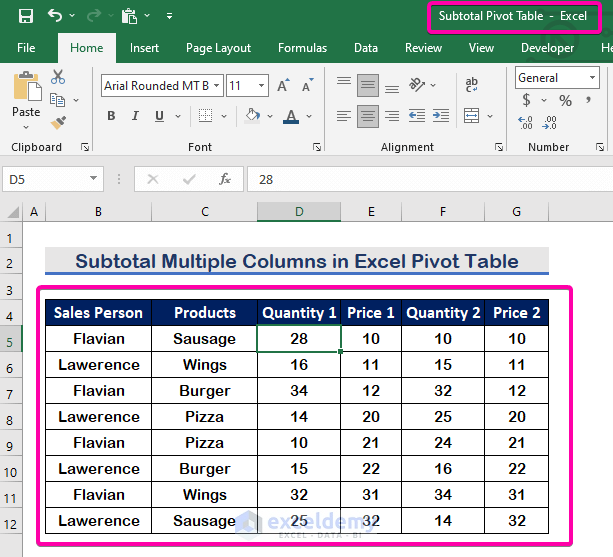
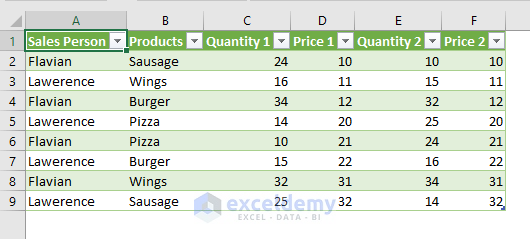
We’ve included a sample data set with a workbook named Subtotal Pivot Table in the image below. This worksheet’s data will be imported into another workbook.
Method 1 – Apply Power Query to Import Data into Excel from Another Excel File
Case 1.1 – Import a Table from Another Excel File
Steps
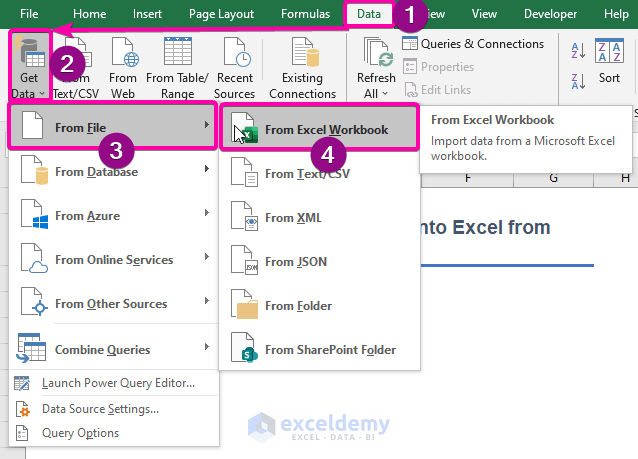
- Click on Data.
- Select Get Data.
- Choose From File.
- Choose the From Excel Workbook option from the list.
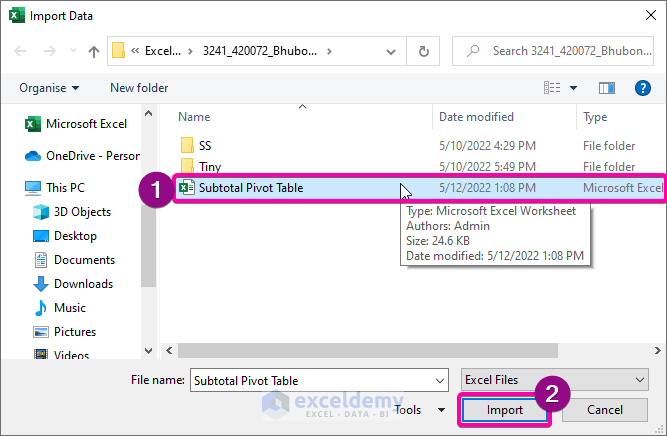
- Select the source file.
- Click on Import.

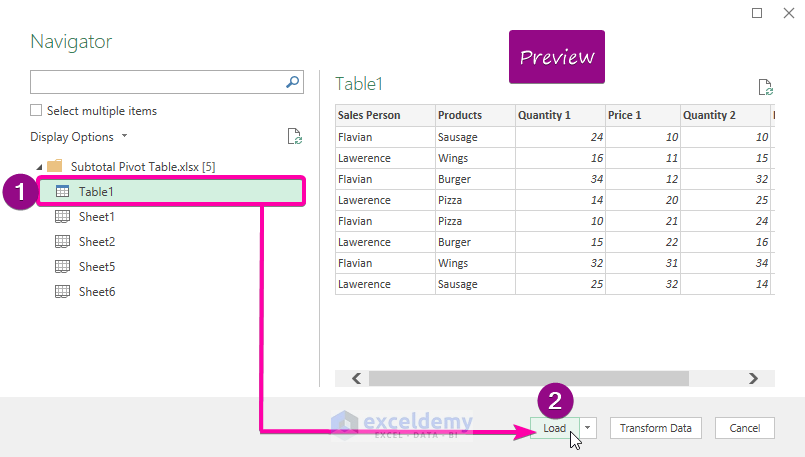
- The existing Tables and Sheets will appear in the Navigator panel.
- Select Table1 from the list and check the preview on the right side.
- Click on Load.
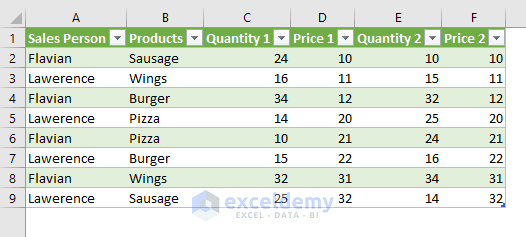
- Your Table will be imported into your current worksheet.
Case 1.2 Import Data from Another Sheet and Edit Data
Steps
- From the Data tab, click on the Get Data.
- Choose From File
- Select the From Excel Workbook option from the list.

- Select your source file to import.
- Click on Import.
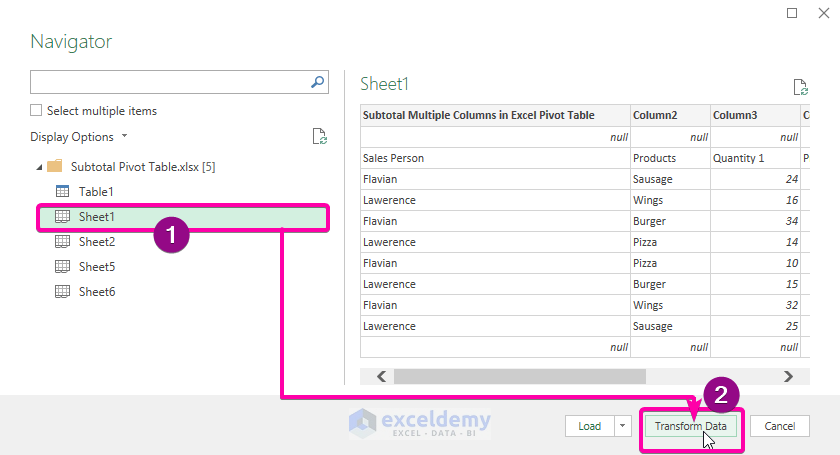
- In the Navigator window, select Sheet1 as we want to import data from Sheet1.
- Click on Transform Data.
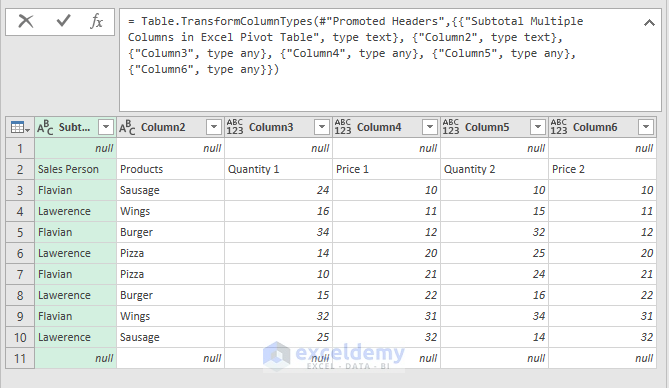
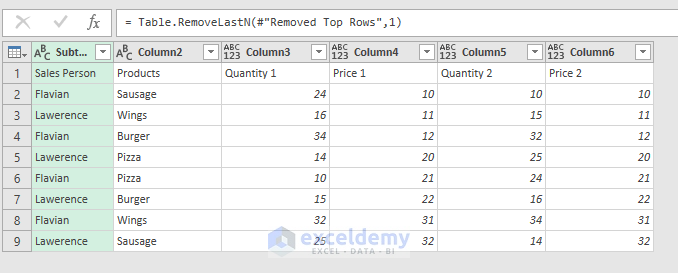
- You will see the following image in the Power Query Editor.
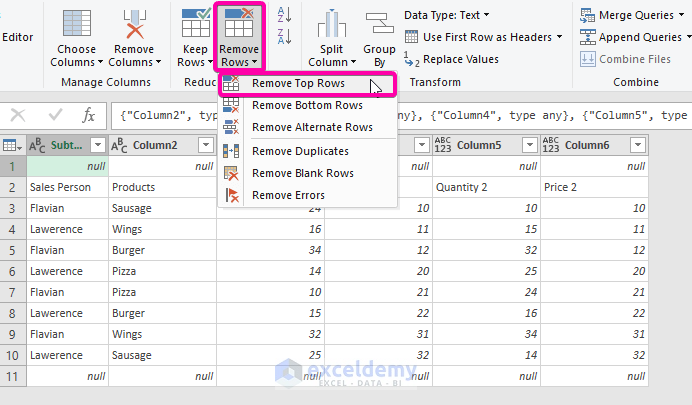
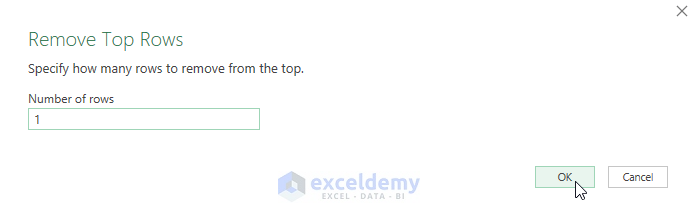
- To remove the top row, click on Remove Top Rows under Remove Rows.
- Type your preferred number(1) in the Number of rows box.
- Press Enter.
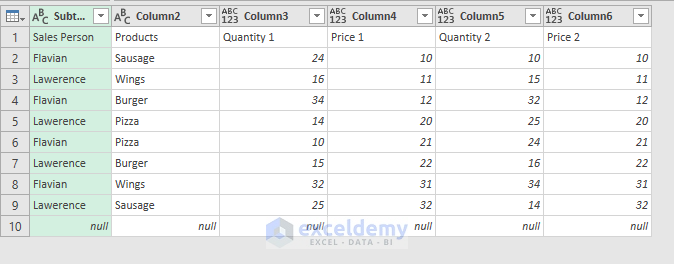
- You will see the following result with the removed top row.
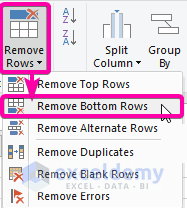
- To remove the bottom row, click on Remove Rows and select Remove Bottom Rows.
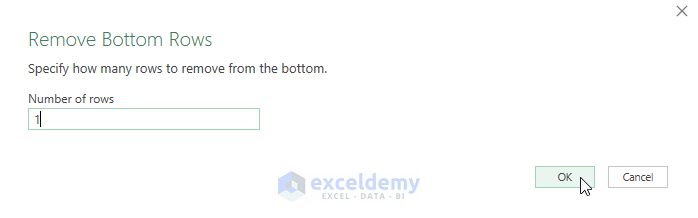
- Type your preferred number(1) in the Number of rows box.
- Press Enter.
- Here’s the result without the bottom row(s).
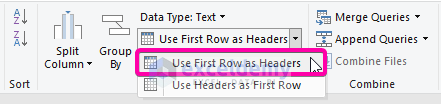
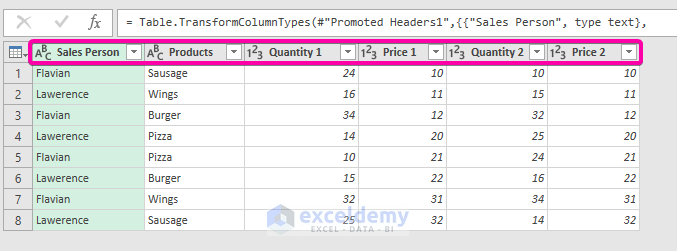
- Click on the Use First Row as Headers to make the first row of the Table the Header.
- The first row will transform into a Header.
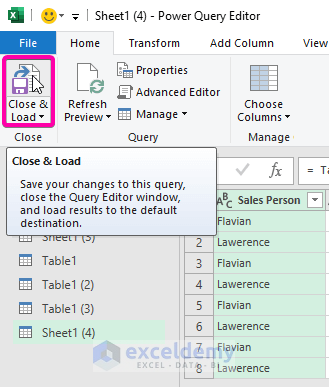
- Click on the Close & Load option to see the data in the current workbook.
- The imported data will appear in the current worksheet.
Notes: If you make any changes to your source file data after importing it, the data will be updated in your current worksheet after refreshing. Importing data and connecting various workbooks has this benefit. Follow the outlined steps to understand the following example.
Update Imported Data from Source File
- Change the source file data and save it.
- Go back to the current workbook and right-click on the cell.
- Click on Refresh.
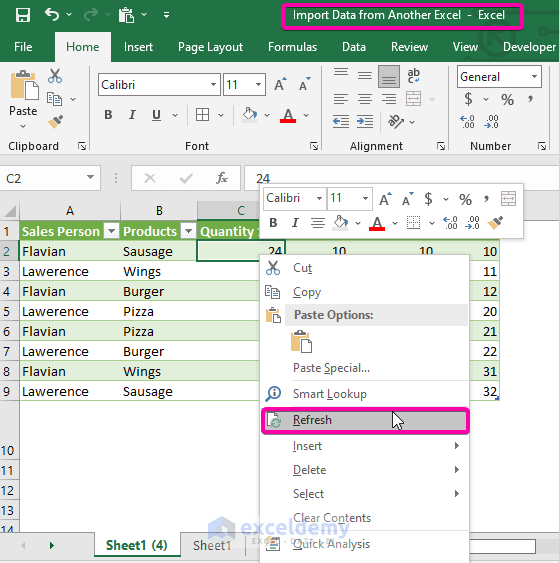
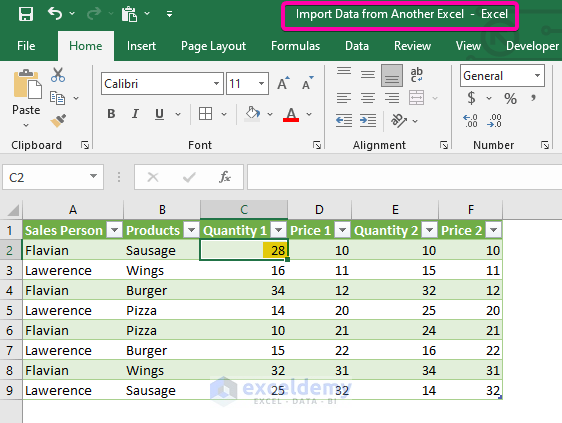
- The changed data will be updated according to the source file.
Method 2 – Run a VBA Code to Import Data into Excel from Another Excel File
Steps
- Press Alt + F11 to start the VBA window.
- From the Insert tab, select Module.
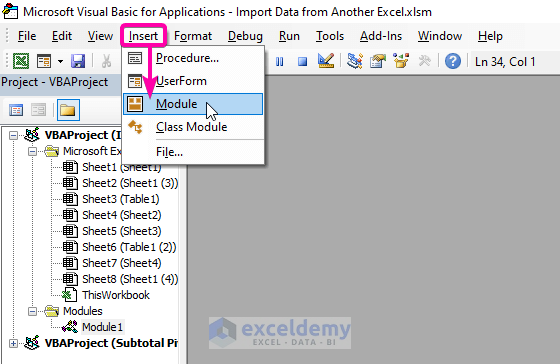
- In the Module box, paste the following VBA code.
Sub ImportData()
'Define variables for workbooks
    Dim CurrentWkb As Workbook
    Dim SourceWkb As Workbook
'Define variables for source
    Dim SourceRng As Range
    Dim DestinationRng As Range
'Set value for your current workbook
    Set CurrentWkb = ActiveWorkbook
    With Application.FileDialog(msoFileDialogOpen)
        .Filters.Clear
'Define file types for selection
        .Filters.Add "Excel 2008-19", "*.xlsx; *.xlsm; *.xlsa"
'Give statement to 'False' for not allowing selection of multiple files
        .AllowMultiSelect = False
        .Show
'Apply If condition
        If .SelectedItems.Count > 0 Then
            Workbooks.Open .SelectedItems(1)
            Set SourceWkb = ActiveWorkbook
'Insert Input Box for selection source range
            Set SourceRng = Application.InputBox(prompt:="Import source range", Title:="External Source Range", Default:="A1", Type:=8)
            CurrentWkb.Activate
'Enter Input box for selection for destination range
            Set DestinationRng = Application.InputBox(prompt:="Select your destination", Title:=" Click any cell selecting Destination", Default:="A1", Type:=8)
'Import the source range to the current workbook
            SourceRng.Copy DestinationRng
            DestinationRng.CurrentRegion.EntireColumn.AutoFit
            SourceWkb.Close False
        End If
    End With
End Sub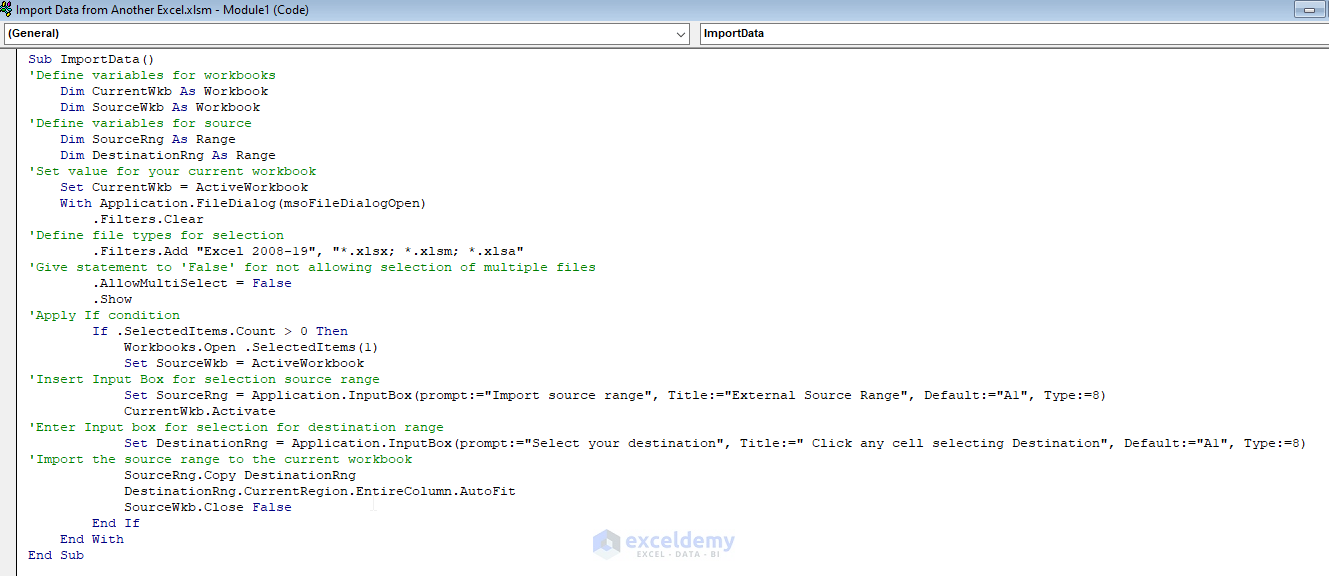
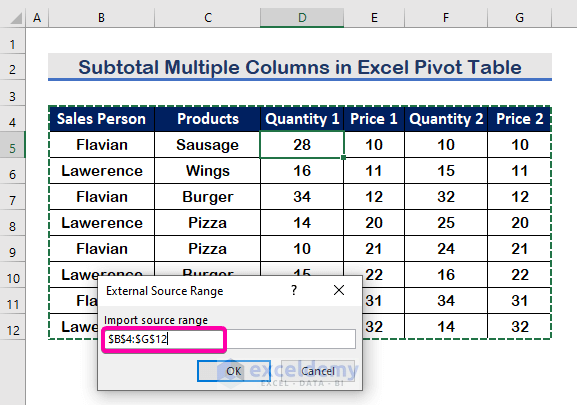
- Save the file and press F5 to run the code.
- Select the source file to import.

- Select the range to import data.
- Click on OK.
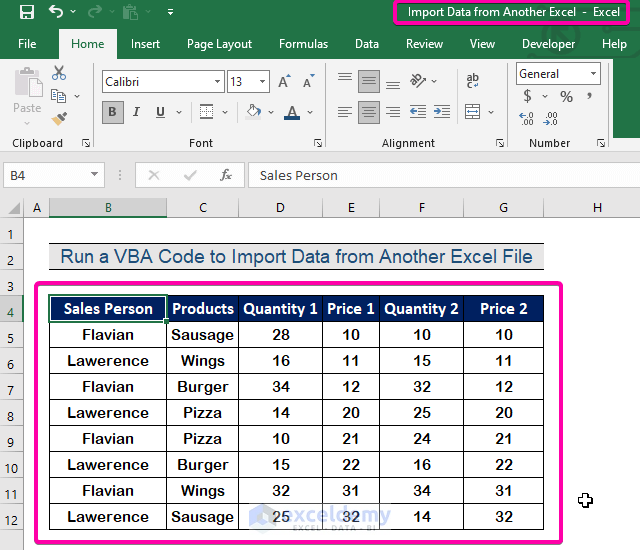
- Click on any cell as the Destination Cell.
- Click on OK.

- Your data from the other file will be imported into the current file, as seen in the figure below.
Download the Practice Workbook
Related Articles
- How to Copy WhatsApp Group Contacts to Excel
- How to Link PowerPoint Chart to Excel
- How to Paste a List of Emails into Excel
- How to Extract Data from Image into Excel
<< Go Back to Importing Data in Excel | Learn Excel
Get FREE Advanced Excel Exercises with Solutions!
