Differences Between a Text File and an Excel File
- File Format:
- Excel files are binary files with a structured format, while text files are plain-text files.
- Structure:
- Text files have no preset structure; they consist of rows and columns separated by delimiters.
- Excel files have a predefined structure with rows and columns arranged into spreadsheets.
- Data Types:
- Excel files support various data types (text, numbers, dates, formulas), whereas text files store data as text only.
- Features:
- Excel files offer sorting, filtering, calculations, and charting capabilities.
- Text files are straightforward and lightweight.
- File Size:
- Text files are smaller because they lack formatting or styling data.
- Compatibility:
- Any text editor can read and edit text files, but Excel files require Microsoft Excel or compatible spreadsheet tools.
When to Import a Text File into Excel
Consider importing a text file into Excel when:
- Connecting with external programs that export reports as text files.
- Transferring pre-existing data from a text file to Excel.
- Manipulating data using Excel’s powerful tools for calculations and organization.
In conclusion, importing text files into Excel streamlines processes, saves time, and allows you to leverage Excel’s capabilities for efficient data manipulation and analysis.
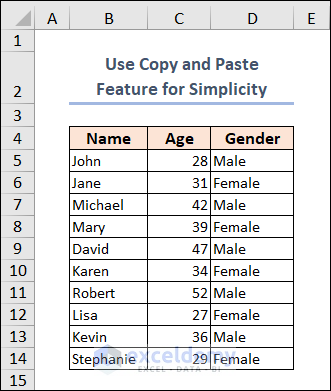
Dataset Overview
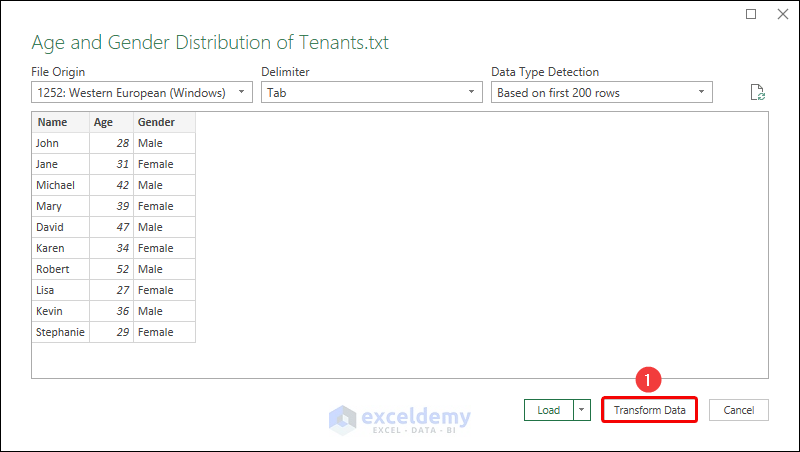
Let’s consider the Age and Gender Distribution of Tenants dataset for a specific apartment. This dataset includes information such as Name, Age, and Gender of tenants, organized under columns B, C, and D.
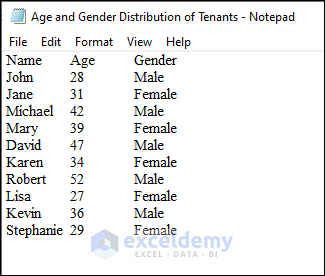
We have the dataset in (.txt) format, which we’ve opened in the Notepad application. Additionally, we’ve displayed the same dataset opened in Excel, allowing us to observe the differences in visualization and formatting.
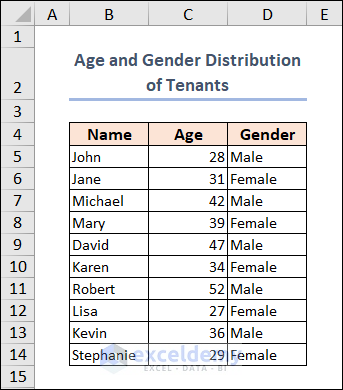
Note: This example uses a basic dataset for simplicity. In practical scenarios, you may encounter larger and more complex datasets.
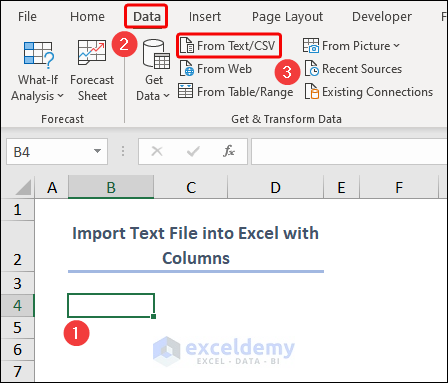
Method 1 – Import Text File into Excel with Columns
- Open Excel and create a new workbook.
- Navigate to the Data tab.
- Select Get Data and choose From Text/CSV.
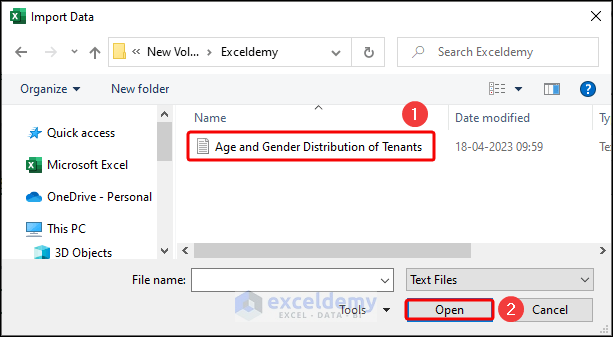
- The Import Data window will appear.
- Locate and double-click the desired text file from the File Explorer.
- Specify delimiter and data format options.
- Click Load to import the data into Excel.
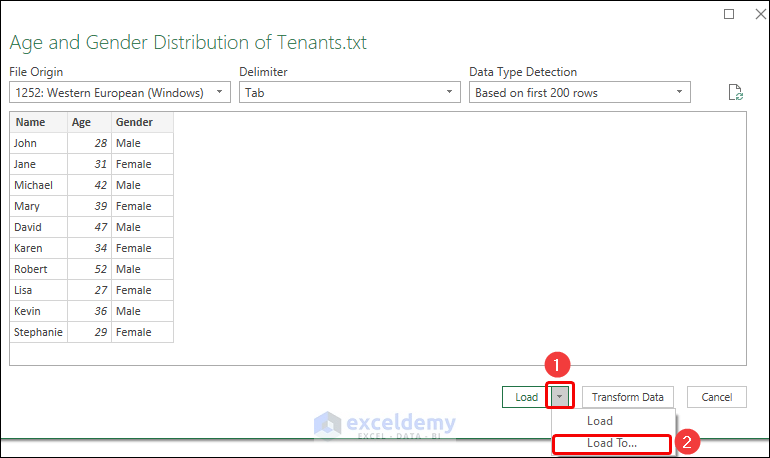
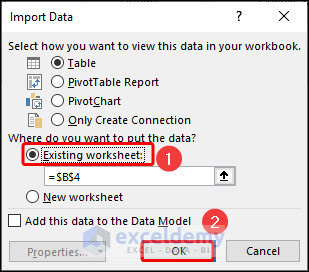
- A dialog wizard Import Data will appear. Select Existing worksheet and select the cell $B$4.
- Press OK.
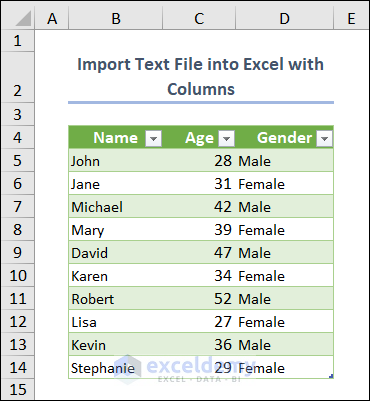
- Excel will import your text file into your existing worksheet.
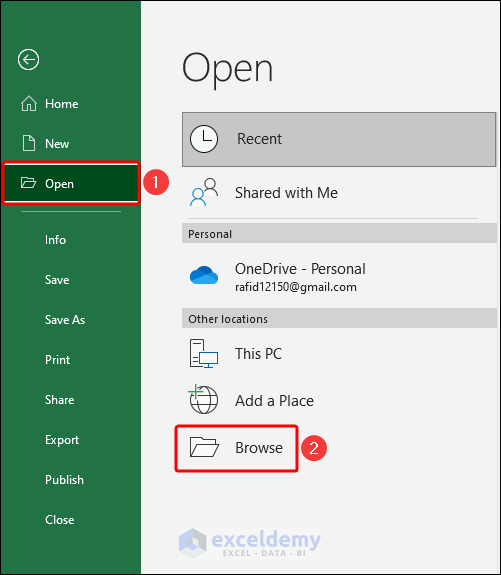
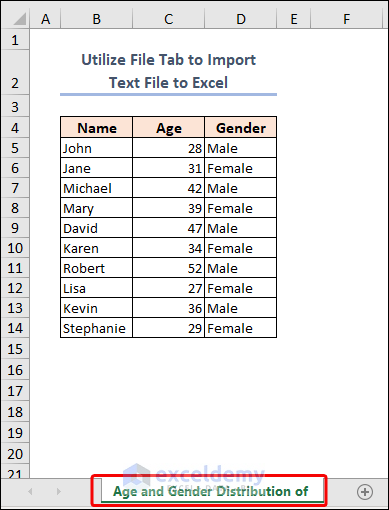
Method 2 – Utilize the File Tab to Import a Text File into Excel
- Go to the File tab.
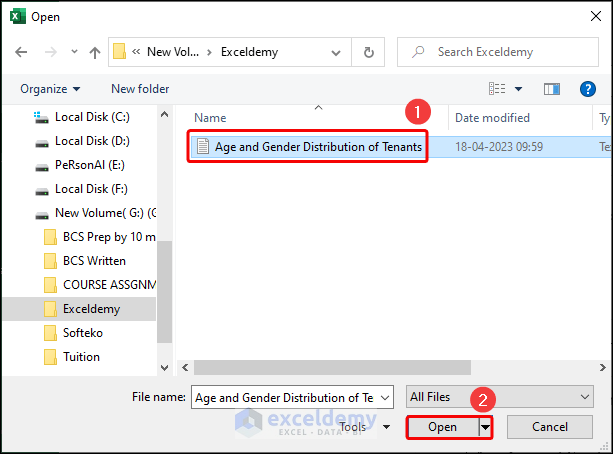
- Click Open and then select Browse.
- Choose the preferred text file in the Open window and click Open.
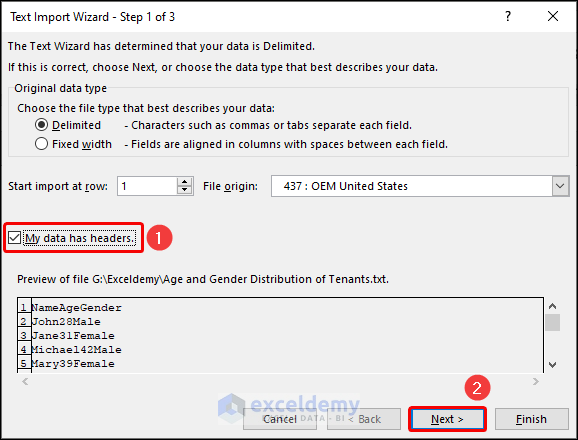
- In Step 1 of the Text Import Wizard, check the box My data has headers and click Next.
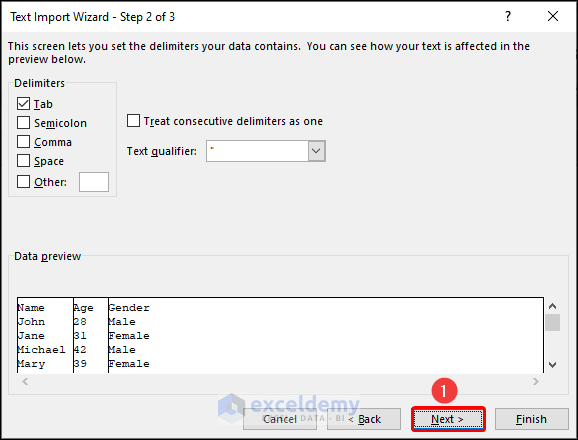
- Excel will already have selected Tab as the delimiter; click Next.
- Click Finish to complete the task.
- A new workbook will be created to open the text file within Excel.
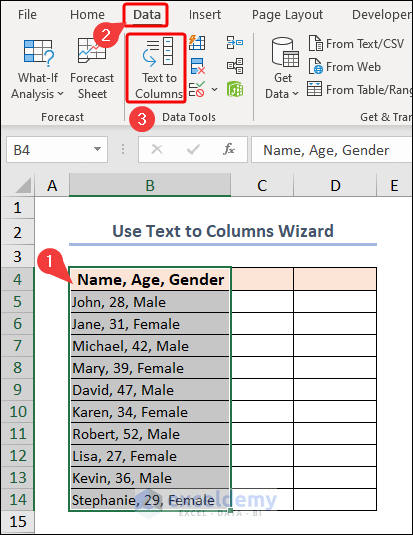
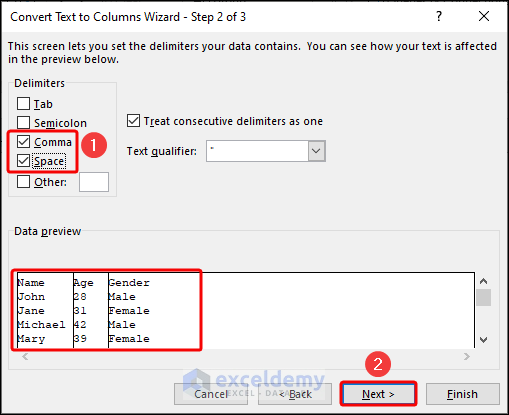
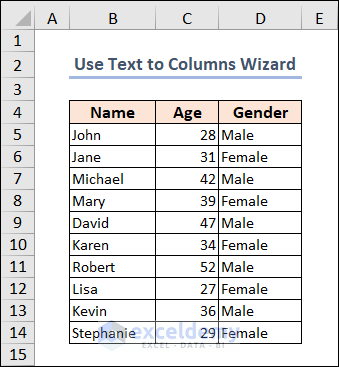
Method 3 – Use Text to Columns Wizard
- Select the entire dataset.
- Go to Data and select Text to Columns in the Data Tools group.
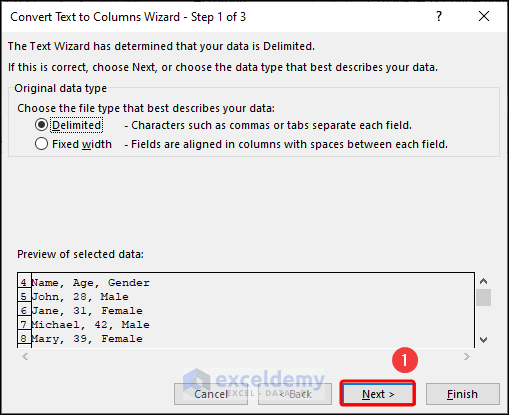
- In the Convert Text to Columns Wizard – Step 1 of 3, select the Delimited option and press Next.
- In Step 2 of 3, uncheck all tick marks except for Comma and Space.
- Preview your data in this window and press Next.
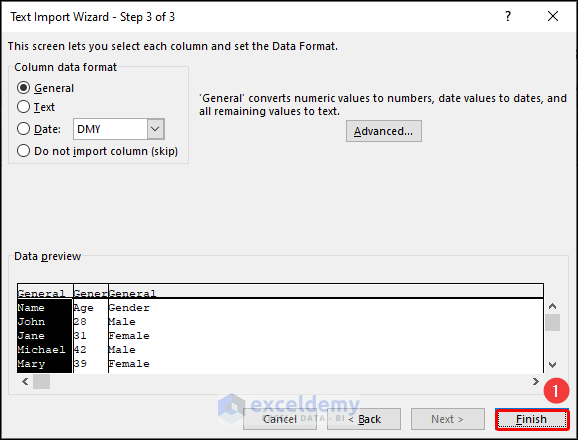
- In Step 3 of 3, select General and click Finish.
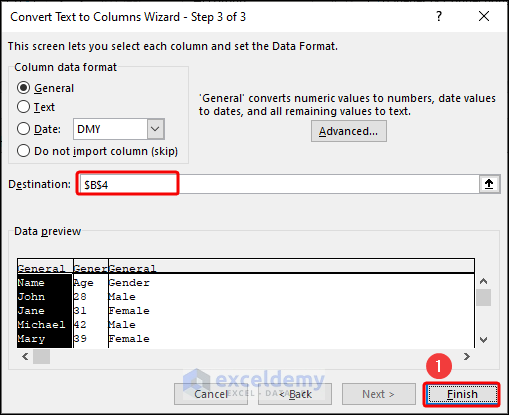
- Confirm replacing the old data in Column B if prompted.
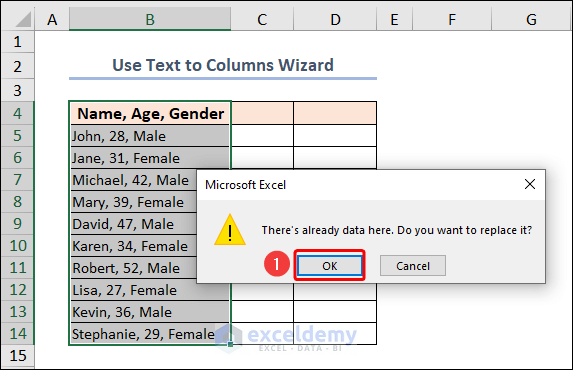
The imported data will now be split into columns.
Method 4 – Use the Copy and Paste Feature for Simplicity
- Open the text file in any software capable of reading plain text files (e.g., Notepad).
- Highlight the entire dataset you want to import.
- Press CTRL + C on your keyboard to copy the selected data.
- Open your Excel file where you want to import the data.
- Click on the cell where you want to paste the data.
- Press CTRL + V to paste the copied data.
Considerations:
- This method is straightforward and time-saving, especially for smaller datasets.
- However, keep in mind that it’s less efficient for larger datasets due to the following reasons:
- Manual Process: Copying and pasting data manually can be repetitive and time-consuming, increasing the risk of errors (e.g., skipping rows or copying incorrect data).
- Limited Capacity: Excel’s copy-and-paste feature has limitations on the amount of data that can be transferred at once. For large datasets, this may require multiple iterations.
- Formatting Issues: Pasting text data directly may lead to formatting problems (e.g., losing leading zeros or altering data formats), affecting subsequent analysis in Excel.
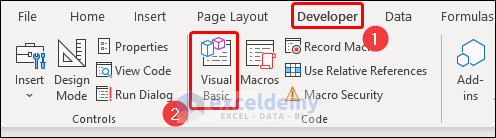
Method 5 – Import a Text File into Excel Using VBA Macro
- Open the Developer Tab:
- Click on the Visual Basic button in the Code group to launch the Microsoft Visual Basic for Applications window.
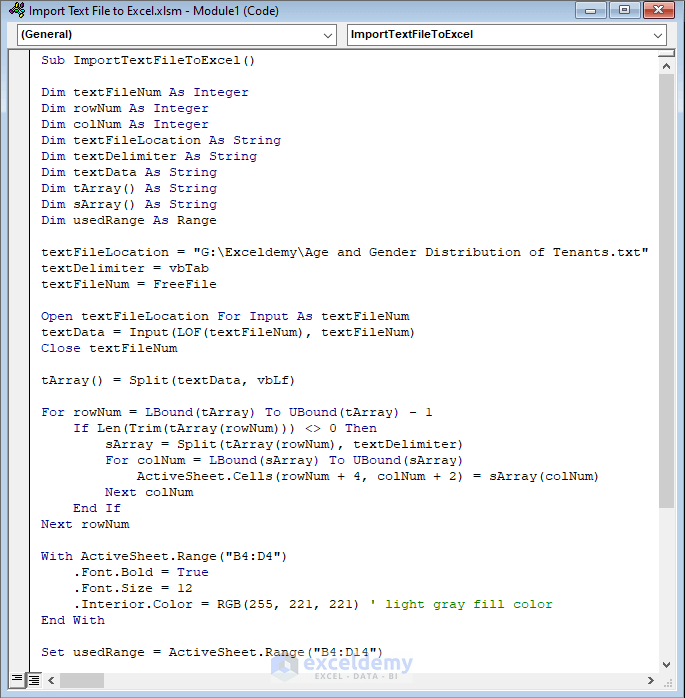
- Insert a Module:
- In the Visual Basic for Applications window, click the Insert tab.
- Choose Module from the list to create a new module where we’ll insert our VBA code.

- Paste the VBA Code:
- Below is the VBA code that accomplishes the task. Paste this code into the module:
Sub ImportTextFileToExcel()
Dim textFileNum As Integer
Dim rowNum As Integer
Dim colNum As Integer
Dim textFileLocation As String
Dim textDelimiter As String
Dim textData As String
Dim tArray() As String
Dim sArray() As String
Dim usedRange As Range
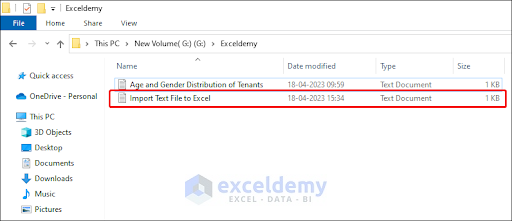
textFileLocation = "G:\Exceldemy\Age and Gender Distribution of Tenants.txt"
textDelimiter = vbTab
textFileNum = FreeFile
Open textFileLocation For Input As textFileNum
textData = Input(LOF(textFileNum), textFileNum)
Close textFileNum
tArray() = Split(textData, vbLf)
For rowNum = LBound(tArray) To UBound(tArray) - 1
If Len(Trim(tArray(rowNum))) <> 0 Then
sArray = Split(tArray(rowNum), textDelimiter)
For colNum = LBound(sArray) To UBound(sArray)
ActiveSheet.Cells(rowNum + 4, colNum + 2) = sArray(colNum)
Next colNum
End If
Next rowNum
With ActiveSheet.Range("B4:D4")
.Font.Bold = True
.Font.Size = 12
.Interior.Color = RGB(255, 221, 221) ' light gray fill color
End With
Set usedRange = ActiveSheet.Range("B4:D14")
' Apply borders to the used range
With usedRange.Borders
.LineStyle = xlContinuous
.Weight = xlThin
.ColorIndex = xlAutomatic
End With
MsgBox "Data Imported Successfully", vbInformation
End SubCode Breakdown
- The first few lines define some variables that will be used later in the code.
- The textFileLocation and textDelimiter variables are set to the location of the text file and the delimiter used in the file.
- The textFileNum variable is set to the file number of the text file using the FreeFile function.
- The text file is opened for input and its contents are read into the textData variable using the Input function. The file is then closed.
- The textData variable is split into an array of lines using the vbLf (line feed) character and stored in the tArray() variable.
- A loop is started to iterate over each line in the tArray() variable.
- For each line, the Len function is used to check if the line has any characters in it (i.e. it is not blank). If the line is not blank, the line is split into an array of columns using the textDelimiter and stored in the sArray() variable.
- Another loop is started to iterate over each column in the sArray() variable.
- The ActiveSheet.Cells() function is used to set the value of the current cell in the Excel sheet to the corresponding value in the sArray() variable. The rowNum and colNum variables are used to keep track of the current row and column.
- After all the data has been imported, the range of cells that the data was imported to is formatted to have the bold font, size 12, and light gray fill color.
- The usedRange variable is set to the range of cells that the data was imported to.
- The Borders property of the usedRange object is used to apply a thin continuous border to the cells.
- A message box is displayed indicating that the data was imported successfully.
- Run the Code:
- Click the green play button or press F5 to run the code.
- The result will be visible in your Excel sheet.
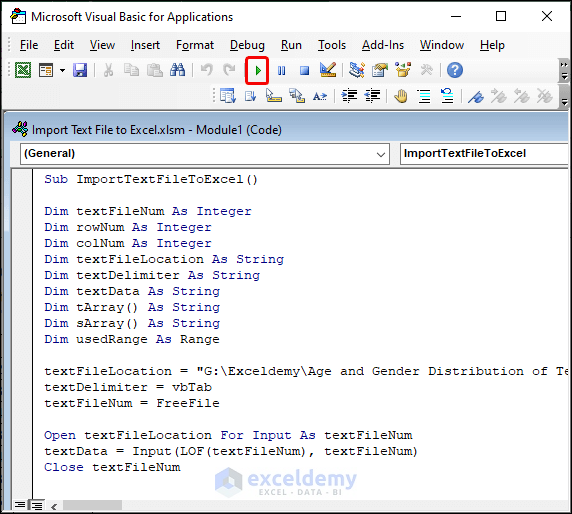
- After executing the code, the result can be seen below:
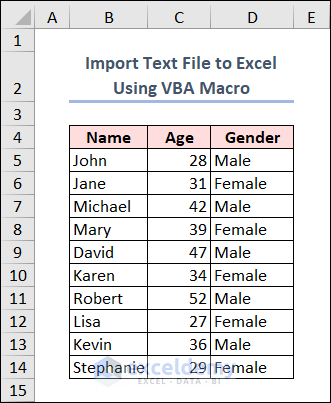
This VBA macro imports the text file, splits it into columns, formats the data, and provides a success message. Adjust the file location and delimiter as needed for your specific scenario.
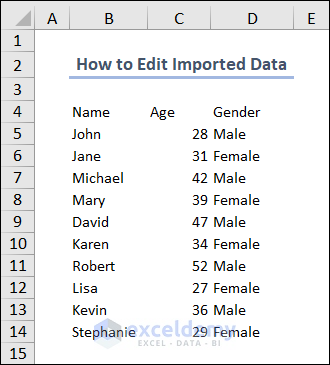
How to Edit the Imported Text File in Excel
- Review Imported Data:
- After importing the data, review it to ensure correctness and identify any errors or inconsistencies.
- Check that the data is in the correct format, contains no missing values, and has no duplicate entries.
- Verify that the data is placed in the correct cells after the import.
- Adjust Column Widths:
- To make all data visible and easy to read, adjust column widths.
- Click on the column header and drag it to the desired width.
- Alternatively, use the AutoFit feature to automatically adjust column widths based on the content.
- Format Data as Needed:
- Depending on the data type, apply formatting for readability or calculations.
- Format numbers as currency, dates as specific date formats, and text as bold or italicized.
- Access formatting options via the Format Cells dialog box or the formatting tools in the Home tab.
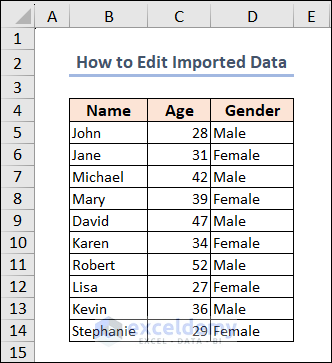
- Enhance Appearance:
- Bold column headers.
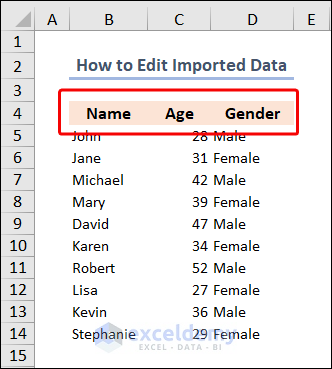
- Apply a background fill color.
- Slightly increase font size.
- Add borders to the data.
- Save the Excel File:
- Click the Save button in the Quick Access Toolbar or select Save or Save As from the File menu.
- Choose a meaningful file name and location for easy access.
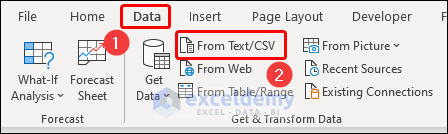
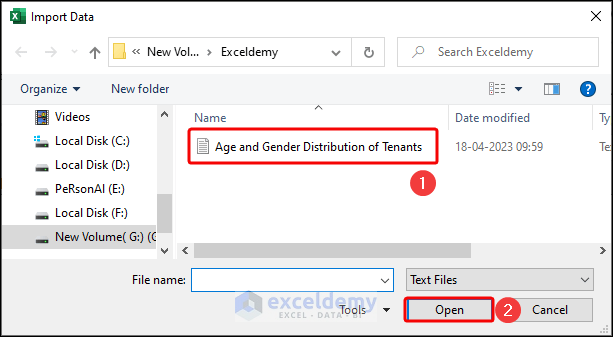
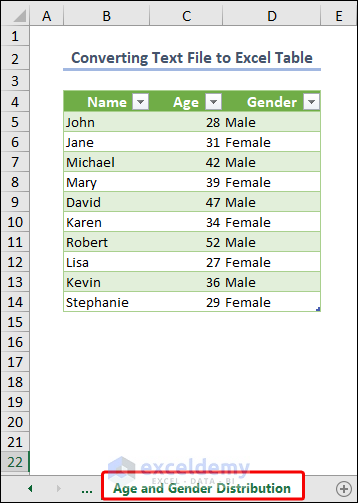
How to Convert a Text File into an Excel Table
- Go to the Data tab on the ribbon.
- Select From Text/CSV under the Get & Transform Data group.
- Choose the Age and Gender Distribution of Tenants file and click Open.
- In the dialog box, select Transform Data.
- Click the Close & Load command.
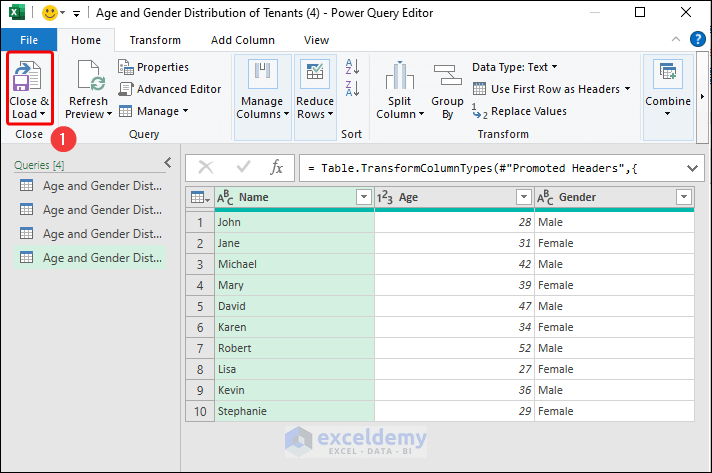
- Excel will create a new worksheet with the data in a table format, using the sheet name from the text file.
How to Export a Text File from Excel
Export Data to a Text File:
- Go to the File tab on the ribbon.
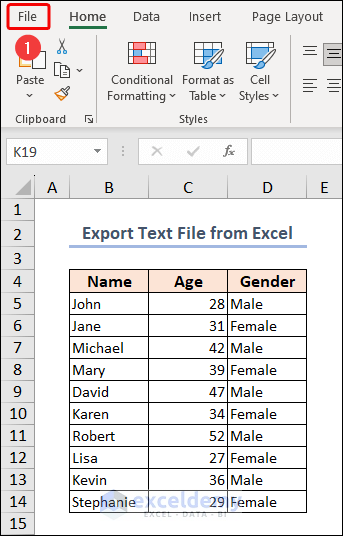
- Select Save As and then click Browse.
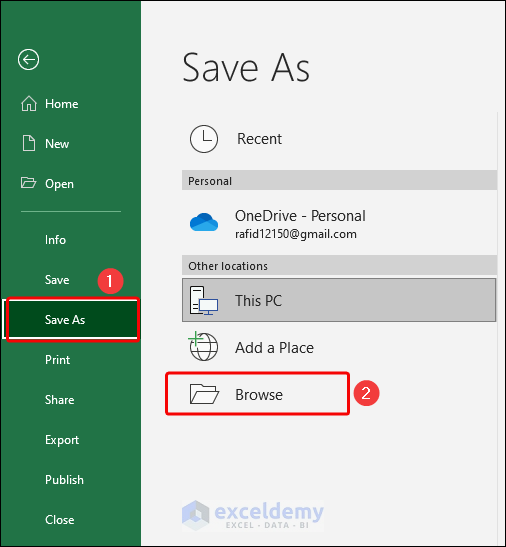
- In the Save As dialog box, choose Text (Tab delimited) as the save type.
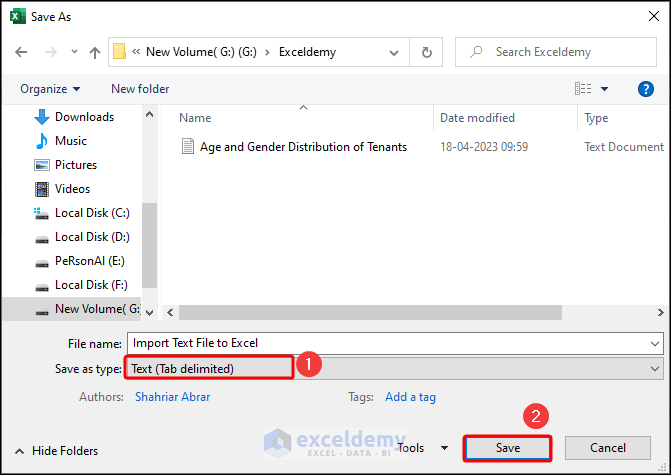
- Click Save.
- The new text file will be saved in your preferred location.
Once you have exported the text file from Excel, you can open it in any program that supports the file format you chose (e.g. Notepad, Microsoft Word, or a database program).
Benefits of Importing a Text File into Excel
Importing a text file into Excel offers several benefits for efficient data management and analysis. Let’s explore these advantages:
- Data Manipulation: Excel provides powerful features for data manipulation. By importing a text file, you can easily sort, filter, and organize data, making it more accessible for analysis and insights.
- Time-saving: Manually copying and pasting data from a text file to Excel can be time-consuming, especially with large datasets. Importing the text file streamlines the process and saves valuable time.
- Reduced Errors: Importing data directly from a text file reduces the risk of errors that may occur during manual data entry.
- Enhanced Data Analysis: Excel’s functions and formulas allow for complex calculations. By importing a text file, you can leverage these features to analyze data and uncover insights that might not be immediately apparent.
- Compatibility: Text files can be created by various programs and operating systems. Importing data from a text file to Excel allows you to consolidate information from different sources and formats.
- Scalability: Text files can handle large datasets efficiently. Importing them into Excel enables you to work with substantial amounts of data without memory or performance concerns.
Things to Remember
- Ensure the text file format is compatible with Excel (e.g., delimited or fixed-width).
- Specify the correct data type for each column during import.
- Use text qualifiers (like quotes) if your text file includes delimiter characters.
- Choose the appropriate encoding for non-ASCII characters.
Frequently Asked Questions
1. Can I import a text file with non-English characters into Excel?
Yes, Excel can import text files with non-English characters. Just select the right character encoding in the Text Import Wizard.
2. Can I import a text file with headers into Excel?
If your text file has headers, choose the My data has headers option in the Text Import Wizard.
3. Can I import a text file into a specific location in an Excel worksheet?
You can import a text file into a specific Excel worksheet location by selecting the starting cell and using the Text Import Wizard’s Existing Worksheet option.
Download Practice Workbook
You can download the practice workbooks from here:
Import Text File to Excel: Knowledge Hub
- Convert Text File to Excel Automatically
- Import Text File with Multiple Delimiters into Excel
- Convert Notepad to Excel with Columns
- Import Data from Text File into Excel
- VBA Code to Convert Text File to Excel
<< Go Back to Importing Data in Excel | Learn Excel
Get FREE Advanced Excel Exercises with Solutions!

Simple text copy from notepad (text and numbers in matrix order) copy paste function
is in excel completely useless ! To do that in excel in compare to use Libre Office Calc for the same task is the task in excel so complicated and requires multiple steps that do not make any sense … LOC wins in simplicity and use off. Why complicating simple task to the point of no use u may ask Excel developers ? Libre Office doesn’t have all the functionality offered as in Excel, but doesn’t have memory leaks, doesn’t crash, no lag, its fast, simple to use, thus more user friendly (does not have text as number issues like in excel) i can copy numbers directly into excel if i need to and so on … Tutorials how to paste simple text and numbers in to excel for user like me (use computer from before 2000) its a laugh at MS how they can screw up simple tasks that should work without complications. U should advise all the others for LOC use off where MS has fail in simplicity in Excel.
Hello Jeff,
Thank you for sharing your perspective! Your feedback is insightful. I understand your frustration and appreciate your feedback! While Excel may sometimes seem complex for simple tasks, there are ways to streamline your workflow, such as using Power Query or automating repetitive actions with macros. Microsoft continues to improve Excel based on user input, so your suggestions are valuable.
Excel and LibreOffice Calc indeed cater to different user preferences and workflows. For ease of use in simpler tasks, LibreOffice may be preferable for some. However, Excel’s extensive capabilities can be invaluable for complex data analysis and automation. Balancing simplicity and functionality is always a challenge!
If simplicity is your main goal, tutorials or add-ins might help ease the process. Don’t lose hope—there are always new tricks to make Excel work for you! Let us know if you’d like specific guidance.
Regards
ExcelDemy
This has helped me so much with my work. I used to be quite educated on Excel, but it’s been 20 years since I really used the non-basic functions. So thank you for this amazing document with pictures (as I’m all about seeing it) and directions. Now, I need to severely brush up on Access. I haven’t touched that in 25+ years!
Hello Marla,
Welcome to ExcelDemy. Thank you so much for your kind words and feedback! We’re thrilled to hear that the guide has been helpful in brushing up your Excel skills.
Yes, visuals can make all the difference, and we’re glad they worked well for you! As for Access, it’s a powerful tool, and diving back into it can definitely open up new possibilities. We’re here to help if you need guidance or resources to get started with Access too.
Best of luck with your journey back into data management!
Regards
ExcelDemy