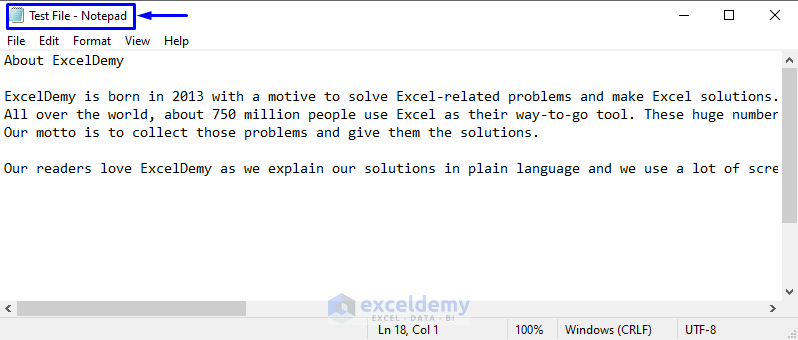
The sample Text file named “Test File” contains random lines and Line breaks. We will learn how to convert this text file to a new Excel file with the same name. Line breaks from the text file will be represented as empty rows in the Excel workbook.
Method 1 – Embed VBA Code to Convert Contents from a Text File to a New Excel Workbook
Steps:
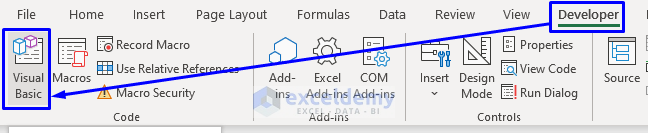
- Press Alt + F11 on your keyboard or go to the tab Developer -> Visual Basic to open Visual Basic Editor.
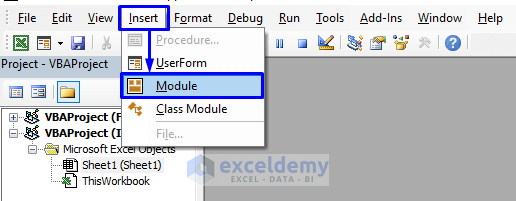
- In the pop-up code window, from the menu bar, click Insert -> Module.
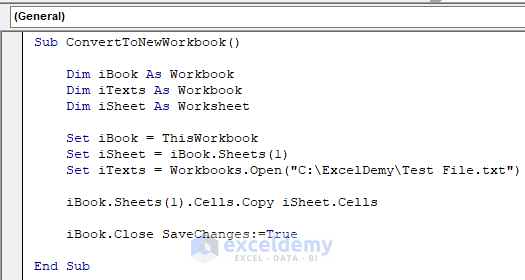
- Copy the following code and paste it into the code window.
Sub ConvertToNewWorkbook()
    Dim iBook As Workbook
    Dim iTexts As Workbook
    Dim iSheet As Worksheet
    Set iBook = ThisWorkbook
    Set iSheet = iBook.Sheets(1)
    Set iTexts = Workbooks.Open("C:\ExcelDemy\Test File.txt")
    iBook.Sheets(1).Cells.Copy iSheet.Cells
    iBook.Close SaveChanges:=True
End Sub
Your code is now ready to run.
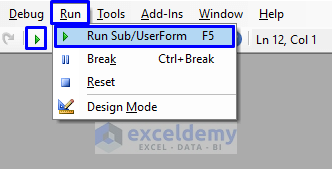
- Press F5 on your keyboard or from the menu bar select Run -> Run Sub/UserForm. You can also just click on the small Run icon in the sub-menu bar to run the macro.
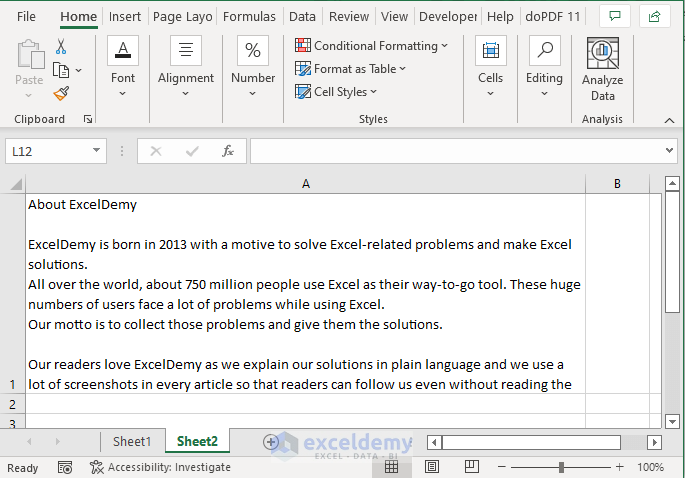
After the successful code execution, you will see that a new Excel workbook will open up. The workbook name and the sheet name where data are stored are the same.
For comparison, see the image below of both the Excel file and the Text file together.
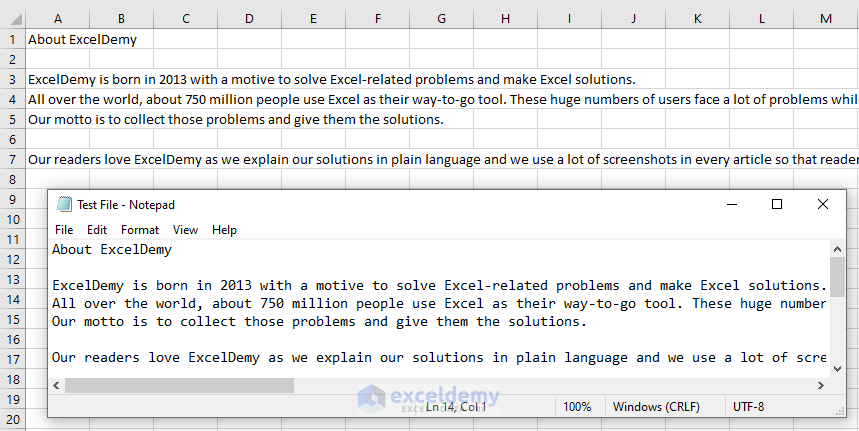
As you can see from the above image, contents from the “Test File” text file are exactly copied in the “Test File” Excel workbook. The columns are joined together to make appropriate spaces for long lines. Line breaks from the text files are represented as empty rows in the workbook.
VBA Code Explanation
Sub ConvertToNewWorkbook()Provide a name for the sub-procedure of the macro.
Dim iBook As Workbook
Dim iTexts As Workbook
Dim iSheet As Worksheet
Declare the necessary variables for the macro.
Set iBook = ThisWorkbookSpecify the Excel workbook where the contents from the text file will be pasted.
Set iSheet = iBook.Sheets(1)Specify the worksheet where the contents from the text file will be pasted.
Set iTexts = Workbooks.Open("C:\ExcelDemy\Test File.txt")Specify the path of your text file in the system.
iBook.Sheets(1).Cells.Copy iSheet.Cells
    iBook.Close SaveChanges:=True
Perform the copy operation.
End SubEnd the sub-procedure of the macro.
Read More: How to Convert Text File to Excel Automatically
Method 2 – Implement Macro to Convert Contents from a Text File to the Active Workbook
Steps:
- Open Visual Basic Editor from the Developer tab and Insert a Module in the code window.
- Copy the following code and paste it into the code window.
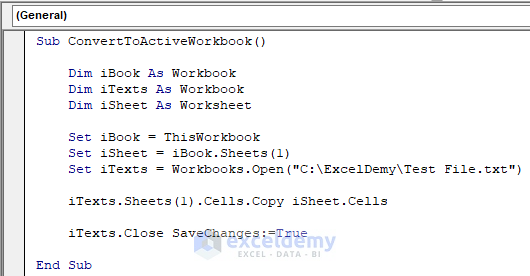
Sub ConvertToActiveWorkbook()
    Dim iBook As Workbook
    Dim iTexts As Workbook
    Dim iSheet As Worksheet
    Set iBook = ThisWorkbook
    Set iSheet = iBook.Sheets(1)
    Set iTexts = Workbooks.Open("C:\ExcelDemy\Test File.txt")
    iTexts.Sheets(1).Cells.Copy iSheet.Cells
    iTexts.Close SaveChanges:=True
End Sub
Your code is now ready to run.
- Run the macro as explained in the above section. The result is shown in the image below.
Contents from the “Test File” text file are exactly copied in Sheet1 of the active Excel workbook. The columns are joined together to make appropriate spaces for long lines. Line breaks from the text files are represented as empty rows in the workbook.
VBA Code Explanation
Sub ConvertToActiveWorkbook()Provide a name for the sub-procedure of the macro.
Dim iBook As Workbook
Dim iTexts As Workbook
Dim iSheet As Worksheet
Declare the necessary variables for the macro.
Set iBook = ThisWorkbookSpecify the Excel workbook where the contents from the text file will be pasted.
Set iSheet = iBook.Sheets(1)Specify the worksheet where the contents from the text file will be pasted.
Set iTexts = Workbooks.Open("C:\ExcelDemy\Test File.txt")Specify the path of your text file in the system.
iTexts.Sheets(1).Cells.Copy iSheet.Cells
    iTexts.Close SaveChanges:=True
Perform the copy operation.
End SubEnd the sub-procedure of the macro.
Method 3 – Apply VBA Macro to Convert Contents from a Text File to an Existing Workbook
Steps:
- As previously shown, open Visual Basic Editor from the Developer tab and Insert a Module in the code window.
- Copy the following code and paste it into the code window.
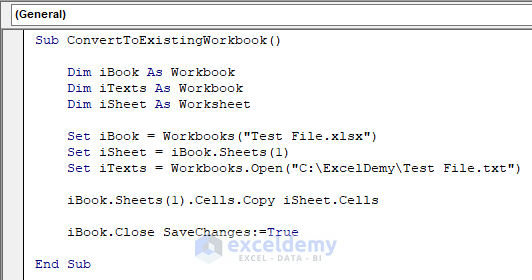
Sub ConvertToExistingWorkbook()
    Dim iBook As Workbook
    Dim iTexts As Workbook
    Dim iSheet As Worksheet
    Set iBook = Workbooks("Test File.xlsx")
    Set iSheet = iBook.Sheets(1)
    Set iTexts = Workbooks.Open("C:\ExcelDemy\Test File.txt")
    iBook.Sheets(1).Cells.Copy iSheet.Cells
    iBook.Close SaveChanges:=True
End Sub
Your code is now ready to run.
- Before running this code, you must open the workbook first.
- Then, Run this code, and the result is shown in the following image.
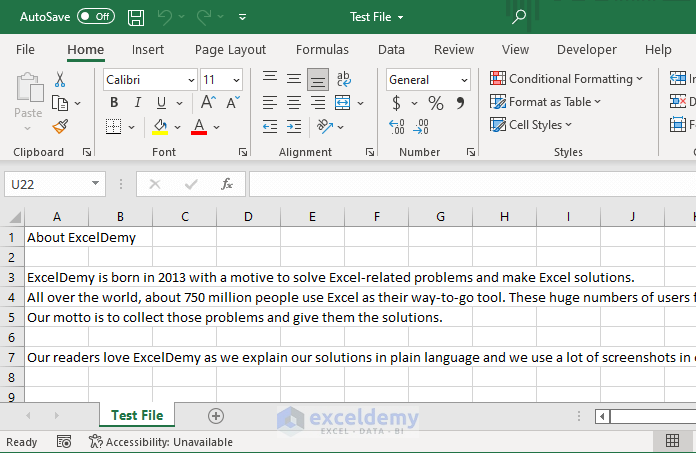
Contents from the “Test File” text file are exactly copied in the already existing Excel workbook “Test File”. The columns are joined together to make appropriate spaces for long lines. Line breaks from the text files are represented as empty rows in the workbook.
VBA Code Explanation
Sub ConvertToExistingWorkbook()Provide a name for the sub-procedure of the macro.
Dim iBook As Workbook
Dim iTexts As Workbook
Dim iSheet As Worksheet
Declare the necessary variables for the macro.
Set iBook = Workbooks("Test File.xlsx")Specify the Excel workbook where the contents from the text file will be pasted.
Set iSheet = iBook.Sheets(1)Specify the worksheet where the contents from the text file will be pasted.
Set iTexts = Workbooks.Open("C:\ExcelDemy\Test File.txt")Later, specify the path of your text file in the system.
iBook.Sheets(1).Cells.Copy iSheet.Cells
    iBook.Close SaveChanges:=True
Perform the copy operation.
End SubEnd the sub-procedure of the macro.
Method 4 – Insert VBA Code to Convert All Contents from a Text File to a Single Cell in Spreadsheet
Steps:
- Open Visual Basic Editor from the Developer tab and Insert a Module in the code window.
- Copy the following code and paste it into the code window.
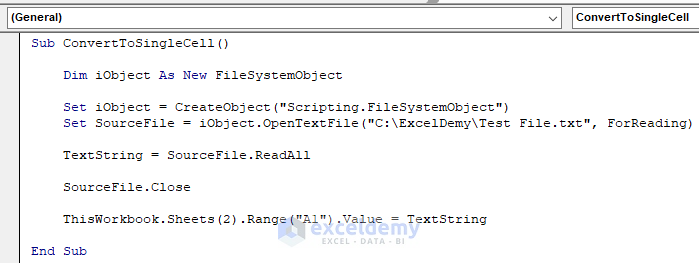
Sub ConvertToSingleCell()
    Dim iObject As New FileSystemObject
    Set iObject = CreateObject("Scripting.FileSystemObject")
    Set SourceFile = iObject.OpenTextFile("C:\ExcelDemy\Test File.txt", ForReading)
    TextString = SourceFile.ReadAll
    SourceFile.Close
    ThisWorkbook.Sheets(2).Range("A1").Value = TextString
End Sub
Your code is now ready to run.
- After you run this code, all the data from the text file will be copied into Cell A1 in the active sheet of the Excel file.
You can adjust the height and width of the row and column to make the contents of the cell more readable.
VBA Code Explanation
Sub ConvertToSingleCell()Provide a name for the sub-procedure of the macro.
Dim iObject As New FileSystemObjectDeclare the necessary variable for the file object.
Set iObject = CreateObject("Scripting.FileSystemObject")Create and specify the file object to work with the object later in the code.
Set SourceFile = iObject.OpenTextFile("C:\ExcelDemy\Test File.txt", ForReading)Specify the path of the text file and open it to read-only.
TextString = SourceFile.ReadAll
    SourceFile.Close
    ThisWorkbook.Sheets(2).Range("A1").Value = TextString
Read the whole text file, close it, and place the contents in cell A1 of the active Excel workbook.
End SubEnd the sub-procedure of the macro.
Method 5 – Embed VBA to Convert an Array of Data from a Text File to Excel Workbook
Steps:
- Open Visual Basic Editor from the Developer tab and Insert a Module in the code window.
- Copy the following code and paste it into the code window.
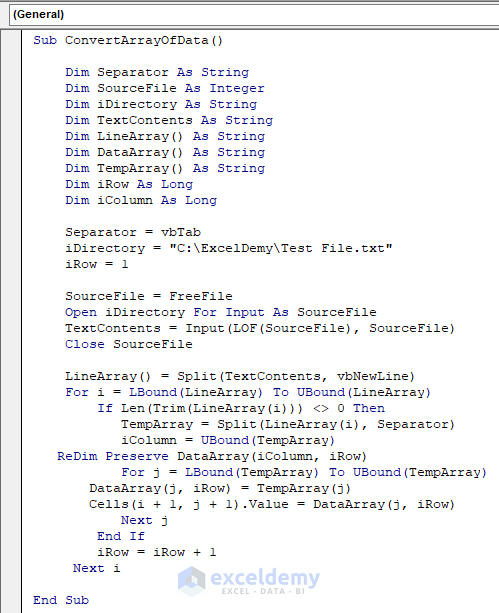
Sub ConvertArrayOfData()
    Dim Separator As String
    Dim SourceFile As Integer
    Dim iDirectory As String
    Dim TextContents As String
    Dim LineArray() As String
    Dim DataArray() As String
    Dim TempArray() As String
    Dim iRow As Long
    Dim iColumn As Long
    Separator = vbTab
    iDirectory = "C:\ExcelDemy\Test File.txt"
    iRow = 1
    SourceFile = FreeFile
    Open iDirectory For Input As SourceFile
    TextContents = Input(LOF(SourceFile), SourceFile)
    Close SourceFile
    LineArray() = Split(TextContents, vbNewLine)
    For i = LBound(LineArray) To UBound(LineArray)
        If Len(Trim(LineArray(i))) <> 0 Then
           TempArray = Split(LineArray(i), Separator)
           iColumn = UBound(TempArray)
   ReDim Preserve DataArray(iColumn, iRow)
           For j = LBound(TempArray) To UBound(TempArray)
       DataArray(j, iRow) = TempArray(j)
       Cells(i + 1, j + 1).Value = DataArray(j, iRow)
           Next j
        End If
        iRow = iRow + 1
     Next i
End Sub
Your code is now ready to run.
- Run this code and notice the image below.
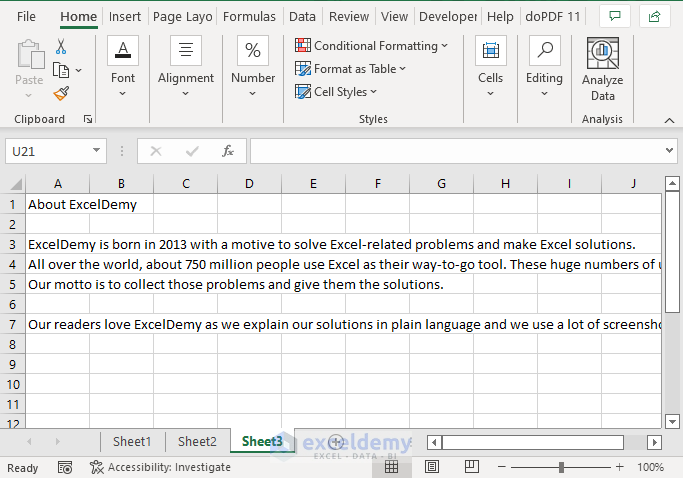
Contents from the “Test File” text file are exactly copied into the active sheet of the Excel workbook. The columns are joined together to make appropriate spaces for long lines. Line breaks from the text files are represented as empty rows in the workbook.
VBA Code Explanation
Sub ConvertArrayOfData()Provide a name for the sub-procedure of the macro.
Dim Separator As String
Dim SourceFile As Integer
Dim iDirectory As String
Dim TextContents As String
Dim LineArray() As String
Dim DataArray() As String
Dim TempArray() As String
Dim iRow As Long
Dim iColumn As Long
Declare the necessary variables for the macro.
Separator = vbTabSpecify the delimiter that is used in the text file.
iDirectory = "C:\ExcelDemy\Test File.txt"Specify the path of your text file in the system.
iRow = 1To scan through the whole dataset.
SourceFile = FreeFile
    Open iDirectory For Input As SourceFile
    TextContents = Input(LOF(SourceFile), SourceFile)
    Close SourceFile
To return the file number with the FreeFile function, it takes the text file as the input parameter opens it, returns its size with the LOF function, and then closes the file.
LineArray() = Split(TextContents, vbNewLine)Specify the line separator that is used in the text file. Modify this line from vbNewLine to vbCrLf or vbLf according to your dataset.
For i = LBound(LineArray) To UBound(LineArray)
        If Len(Trim(LineArray(i))) <> 0 Then
           TempArray = Split(LineArray(i), Separator)
           iColumn = UBound(TempArray)
   ReDim Preserve DataArray(iColumn, iRow)
           For j = LBound(TempArray) To UBound(TempArray)
       DataArray(j, iRow) = TempArray(j)
       Cells(i + 1, j + 1).Value = DataArray(j, iRow)
           Next j
        End If
        iRow = iRow + 1
     Next i
Perform the copy-paste operation. The contents from the text file are copied and pasted into the cell A1 of the active worksheet.
End SubEnd the sub-procedure of the macro.
Method 6 – Implement Macro to Convert Contents from a Text File to Excel Based on Separator
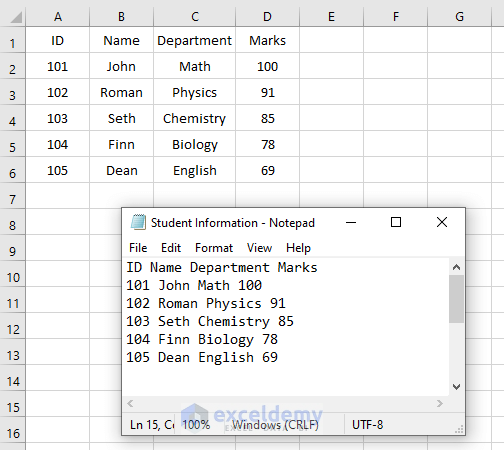
The text file we will use in this section holds data that must be presented in an organized way while converting them into an Excel workbook. An example is shown in the image below.
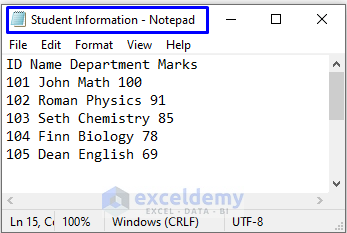
The “Student Information” text file holds the data of students which is hard to understand. We will transfer the contents of this text file to an Excel file in a way that all the IDs will be in Column A, Names in Column B, Department in Column C and Marks will be in Column D. We will use space (“ “) as the separator; meaning whenever the code finds any space (“ “) in the text file, it will place the next word from the text file in the next column in the Excel workbook and move forward like that.
The steps to get with the VBA code are given below.
Steps:
- Open Visual Basic Editor from the Developer tab and Insert a Module in the code window.
- Copy the following code and paste it into the code window.
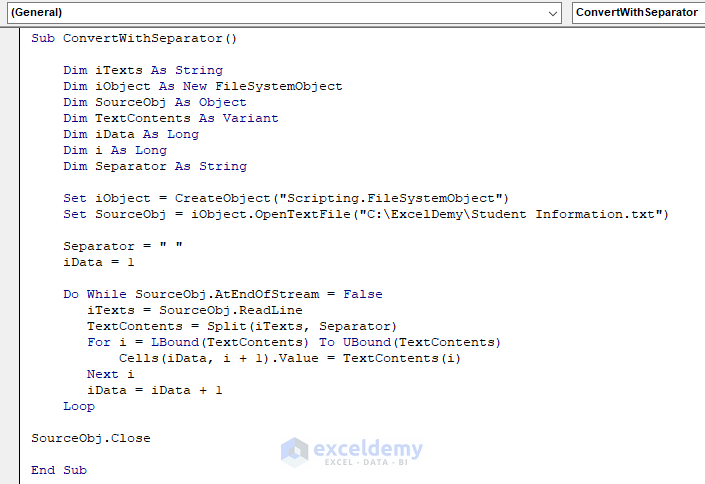
Sub ConvertWithSeparator()
    Dim iTexts As String
    Dim iObject As New FileSystemObject
    Dim SourceObj As Object
    Dim TextContents As Variant
    Dim iData As Long
    Dim i As Long
    Dim Separator As String
    Set iObject = CreateObject("Scripting.FileSystemObject")
    Set SourceObj = iObject.OpenTextFile("C:\ExcelDemy\Student Information.txt")
    Separator = " "
    iData = 1
    Do While SourceObj.AtEndOfStream = False
       iTexts = SourceObj.ReadLine
       TextContents = Split(iTexts, Separator)
       For i = LBound(TextContents) To UBound(TextContents)
           Cells(iData, i + 1).Value = TextContents(i)
       Next i
       iData = iData + 1
    Loop
SourceObj.Close
End Sub
Your code is now ready to run.
- Run the code.
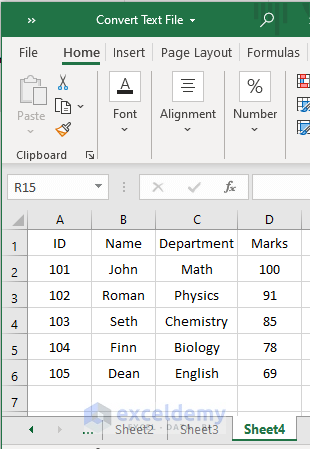
All the data from the text file are shifted to the active Excel book in an organized and meaningful way.
VBA Code Explanation
Sub ConvertWithSeparator()Provide a name for the sub-procedure of the macro.
Dim iTexts As String
Dim iObject As New FileSystemObject
Dim SourceObj As Object
Dim TextContents As Variant
Dim iData As Long
Dim i As Long
Dim Separator As String
Declare the necessary variables for the macro.
Set iObject = CreateObject("Scripting.FileSystemObject")Create and specify the file object to work with the object later in the code.
Set SourceObj = iObject.OpenTextFile("C:\ExcelDemy\Student Information.txt")Specify the path of the text file and open it.
Separator = " "Specify the separator that is used in the text file. We used space (” “) as the separator in our text file. You must modify this line based on your dataset.
iData = 1To scan through the whole dataset.
Do While SourceObj.AtEndOfStream = False
       iTexts = SourceObj.ReadLine
       TextContents = Split(iTexts, Separator)
       For i = LBound(TextContents) To UBound(TextContents)
           Cells(iData, i + 1).Value = TextContents(i)
       Next i
       iData = iData + 1
    Loop
SourceObj.Close
It starts iterating from the smallest subscript to the largest subscript of the array, then splits the text contents based on the separator and later stores the value in the variable. It continues doing this until no value is left there to scan. Close the source text file.
End SubEnd the sub-procedure of the macro.
Method 7 – Insert Macro to Convert an Array of Data from a Text File to Excel Based on Separator
Steps:
- Open Visual Basic Editor from the Developer tab and Insert a Module in the code window.
- Copy the following code and paste it into the code window.
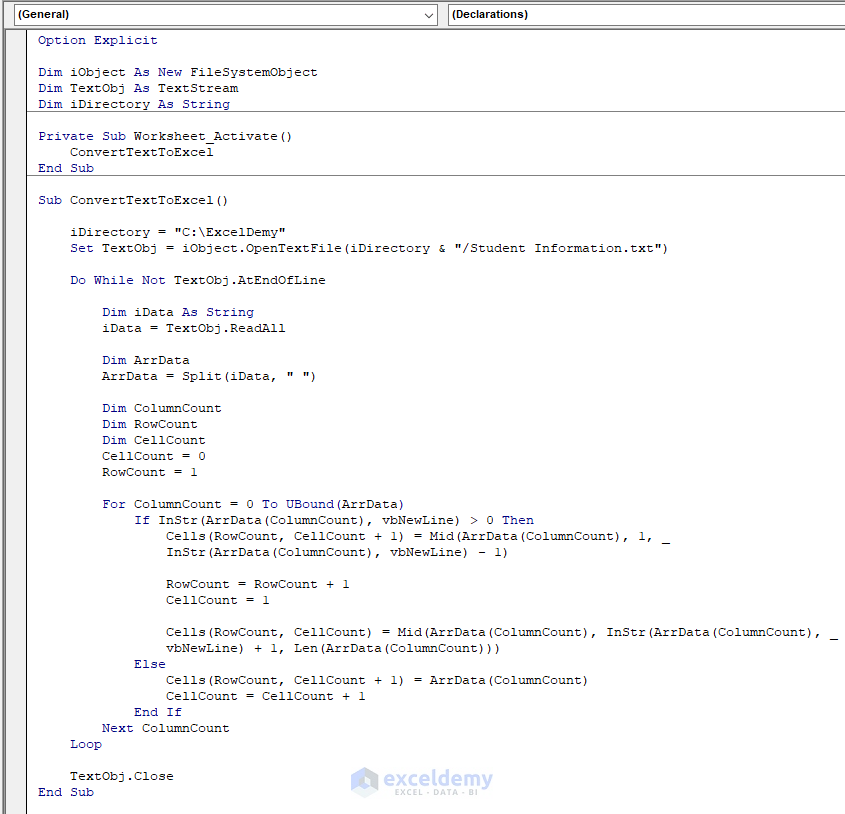
Option Explicit
Dim iObject As New FileSystemObject
Dim TextObj As TextStream
Dim iDirectory As String
Private Sub Worksheet_Activate()
    ConvertTextToExcel
End Sub
Sub ConvertTextToExcel()
    iDirectory = "C:\ExcelDemy"
    Set TextObj = iObject.OpenTextFile(iDirectory & "/Student Information.txt")
    Do While Not TextObj.AtEndOfLine
        Dim iData As String
        iData = TextObj.ReadAll
        Dim ArrData
        ArrData = Split(iData, " ")
        Dim ColumnCount
        Dim RowCount
        Dim CellCount
        CellCount = 0
        RowCount = 1
        For ColumnCount = 0 To UBound(ArrData)
            If InStr(ArrData(ColumnCount), vbNewLine) > 0 Then
                Cells(RowCount, CellCount + 1) = Mid(ArrData(ColumnCount), 1, InStr(ArrData(ColumnCount), vbNewLine) - 1)
                RowCount = RowCount + 1
                CellCount = 1
                Cells(RowCount, CellCount) = Mid(ArrData(ColumnCount), InStr(ArrData(ColumnCount), vbNewLine) + 1, Len(ArrData(ColumnCount)))
            Else
                Cells(RowCount, CellCount + 1) = ArrData(ColumnCount)
                CellCount = CellCount + 1
            End If
        Next ColumnCount
    Loop
    TextObj.Close
End Sub
Your code is now ready to run.
- Run the code.
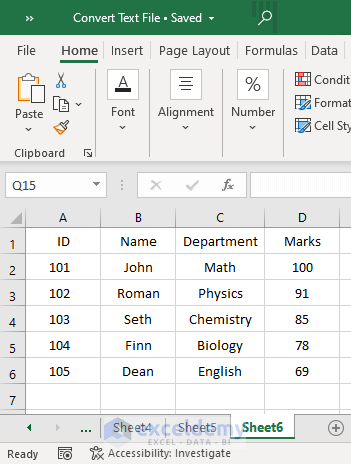
All the data from the text file are shifted to the active Excel book in an organized and meaningful way – all the IDs from the text file are in Column A, Name in Column B, Department in Column C, and Marks in Column D. We used space (“ “) as the separator.
VBA Code Explanation
Option ExplicitForces to declare all the variables explicitly of the file.
Dim iObject As New FileSystemObject
Dim TextObj As TextStream
Dim iDirectory As String
Declare the necessary variables for the macro.
Private Sub Worksheet_Activate()
    ConvertTextToExcel
End Sub
Call the sub-procedure of the macro from the Worksheet_Activate event.
Sub ConvertTextToExcel()Initiate the sub-procedure of the macro.
iDirectory = "C:\ExcelDemy"
    Set TextObj = iObject.OpenTextFile(iDirectory & "/Student Information.txt")
Specify the folder path where the source text file is stored. Then, define the object of the source text file and open it.
Do While Not TextObj.AtEndOfLineTo check whether the current position is the end of a line or not with the AtEndOfLine read-only property.
Dim iData As String
  iData = TextObj.ReadAll
Declare a variable to read all contents from the source file.
Dim ArrData
  ArrData = Split(iData, " ")
Declare another variable to specify the separator based on which the split operation will occur with the Split function and store the split data in that variable.
Dim ColumnCount
Dim RowCount
Dim CellCount
Declare the rest of the necessary variables for the macro.
CellCount = 0
RowCount = 1
To scan through the whole dataset.
For ColumnCount = 0 To UBound(ArrData)
    If InStr(ArrData(ColumnCount), vbNewLine) > 0 Then
       Cells(RowCount, CellCount + 1) = Mid(ArrData(ColumnCount), 1, InStr(ArrData(ColumnCount), vbNewLine) - 1)
       RowCount = RowCount + 1
       CellCount = 1
       Cells(RowCount, CellCount) = Mid(ArrData(ColumnCount), InStr(ArrData(ColumnCount), vbNewLine) + 1, Len(ArrData(ColumnCount)))
    Else
       Cells(RowCount, CellCount + 1) = ArrData(ColumnCount)
       CellCount = CellCount + 1
     End If
Next ColumnCount
    Loop
    TextObj.Close
It starts iterating from 0 to the largest subscript of the array, then returns the position of the first occurrence of the strings with the VBA InStr function and later stores the value in the variable. It continues doing this until no value is left there to scan. Close the source text file.
End SubEnd the sub-procedure of the macro.
Read More: How to Import Data from Text File into Excel
Key Point to Remember
When you work with the FileSystemObject in your VBA code, you must do the following modification in your VBA code window.
- Go to Tools -> References from the menu bar of the code window.
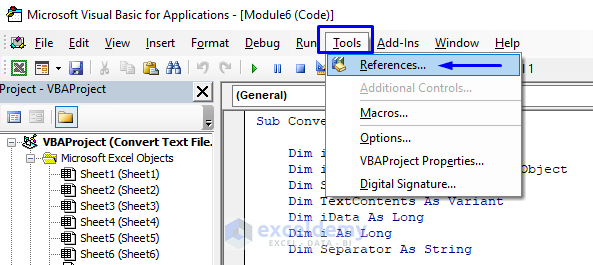
- Check the Microsoft Scripting Runtime box and click OK.
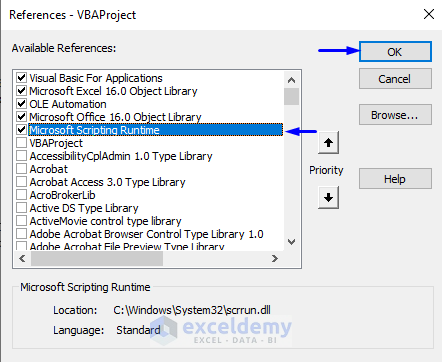
You will get errors if you don’t turn on the Microsoft Scripting Runtime while working with file objects in Excel VBA.
Download Workbook
Related Articles
- How to Import Text File with Multiple Delimiters into Excel
- How to Convert Notepad to Excel with Columns
<< Go Back to Import Text File to Excel | Importing Data in Excel | Learn Excel
Get FREE Advanced Excel Exercises with Solutions!

Unable to convert text file to excel in separate cell. will you help me to solve this issue
Dear RATAN KUMAR BARMAN,
Thank you very much for reading our articles. You mentioned that you are unable to convert text files to Excel in separate cells.
Based on your query, we have checked the Excel file. We found that methods 1, 2, 3, and 5 convert text files to Excel in separate cells by default based on the data of the text file. Also, methods 6 and 7 convert the contents of a text file to Excel based on a separator in separate cells. We suggest you read the article again and apply the Excel following the instructions.
Regards,
Alok
ExcelDemy