When you need to go backward in a loop like you want to check a range from the bottom to the top, in that case, you can use the For Next loop with a negative number in step. So, if you want to use Excel VBA with For loop decrement then you can follow this article.
In a For Next loop decrement or reverse For Next loop, the counter value will decrease with the given interval.
Here, I have deleted the empty rows from my dataset with the help of the reverse For Next loop.
How to Launch VBA Editor in Excel
To write a VBA code in Excel, you have to launch the VBA editor. For launching this VBA editor, you must need the Developer tab, now if you don’t see the Developer tab then you have to enable the Developer tab.
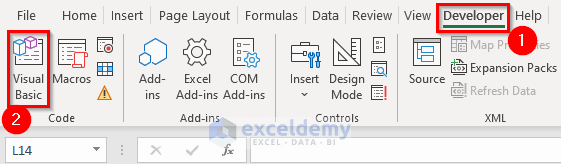
- To launch VBA Editor, choose the Developer tab >> then select Visual Basic.
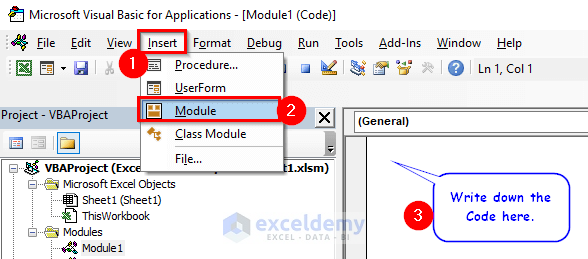
- Now, from the Insert tab >> you have to select Module. After inserting the Module, you need to write the preferable code as your dataset.
How to Use For Next Loop in Excel VBA
When you need to repeat an operation then you can use the For Next loop. In this video, I used a dataset containing employee information. As you can see I have colored the rows which have no values in the column named Email Address. So, what have I done here? Actually, I checked every cell of the Email Address column to see whether the cell contains any value or not. And if the cell is blank then that cell-related range will be colored.
So, when you want to check every cell within a range or you want to repeat the work after a specified interval then you should use the For Next loop.
In the case of using a For Next loop, you must know how many times you want to continue the loop.
- Write down the corresponding code in the Module.
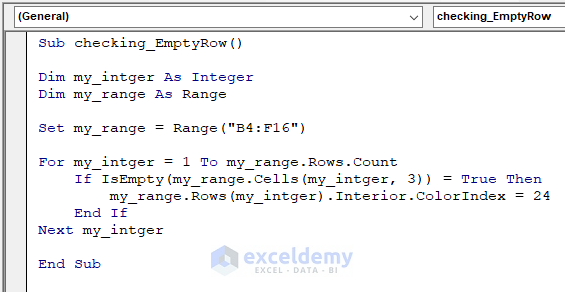
Sub checking_EmptyRow()
Dim my_intger As Integer
Dim my_range As Range
Set my_range = Range("B4:F16")
For my_intger = 1 To my_range.Rows.Count
    If IsEmpty(my_range.Cells(my_intger, 3)) = True Then
        my_range.Rows(my_intger).Interior.ColorIndex = 24
    End If
Next my_intger
End Sub
🔎 Code Breakdown:
- Here, I create a sub-procedure named checking_EmptyRow.
- Then, I declare two variables my_intger as Integer and my_range as Range.
- Then, I set the variable my_range with range B4 to F16 cells.
- The For Next loop will continue from 1 to the number equivalent to the total rows number of that range. Here as I didn’t mention the step so by default the interval for the loop will be 1. This means the loop will continue by inserting the value of my_intger 1,2,3… up to the total rows number of the mentioned range.
- In the For Next loop, there will be an If-End If statement to check if the cell of the 3rd column of the range is empty or not. And if the cell is empty then there will be a color to that row.
- For coloring, I use the ColorIndex property. Here you can insert 1 to 56 as the ColorIndex value.
- Lastly, from the Macros >> select checking_EmptyRow >> press Run to see the output.
Excel VBA with For Loop Decrement: 5 Suitable Examples
Now, I will explain five suitable examples of For loop decrement so you can relate how and where to use this reverse For Next loop. In the earlier section, I have described how you can use the For Next loop. Now, you will see how you can continue the loop backward.
In a reverse For Next loop, you have to mention the step number with a negative value.
1. Removing Empty Rows with Reverse For Next Loop
Suppose you want to check every row; if any row contains a specified condition, then that particular row will be deleted. In this video, if any row of the given range (B4:F16) contains a blank cell then the row will be deleted. Say the 8th row is eligible to delete so after the removal of the 8th row, the 9th row will be the new 8th row. On the other hand, the loop is moving forward so the 9th row (new 8th row) remains unchecked. Thus, in this case, you need to use the reverse For Next loop. So, the loop will start from the bottom and move upwards. It will check the 9th row first and delete it if it meets the condition. As a result, the 10th row (which is checked already as the loop goes from bottom to top) will take the position of the 9th row and the loop will move to the 8th row. In this way, every row will be checked.
- Write the code given below in a new Module.
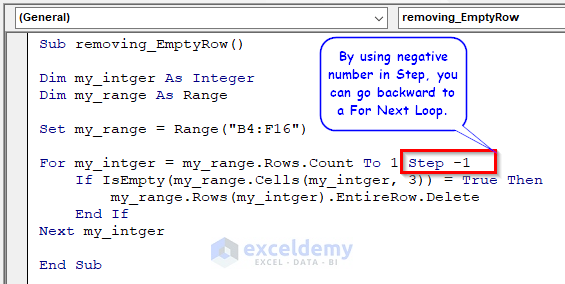
Sub removing_EmptyRow()
Dim my_intger As Integer
Dim my_range As Range
Set my_range = Range("B4:F16")
For my_intger = my_range.Rows.Count To 1 Step -1
    If IsEmpty(my_range.Cells(my_intger, 3)) = True Then
        my_range.Rows(my_intger).EntireRow.Delete
    End If
Next my_intger
End Sub
🔎 Code Breakdown:
- This is a similar code to the previous one. Here, I used reverse For Next loop with Step -1. So, this loop will move from the last row to the 1st one of the mentioned range.
- And inside the If-End If statement, I used EntireRow.Delete property to delete the row.
- Now, from the Macros >> select removing_EmptyRow >> press Run to see the output.
You will get all the rows having complete information.
2. Inserting IDs from Bottom to Top Through Decremental For Next Loop
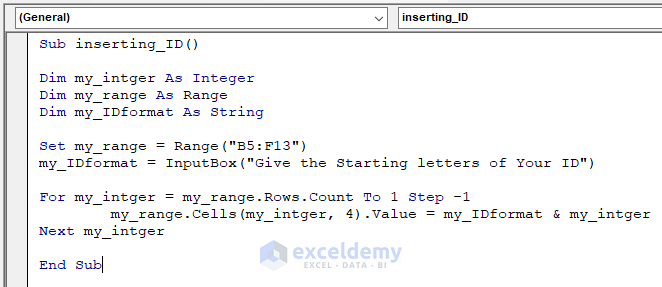
Here, I introduced new IDs with the help of VBA code in Excel. Through For loop decrement in Excel VBA, I inserted the IDs serially from bottom to top. Also, a user can include the company title or short form in the ID.
- Now, write the following code in a new Module.
Sub inserting_ID()
Dim my_intger As Integer
Dim my_range As Range
Dim my_IDformat As String
Set my_range = Range("B5:F13")
my_IDformat = InputBox("Give the Starting letters of Your ID")
For my_intger = my_range.Rows.Count To 1 Step -1
        my_range.Cells(my_intger, 4).Value = my_IDformat & my_intger
Next my_intger
End Sub
🔎 Code Breakdown:
- Here, the variable my_IDformat will take some strings given by the user through Inputbox. And these strings will be added before the number. This is how you can make a new ID format.
- Then, my_range.Rows.Count will return the total number of rows of my_range which is 9.
- So, the reverse For Next loop will assign the value of my_intger from 9 to 1.
- The given strings and number will join with the Ampersand (&) operator. Lastly, you will get this ID in the 4th column of the mentioned range.
- From Macros >> select inserting_ID >> press Run to get the IDs in the E column.
Read More: Excel VBA For Loop with Array
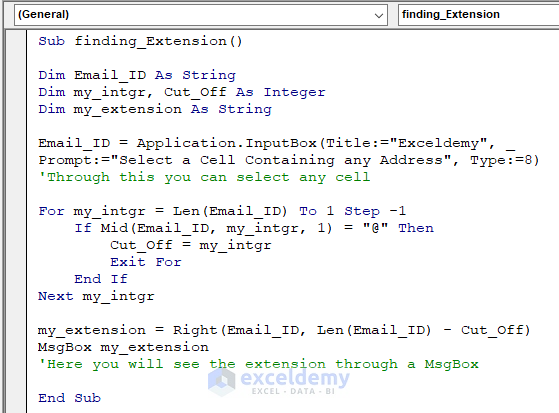
3. Finding Extension of Email Address from User Input Using For Loop with Step Backwards
If you want to separate some strings from a text then this example will be helpful for you. Here, as you can see in the video, you can find the extension of any mail address.
- Use the following code in a Module and check the result.
Sub finding_Extension()
Dim Email_ID As String
Dim my_intgr, Cut_Off As Integer
Dim my_extension As String
Email_ID = Application.InputBox(Title:="Exceldemy", _
Prompt:="Select a Cell Containing any Address", Type:=8)
'Through this you can select any cell
For my_intgr = Len(Email_ID) To 1 Step -1
    If Mid(Email_ID, my_intgr, 1) = "@" Then
        Cut_Off = my_intgr
        Exit For
    End If
Next my_intgr
my_extension = Right(Email_ID, Len(Email_ID) - Cut_Off)
MsgBox my_extension
'Here you will see the extension through a MsgBox
End Sub
🔎 Code Breakdown:
- There is an InputBox through which the user can select a cell from the worksheet and that cell’s value will assign to the Email_ID.
- The LEN function in VBA will return the total number of characters from Email_ID where the cell value is.
- The reverse For Next loop will check every string from the last of the text.
- In If-End If statement, the MID function will take each character and when the character is @ then the Cut_Off variable will consider that value. And the For Next loop will stop.
- Then with the help of VBA RIGHT and LEN functions, my_extension will keep the letters after @ sign.
- There is a MsgBox that will show the value of my_extension.
- To run the code, from Macros >> select the sub procedure named finding_Extension >> press Run.
Read More: Excel VBA: Running a Backwards For Loop
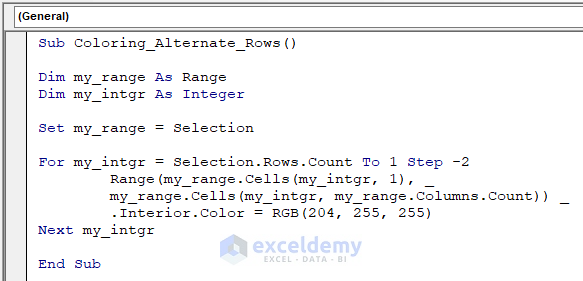
4. Using For Loop with Step Backwards to Color Alternate Rows
If you want to decorate your dataset by coloring alternate rows then you can use this code. With a simple VBA code, you can color the alternate rows with one click, no matter how large your dataset is.
- Now, write down the following code in a new Module.
Sub Coloring_Alternate_Rows()
Dim my_range As Range
Dim my_intgr As Integer
Set my_range = Selection
For my_intgr = Selection.Rows.Count To 1 Step -2
        Range(my_range.Cells(my_intgr, 1), _
        my_range.Cells(my_intgr, my_range.Columns.Count)) _
        .Interior.Color = RGB(204, 255, 255)
Next my_intgr
End Sub
🔎 Code Breakdown:
- Here the Selection property allows you to select a range.
- In For Next loop, Step -2 denotes the loop will run not only backward but also with 2 decrements. So, basically, the loop will go for every alternate row. For example, you take 8 rows then the loop run to the 8th,6th,4th, and 2nd rows.
- With Interior.Color property the alternate rows will be colored to RGB(204, 255, 255).
- RGB(204, 255, 255)—> 204 intensifying red, 255 for green, and 255 for blue. This will make a combination of the three colors.
- Lastly, select a range >> press the Run button to see the output. You have to keep in mind that without selection the code will not give the target result.
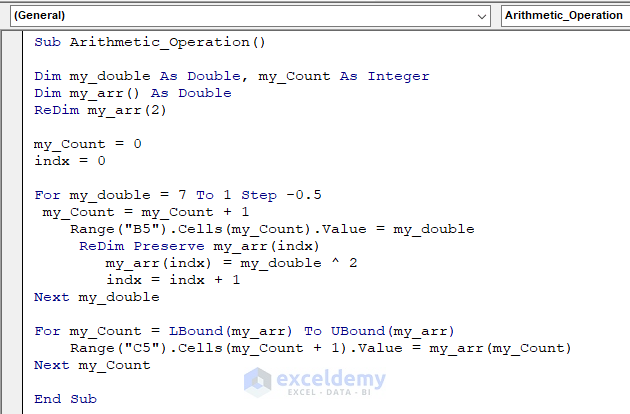
5. Using Non-Integer Step as For Loop Decrement to Find Square of Certain Numbers
Here I have found the squares of both some integer and non-integer numbers. So, you can find any power value for any type of number with this For Next loop.
- So, write the code in a new Module and check the result.
Sub Arithmetic_Operation()
Dim my_double As Double, my_Count As Integer
Dim my_arr() As Double
ReDim my_arr(2)
my_Count = 0
indx = 0
For my_double = 7 To 1 Step -0.5
 my_Count = my_Count + 1
    Range("B5").Cells(my_Count).Value = my_double
     ReDim Preserve my_arr(indx)
        my_arr(indx) = my_double ^ 2
        indx = indx + 1
Next my_double
For my_Count = LBound(my_arr) To UBound(my_arr)
    Range("C5").Cells(my_Count + 1).Value = my_arr(my_Count)
Next my_Count
End Sub
🔎 Code Breakdown:
- When you use non-integer numbers then you should use Double as the data type.
- Here, I’m going to declare an array for keeping the outputs.
- The For Next loop will go from 7 to 1 and the iteration will decrease by 0.5. So, I’m going to present the square values of 7, 6.5,6, 5.5….. up to 1.
- ReDim will resize the array. Additionally, I use ReDim Preserve to keep the old data intact.
- Here, I use another For Next loop to show the array in column C.
- Press the Run button to get the square values in the C column.
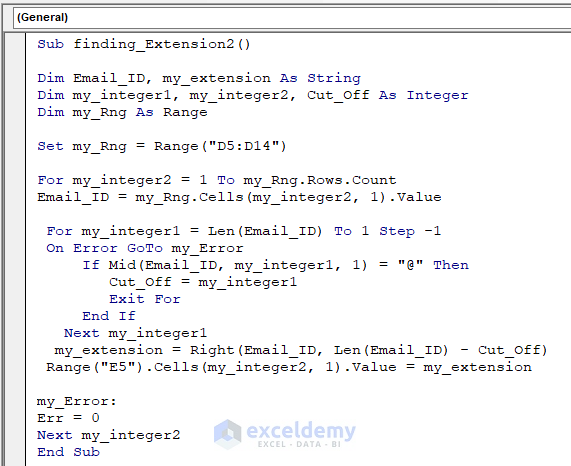
How to Exit a For Next Loop in Excel
Here, you are seeing the extensions of email addresses given to the D column. Actually, a similar example you have shown in example 3. But there you got the extension through MsgBox where I have used the Exit For statement. For Next loop is a continuous iteration process. But there is a way to stop this iteration which is the Exit For statement. Exit For means the For Next loop will not go to the next iteration, it is done.
- You can copy the following code and paste it into a new Module for your better understanding.
Sub finding_Extension2()
Dim Email_ID, my_extension As String
Dim my_integer1, my_integer2, Cut_Off As Integer
Dim my_Rng As Range
Set my_Rng = Range("D5:D14")
For my_integer2 = 1 To my_Rng.Rows.Count
Email_ID = my_Rng.Cells(my_integer2, 1).Value
 For my_integer1 = Len(Email_ID) To 1 Step -1
 On Error GoTo my_Error
     If Mid(Email_ID, my_integer1, 1) = "@" Then
        Cut_Off = my_integer1
        Exit For
     End If
   Next my_integer1
  my_extension = Right(Email_ID, Len(Email_ID) - Cut_Off)
 Range("E5").Cells(my_integer2, 1).Value = my_extension
my_Error:
Err = 0
Next my_integer2
End Sub
🔎 Code Breakdown:
- Here, I set the range D5:D14 in my_Rng.
- All the cell values of the mentioned range will assign to the variable named Email_ID one by one with For Next loop.
- Firstly, Email_ID will take the D5 cell value, [email protected].
- Then, the VBA LEN function will return 18 (the total number of characters from Email_ID).
- The reverse For Next loop will check every string from 18th no.
- In If-End If statement, the MID function will take each character and when the character is @ then the Cut_Off variable will consider that value. And the Exit For will stop the loop for further iteration.
- Here, I used Error handling as if there is any blank cell in the range then the code will not run. So, when it gets any blank cell then the code will jump to my_Error: section and assign 0 as the value to Err variable.
- Then with the help of VBA RIGHT and LEN functions, my_extension will keep the letters after @ sign which will return to the E5 cell. In this way, the loop will go to the next cell.
- Now Run the code and see the output.
Read More: Excel VBA: How to Exit a For Loop
How to Use For Each Loop in Excel VBA
Here, you can see how to highlight some cells which will fulfill a condition. Here, with this code, I will check in D5 to D16 cells which cells are empty.
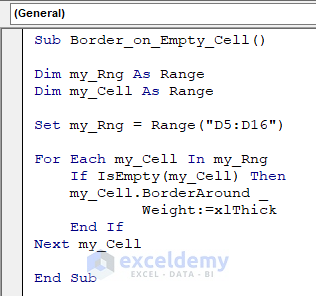
Sub Border_on_Empty_Cell()
Dim my_Rng As Range
Dim my_Cell As Range
Set my_Rng = Range("D5:D16")
For Each my_Cell In my_Rng
    If IsEmpty(my_Cell) Then
    my_Cell.BorderAround _
            Weight:=xlThick
    End If
Next my_Cell
End Sub
🔎 Code Breakdown:
- Here, I declare two variables my_Rng, my_Cell as Range.
- Then, set my_Rng with the range D5:D16 for the active sheet.
- I use a For Each loop to call each cell from the given range.
- If Not-End If statement implies that when the cell value is empty, the border weight of the cell will change to a thick one.
- Now from Macros >> choose sub procedure named Border_on_Empty_Cell >> press Run. And you will get the highlighted cells.
Frequently Asked Questions
- Can You Decrement in a For Loop in Excel VBA?
Yes, you can decrement in a For Next loop by using a Negative number in Step.
- How Do You Increment a For Loop in VBA?
By default in the For Next loop, the Step is 1. But you can use any other Positive number in Step to run the loop forward as per your requirement.
- Can For Loop Count Down in VBA?
Yes, if you write a code like the one below, then this will count down up to 200 numbers (you can re-write this number according to your necessity).
Sub Count_Down()
For my_Count = 1 To 200
Range("A1").Cells(my_Count, 1).Value = my_Count
Next my_Count
End Sub
If you want to count down column-wise then you can use the following line
Range("A1").Cells(1, my_Count).Value = my_Count💬 Things to Remember
- If there is a blank cell used in For Next loop then you may face some errors. In that case, you should use Error Handling.
- The For Next loop won’t stop automatically till the last iteration. You must use Exit For if you want to stop the loop based on any condition.
Practice Section
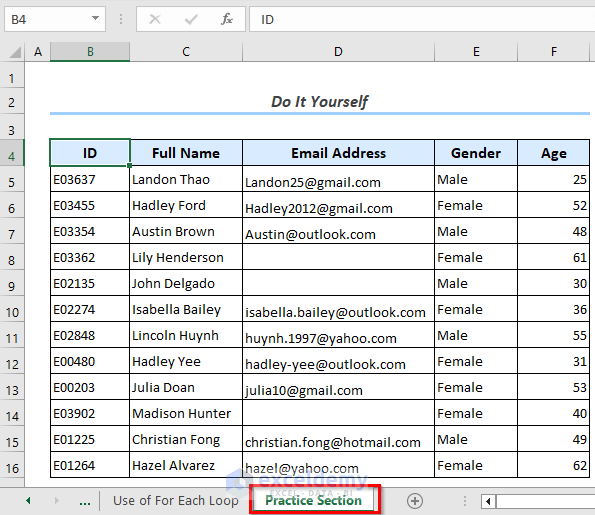
Now you can practice by yourself and learn how to use For Loop Decrement in Excel.
Download Practice Workbook
You can download the practice workbook from here:
Conclusion
Here, I have tried to explain how to use Excel VBA with For Loop Decrement. Hopefully, you can understand the examples. I tried to keep the examples simple. If you get the usages of these For Loop Decrements, then you can implement them to solve the complex one.
Please, drop comments, suggestions, or queries if you have any in the comment section below.
Related Articles
- Excel VBA to Use For Loop with Two Variables
- How to Use Excel VBA Nested For Loop
- How to Continue Excel VBA For Loop
- Excel VBA: For Loop Skip to Next Iteration

