Networking equipment such as switches, routers, wireless, etc. is well-known in the technology industry. To promote the product, companies may often require to make a catalogue. So, in this article, we are going to discuss how to create a networking catalogue in Excel.
How to Create a Networking Catalogue in Excel: with Easy Steps
Before we make a catalogue in Excel, we need to set up and place the outline of that catalog. Let’s assume we have a dataset, namely “Networking Catalogue for ABC Limited”. Here the dataset has five columns with eight rows. We will recreate the images as attached below.

Here, we have used the Microsoft Excel 365 version; you may use any other version according to your convenience.
Step 01: Give a Suitable Title to the Catalogue
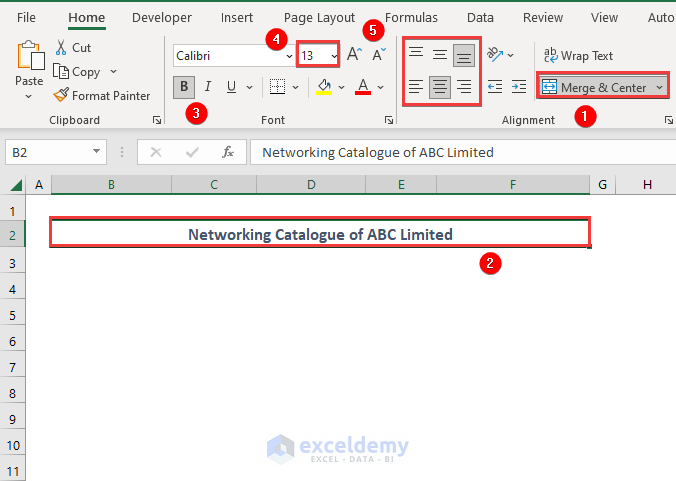
First thing first, we will start our process by creating an appropriate title for our catalogue. Here we have chosen “Networking Catalogue of ABC Limited” as our catalogue title. Though you can choose anything which seems appropriate to you.
- After writing the title name, select the adequate range of cells (B2:F2 for instance) to accommodate your title.
- Then click on Merge & Center feature and Select the Bold option (B) from Font Ribbon.
- Select the appropriate Font (Calibri in our case) and then change the Font Size to 13. Next, make your title in the Bottom and Centeralignment as in the image depicted below. It is worth mentioning that, those are subjective values, you may use any of the combinations on the basis of our work type or maintain a specific guideline if your work has any.
Step 02: Create a Basic Outline
In Microsoft Excel, you can create an outline to segment and present your data more effectively. So we will now create a basic outline prior to entering our networking catalogue data. For your better understanding, we have added a GIF to demonstrate the process. Anyway, you can create your own outline according to your preference.

Step 03: Write the Product Information
Apart from marketing and advertising the product, a networking catalogue also helps its user to track the record of the product. For example, a seller wants to know how many networking items he has in his product inventory. Using a catalogue surely benefits him if he wants to avoid random searching in his warehouse. Thus it will increase work efficiency and ensure the best utilization of available resources. To avail of these opportunities, you have to list all of your product-related information in the created table. So now we will write the product information in our Excel sheet.
- See the image attached below. Here, we list the product name and use Wrap Text to avoid the overlapping of the text on nearby cells.

- Then write the product id of the equipment as shown below.

- To write the product type of our networking catalouge, we will now incorporate a drop-down list within the column.
- First, select D5:D11 in which we would like to create a drop-down list.

- Then select Data > Data Validation from your Ribbon.

- Subsequently, a dialog box will appear. Now select Settings tab > choose List from the drop-down options of Allow.
- Then click on the Upwards arrow.

- Thus, an additional Data Validation box will pop up.
- Now type your list of data in this box. Switch, Router, Wireless, Server, IP Phone, Accessories for instance.

- Afterward, press OK.

- Now, to list your product type column, click on the down arrow icon and select the respective product type name in the corresponding row.

- After inputting our data, see the output below.

- So far, so good. Now, we will type the corresponding price of the equipment. See the attachment given below.
- Now, to add a Dollar sign ($), click on the down-head arrow from the Number.
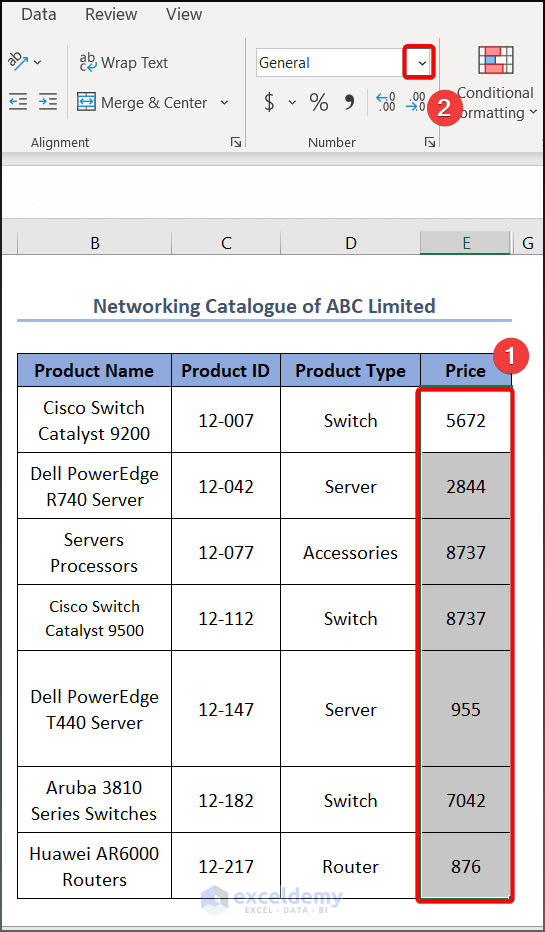
- Select the Currency option afterward.

- See the output as given below.
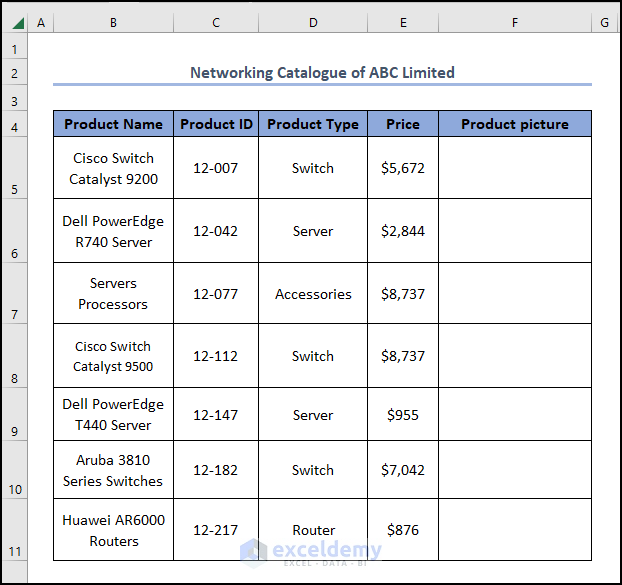
- You still lag behind in adding the images to our networking catalogue.
- After selecting the intended cell, go to Insert > Pictures > This device.

- Find the picture from your storage and click on Insert simultaneously.
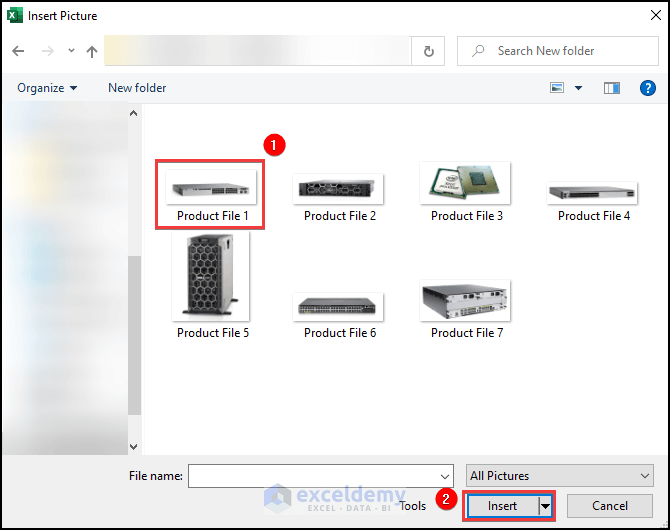
- See the output as given below.
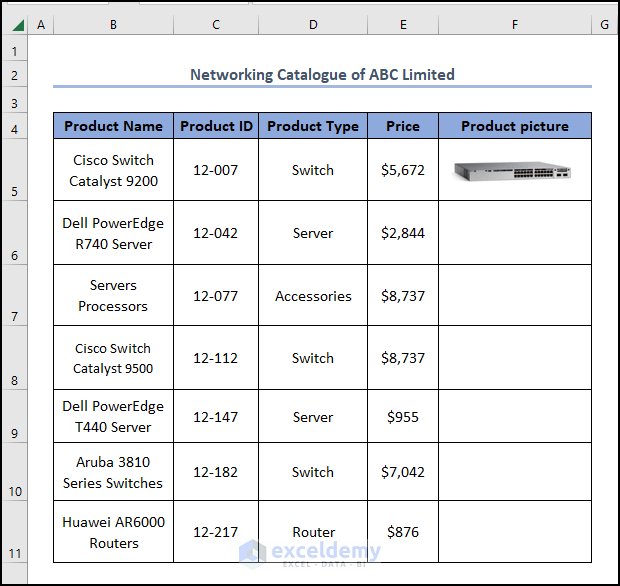
- Follow the same process to attach the rest of the image as shown below.

Read More: How to Create Product Catalogue in Excel
Things to Remember
- Keep in mind while attaching the image in your Excel sheet, unlike the text data the attached image won’t embed within the specific cell. Thus you may need to move it to the appropriate position to fit the image within the specific row.
Practice Section
We have provided a Practice section on the right side of each sheet so you can practice yourself. Please make sure to do it yourself.
Download Practice Workbook
You can download and practice the dataset that we have used to prepare this article.
Conclusion
In this article, we have discussed how to create a networking catalogue in Excel. We think it is necessary knowledge to promote your product to your customers. However, If you have any queries, feel free to comment below, and we will get back to you soon.
Related Articles
<< Go Back To Catalogue in Excel | Hyperlink in Excel | Linking in Excel | Learn Excel
Get FREE Advanced Excel Exercises with Solutions!
