In this article, we will show you how you can perform custom scaling in Excel to control the print area. When it comes to printing an Excel spreadsheet, many face this problem of proper scaling. Especially, for a large dataset that contains many columns or rows, it is difficult for the users to print the entire worksheet in one page.
Perform Custom Scaling in Excel: 3 Easy Ways
There are many ways we can scale the print area in Excel. This article will show some simple and quick methods for custom scaling in Excel.
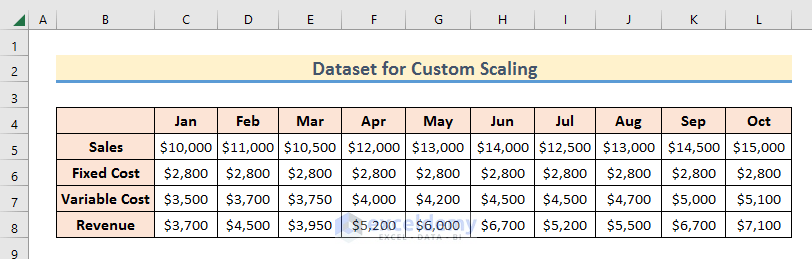
For that, we have taken a dataset that contains accounting data of a company. The records are taken from January to October and are too large to be printed in a single page.
So, let’s see how we can print it in a single page.
1. Using Custom Scaling Feature
Excel has the Custom Scaling feature for printing which can help us to print all the data in one page. Let’s have a look at the description below.
Steps:
- Go to File >> Print option.
- You can see the No Scaling option and all the columns don’t show up in the print section and there are two printable pages.

- Now, click on the Extension arrow and select the Custom Scaling Options.

- This Page Setup window will open.
- Now, select Fit to: and set page(s) wide by and tall boxes to 1.
- And press OK.
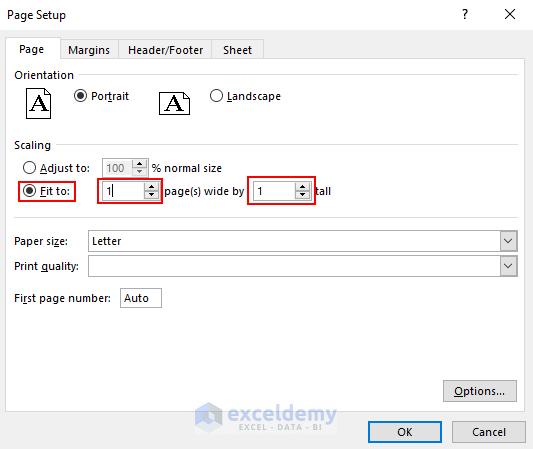 Thereby, the print area will cover the whole dataset.

Read More: How to Use Scaling Option in Excel
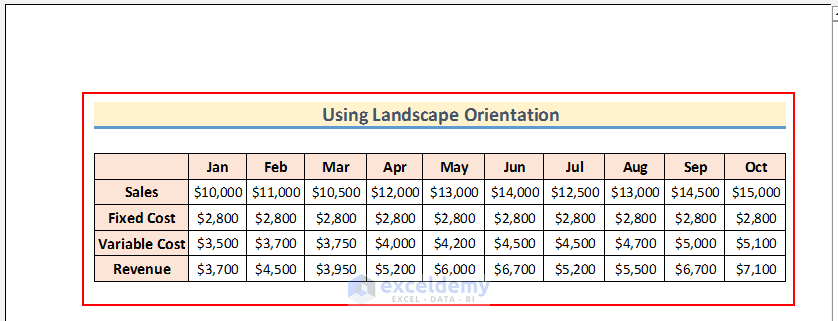
2. Switching to Landscape Orientation for Custom Scaling
Excel has two types of orientations: Portrait and Landscape Orientation. When the dataset has too many columns, the Landscape Orientation can be useful for printing the whole dataset in a single page.
Steps:
- Go to the Page Layout ribbon and Select the Landscape mode from the Orientation section.

- Now, go to File >> Print option to check the print area.
- And, you can see all the data table will be covered in the print area.
Read More: [Solved!] Excel Scaling Issues
3. Manually Selecting the Print Area for Custom Scaling
You can also manually scale the print area. This method is particularly useful when you want to print out a section of a spreadsheet.
Steps:
- First, select the dataset portion that you want to print.
- Then, go to the Page Layout ribbon and click on Set Print Area from the Print Area option.

- Now to check the print area, go to File >> Print option.
- You can see your selected area is shown in the print area.

How to Scale Print Area by Default Commands in Excel
There are some default commands in Excel that enable the user to print the workbook in a single page. Let’s see the application of these commands.
Applying Fit Sheet on One Page Feature
This feature sets the whole dataset in a single printable page.
Steps:
- First, go to the File >> Print option.
- Then, scroll down the Setting box and select Fit Sheet on One Page option.

- Thereby, your whole dataset will appear in the print area.

Read More: How to Print and Fit to One Page in Excel
Download Practice Workbook
You can Download and practice this workbook.
Conclusion
Thank you for reaching this far. Now you know how to perform custom scaling in Excel. Hope you find the content of this article useful. If there are further queries or suggestions regarding the content of this article, feel free to leave them in the comment section.
<< Go Back to Print Scale | Page Setup | Print in Excel | Learn Excel
Get FREE Advanced Excel Exercises with Solutions!
