Oftentimes, our Excel worksheets contain numerous columns which can throw a curveball when trying to print the spreadsheet on a single page. Fear not! Because help has arrived! In this article, we’ll explore all the nitty-gritty of how to use scaling option in Excel.
Importance of Using Scaling Option in Excel
First and foremost, let’s get ourselves up to speed on the significance of the Scaling option in Excel. In a nutshell, the Scaling option enables us to fit numerous columns by lowering the worksheet size, thus achieving an optimum fit. Hence, it avoids splitting the spreadsheet into multiple pages.
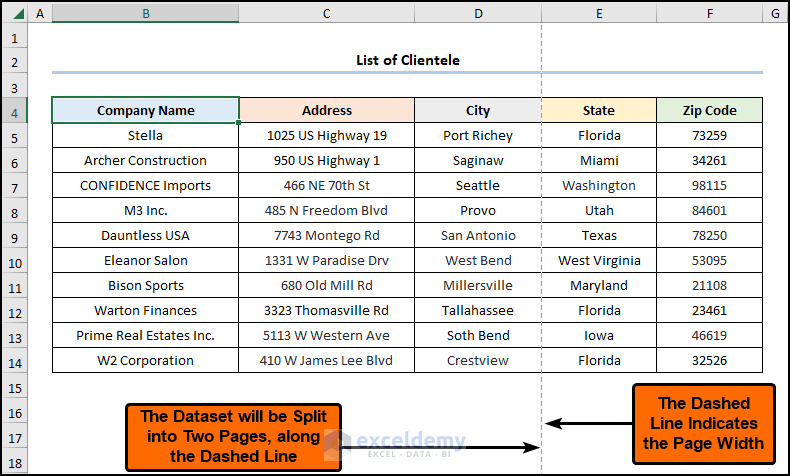
For instance, the screenshot above illustrates how the dataset spans across two pages when there are lots of columns in the worksheet.
How to Use Scaling Option in Excel: 4 Ways
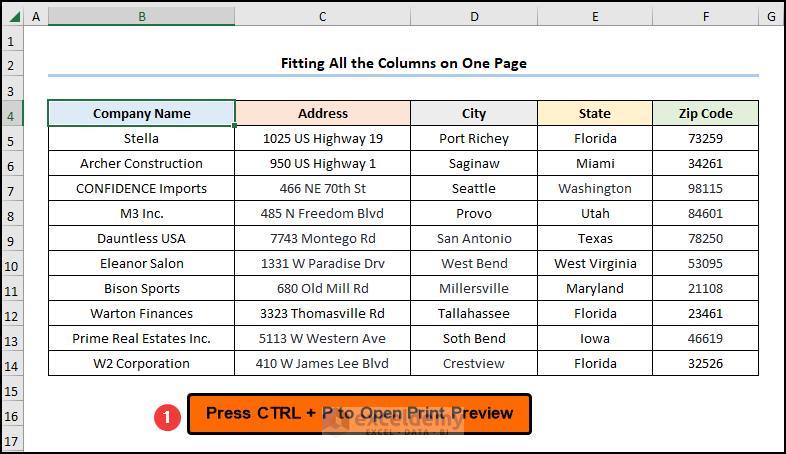
At this time, let’s suppose the List of Clientele dataset in the B4:F14 cells containing the “Company Name”, “Address”, “City”, “State”, and “Zip Code” columns respectively. Here, we want to use the Scale option in Excel so that all the columns in the dataset fit on a single page. Therefore, let’s see each method individually and with the appropriate illustrations.

Here, we have used the Microsoft Excel 365 version; you may use any other version according to your convenience.
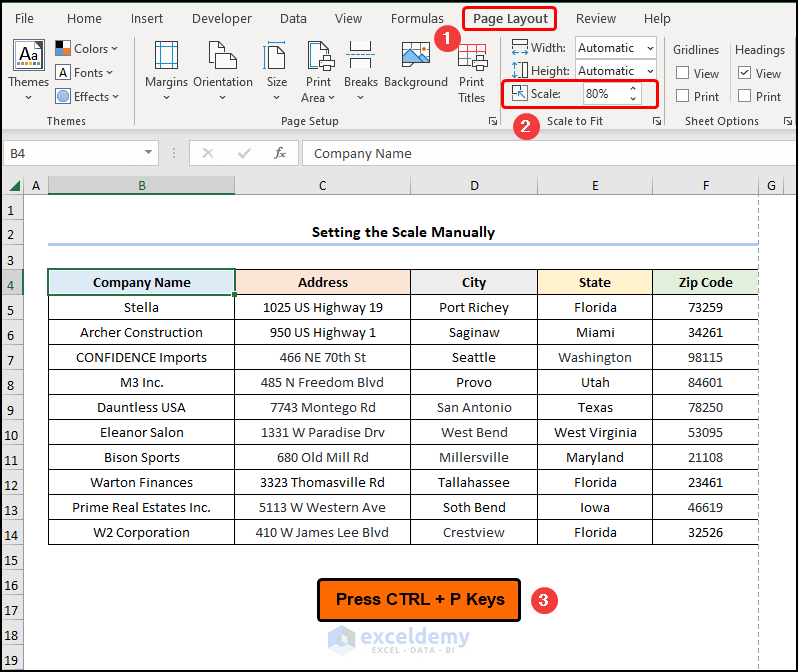
1. Set Scale Manually
First of all, let’s start with a simple way to scale a worksheet in Excel which involves manually entering the scale percentage.
📌 Steps:
- Initially, go to the Page Layout tab >> click the spin button to decrease the Scale percentage, here it is “80%” >> hit the CTRL + P keys to move to the Print Preview window.
📃 Note: Please try keeping the Scale percentage within 65%, otherwise it becomes difficult to read the data.
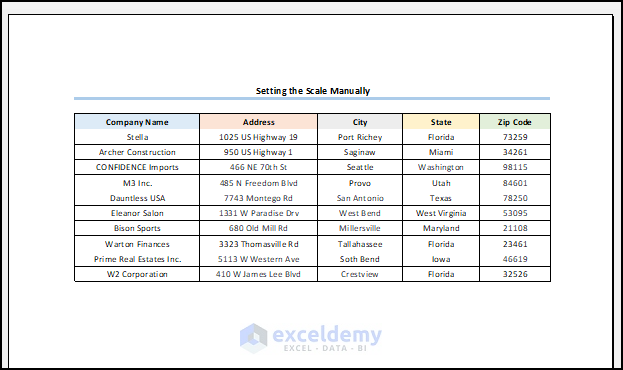
Voila! That is how simple it is to fit multiple columns into a single page.
Read More: How to Perform Custom Scaling in Excel
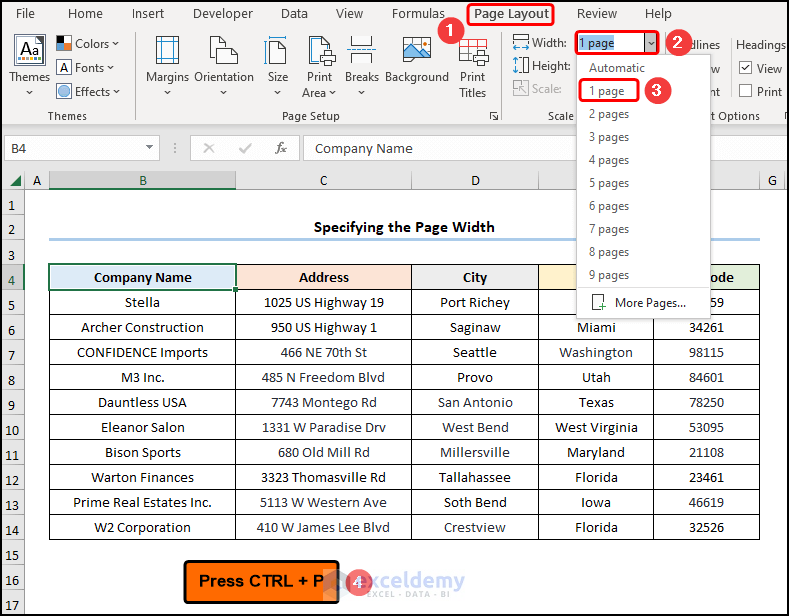
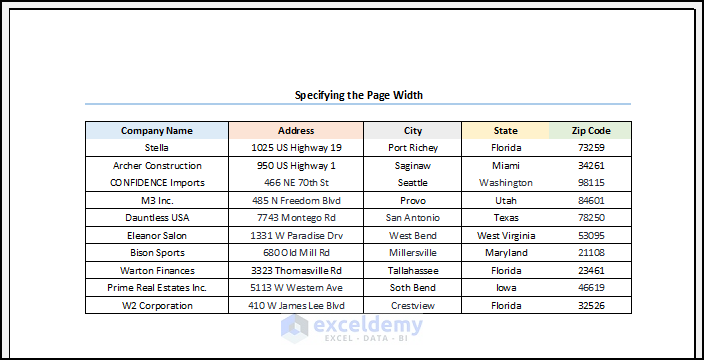
2. Specify Page Width
In truth, the previous method is simple, however, it takes a couple of attempts to make sure the correct Scale has been chosen. Now, what if there was an even simpler method? So, follow along.
📌 Steps:
- In the first place, navigate to Page Layout >> click the Width drop-down >> choose 1 page option >> click CTRL + P to open Print Preview.
Boom! Excel scales the dataset to fit within one page.
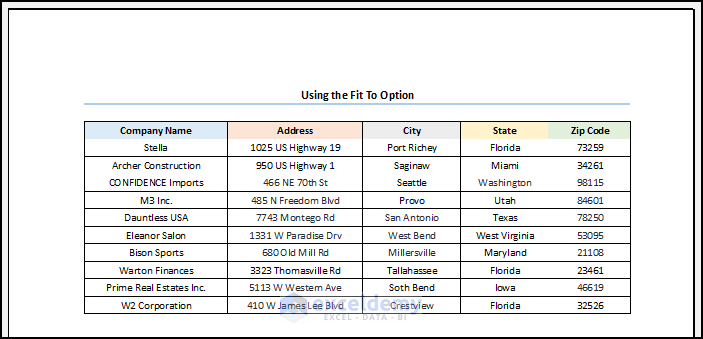
3. Utilize Fit to Option
For one thing, we can specify the width and height in which we want to print the worksheet with the help of the Fit to option. Hence, let’s see it in action.
📌 Steps:
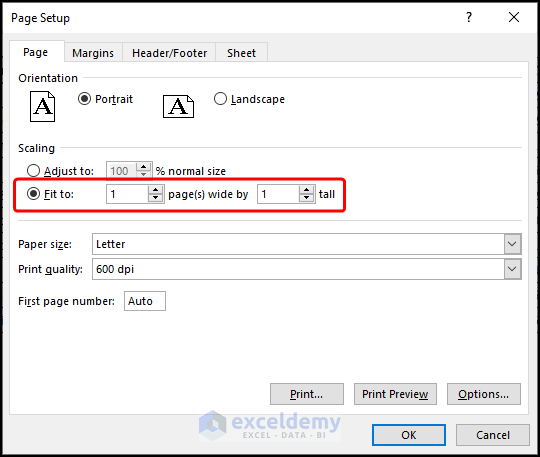
- First, jump to the Page Layout tab >> click the dialog box launcher or quickly press the ALT + P keys, followed by the S key and then the P key.
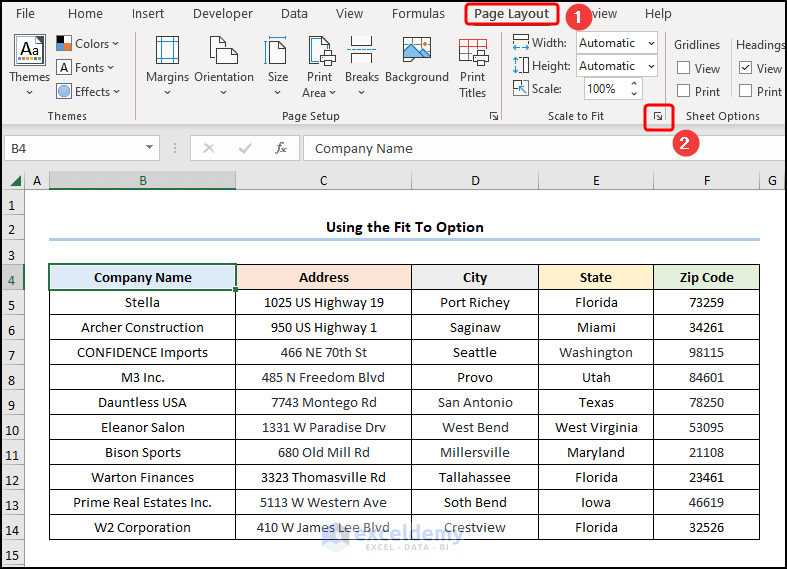
- Second, proceed to the Page tab >> check the Fit to radio button >> use the spin button to select “1 page(s) wide by 1 page tall” >> select Print Preview.
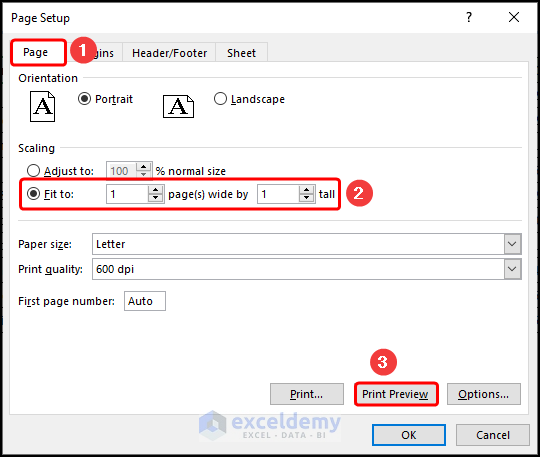
Finally, the results should resemble the image shown below.
Read More: [Solved!] Excel Scaling Issues
4. Fit All the Columns on One Page
Furthermore, our last method needs no further introduction since the title befittingly describes the resulting output 😀, henceforth let’s go through the steps.
📌 Steps:
- At the very beginning, press the CTRL + P keys to launch the Print wizard.
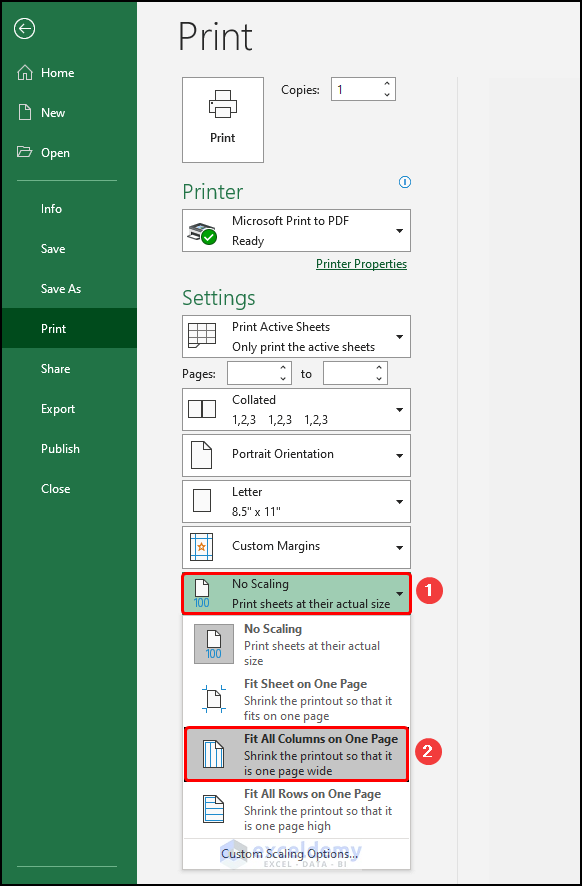
- Not long after, click the No Scaling drop-down >> choose the Fitting All the Columns on One Page option.
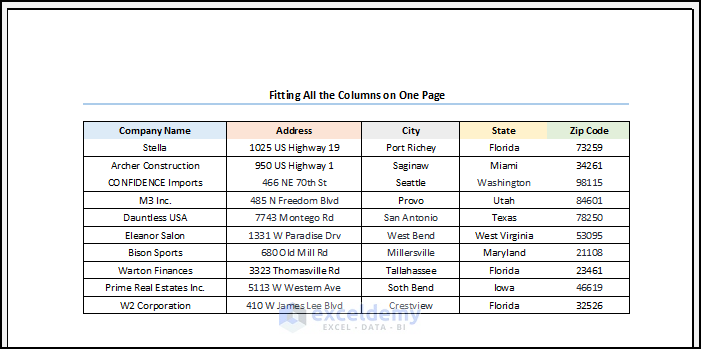
Eventually, the final output should look like the picture shown below.
Read More: How to Print and Fit to One Page in Excel
Things to Remember
Last but not least, here are a few things to consider when using the Scale option in Excel.
- First, if we need to enable the Freeze Pane option, then we have to use the Fit to option in the Page Layout tab.
- Second, when using the Fit to option Excel does not enlarge the data to fill up the page and disregards any manual page breaks.
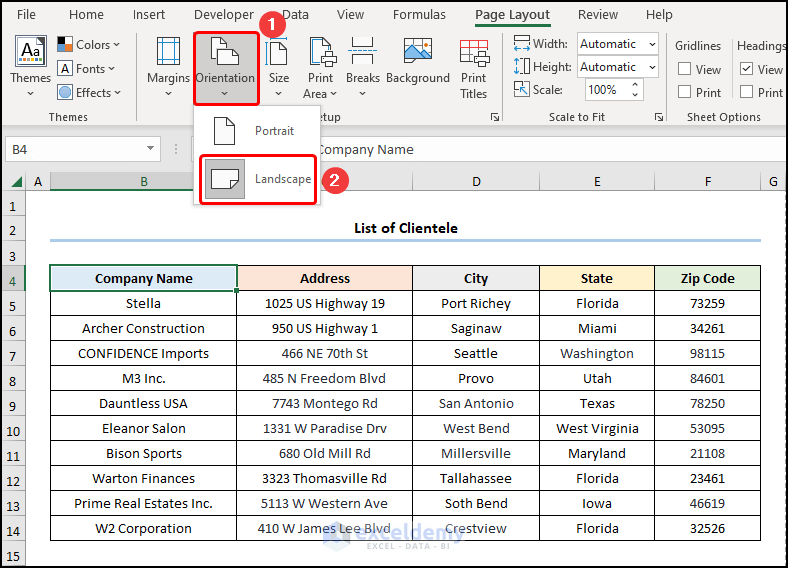
- Third, if our worksheet consists of lots of columns then we can change the Page Orientation to Landscape.
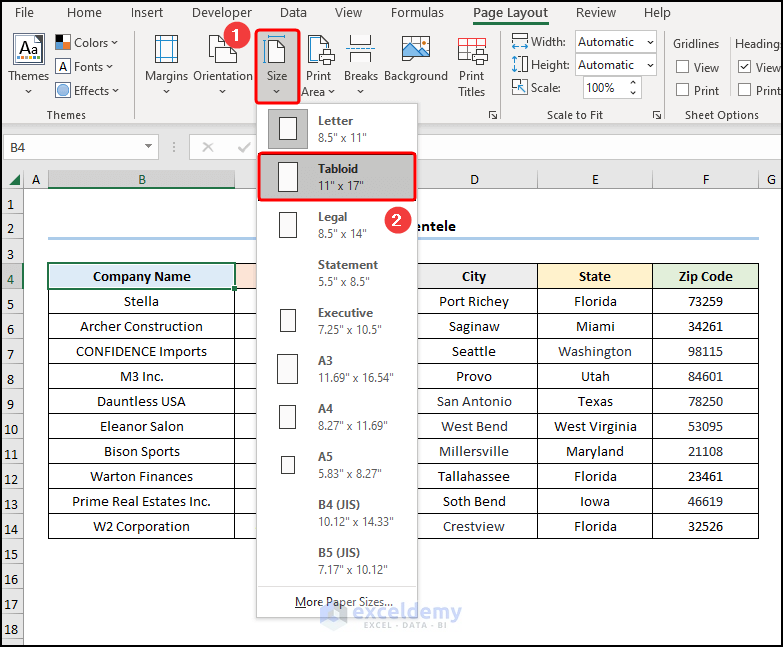
- Fourth, to accommodate lots of columns we may choose a larger Paper Size.
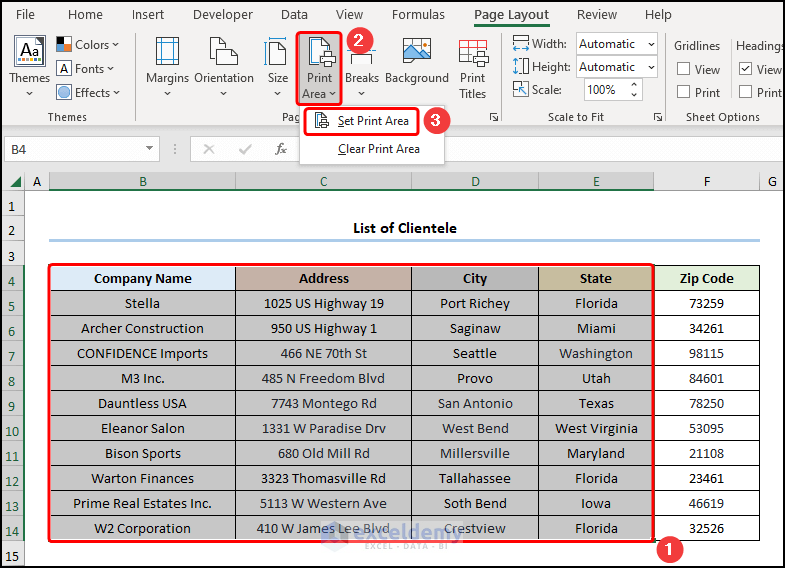
- Moreover, we can consider the Print Area option to eliminate unnecessary columns.
- Lastly, remove the Scaling option by selecting the No Scaling option.

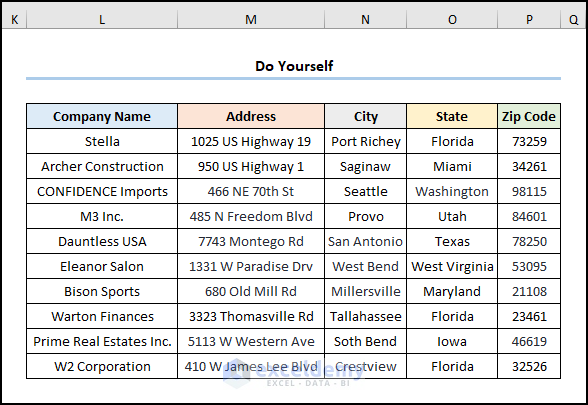
Practice Section
We have provided a Practice section on the right side of the first sheet so you can practice yourself. Please make sure to do it by yourself.
Download Practice Workbook
Conclusion
To sum up, this tutorial provides helpful knowledge on how to use scaling option in Excel. Now, we recommend you apply all this know-how in the practice dataset by downloading the practice workbook. In addition, feel free to comment and provide your valuable feedback.
<< Go Back to Print Scale | Page Setup | Print in Excel | Learn Excel
Get FREE Advanced Excel Exercises with Solutions!
