Excel is the most widely used tool for dealing with huge datasets. We can perform myriads of tasks of multiple dimensions in Excel. Sometimes, we need to arrange the dataset to look visually appealing. In this article, I will discuss 3 easy methods on how to change orientation in Excel from horizontal to vertical.
How to Change Orientation from Horizontal to Vertical in Excel: 3 Easy Ways
This is the dataset for today’s article. I have some salesperson and their sales amounts for some months. I will change the orientation

1. Use Paste Special Feature to Change Orientation
First of all, I will discuss the method where I will use the Paste Special Feature.
- Press CTRL+C to copy B4:E7.

- Then right-click your mouse to bring the context menu. Select Paste Special.

- Paste Special window will appear. Check the Transpose

- Excel will change the orientation from horizontal to vertical. After some formatting, your final output will be like this.

Read More: Difference Between Alignment and Orientation in Excel
2. Apply TRANSPOSE Function to Change Orientation from Horizontal to Vertical
Now I will show how to use the TRANSPOSE function.
Steps:
- Select B9:E12. Then write down the following formula
=TRANSPOSE(B4:E7)
- Press CTRL+SHIFT+ENTER. Excel will change the orientation.

- Format as per your wish. Your output will be like this.

3. Perform Find & Replace Feature to Change Orientation from Horizontal to Vertical
Here, I will demonstrate another method that will use the Find & Replace feature to change the orientation of the dataset.
Steps:
- Copy B4:E7 and bring the Paste Special Feature following method-1. Then, select Paste Link.
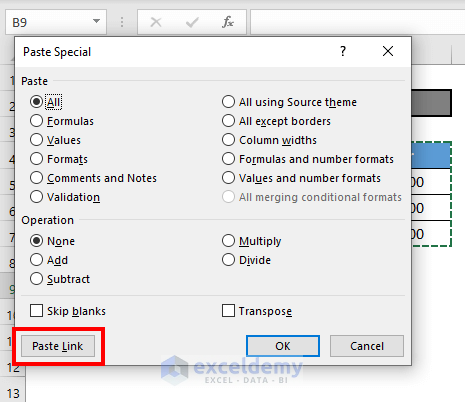
- Excel will simply paste the values.

- Then press CTRL+F to bring the Find and Replace Replace = with xy.

- Excel will replace the values accordingly.

- Then transpose B9:E12 following method-1.

- Again call the Find and Replace command and replace xy with =.

- Excel will change the orientation. After some formatting, your output will be like this.

Read More: How to Change Text Orientation in Excel
Things to Remember
- TRANSPOSE function is an array function. So you have to select CTRL+SHIFT+ENTER.
- If your original dataset is a m*n matrix, you have to select n*m matrix and then apply the TRANSPOSE function.
Download Practice Workbook
Conclusion
In this article, I have demonstrated 3 effective methods of changing orientation in Excel from horizontal to vertical. I hope it helps everyone. If you have any suggestions, ideas, or feedback, please feel free to comment below.
Related Articles
- How to rotate text 180 degrees in Excel
- How to Write Vertically in Excel
- How to Change Orientation of Text to 22 Degrees in Excel
- How to Mirror Text in Excel
<< Go Back to Rotate Text | Text Formatting | Learn Excel
Get FREE Advanced Excel Exercises with Solutions!
