Excel is a powerful tool for working with data, and one of the most common tasks is working with dates. In Excel, dates can be entered in a variety of formats, but the most common is the short date format. In this article, we will discuss four different methods to use short date number format in Excel.
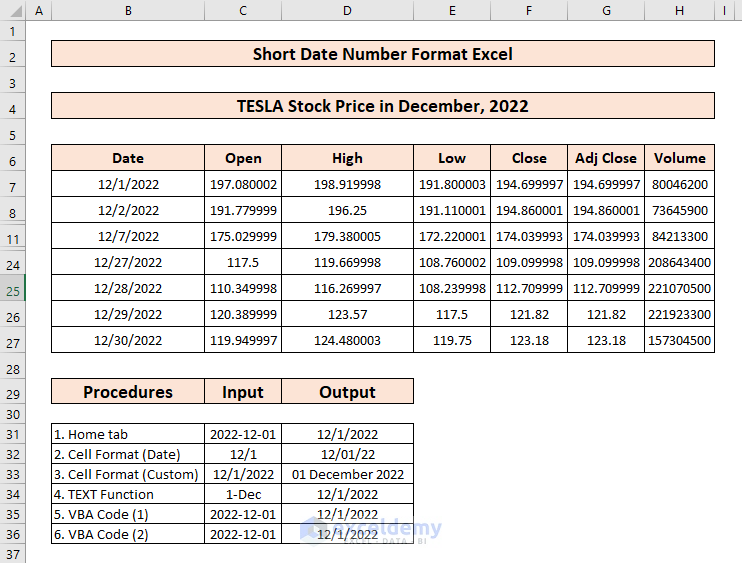
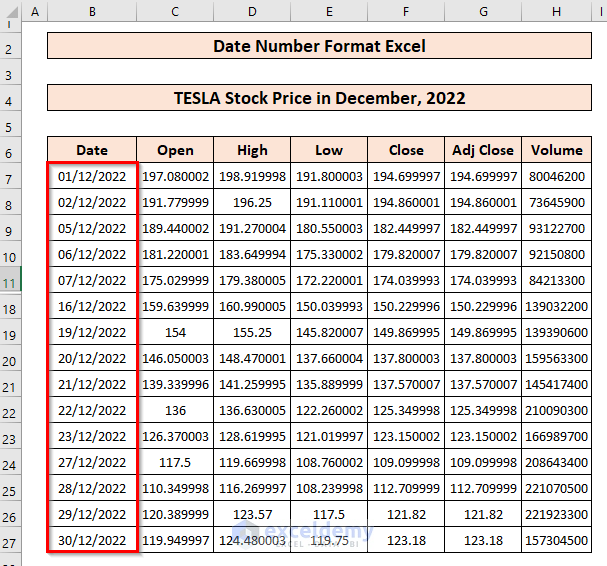
We have a sample dataset, where different types of data such as, stock opening price, closing price, adjusted closing price, and volume of a company are listed against some random dates of December, 2022.
Before starting the article, let’s have an overview of the final output you are going to get.
How to Change Default Date Format in Excel
The first thing to understand is that Excel stores date as numbers, with the number 1 representing January 1st, 1900. An additional number represents each day, so January 2nd, 1900 is represented by the number 2, and so on. This means that when you enter a date into Excel, it is actually stored as a number.
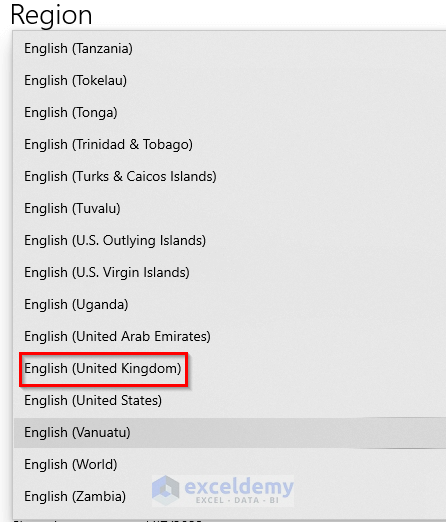
Now, let’s get to know how to change the default date format if necessary. Let’s take a dataset named TESLA Stock Price in December 2022. Generally, the default date format in excel remains as mm/dd/yyyy. But, if we want to change that default format, we need to follow these steps:
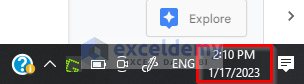
1. Go to the bottom right corner of your computer screen. And right-click upon the clock.
2. From the drop-up bar, select the Adjust date/time A new window will pop-up.

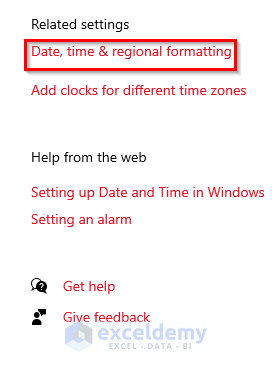
3. Then select the Date, time & regional formatting.
4. Afterward, you can do two things. Either You can go to the Regional format option and change the regional format from the drop-down menu or you can select the change data formats option and change the format from there (limited options).
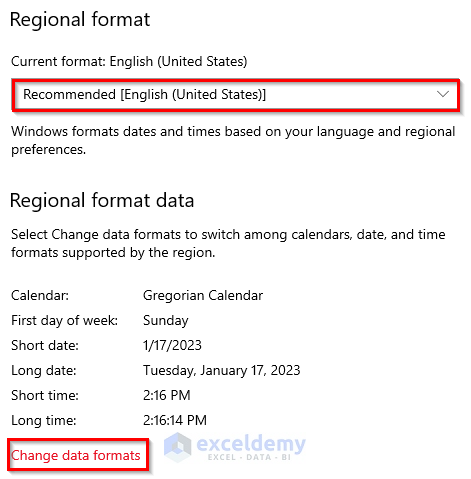
5. Now, change the format.
6. Return to your Excel file. You will see that the previous short-date format inside your worksheet has a new default format.
How to Manipulate Short Date Number Format in Excel: 6 Methods
We are taking the aforementioned dataset to demonstrate the 6 methods below. You can use any dataset suitable for you.

1. Return to Short Date Format Using Home Tab
This is the simplest method of all. The Home Tab is located inside the default ribbon.
Steps:
- Firstly, select the cells from B7 to B27 & click on Home>Number (Drop down)
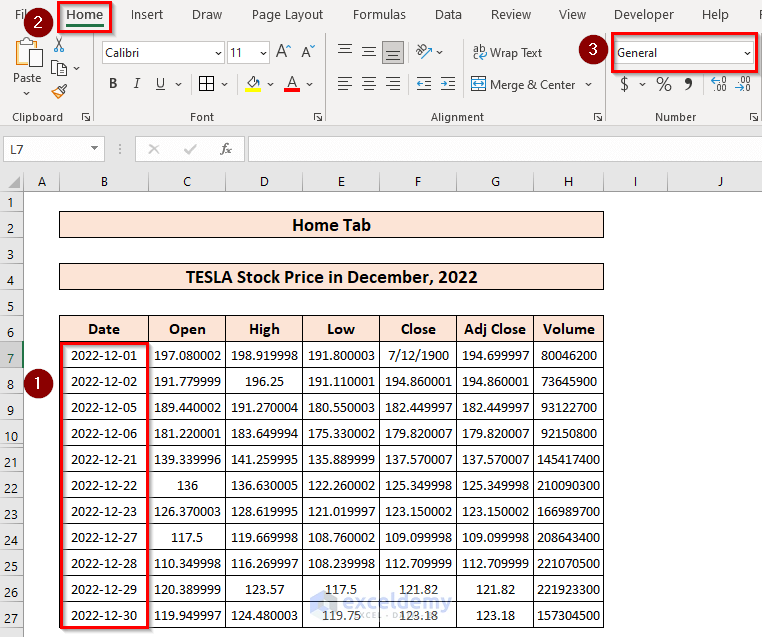
- Then select Short Date & the date format is changed.
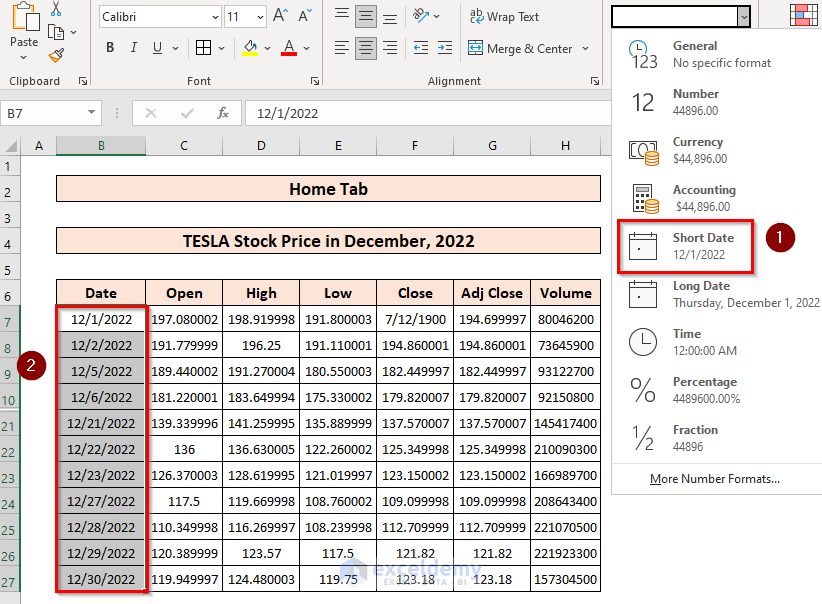
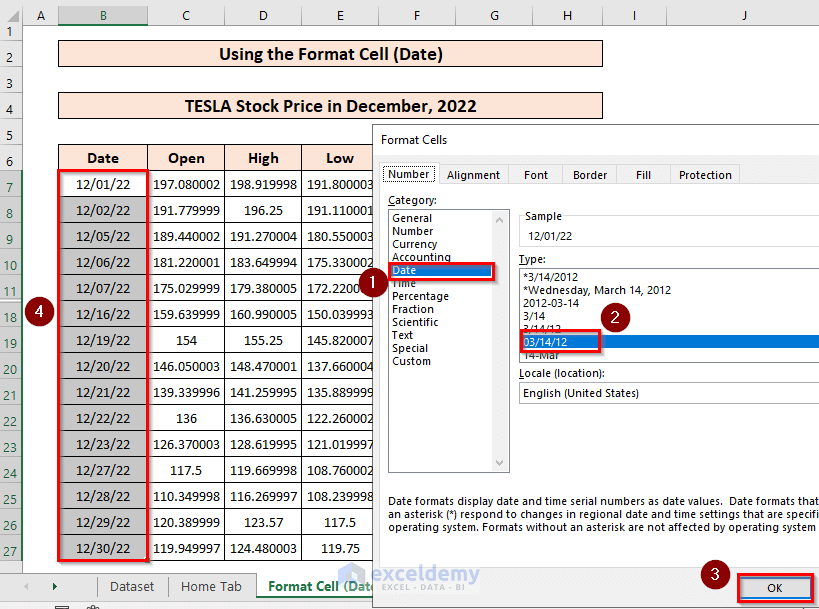
2. Return to a Different Short Date Format Using Format Cells
In this method, we are going to use the Format Cells option to convert the dates into our desired short date format.
Steps:
- Firstly, select the cells from B7 to B27, right-click on them & select Format Cells…

- A new prompt will be opened. From there, select Date>03/14/12 (any Type)>OK. And the format will be changed successfully.
Read More: How to Convert a Date to dd/mm/yyyy hh:mm:ss Format in Excel
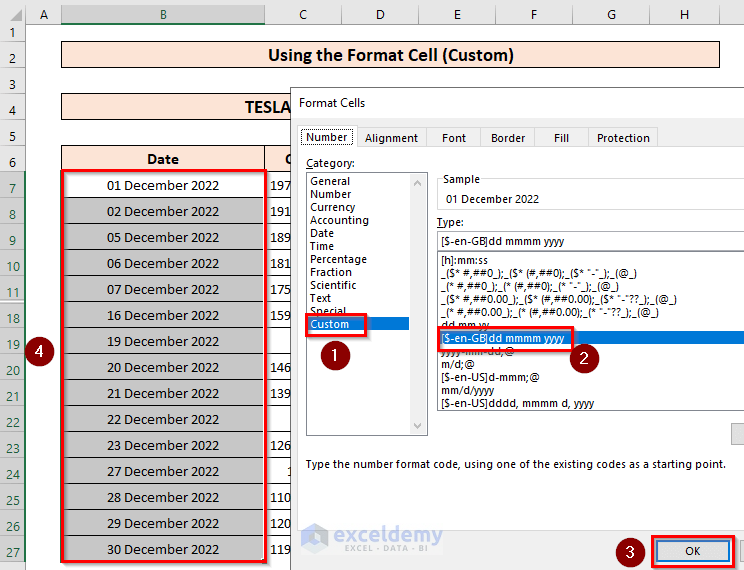
3. Short Date Format Using Format Cells (Custom)
This method is almost the same as the previous one. Here, some unconventional methods are available for use.
Steps:
- Firstly, select the cells from B7 to B27, right-click on them & select Format Cells… (Same as the first step of the previous method)
- A new prompt will be opened. From there, select Custom>($-en-GB)dd/mmmm/yyyy(any Type)>OK. And a new format will appear.
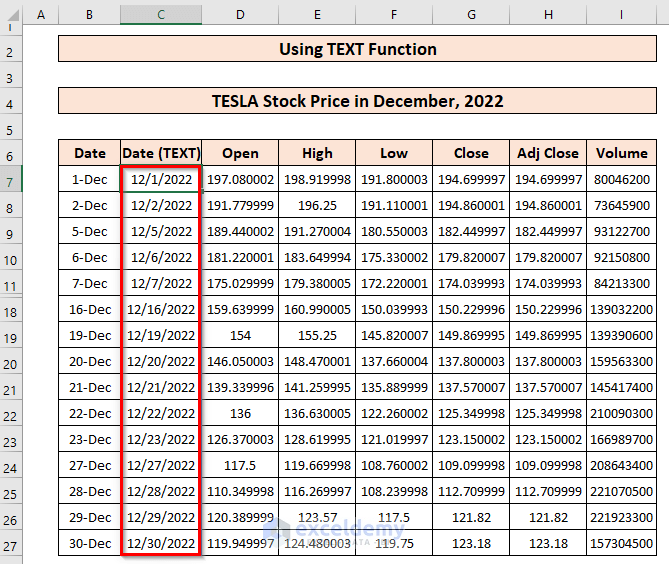
4. Using TEXT Function to Define a Short Date
In the case of this method, we are going to use an Excel function named TEXT in a different column beside the primary date column to format the date according to our needs.
Steps:
- To begin, go to cell C7 and type the following formula:
=TEXT(B7:B27,”mm/d/yyyy”)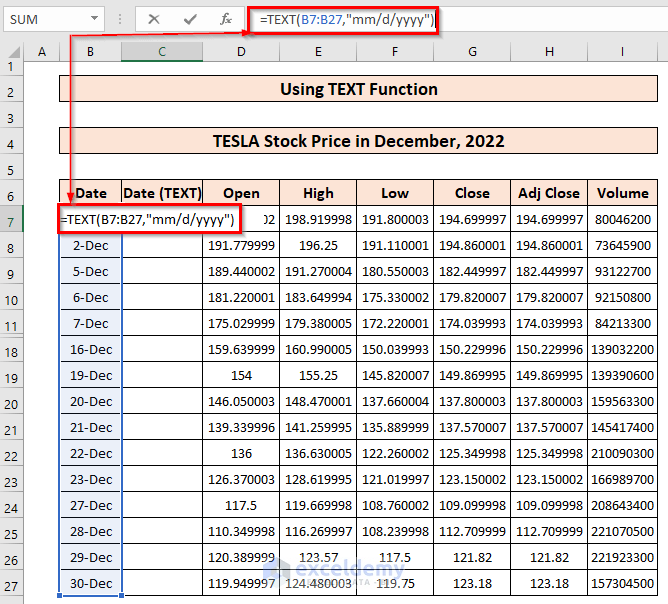
- After that, press ENTER. And all the cells ranging C7:C27 will consist of the same date as B7:B27 but in a different format.
5. Using a VBA Code to Change Short Date Format
At this point, we are going to generate a simple VBA code to manipulate the present date format according to our demands.
Steps:
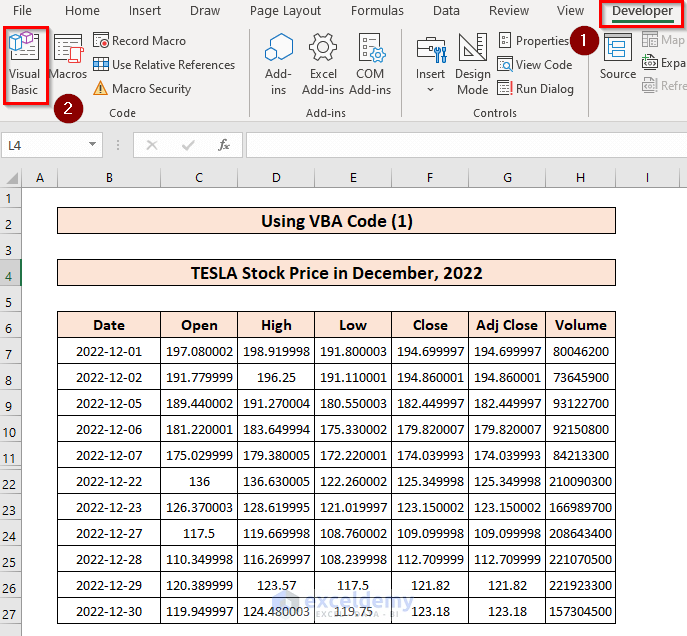
- To start this method, click on Visual Basic under the Developer tab. (If you have not used this tab before, it may not be inside the title bar at first. You have to add it manually. Here is the procedure for how to add the developer tab in the title bar.
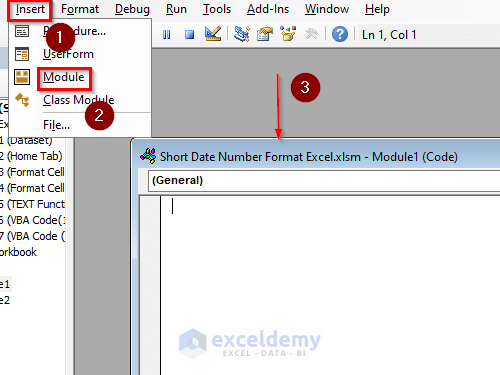
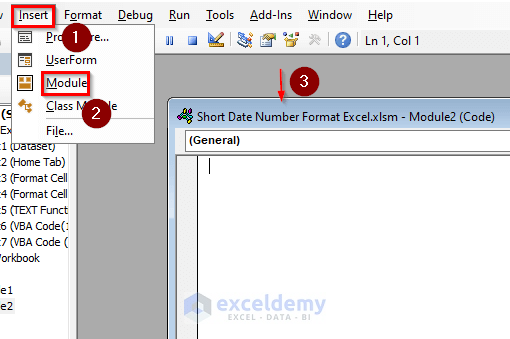
- Next, go to the Insert tab, and from the drop-down menu select Module. A new module will be available for writing the code.
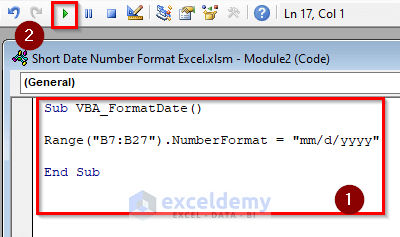
- Afterward, start writing the code. When the coding is complete, click on the play button to run the code.
Code
Sub VBA_FormatDate()

Range("B7:B27").NumberFormat = "mm/d/yyyy"

End Sub
Code Break Down:
After declaring the subheading, the range of cells from B7 to B27 is set for a definite number format. Which is: “mm/d/yyyy”. It means, the first two digits will be months, second one or two (if necessary) digit(s) will be date. And the last four digits will be year.
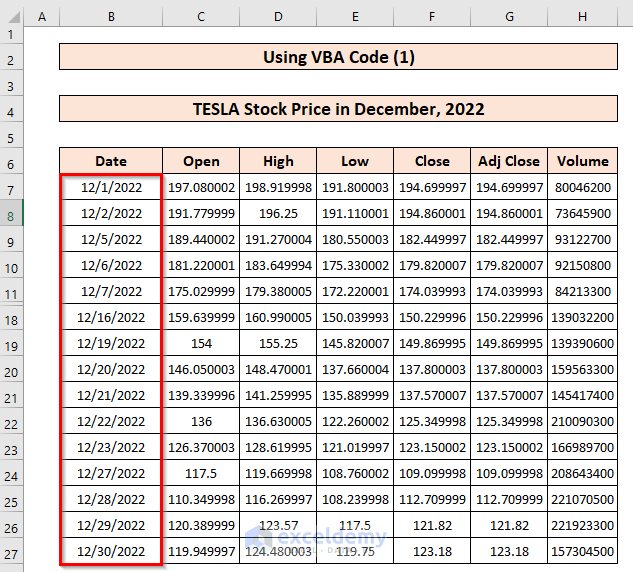
- Finally, return to the excel worksheet window and observe that the date format is changed accordingly.
6. Using Another VBA Code to Change Short Date Format
At the end of this article, we are going to generate another VBA code to carry out the same function as before.
Steps:
- Same as before, click on Visual Basic under the Developer tab.

- Like before, go to the Insert tab, and from the drop-down menu select Module. A new module will be available for writing the code.
- Then as before, start writing the code. When the coding is complete, click on the play button to run the code.
Code
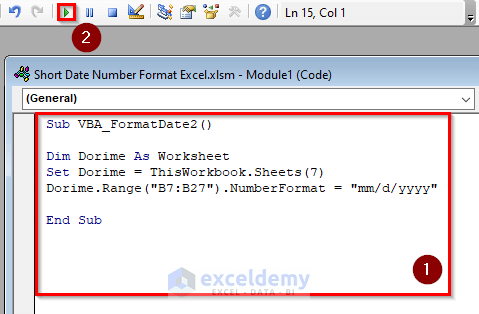
Sub VBA_FormatDate2()

Dim Dorime As Worksheet

Set Dorime = ThisWorkbook.Sheets(7)

Dorime.Range("B7:B27").NumberFormat = "mm/d/yyyy"

End Sub
Code Break Down:
- After declaring the subheading, A variable named “Dorime” is defined.
- Then we set the range of Dorime as B7:B27.
- Lastly, the number format of this range is defined as “mm/d/yyyy”, meaning the first two digits will be months, second one or two (if necessary) digit(s) will be date. And the last four digits will be year.
- Finally, return to the excel worksheet window and observe that the date format is changed accordingly.

Things to Remember
- You may not have to use the methods from 4 to 6 if you do not want to use an unconventional customized date format.
- If the dataset which contains the dates, does not include all the dates serially, be careful to use the Autofill function. Because it may ruin your data accuracy.
Download Practice Workbook
You can download and practice the dataset we used to prepare this article.
Conclusion
In conclusion, Excel offers a variety of short date number format for entering and displaying dates. The most common format is the mm/dd/yyyy format, but other formats are also available. Additionally, Excel allows you to create custom date formats to suit your specific needs. Understanding how to use these different date formats can help make working with dates in Excel more efficient and accurate. You can drop any comment in the comment section below if you have any queries.
Related Articles
- How to Change Default Date Format from US to UK in Excel
- How to Change Date Alignment in Excel
- Fix Excel Date Not Formatting Correctly
<< Go Back to Date Format | Number Format | Learn Excel
Get FREE Advanced Excel Exercises with Solutions!
