Excel files contain sensitive calculations or preferred data formatting that users do not want to let anyone to meddle with. Therefore, users want to save Excel file with password. However, there are many sheds of saving Excel worksheets or workbooks with a password. Users may want
(i) To require a password to open the file.
(ii) To enter a password while modifying the Excel file.
(iii) To ask for the password every time a modification is being made.
These requirements are the causes of saving an Excel file with a password. Follow the latter section to save the Excel file with a password.
How to Save an Excel File or Workbook?
Saving an Excel file is easy. There are multiple ways to save an Excel file. Users can follow one of them according to their needs.
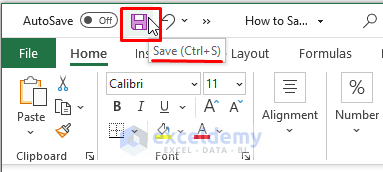
Using Save Icon or Keyboard Shortcuts
Above the ribbon, Excel resides the Save Icon. After creating a new Excel file or modifying the existing one just click on the Save icon or press CTRL+S to save the file with modified contents and settings.
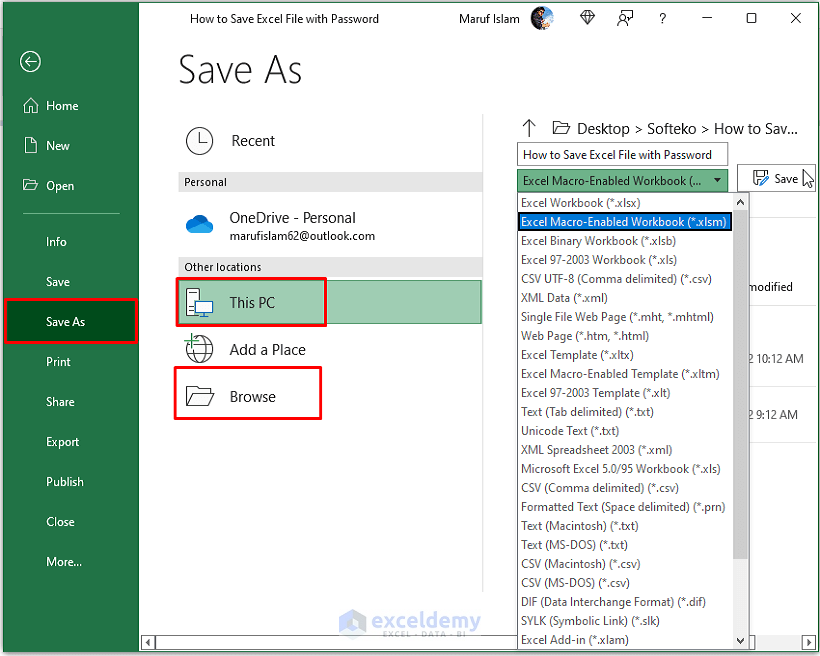
Using Save As Feature
Users may need to save the existing Excel file or the newly created file in different Excel file types from the previous one. He or she can go to Excel File > Save As > This PC or Browse (to save files in a specific location) > Select the File Type (i.e., xlsx, xlsm, xls, etc.) from the save drop-down menu > Click on Save.
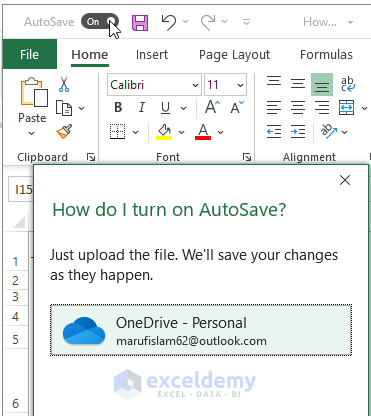
Using OneDrive to Auto Save
Also, users can auto-save their Excel files without ever worrying about missing data within an Excel workbook. Just turn the AutoSave button On above the Excel Ribbon. Excel brings the One Drive setup window. After setting up the One Drive account or just selecting it (in case users have already set up an account), Excel automatically saves each modification made in the Excel files.
Save Excel File with Password: 6 Easy Ways
Saving an Excel file is a basic Excel operation. However, saving an Excel file with an encrypted password requires an understanding of the file’s reach or the extent of its shareability. Go through the below section to be able to save Excel files with passwords.
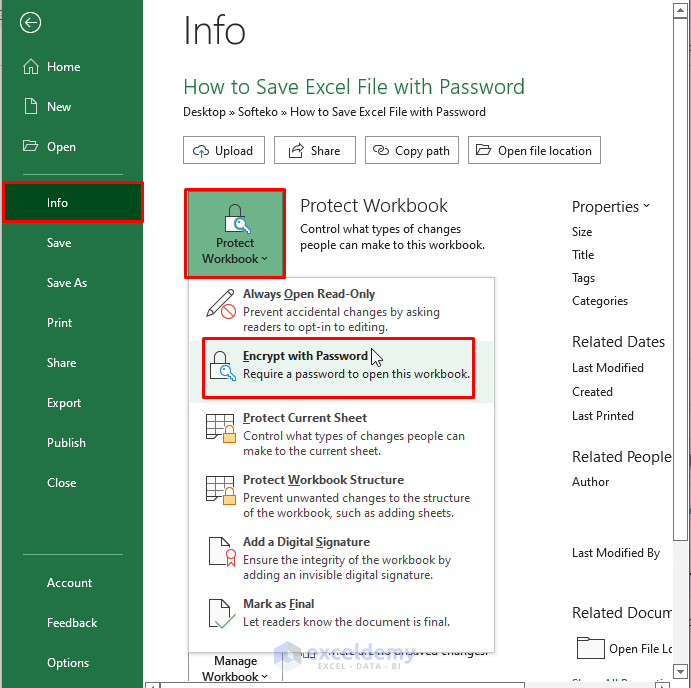
Method 1: Using Info Tab Options to Encrypt an Excel File
Excel offers file encryption to multiple extents. Users can choose one of the options to apply to their files.
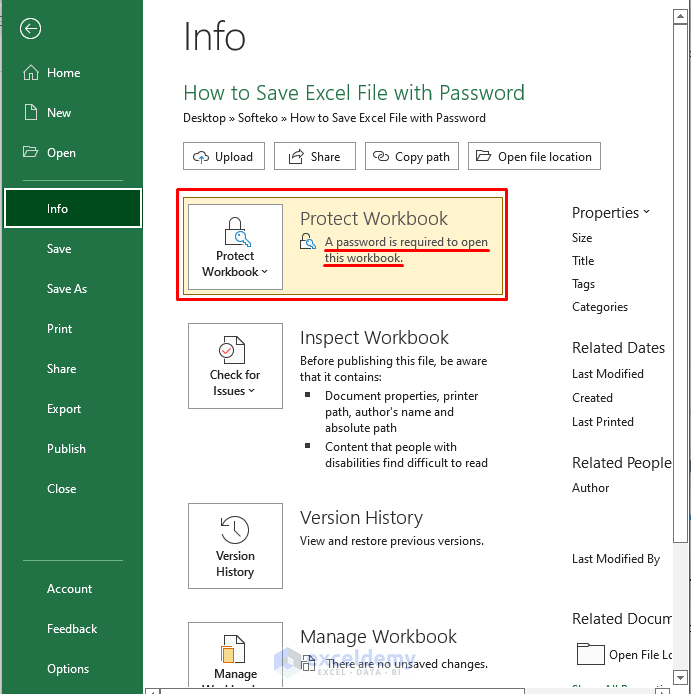
🔼 Go to Excel File > Info > Protect Workbook > Select any of the offered options (here Encrypt with Password option is chosen).
🔼 Selecting Encrypt with Password fetches a pop-up to enter a password. Provide the password (i.e., 0000) then click OK.

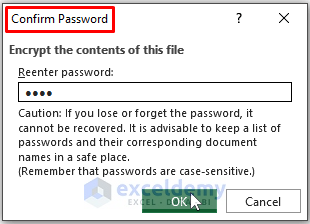
🔼 Again, reenter the password for confirmation. Afterward, click OK.
🔼 After encrypting the file, you can see Excel locks the file saying a password is required to open the workbook.
At last, follow any described ways to save the file. Thus, you successfully save an Excel file with an encrypted password.
Method 2: Using Save As Tools Option to Save File with Password
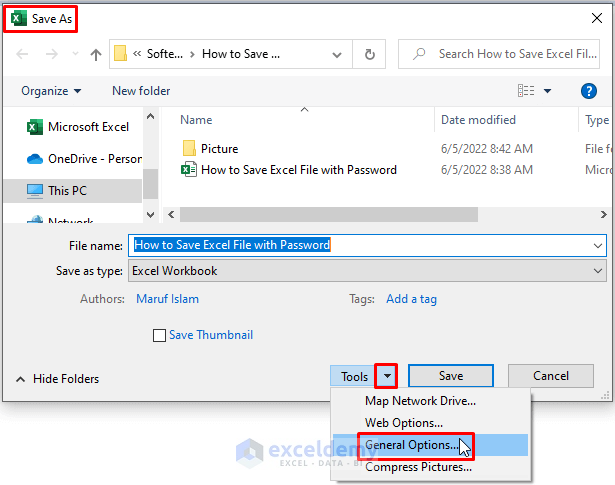
The device’s Save As feature window holds the Tools option. Users can use the Tools’ General Options to restrict the file access with a password.
🔼 Navigate to Excel File > Save As > Browse.

🔼 Excel opens the device’s Save As window. Click on the Down-arrow icon (beside Tools) > Click on the General Options (from the offered options).
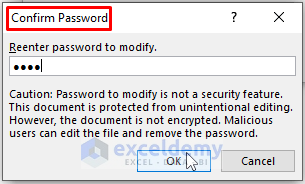
 🔼 The General Options dialog box appears. Enter the required passwords to Open or Modify the Excel file then click OK.
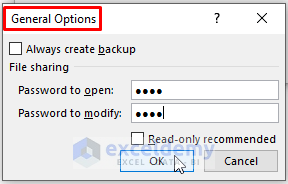
🔼 Afterward, click on Save. The device saves the file with an embedded password with it.
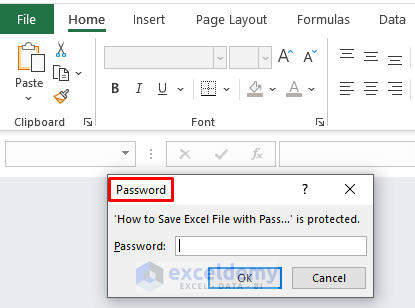
🔺 To check whether the encryption works or not, just reopen the file. You see Excel asks to enter a password using a dialog box as shown below.
Read More: How to Save Multiple Excel Sheets as One File
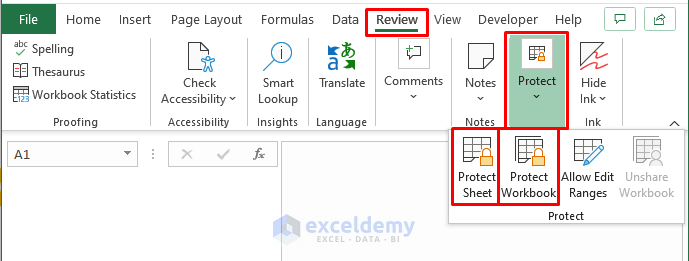
Method 3: Protect Sheet or Workbook Using Review Tab Before Save
Excel provides Protect Sheet and Protect Workbook options to offer multiple levels of access to an Excel file to other users. An editor can choose which activities he or she wants to allow during the usage of hir or her’s file.
🔼 Move to the Review tab > Select Protect Sheet (in this case) or Protect Workbook.
🔼 Tick options to grant permission to other users, you want to set the boundaries of their access to the file. Then provide a password and click OK.

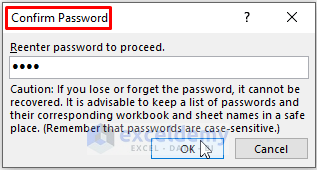
🔼 Excel fetches the confirmation password dialog box. Reenter the password and click OK.
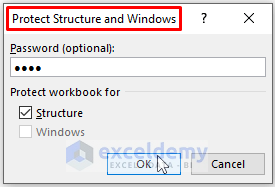
🔼 In case you select Protect Workbook, Excel brings up the Protect Structure and Windows dialog box. Provide a password with desired ticked options. Click on OK on both dialog boxes (i.e., Protect Structure and Windows and Confirm Password).
Afterward, you can save the file following any of the shown ways.
Method 4: Using VBA Macro to Restrict File Access for Further Editing
Excel VBA Macro Tools can restrict a file’s macro access. Also, it can insert text to notify users that the file is a protected file.
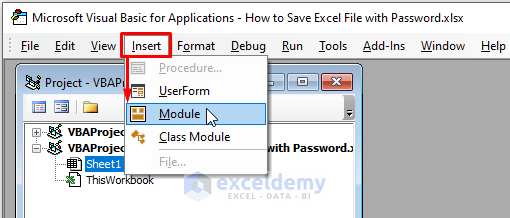
🔼 Use ALT+F11 or go to the Developer tab > Visual Basic to open Microsoft Visual Basic. In the window, click on Insert > Module to insert a module.
🔼 Paste the following macro in the Module then navigate to Tools > select VBAProjetc Properties.
Sub SavewithPassword()

Range("A1").Value = "This Sheet is Password Protected"

End Sub
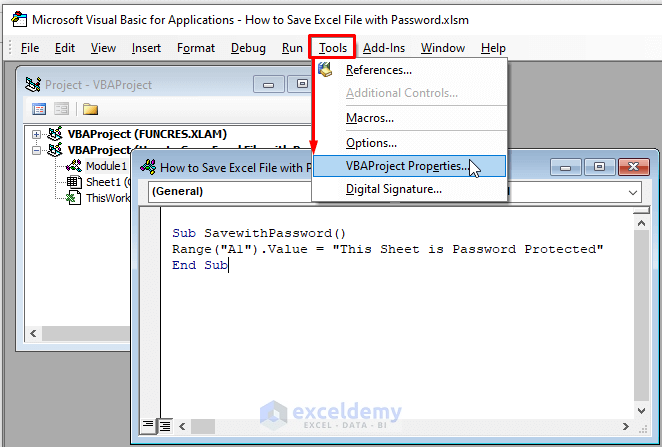
The macro displays a text (i.e., This Sheet is Password Protected) in cell A1.
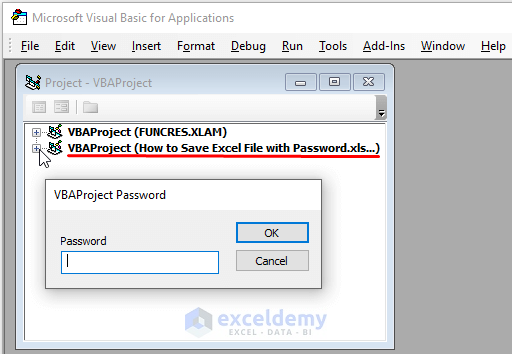
🔼 In the VBAProject Properties window, choose the Protection section > Tick the Lock Project for viewing option > Provide Password then click on OK.

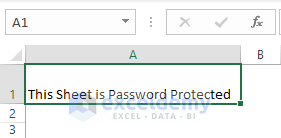
🔼 Hit F5 to run the macro. Return to the worksheet, you see the text is inserted in A1.
🔼 Reopen the file, afterward go to Microsoft Visual Basic to modify or change the macro. But you see- Excel notifies you that the Module is password protected.
In the end, save the Excel file using any of the described instructions at the beginning of this article.
Read More: How to Save Multiple Sheets in Excel
Method 5: Using Context Menu Options to Protect Before Saving an Excel File
Alternative to the Review tab, users can 1st protect an Excel file using the Context Menu options.
🔼 Right-click on an Excel worksheet after that select Protect Sheet option to encrypt the sheet with a password.
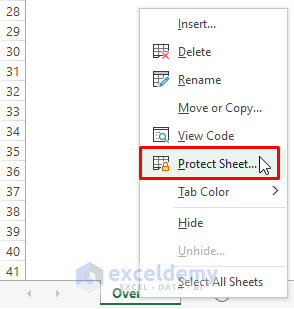
Follow the instruction at the beginning of this article to save the Excel file with a password afterward. This method will protect a specific sheet from editing.
Method 6: Saving Excel File with Password Using Format Feature Options
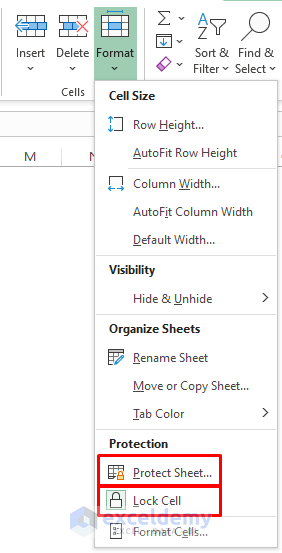
In the Home tab Cells section, Excel offers the Format feature. Users can enable the Protect Sheet or Lock Cell option to save an Excel file with a password. From the name of the options, you might have understood that this method will protect the sheet or cell from being edited by others who don’t know the password.
🔼 Go through the Home tab > click on Format (inside the Cells section) > Choose Protect Sheet or Lock Cells. Though Lock Cells requires to Protect Sheet option applied eventually. Otherwise, locking cells won’t be able to do much to protect any content of the sheet. Have a quick look at ways of protecting an Excel Worksheet article.
Now, choose any of the file-saving ways to save the Excel file with a password.
Conclusion
In this article, we demonstrate the user’s options and ways to save an Excel file with password. You can choose any of the mentioned methods to go with. Methods 1 and 2 encrypt the Excel files, and methods 3, 4, and 5 are the different ways to conduct the same Protect Sheet operation. Method 4 is unique in its execution as it saves files from macro alteration. Hope these above-mentioned methods fulfill your requirements. Comment, if you have further inquiries or have anything to add.
Related Articles
- How to Save Excel File in XLSX Format
- How to Save Multiple Tabs in Excel as Separate Files
- How to Save a Worksheet in Excel
- How to Save a Worksheet in Excel to a Separate File
- How to Save a Copy of an Excel File
<< Go Back to How to Save Excel File | Excel Files | Learn Excel
Get FREE Advanced Excel Exercises with Solutions!
