In this article, I’ll show you how you can insert a single column or multiple columns within a data set using VBA in Excel. I’ll give all the VBA codes and explanations with proper examples and illustrations.
Sub VBA_Insert_Single_Column()

ActiveSheet.Range("C4").EntireColumn.Insert

End Sub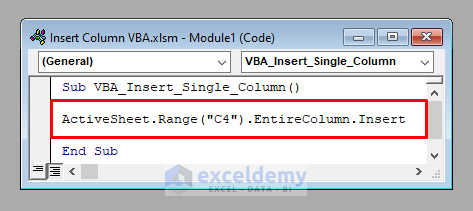
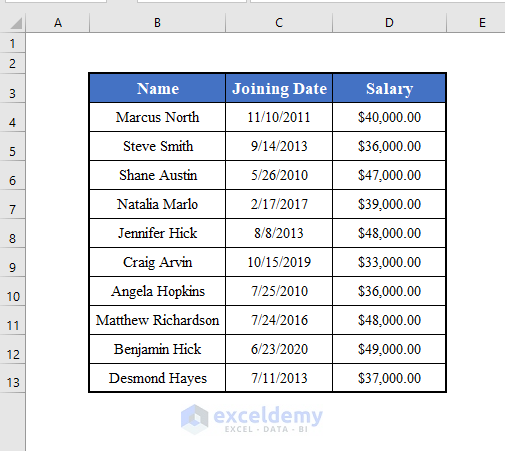
Here we’ve got a data set with the names, joining dates, and salaries of a company.
Our objective today is to learn how we can insert one or more columns within this data set using Excel VBA.
1. Inserting a Single Column with Excel VBA
First of all, I’ll show you how you can insert a single column within this data set using VBA.
Let’s enter a new column before column B (Joining Date).
The line of code will be:
⧭ VBA Code:
ActiveSheet.Range("C4").EntireColumn.Insert
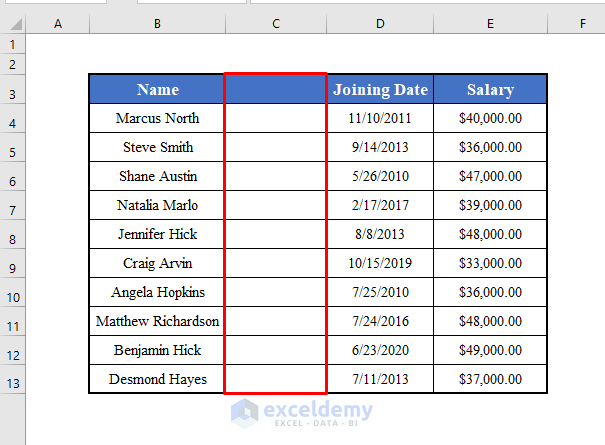
⧭ Output:
Run the code and it’ll insert a new column before column C.
⧭ Note:
Instead of C4, you can use any cell reference of column C, if you want to insert a new column before column C.
Read More: How to Insert Column without Affecting Formulas in Excel
2. Inserting Multiple Columns with Excel VBA
Now let’s insert multiple columns within a data set using VBA.
For example, let’s insert 3 columns before column C (Joining Dates).
We have to iterate through a for-loop.
The VBA code will be:
⧭ VBA Code:
Sub VBA_Insert_Multiple_Columns()

Inserted_Columns = 3

For i = 1 To Inserted_Columns
    ActiveSheet.Range("C4").EntireColumn.Insert
Next i

End Sub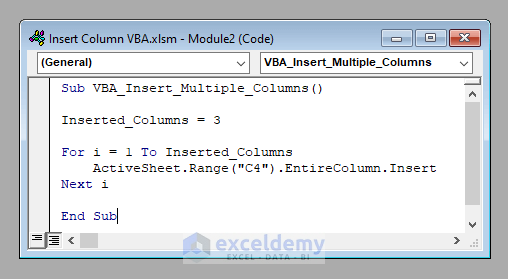
⧭ Output:
Run the code, and it’ll insert 3 empty columns before column C.

⧭ Note:
Here I’ve put the value of the variable Inserted_Column as 3 because I want to insert 3 columns. You can change it according to your needs.
Similar Readings
- Insert Column with Name in Excel VBA
- Excel Fix: Insert Column Option Greyed out
- Cannot Insert Column in Excel
3. Adding Single or Multiple Column(s) After a Fixed Interval
This time we’ll learn another very interesting thing. We’ll insert a single column or multiple columns after a fixed interval within our data set.
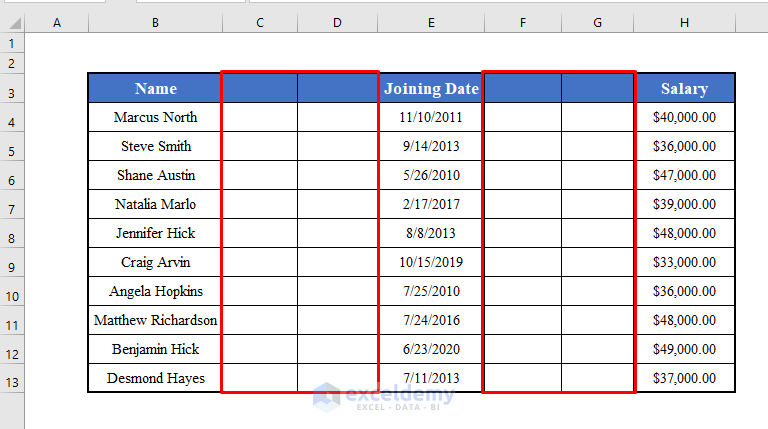
For example, let’s insert 2 columns after each 1 column of our data set.
The VBA code will be:
⧭ VBA Code:
Sub VBA_Insert_Column_After_a_Interval()

Interval = 1

Inserted_Columns = 2

Count = 0

For i = 1 To ActiveSheet.UsedRange.Columns.Count - 1
    Count = Count + Interval + 1
    For j = 0 To Inserted_Columns - 1
        Count = Count + j
        ActiveSheet.UsedRange.Cells(1, Count).EntireColumn.Insert
    Next j
Next i

End Sub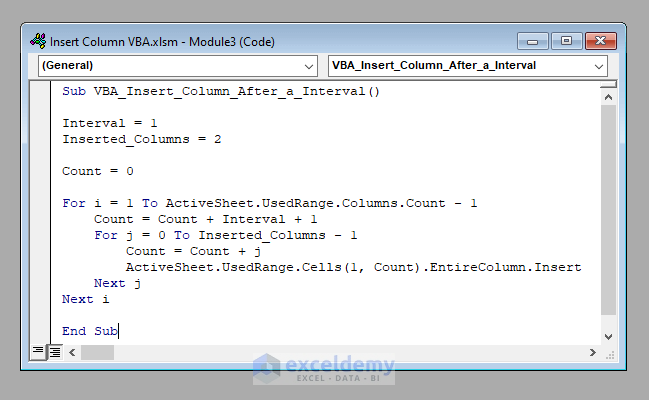
⧭ Output:
Run this code. It’ll insert 2 columns after each 1 column of your data set.
⧭ Note:
Here I’ve put the value of the variables Interval as 1 and Inserted_Column as 3 because I want to insert 3 columns after each interval of 1 column. You can change these according to your needs.
Read More: How to Insert a Column Between Every Other Column in Excel
4. Inserting Single or Multiple Column(s) at Random Places
Finally, we’ll learn to insert column (s) in random places within our data set.
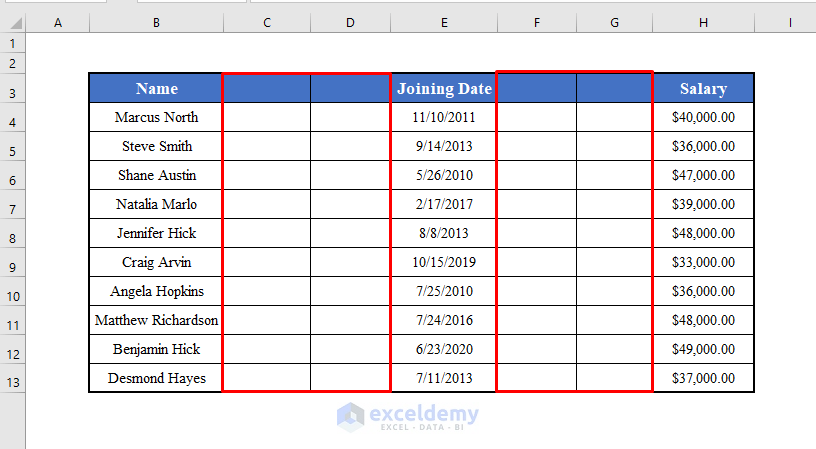
Let’s insert two columns in each of the 2nd and 4th positions of our data set.
The VBA code will be:
⧭ VBA Code:
Sub Insert_Columns_Randomly()

Positions = "2,4"

Inserted_Columns = 2

Positions = Split(Positions, ",")

Count = 0

For i = 0 To UBound(Positions)
    For j = 0 To Inserted_Columns - 1
        Count = Count + j
        ActiveSheet.UsedRange.Cells(1, Positions(i) + Count).EntireColumn.Insert
    Next j
Next i

End Sub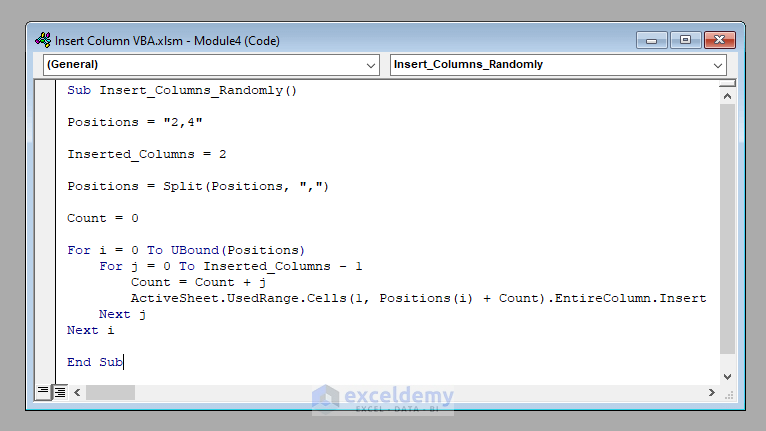
⧭ Output:
Run this code and you’ll find 2 columns inserted in each of the 2nd and 4th positions of our data set.
⧭ Note:
Here I’ve put the value of the variables Positions as “2,4” and Inserted_Column as 2 because I want to insert 2 columns in each of the 2nd and 4th positions of my data set. You change these according to your needs.
Things to Remember
In a few of the above codes, I have used the UsedRange property of VBA to access all the used cells of my worksheet. Click here to know the UsedRange property of VBA in detail.
Download Practice Workbook
Download this practice workbook to exercise while you are reading this article.
Conclusion
Using these methods, you can insert a single column or multiple columns within your data set using VBA in Excel. Do you have any questions? Feel free to ask us.

