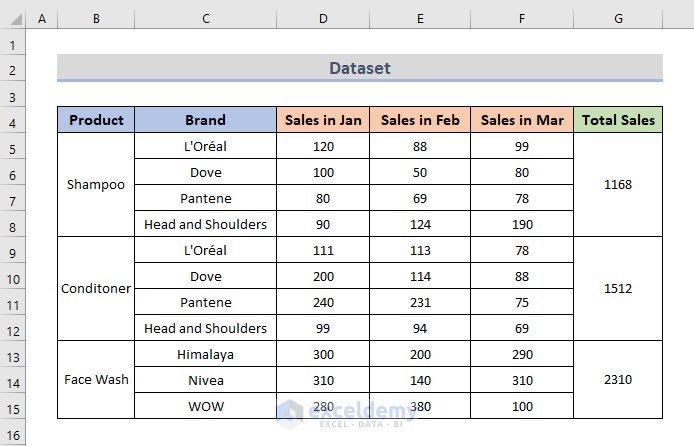
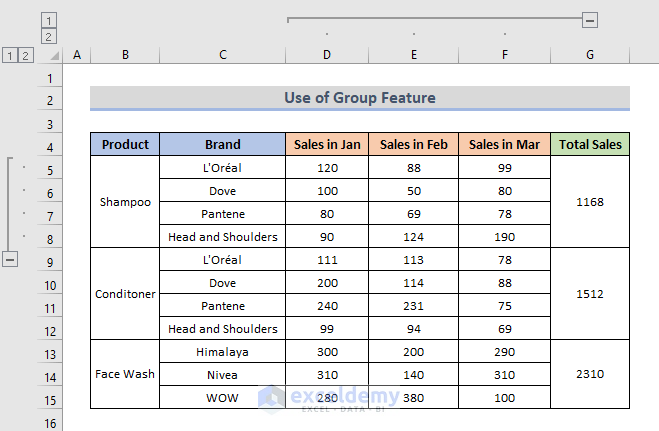
To group cells in Excel, we are going to use the following dataset. It contains some products in column B, the name of the brand of those products in column C, sales in January, February, and March in columns D, E, and F, and the total sales of each product in column G. Suppose we don’t need the individual sales per month or brand. So, we can group them.
Method 1 – Grouping Cells Using Excel Group Feature
Steps:
- Select the data that will be used to group the cells. We are selecting the cells in columns D, E, and F.
- Go to the Data tab from the ribbon.
- Click on the Group drop-down menu.
- Choose the Group option in the menu.
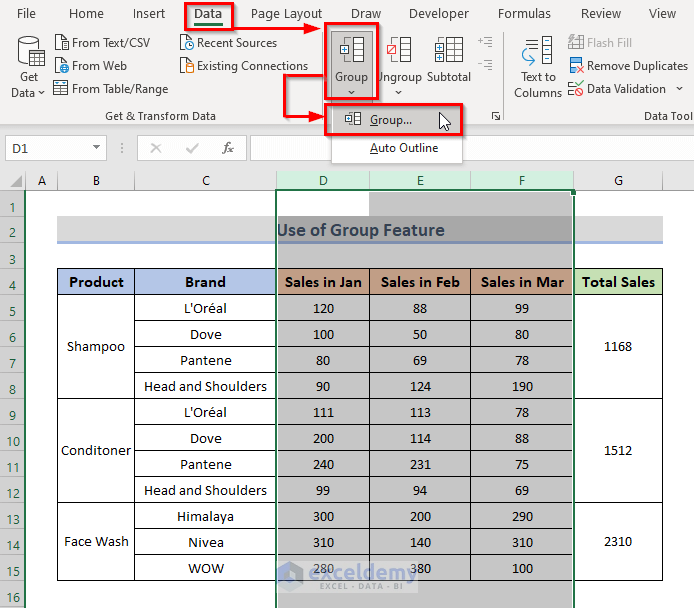
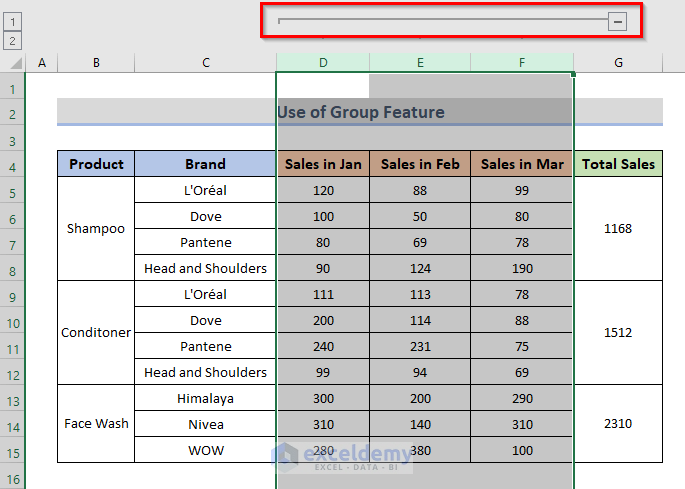
- This will add a minus sign symbol to the outline above the selected cells and we will be able to group the cells in our Excel spreadsheet.
- Let’s group the cells of rows 5, 6, 7, 8. So, we select cells of rows 5, 6, 7, 8.
- Go to the Data tab in the Excel toolbar and select the Group option.
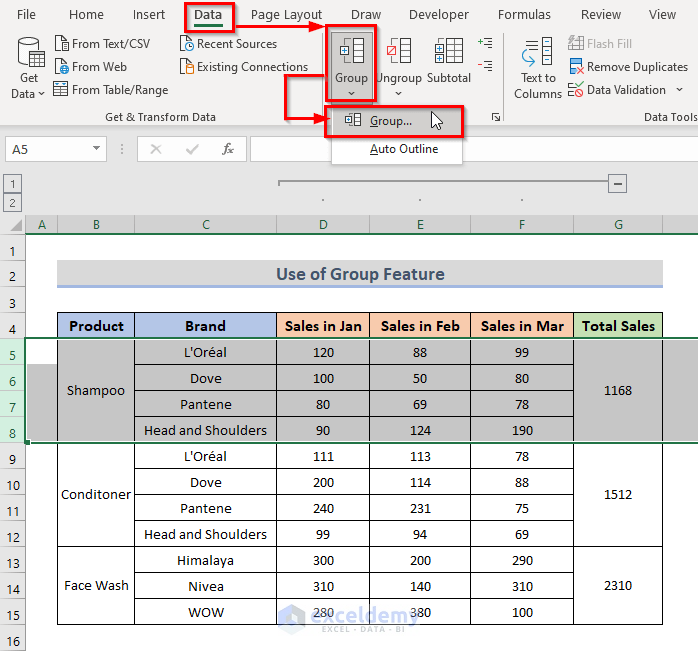
- Now, when you want to hide those cells, you can easily do that since they are in a group now.
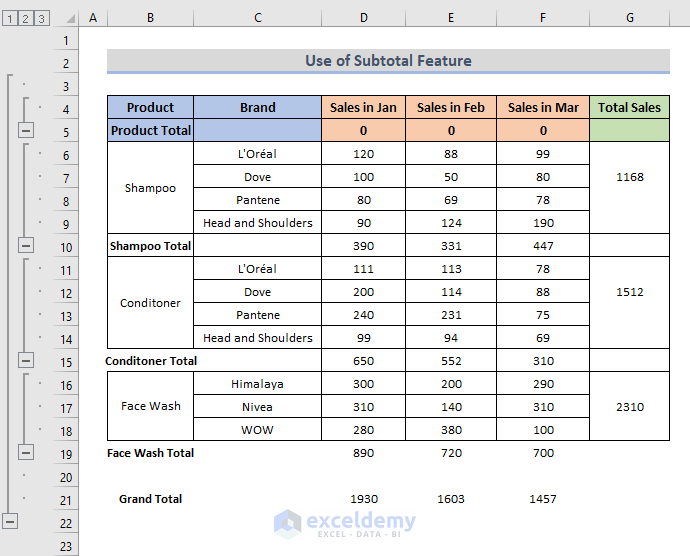
Method 2 – Apply Subtotal Command to Group Cells
Steps:
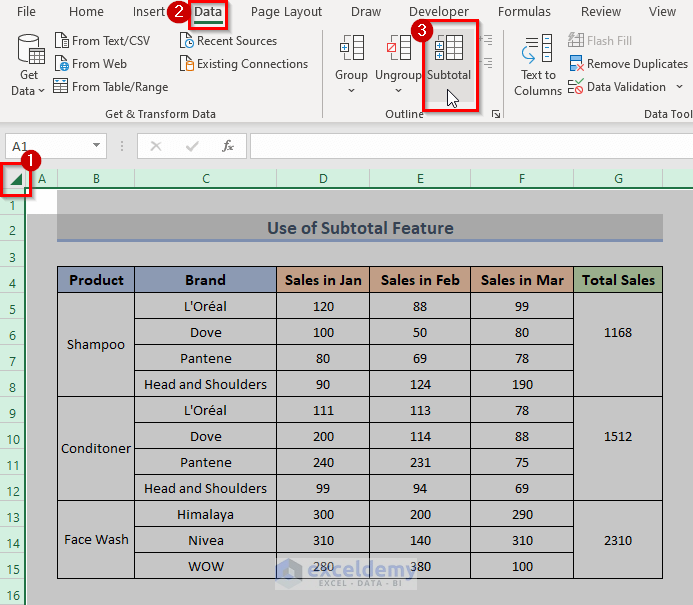
- Select the whole sheet by clicking on the green triangle at the top of the left corner of the Excel sheet.
- Go to the Data tab on the ribbon.
- Click on the Subtotal option under the Outline category.
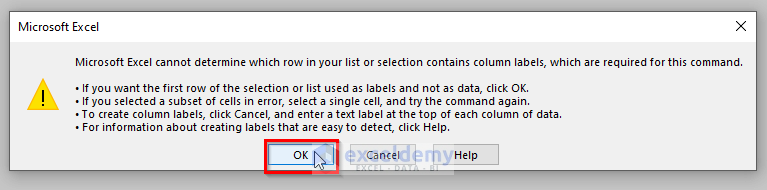
- A Microsoft Excel pop-up window will appear. Simply click on the OK button.
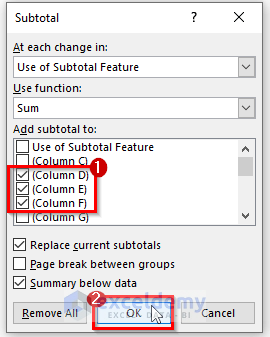
- You will be able to see the Subtotal dialog box.
- Select the columns that you want to group.
- Click OK.
- This will create new rows after every product, and those are the total sales for every month.
- If you look at the left side of the spreadsheet, you can see that the cells of the products are in a group now.
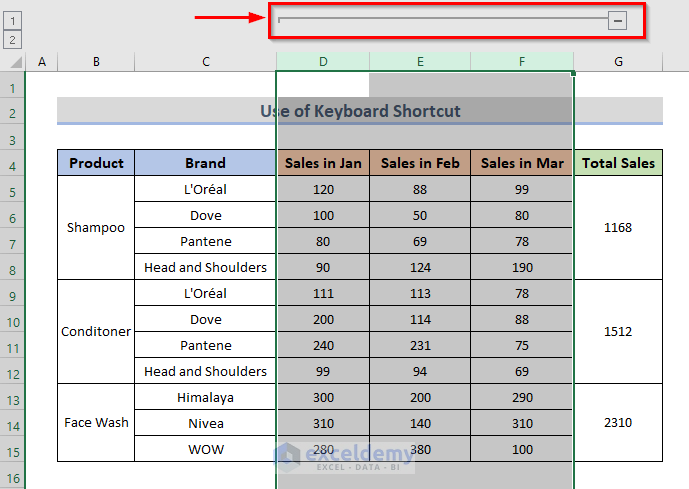
Method 3 – Keyboard Shortcuts to Group Cells in Excel
Steps:
- Select the cells that you want to group. We selected columns D, E, and F.
- Press Shift + Alt + Right Arrow.
- These columns are in a group now.
Method 4 – Use the Auto Outline Option to Group Cells with the Same Value
Steps:
- Create additional rows that indicate total sales of Shampoo, Conditioner, and Face Wash.
- Select the whole dataset.
- Go to the Data tab from the ribbon.
- Go to the Group drop-down menu under the Outline category.
- Click on the Auto Outline command.

- The individual products are in a group as shown in the following picture.

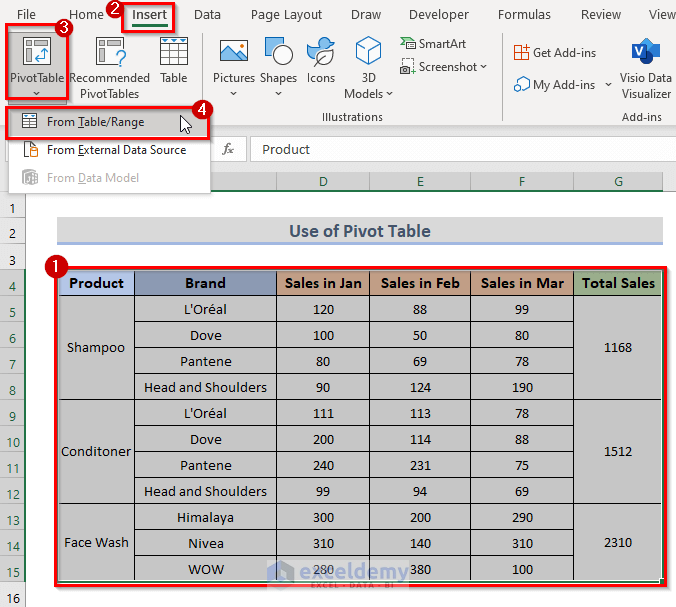
Method 5 – Apply Pivot Table to Group Cells with the Same Value
Steps:
- Select the whole dataset.
- Go to the Insert tab.
- In the Tables category, go to the PivotTable drop-down menu and click on From Table/Range.
- This will open the PivotTable from table or range dialog box.
- Select the New Worksheet and click on the OK button.
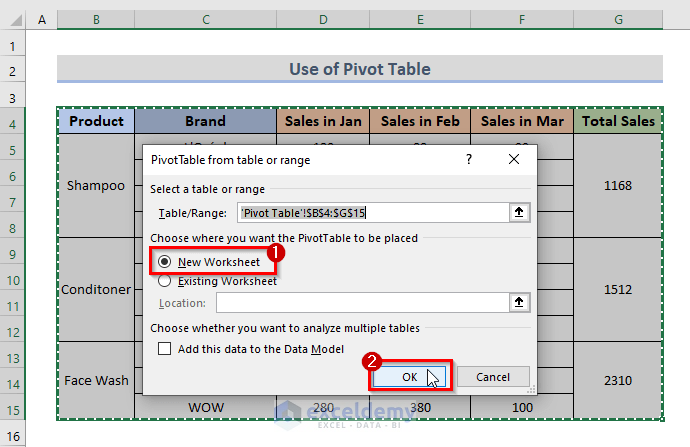
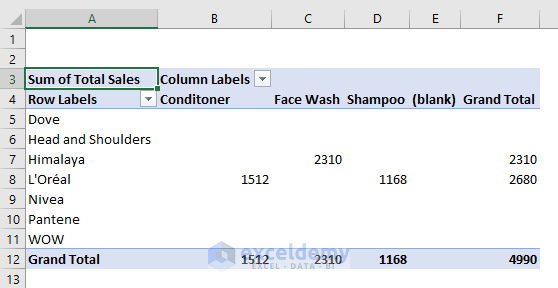
- A PivotTable will appear in a new worksheet.
- From the PivotTable Fields settings dialog box, group the data as you wish. We put the Product information in the Columns section, the Brand in the Rows section, and the Total Sales in the Values.
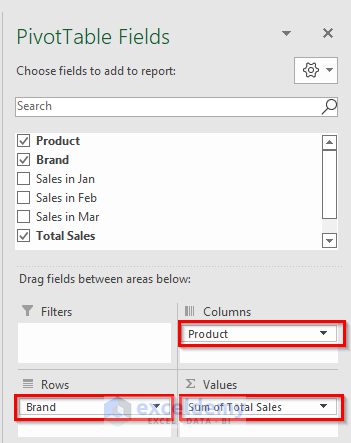
- We can change the groups as needed.
Method 6 – Use VBA to Group Cells
Steps:
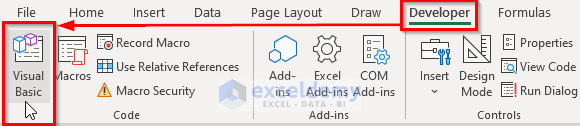
- Go to the Developer tab on the ribbon.
- Click on Visual Basic or press Alt + F11 to open the Visual Basic Editor.
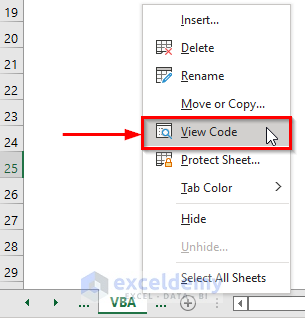
- Another way to open the Visual Basic Editor is, to simply right-click on the sheet and select View Code.
- This will open the Visual Basic Editor where you can write the code.
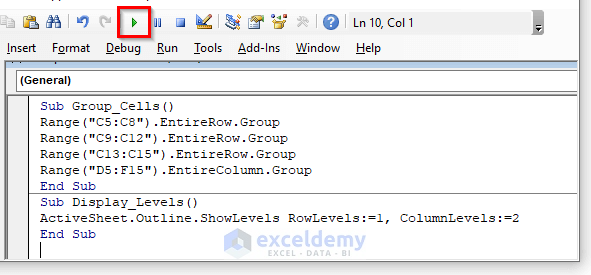
- Copy the VBA Code below into the editor:
VBA Code:
Sub Group_Cells()
Range("C5:C8").EntireRow.Group
Range("C9:C12").EntireRow.Group
Range("C13:C15").EntireRow.Group
Range("D5:F15").EntireColumn.Group
End Sub
Sub Display_Levels()
ActiveSheet.Outline.ShowLevels RowLevels:=1, ColumnLevels:=2
End Sub- Run the code by pressing the F5 key or clicking the Run Sub button.
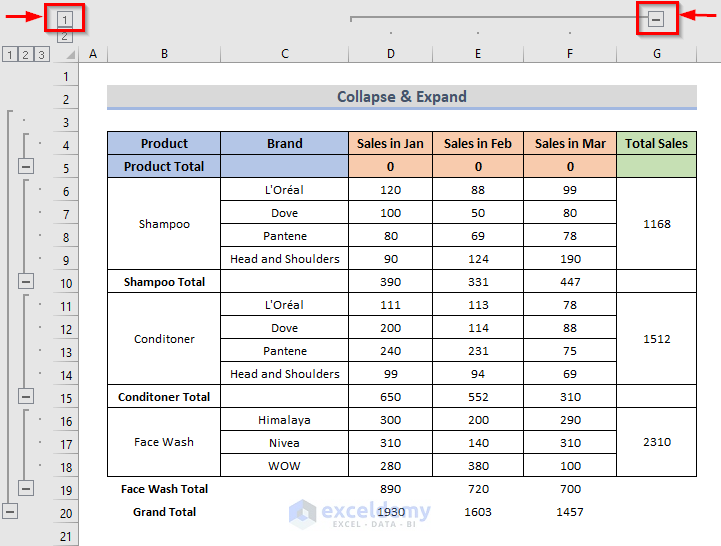
Collapse & Expand Cells after Grouping
To collapse the grouped cells, on the left, click the minus (‘–’) icon or click on the numbers. The exterior numbers will collapse the cells.
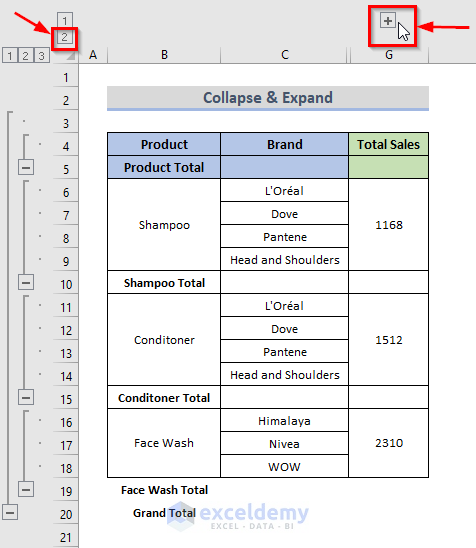
To expand the grouped cells, use the plus (‘+’) sign and this will widen the collapsed collection of cells, or click on the numbers close to the headers. The inner numbers will expand the cells.
Ungroup Cells in Excel
Steps:
- Go to the Data tab.
- From the Outline category, click on the Ungroup drop-down menu and select Ungroup.

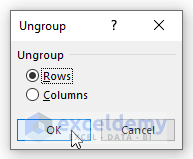
- This will open up an Ungroup selection window. Select that you want to ungroup the Rows or Columns.
- Click on the OK button.
You can Ungroup the cells by using the keyboard shortcut Shift + Alt + Left Arrow.
Download Practice Workbook
You can download the workbook and practice grouping cells.
Group Cells in Excel: Knowledge Hub
- Use Grouping and Consolidation Tools
- Group and Ungroup Columns or Rows
- Group Cells with Same Value
- Group Similar Items
- Create Multiple Groups
- Group Duplicates
- Group Time Intervals
- Remove Grouping
- Group Rows
- Group Rows with Expand or Collapse
- Group Rows by Name
- Group Rows by Cell Value
- Group Rows with Same Value
- Group Rows with Plus Sign on Top
- Group and Ungroup Columns or Rows
- Group Columns Next to Each Other
<< Go Back to Outline in Excel | Learn Excel
Get FREE Advanced Excel Exercises with Solutions!
