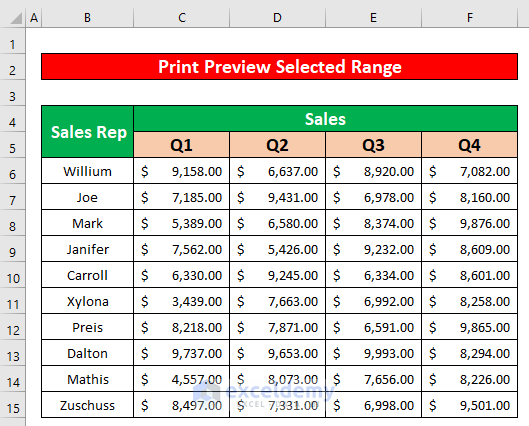
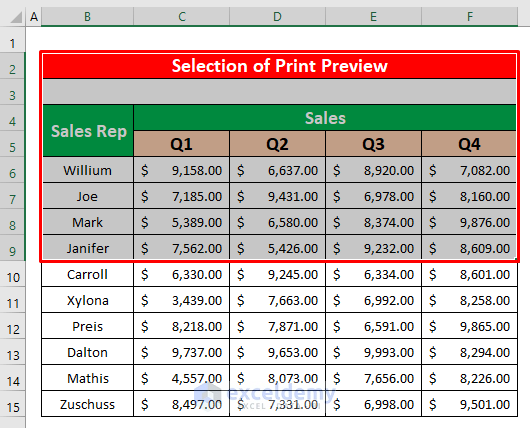
In this article we will demonstrate some methods for printing previews for a selected range of cells in Excel by using Microsoft Visual Basic for Application (VBA). We’ll use the following dataset containing information about the sales of some employees to illustrate our methods.
Excel VBA to Show Print Preview for Selected Range (Quick View)
Sub Print_Range_Method()
Sheets("Range Method").Select
Range("B4:F9").Select
ActiveSheet.PageSetup.PrintArea = "B4:F9"
ActiveWindow.SelectedSheets.PrintOut From:=1, _
To:=1, Copies:=1, Collate:=True
End Sub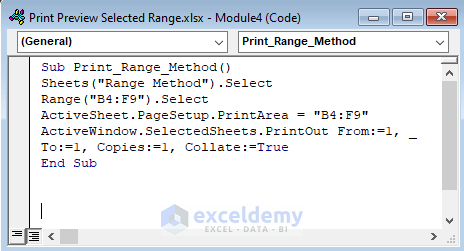
Example 1 – Using VBA PrintOut Method
From our dataset, let’s print preview a selected range using a simple VBA code.
Step 1:
- Open a Module by going to Developer → Visual Basic.
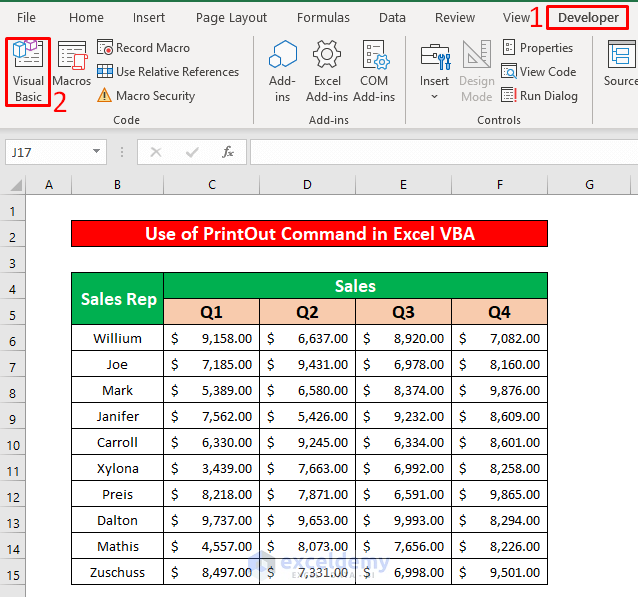
A window named Microsoft Visual Basic for Applications – Print Preview Selected Range will pop up.
- In that window, go to Insert → Module.
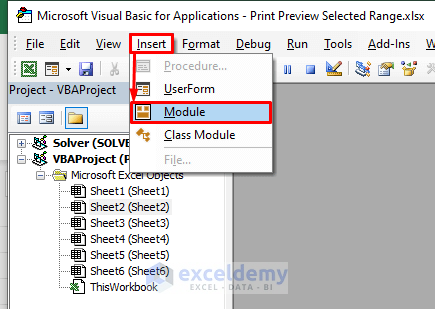
Step 2:
The Print Preview Selected Range module pops up.
- Enter the following VBA code in the module:
Sub Print_Preview_Selected_Range()
Range("B4:F15").PrintOut
End Sub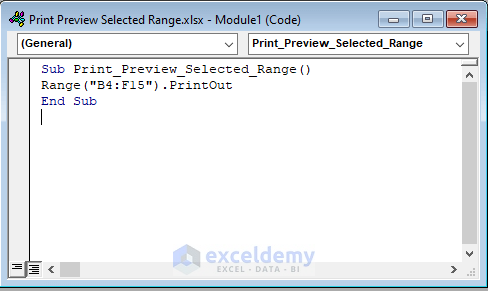
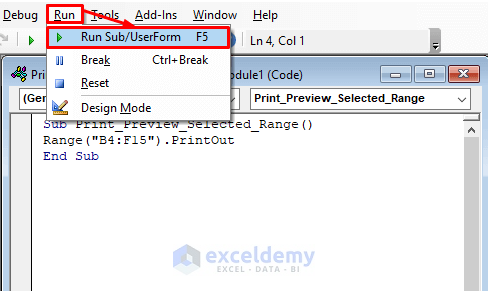
- Run the code by going to Run → Run Sub/UserForm.
Step 3:
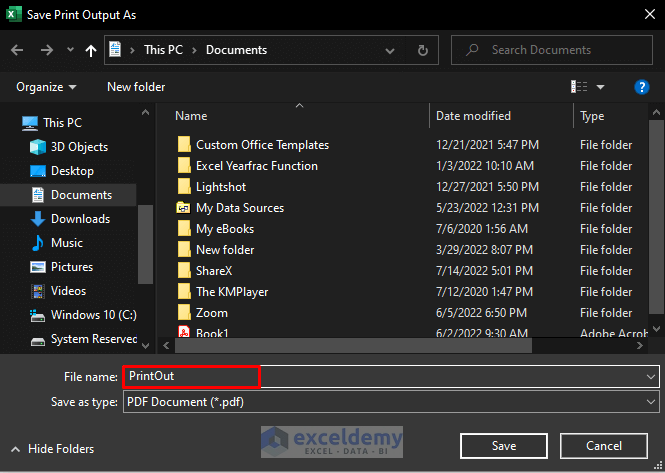
The Save Print Output As window will appear.
- Select “PDF Document” as the Save as type.
- Give the PDF file a name, here PrintOut.
- Click Save.
- Navigate to the save location and open the file.
You will see the selected range.
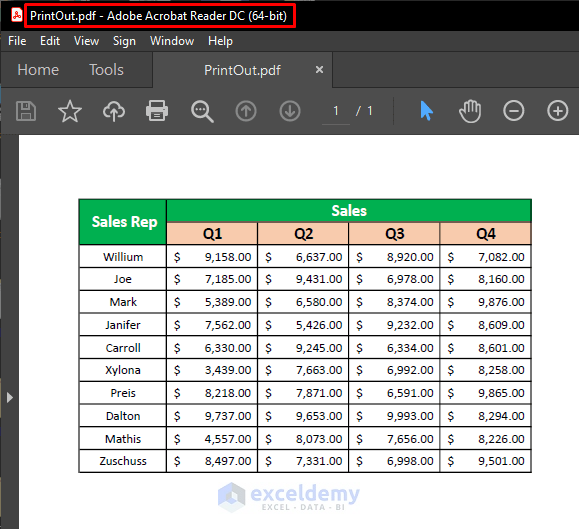
- View the print preview of this selected range by pressing CTRL + P and giving the necessary commands.
Read More: Excel VBA: Print Range of Cells
Example 2 – Defining the Excel Sheet
In this method, we will define the sheet name to print preview.
Step 1:
- As per Example 1, insert a new module and enter the following VBA code:
Sub Define_Sheet()
Sheets("Define Sheet").Range("B4:F10").PrintOut
End Sub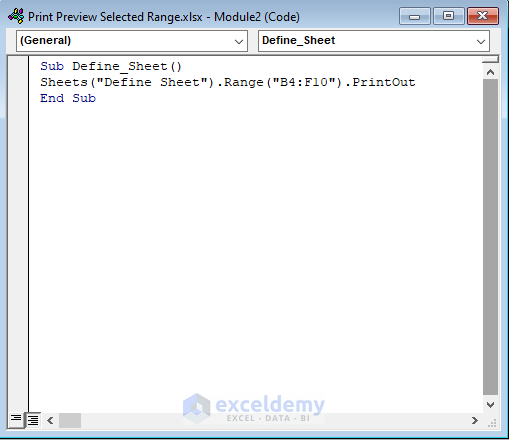
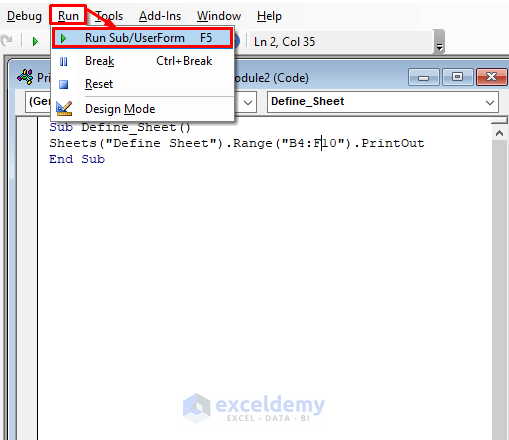
- Run the code by clicking Run → Run Sub/UserForm.
Step 2:
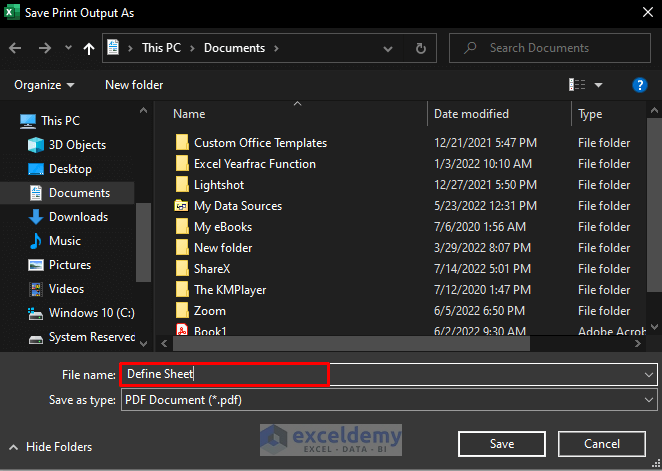
- The Save Print Output As window will appear.
- Save as a PDF file named Define Sheet.
- Click Save.
- Locate and open the saved file.
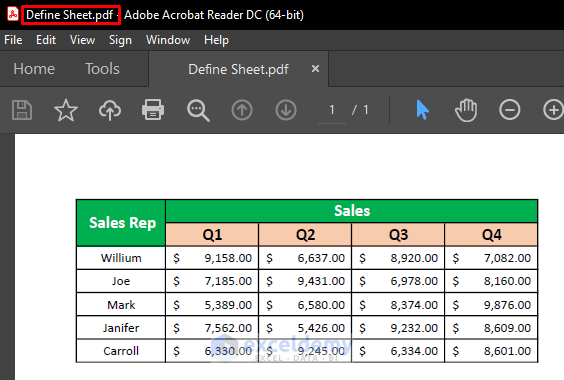
To view the print preview of this selected range of cells, press CTRL + P and give the necessary commands.
Read More: Excel VBA: Set Print Area for Multiple Ranges
Example 3 – Using Print Preview Selected Range to Print
Another way to print a range of cells using VBA is to select the range that we want to print preview.
Step 1:
- Select a range of cells from our dataset, for example B2 to F9.
- As per Example 1, insert a new module and enter the below VBA code in it:
Sub Selection_of_Print_Preview()
Range("B2:F9").PrintOut
End Sub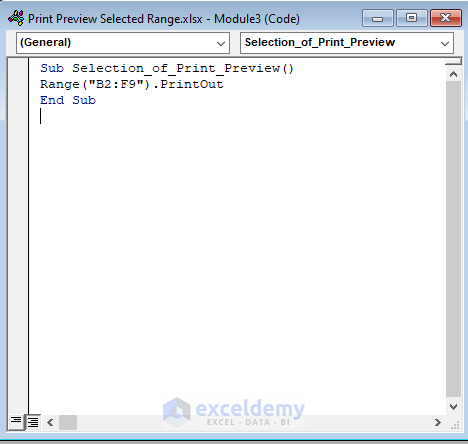
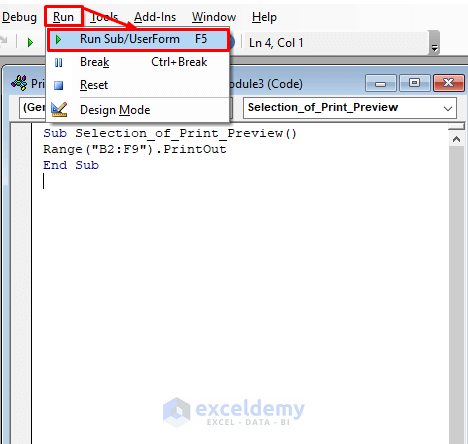
- Run the code by clicking Run → Run Sub/UserForm.
Step 2:
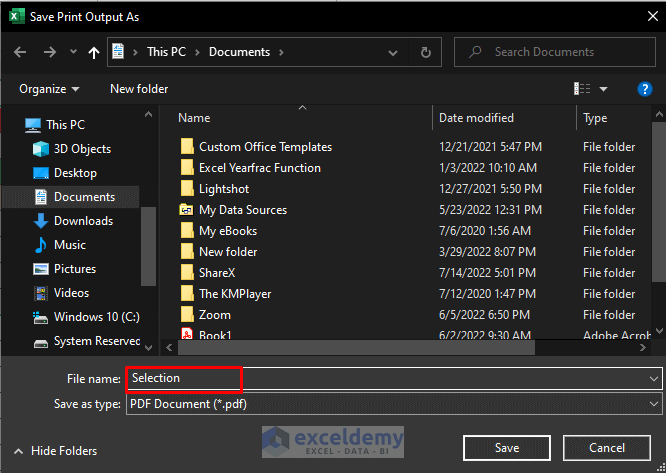
- In the Save window that appears, save the file as type “PDF Document” with the name Selection.
- Click Save.
- Locate and open the saved file.
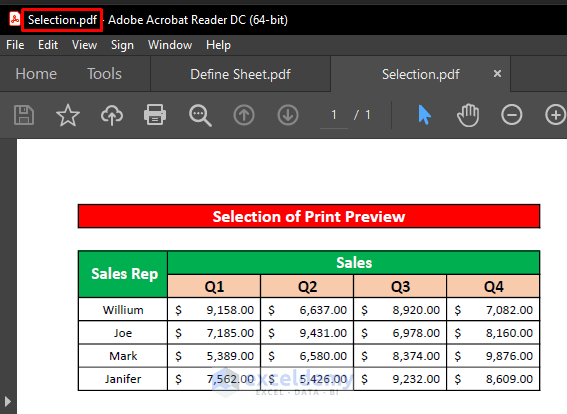
- View the print preview of this selected range of cells by pressing CTRL + P and giving the necessary commands.
Example 4 – Defining the Selected Range in the VBA Code
We can also print a range of cells by VBA using the Range Method. Let’s print the information of the first four entries.
Step 1:
- As per Example 1, insert a new module and enter the below VBA code in it:
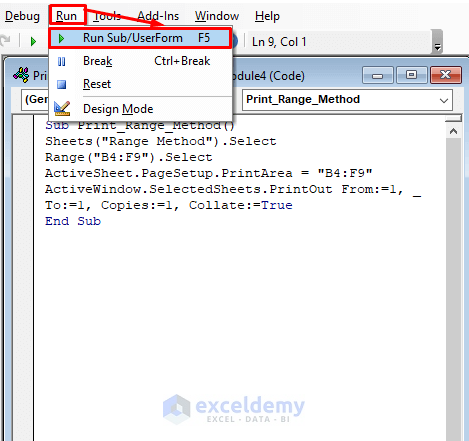
Sub Print_Range_Method()
Sheets("Range Method").Select
Range("B4:F9").Select
ActiveSheet.PageSetup.PrintArea = "B4:F9"
ActiveWindow.SelectedSheets.PrintOut From:=1, _
To:=1, Copies:=1, Collate:=True
End Sub
- Run the code by clicking Run → Run Sub/UserForm.
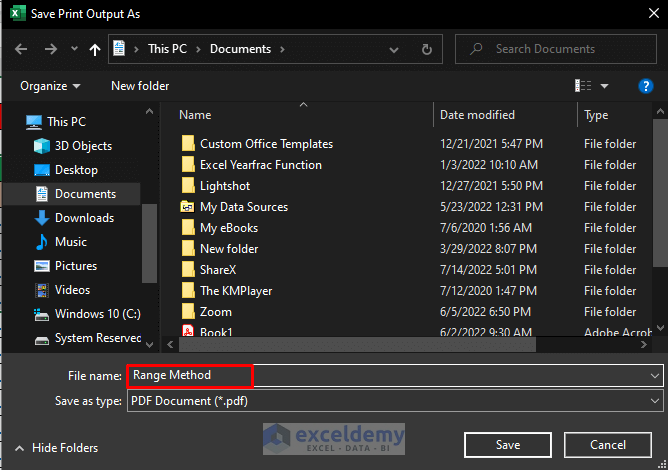
Step 2:
- In the Save window that appears, save the file as type “PDF Document” with the name Range Method.
- Click Save.
- Open the saved file to see the selected range.
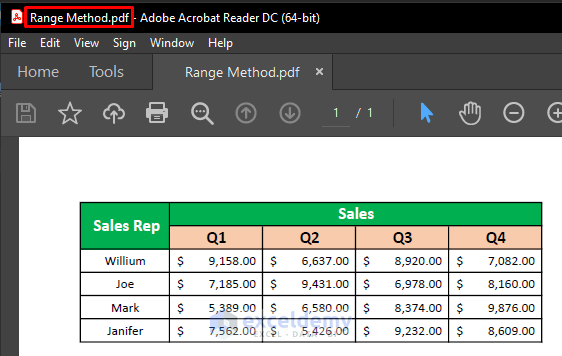
- View the print preview of this selected range of cells by pressing CTRL + P and giving the necessary commands.
Example 5 – Using VBA With Statement
Step 1:
- As per Example 1, insert a new module and enter the below VBA code in it:
Sub Print_Preview_With_Statement()
With Sheets("Statement")
.PageSetup.PrintArea = "B4:F15"
.PrintOut
End With
End Sub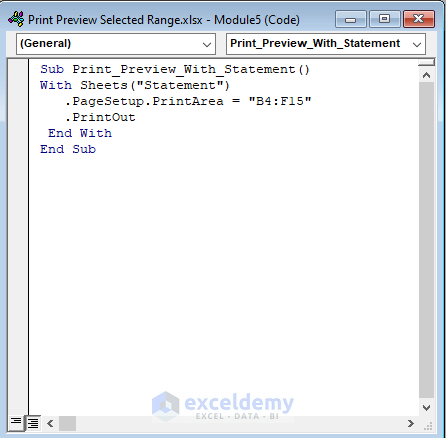
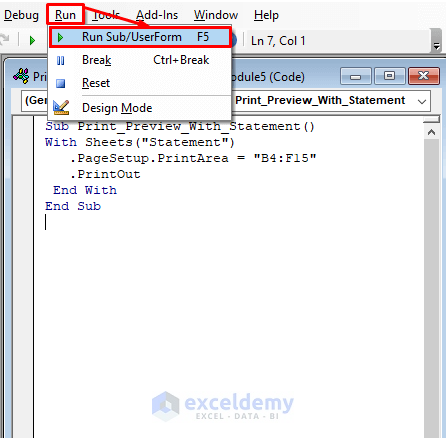
- Run the code by clicking Run → Run Sub/UserForm.
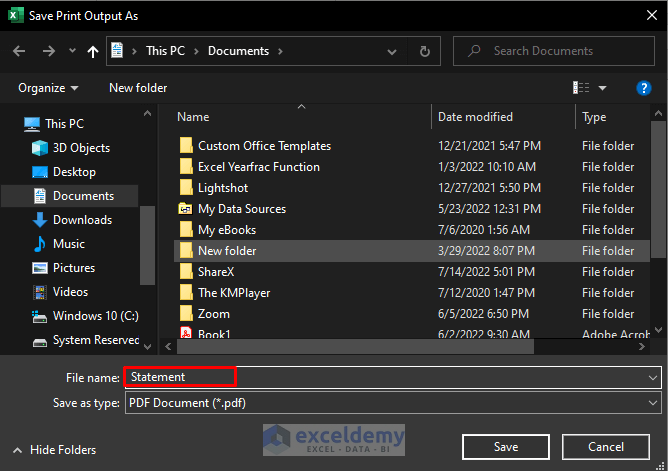
Step 2:
- In the Save window, save the file as type “PDF Document” with the name Statement.
- Click Save.
- Open the saved file to view the selected range.
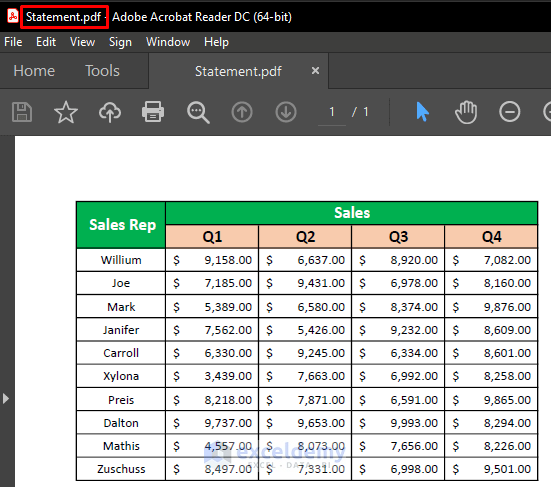
- View the print preview of this selected range of cells by pressing CTRL + P and giving the necessary commands.
Things to Remember
You can also pop up the Microsoft Visual Basic for Applications window by using the keyboard shortcut Alt + F11.
If the Developer tab is not visible in your ribbon, enable it by going to File → Option → Customize Ribbon.
Download Practice Workbook
Related Articles
- Excel VBA: How to Set Print Area Dynamically
- How to Set Print Area to Selection Using VBA in Excel
- VBA Code for Print Button in Excel
- How to Print Specific Sheets Using VBA Macro in Excel

