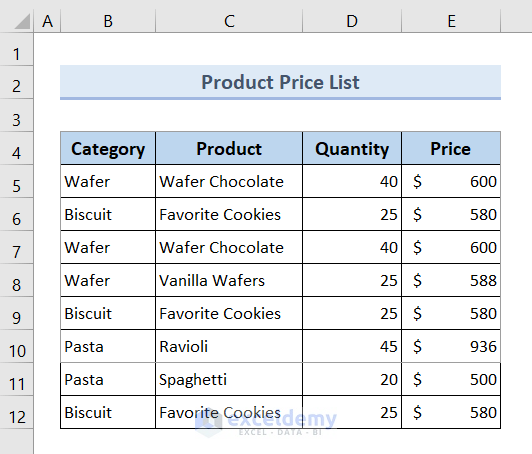
In this article, we will discuss 5 examples related to setting the print area for multiple ranges using VBA in Excel.
Example 1 – Print Multiple Ranges from Active Sheet On Same Page
This method merges multiple ranges from the active worksheet on the same page column-wise. So, the first column of the second range will be adjacent to the last column of the first range.
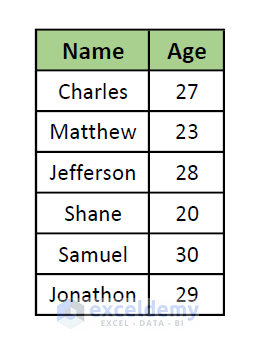
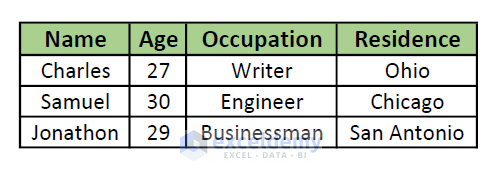
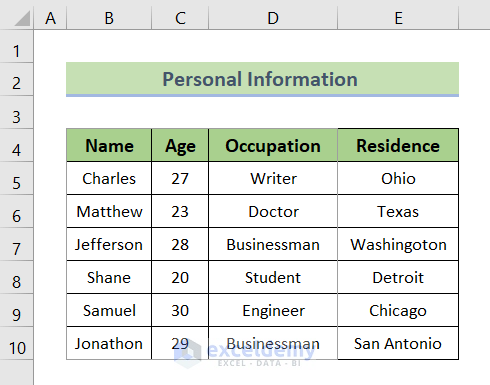
In the dataset in the attached picture, we will select B4:C10 as the first range and C4:D10 as the second range.
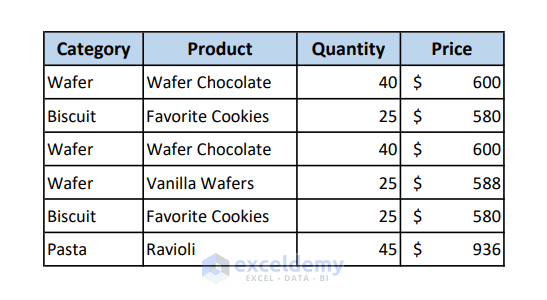
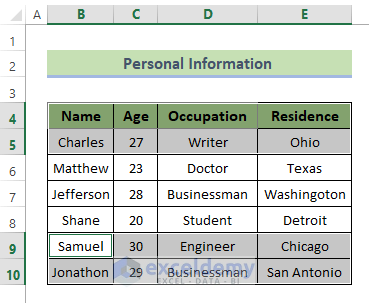
In the output, we will get the same data table as below.
- Press ALT + F11 to open the VBA Editor.
- Go to Insert >> Module to create a new module.
Enter the following code in the VBA Editor and Save it:
Sub Print_Multiple_Ranges_Active_Sheet()

Dim yRng1 As Range
Dim yRng2 As Range
Dim rxUni As Range

Set yRng1 = Sheets("Sheet1").Range("B4:C10")
Set yRng2 = Sheets("Sheet1").Range("C4:E10")

With ActiveSheet.PageSetup
        .printArea = yRng1.Address & "," & yRng2.Address
         ActiveWindow.SelectedSheets.PrintOut Preview:=Preview
End With

End Sub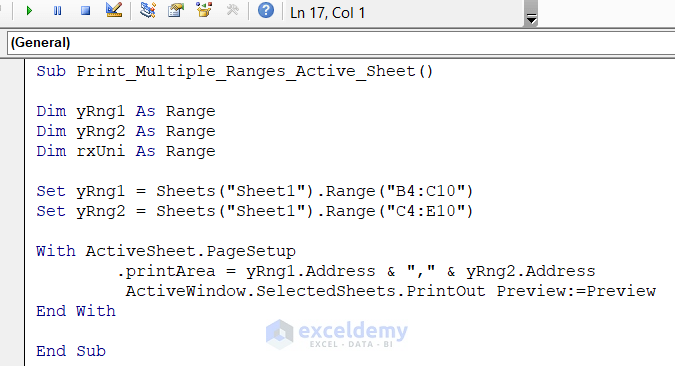
Breakdown of the Code
- We declare 3 variables.
- We input two ranges.
- We set PrintArea for the multiple ranges and then print out the specified range using the With statement property.
- Press F5 to Run the code.
The printing will automatically begin. The following table will appear in the printed output.
Read More: Excel VBA: Print Preview for Selected Range
Example 2 – Set Print Area for Multiple Ranges of a Selected Sheet
Use this method to set multiple ranges as print areas. You can also specify a sheet’s serial number to print a specific sheet.
Steps:
- Open a VBA module by following the instructions here.
- Enter the following VBA code in the module and Save it:
Sub Print_Multiple_Ranges_Selected_Sheet()

    Worksheets(2).Range("B4:C10, B4:D10").PrintOut

End Sub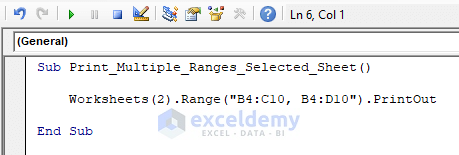
Breakdown of the Code
- We specify the worksheet number using Worksheets().
- We use the Range property to specify the ranges.
- We use the PrintOut command to start printing.
- Press F5 to Run the code.
The printing will automatically begin. The contents of the inserted ranges will appear on separate pages like this:
Example 3 – Print Multiple Ranges on a Single Page by Merging Rows
Use this method to set multiple ranges as print areas and print them all on the same page.
- Open a VBA module by following the instructions here.
- Enter the following VBA code in the module and Save it:
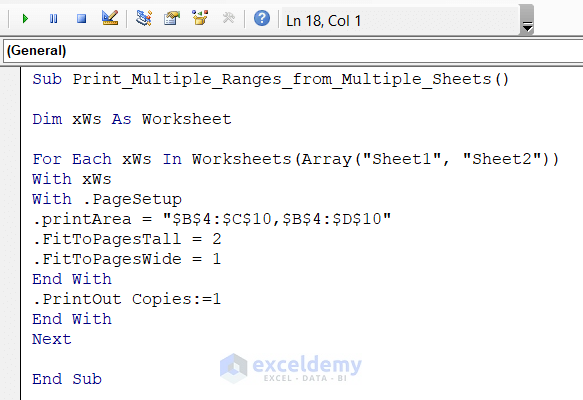
Sub Print_Multiple_Range_in_One_Page()

Dim yRng1 As Range
Dim yRng2 As Range
Dim yNewWs As Worksheet
Dim yWs As Worksheet
Dim yIndex As Long

Application.ScreenUpdating = False
Application.DisplayAlerts = False
Set yWs = ActiveSheet
Set yNewWs = Worksheets.Add
yWs.Select
yIndex = 1

For Each yRng2 In Selection.Areas
    yRng2.Copy
    Set yRng1 = yNewWs.Cells(yIndex, 1)
    yRng1.PasteSpecial xlPasteValues
    yRng1.PasteSpecial xlPasteFormats
    yIndex = yIndex + yRng2.Rows.Coun
Next

yNewWs.Columns.AutoFit
yNewWs.PrintOut
yNewWs.Delete
Application.DisplayAlerts = True
Application.ScreenUpdating = True

End Sub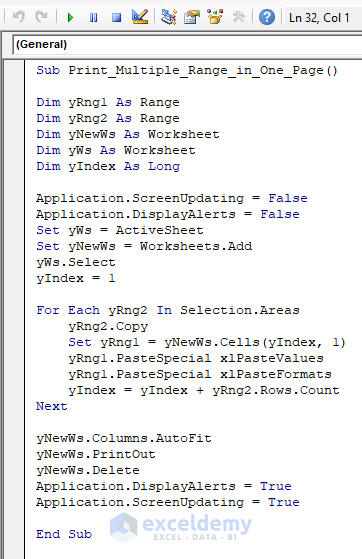
Breakdown of the Code
- We declare 5 variables.
- We use the Add property to open a new worksheet.
- We use a For loop to Copy each of the selected areas and Paste their values as well as formats to the new worksheet sequentially.
- We use the AutoFit property to fit the pasted values perfectly.
- We use the PrintOut property to print the contents of the newly added worksheet.
- We use the Delete property to delete the worksheet.
- Go back to the worksheet and select the range that you want to print out.
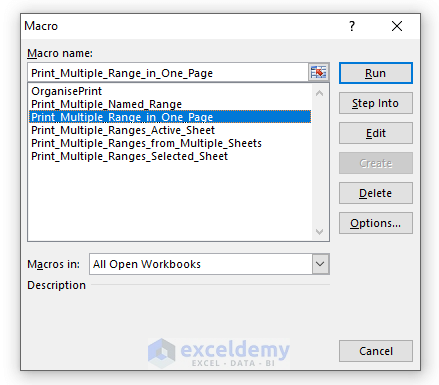
- Press ALT + F8 to open the Macro dialog box.
- Select the macro Print_Multiple_Range_in_One_Page and click the Run button.
The printing will automatically begin. The selected ranges are printed on the same page like this:
Read More: How to Print Specific Sheets Using VBA Macro in Excel
Example 4 – Set Multiple Ranges From Multiple Sheets as Print Area
To set multiple ranges as the print areas from multiple sheets, follow this method.
- Open a VBA module by following the instructions here.
- Enter the following VBA code in the module and Save it:
Sub Print_Multiple_Ranges_from_Multiple_Sheets()

Dim xWs As Worksheet

For Each xWs In Worksheets(Array("Sheet1", "Sheet2"))
With xWs
With .PageSetup
.printArea = "$B$4:$C$10,$B$4:$D$10"
.FitToPagesTall = 2
.FitToPagesWide = 1
End With
.PrintOut Copies:=1
End With
Next

End Sub
Breakdown of the Code
- We declare a variable.
- We use a For loop to retrieve each sheet.
- We use the printArea property to set multiple ranges using the With statement.
- We set the number of print copies to 1 using PrintOut Copies.
- Press the F5 key to Run the code.
The printing will automatically begin, and the contents of the inserted ranges will appear on separate pages like this:
Read More: How to Set Print Area to Selection Using VBA in Excel
Example 5 -. Print Multiple Named Ranges on a Single Page by Merging Columns
If you have too many ranges to print out, you can name each of them uniquely for convenience.
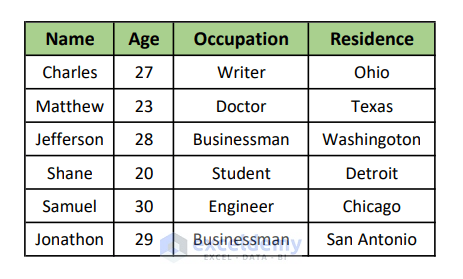
In the dataset in the attached picture, we will select B4:C10 as the first range and C4:D10 as the second range. So in the output, we will get the same data table as the following:
- Open a VBA module by following the instructions here.
- Enter the following VBA code in the module and Save it:
Sub Print_Multiple_Named_Range()

Dim xRng As Range
Dim yRng As Range

Set xRng = Range("$B$4:$C$10")
Set yRng = Range("$D$4:$E$10")

With ActiveSheet
.PageSetup.printArea = Union(xRng, yRng).Address
ActiveWindow.SelectedSheets.PrintOut Preview:=Preview
End With

End Sub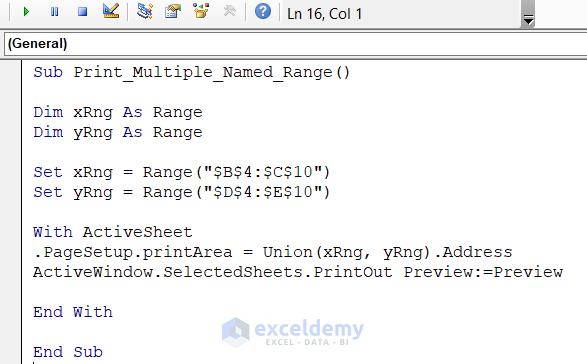
Breakdown of the Code
- We declare two variables.
- We assign cell ranges to different names.
- We use the Union function to merge those ranges column-wise to set the PrintArea.
- We use the PrintOut property to print out the specified ranges.
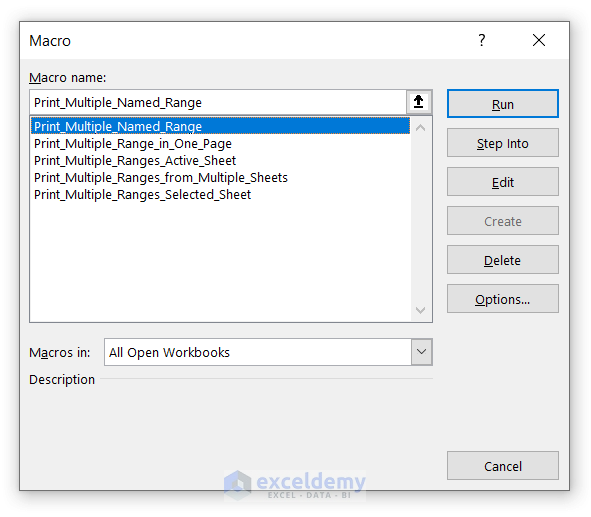
- Go back to the worksheet.
- Press ALT + F8 to open the Macro dialog box.
- Select the macro Print_Multiple_Named_Range and click the Run button.
The printing will automatically begin, and all the selected ranges will be printed on the same page like this:
Download Practice Workbook
Related Articles
- How to Display Print Preview with Excel VBA
- Excel VBA: How to Set Print Area Dynamically
- VBA Code for Print Button in Excel
- Excel VBA: Print Range of Cells


how can I change the value in multiple cell,
For example,
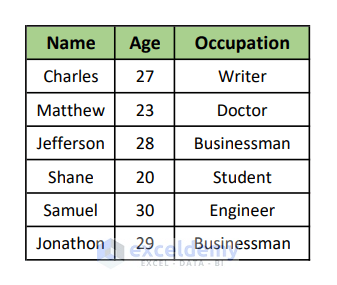
i have data of 20 student’s like
1. Name, 2. Roll Number, 3. subject and 4. semester. and this all data is on sheet 2, and I want to print each student’s data automatically in a same format front page.
Hello HBING,
To solve your issue follow the steps given below.
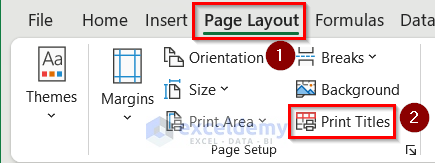
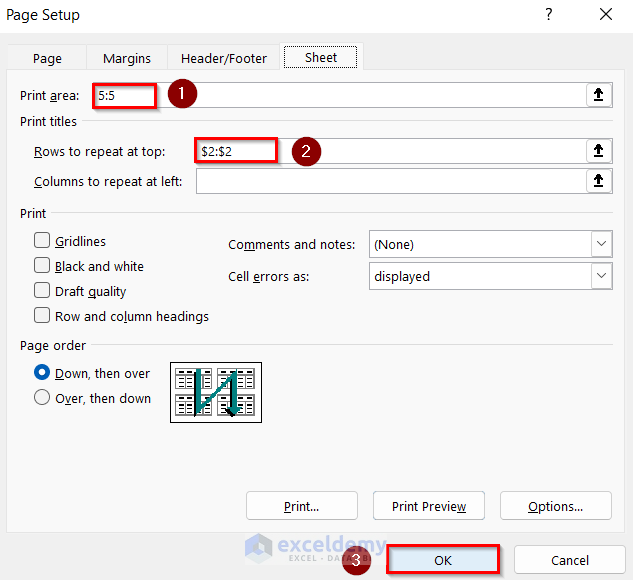
• Firstly, go to the Page Layout tab >> click on Print Titles.
• After that, type 5:5 as Print Area and $2:$2 as Rows to repeat at top.
• Then, click on OK.
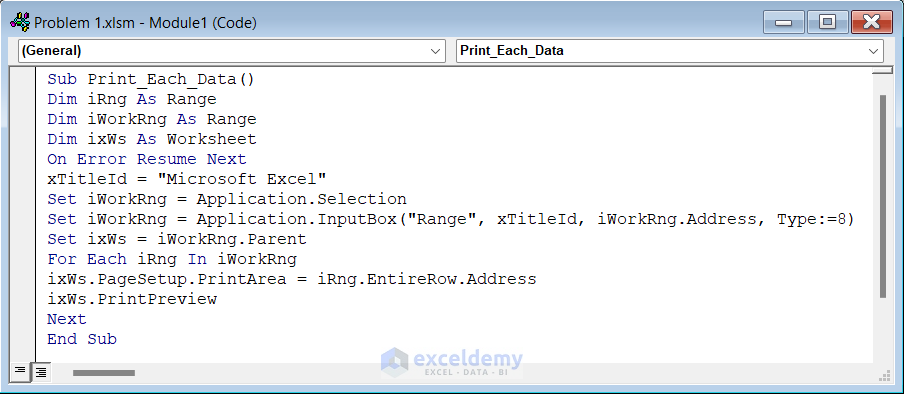
• Now, write the following code in your module.
Sub Print_Each_Data()
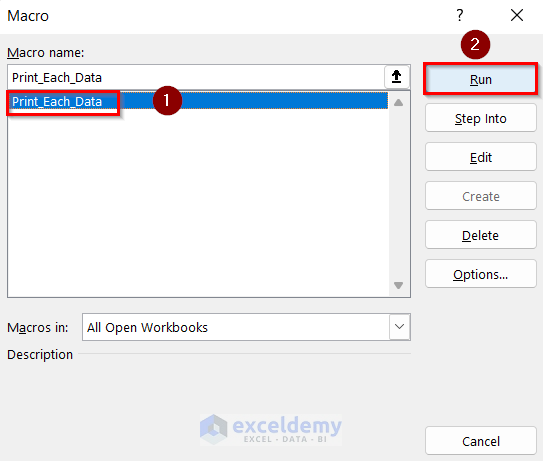
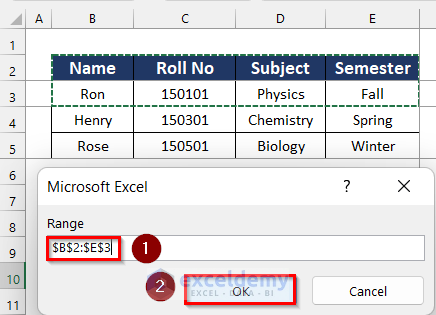
Dim iRng As RangeDim iWorkRng As RangeDim ixWs As WorksheetOn Error Resume NextxTitleId = "Microsoft Excel"Set iWorkRng = Application.SelectionSet iWorkRng = Application.InputBox("Range", xTitleId, iWorkRng.Address, Type:=8)Set ixWs = iWorkRng.ParentFor Each iRng In iWorkRngixWs.PageSetup.PrintArea = iRng.EntireRow.AddressixWs.PrintPreviewNextEnd Sub• Next, click on Macros from the Developer tab.
• Select the macro named Print_Each_Data.
• Lastly, click on Run.
• Now, a box will open.
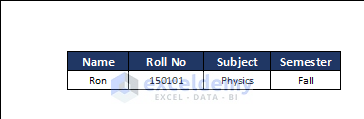
• Then, select the range which you want to print. Here, we selected cell range B2:E3.
• Finally, click on OK.
• Thus, you can print each student’s data automatically in the same format.
If you face any further problems, please share your Excel file with us in the comment section.
Regards
Arin Islam,
Exceldemy.