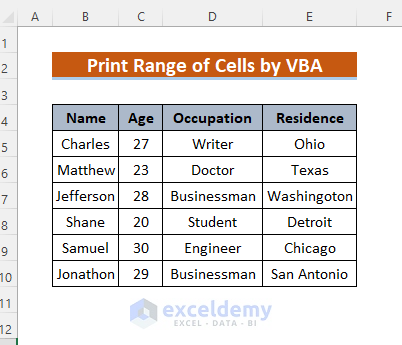
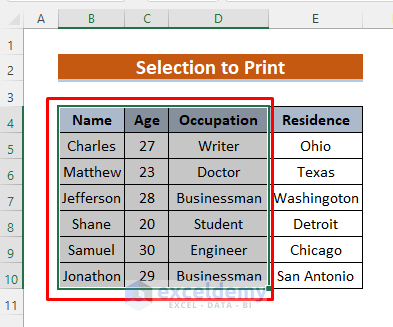
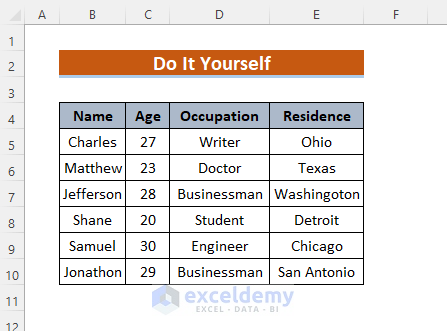
This is the sample dataset.
Method 1 – Using the Excel VBA PrintOut Method to Print a Range of Cells
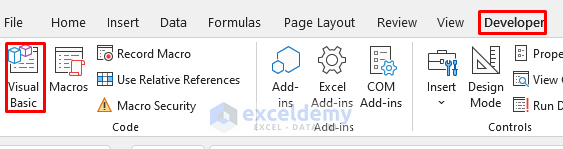
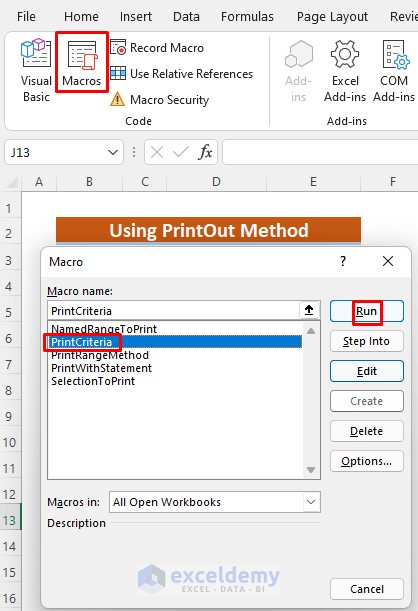
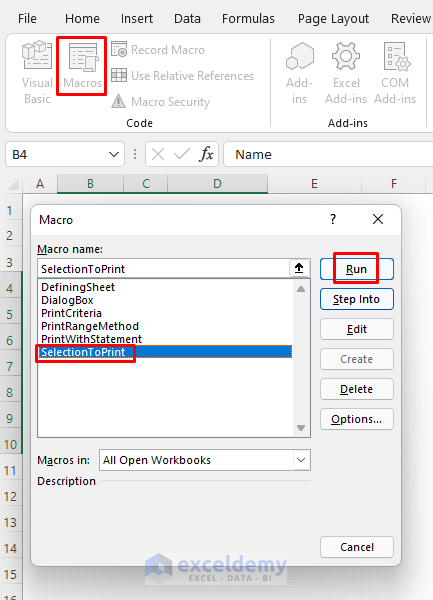
- Open Visual Basic in the Developer Tab.
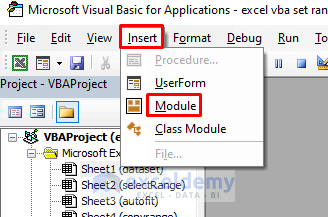
- In the new window, select Insert >> Module.
- Enter the following code in the VBA Module.
Sub PrintCriteria()
Range("B4:C10").PrintOut
End Sub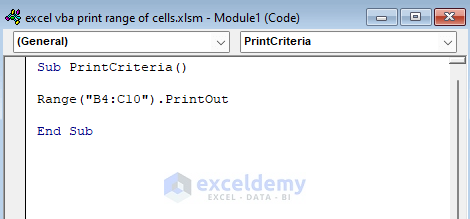
B4:C10 is defined to print using the Range Method and the PrintOut Method.
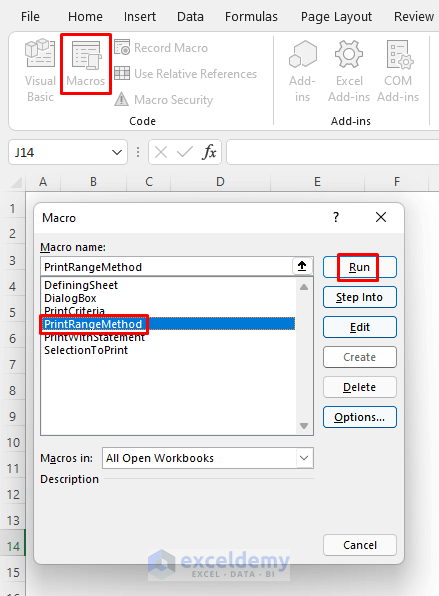
- Go back to your sheet and run the Macro (PrintCriteria).
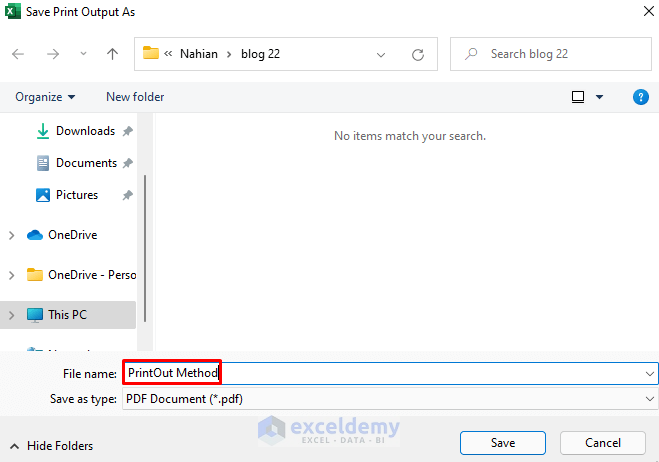
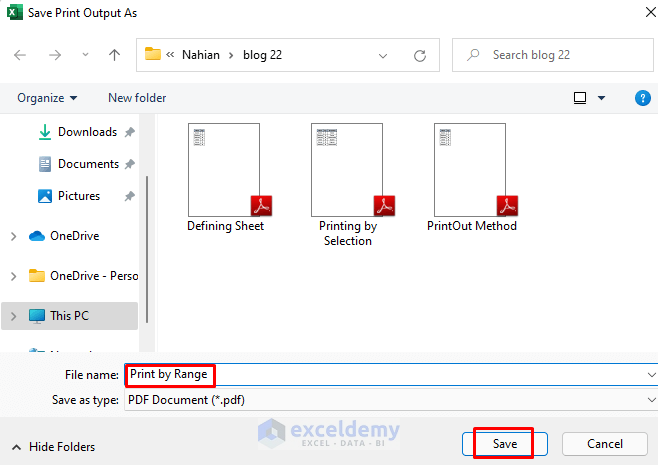
To Save the file for further use or to Print it later:
- The Save window will open. Save your range as PDF and rename it (PrintOut Method, here)
- Click Save.
- Open the file to see the selected range.
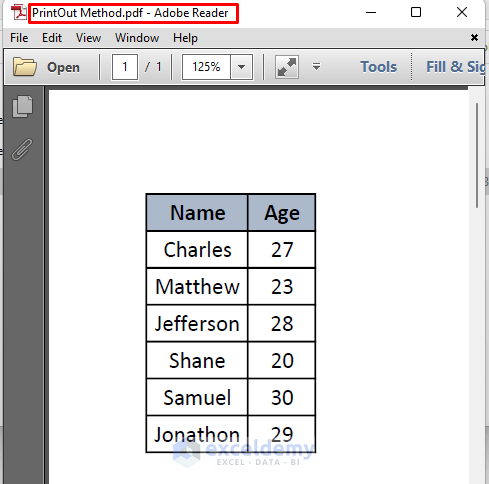
- To print it, press CTRL + P.
Read More: Excel VBA: Print Preview for Selected Range
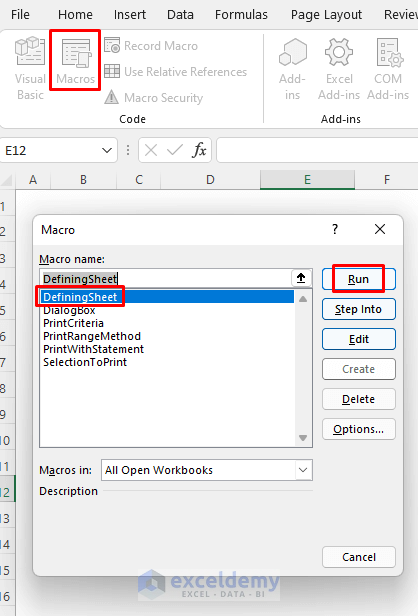
Method 2 – Defining the Excel Sheet to Print a Range of Cells using Excel VBA
You want to print the Name and Age only.
Steps:
- Enter the following code in the VBA Module. (To see how to open a VBA Module, go to Method 1)
Sub DefiningSheet()
Sheets("Defining_Sheet").Range("B4:C10").PrintOut
End Sub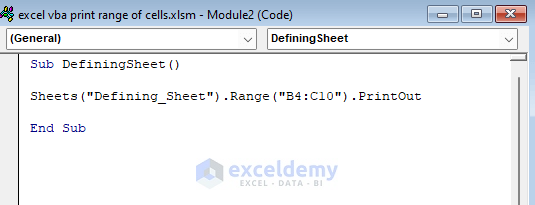
The Excel sheet is defined in the VBA Module. B4:C10 inDefining_Sheet is selected.
- Go back to your sheet and run the Macro (DefiningSheet).
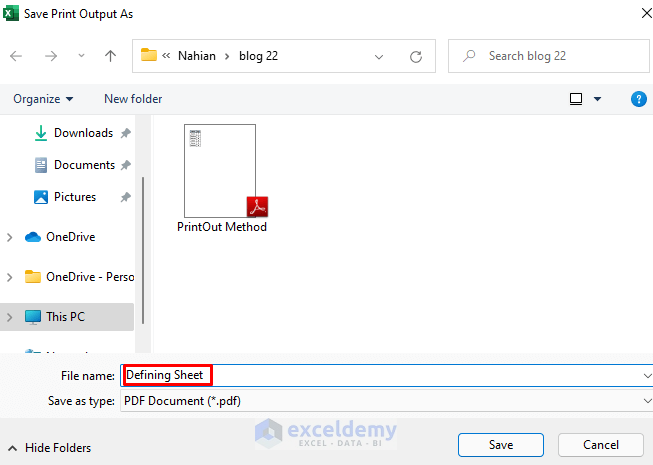
To Save the file for further use or to Print it later:
- The Save window will open. Save your range as PDF and rename it (Defining Sheet, here).
- Click Save.
- Open the file to see the selected range.
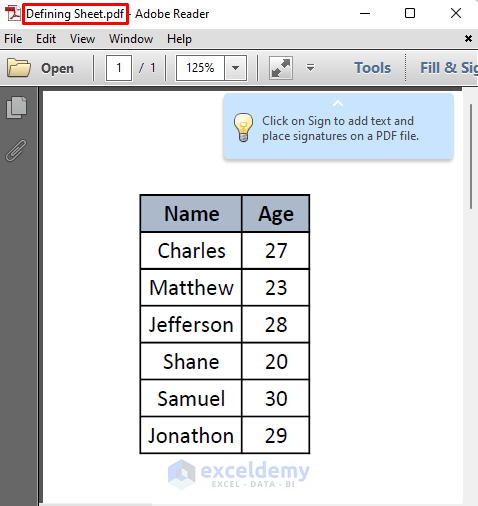
- To print it, press CTRL + P.
Read More: How to Print Specific Sheets Using VBA Macro in Excel
Method 3 – Selecting a Range of Cells to Print using Excel VBA
You want to print Name, Age, and Occupation only.
Steps:
- Enter the following code in the VBA Module. (To see how to open a VBA Module, go to Method 1)
Sub SelectionToPrint()
Selection.PrintOut
End Sub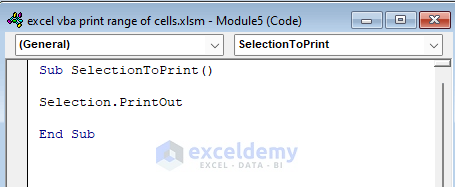
The Selection Property was used in the PrintOut Method to print the selected range.
- Go back to your sheet and select B4:D10.
- Run the Macro (SelectionToPrint).
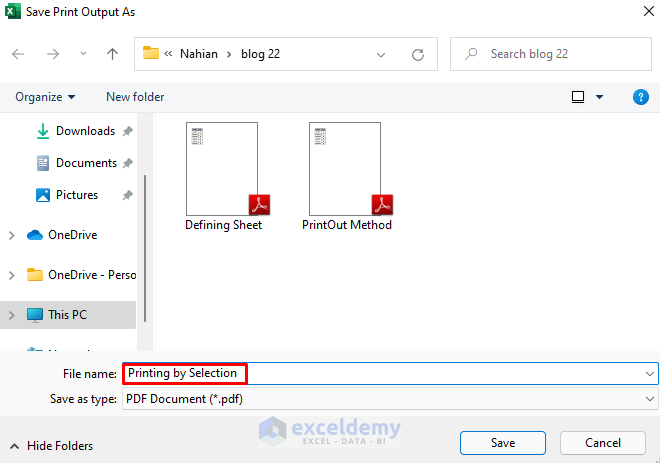
To Save the file for further use or to Print it later:
- The Save window will open. Save your range as PDF and rename it (Printing by Selection, here).
- Click Save.
- Open the file to see the selected range.
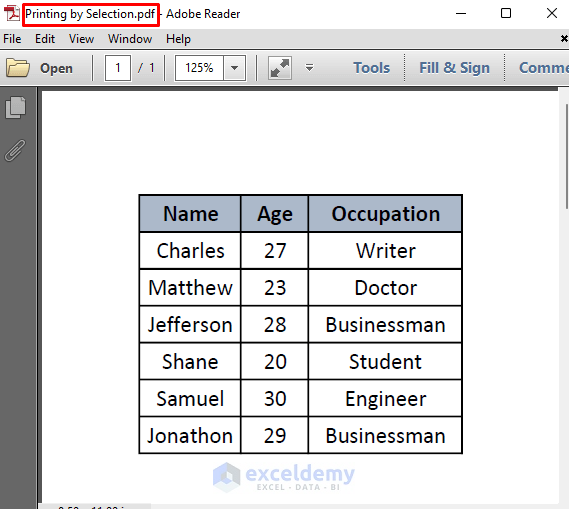
To print it, press CTRL + P.
Read More: How to Set Print Area to Selection Using VBA in Excel
Method 4 – Defining a Range of Cells to print in the VBA Code in Excel
You want to print the information about the first four persons.
Steps:
- Enter the following code in the VBA Module. (To see how to open a VBA Module, go to Method 1)
Sub PrintRangeMethod()
Sheets("Range_Method").Select
Range("B4:E8").Select
ActiveSheet.PageSetup.PrintArea = "B4:E8"
ActiveWindow.SelectedSheets.PrintOut From:=1, _
To:=1, Copies:=1, Collate:=True
End Sub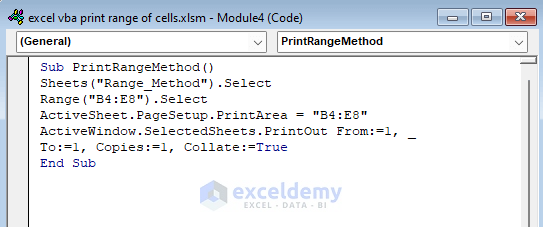
B4:E8 is defined, using the Range Method. It is set as the PrintArea and the PrintOut Method is used to print the selected range.
- Go back to your sheet and Run the Macro (PrintRangeMethod).
To Save the file for further use or to Print it later:
- The Save window will open. Save your range as PDF and rename it (Print by Range, here).
- Click Save.
- Open the file to see the selected range.
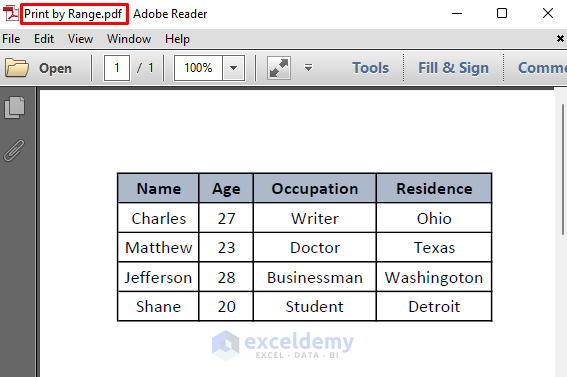
- To print it, press CTRL + P.
Method 5 – Printing a Range of Cells using Excel VBA With Statement
You want to print Names, Ages, and Occupations of the first four persons.
Steps:
- Enter the following code in the VBA Module. (To see how to open VBA Module, go to Method 1)
Sub PrintWithStatement()
With Sheets("With_Statement")
.PageSetup.PrintArea = "B4:D8"
.PrintOut
End With
End Sub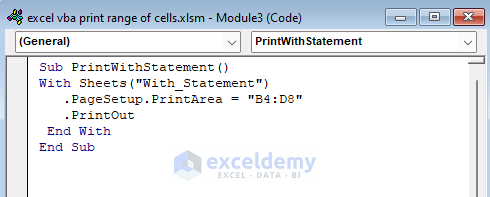 The With Statement defines the Excel sheet (With_Statement). The PrintArea property is used to print the selected range.
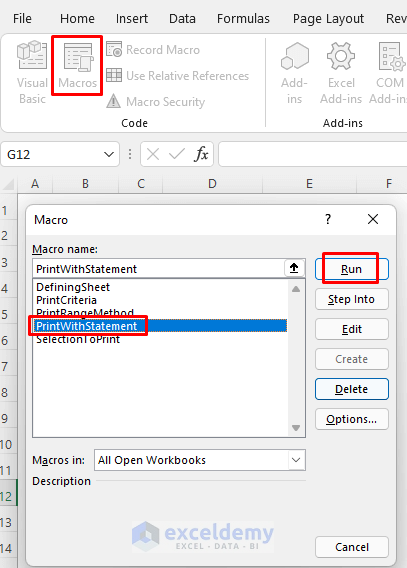
- Go back to your sheet and run the Macro (PrintWithStatement).
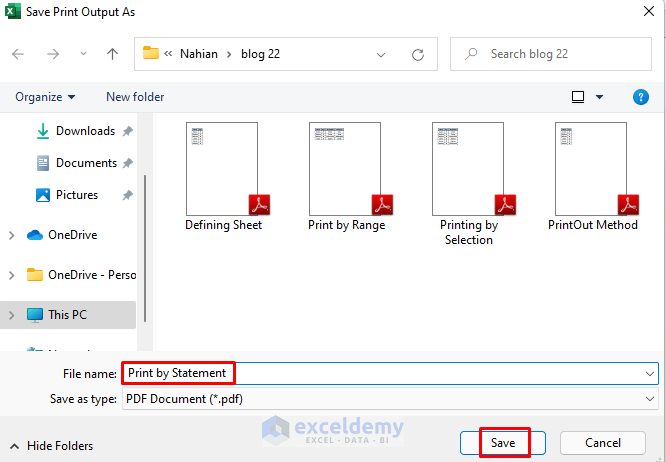
To Save the file for further use or to Print it later:
- The Save window will open. Save your range as PDF and rename it (Print by Statement, here).
- Click Save.
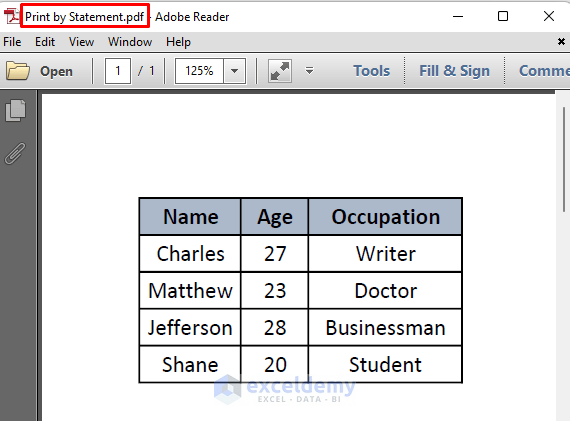
- Open the file to see the selected range.
- To print it, press CTRL + P.
Practice Section
Practice here.
Download Practice Workbook
Related Articles
- How to Display Print Preview with Excel VBA
- Excel VBA: How to Set Print Area Dynamically
- Excel VBA: Set Print Area for Multiple Ranges
- VBA Code for Print Button in Excel

