Method 1 – Manual Approach to Split Excel Sheet into Multiple Files
Method 1.1 Using Copy and Paste Options
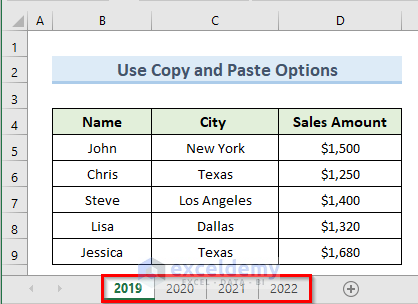
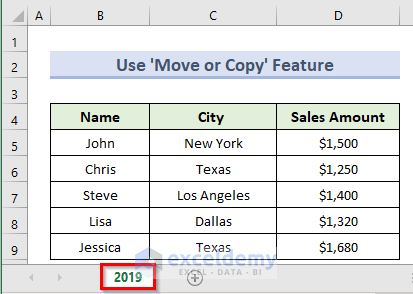
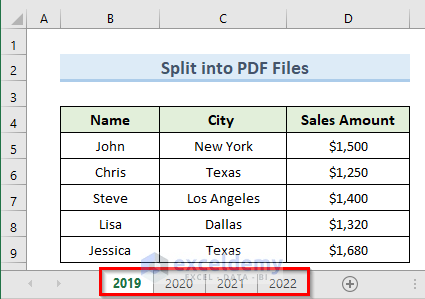
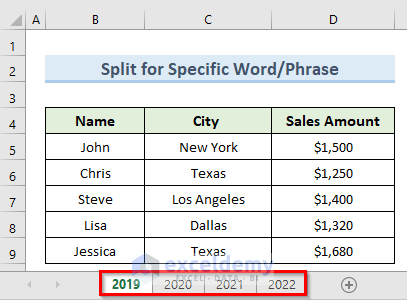
In the following dataset, we have sales data of five people for four years in four different worksheets. Suppose we want to split each Excel sheet of the workbook into a separate file.
STEPS:
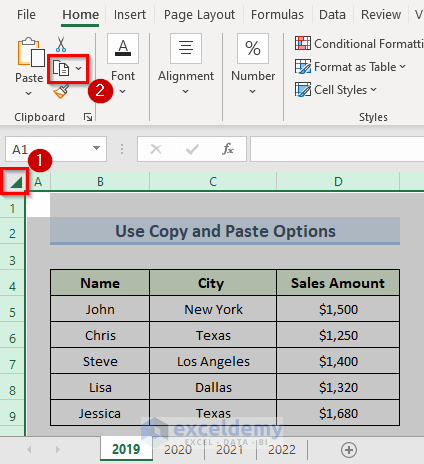
- Click on the sheet 2019.
- Click on the triangular Select all button on the top left corner or press Ctrl + A to select the table.
- Select Copy from the Home tab or press Ctrl + C to copy the entire selected sheet.
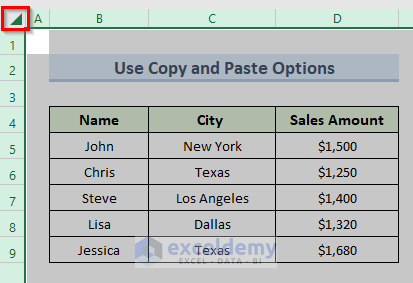
- Open a new worksheet (Excel file).
- Select cell A1 or the entire worksheet by clicking on the triangular select all button.
- Press Ctrl + V to paste the copied data.
- Save the workbook.
- Repeat for the other sheets.
This method is not only inefficient but also time-consuming.
Method 1.2 Applying Move or Copy Feature
STEPS:
- Right-click on the sheet named 2019.
- Select the option ‘Move or Copy’.
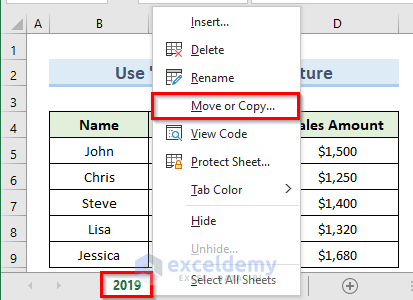
- The above command will open a new pop-up window named ‘Move or Copy’.
- Select the option (new book) from the To book drop-down list.
- Check the option Create a Copy and click on OK.
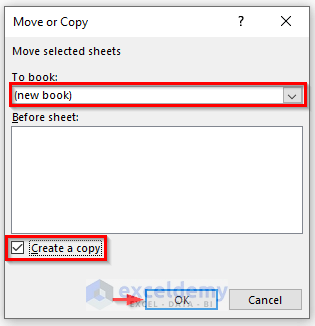
- A copy of the worksheet 2019 will open in a new worksheet.
- Repeat for other sheets.
This method is slightly faster than copy-pasting.
Method 2 – Running VBA Macro to Split Excel Sheet into Multiple Files
Before you can use the code:
- Make a folder to store the output files.
- Save the main Excel file in the newly created folder.
Method 2.1 Splitting Into Multiple Excel Files
STEPS:
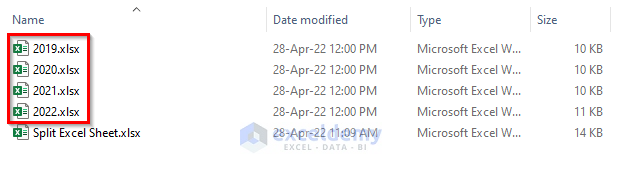
- Save the main Excel file as ‘Split Excel Sheet.xlsx’ in the newly made folder.

- Open the original workbook.

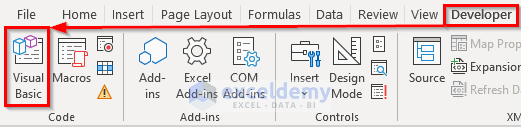
- Go to the Developer tab and select the option ‘Visual Basic’ from the ribbon, or press Alt + F11.

- This will open the VBA editor.
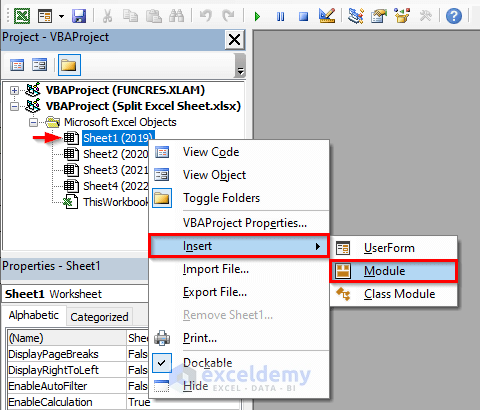
- Right-click on any sheet from the section ‘Microsoft Excel Objects’.
- Select the option Insert and click on Module.
- This will open a blank VBA code window. Copy the following code in the blank code window:
Sub Split_Sheet_into_ExcelFiles()
Dim FilePath As String
FilePath = Application.ActiveWorkbook.Path
Application.ScreenUpdating = False
Application.DisplayAlerts = False
For Each Sheet In ThisWorkbook.Sheets
Sheet.Copy
Application.ActiveWorkbook.SaveAs Filename:=FilePath & "\" & Sheet.Name & ".xlsx"
Application.ActiveWorkbook.Close False
Next
Application.DisplayAlerts = True
Application.ScreenUpdating = True
End Sub- Click on the Run button or press the F5 key to run the code.
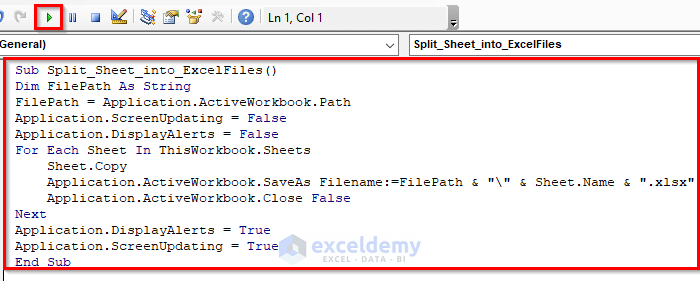
- This splits all the sheets of our original workbook into individual Excel files. The newly separated Excel files are put in the same folder as the original workbook.
Method 2.2 Splitting Into Multiple PDF Files
In this method, we will split the Excel worksheets into multiple PDF files.
STEPS:
- Go to the Developer tab and select the option ‘Visual Basic’ from the ribbon, or press Alt + F11. The VBA editor will open.
- Right-click any object in the ‘Microsoft Excel Objects‘ area.
- Select Insert and click on the option Module.

- Copy the following code in the code window:
Sub Split_Sheet_into_PDF()
Dim FilePath As String
FilePath = Application.ActiveWorkbook.Path
Application.ScreenUpdating = False
Application.DisplayAlerts = False
For Each Sheet In ThisWorkbook.Sheets
Sheet.Copy
Application.ActiveSheet.ExportAsFixedFormat _
Type:=xlTypePDF, Filename:=FilePath & "\" & Sheet.Name & ".xlsx"
Application.ActiveWorkbook.Close False
Next
Application.DisplayAlerts = True
Application.ScreenUpdating = True
End Sub- Click on the Run button or press the F5 key.
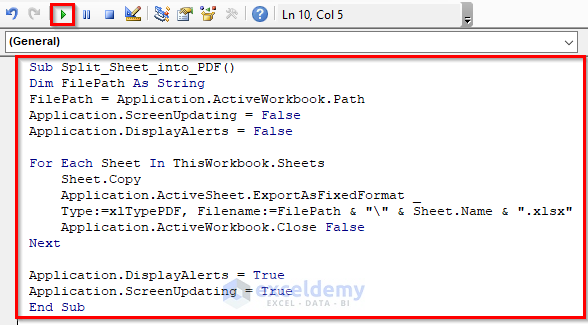
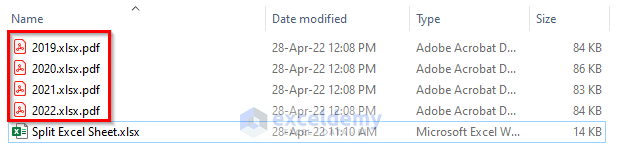
- The Excel sheets will be separated in PDF format in the folder with the original file.
Method 3 – Using VBA to Split Excel Sheets Containing Specific Word or Phrase into Multiple Files
From the following dataset, we will separate the sheets that only contain text 22 in their name.
STEPS:
- Go to the Developer and select the option ‘Visual Basic’. Alternatively, press Alt + F11.

- The VBA editor will pop up.
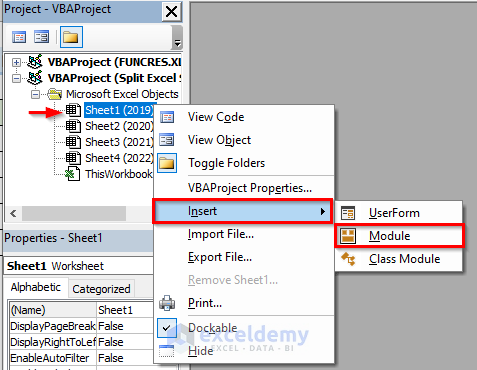
- In the ‘Microsoft Excel Objects‘ box, right-click on any object.
- Select Insert and click on the option Module.
- A new blank VBA code window will appear. Insert the following code in that code window:
Sub Split_Sheet_Specific_Word()
Dim FilePath As String
Dim Find As String
Find = "22"
FilePath = Application.ActiveWorkbook.Path
Application.ScreenUpdating = False
Application.DisplayAlerts = False
For Each Sheet In ThisWorkbook.Sheets
If InStr(1, Sheet.Name, Find, vbBinaryCompare) <> 0 Then
Sheet.Copy
Application.ActiveWorkbook.SaveAs _
Filename:=FilePath & "\" & Sheet.Name & ".xlsx"
Application.ActiveWorkbook.Close False
End If
Next
Application.DisplayAlerts = True
Application.ScreenUpdating = True
End Sub- Click on the Run button or press the F5 key.
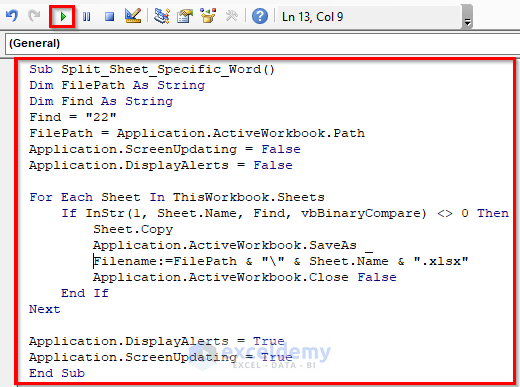
- The sheet with 22 in its name has been isolated into the folder alongside the original file.

Download Practice Workbook
You can download the practice workbook from here.
Related Articles
- How to Split Excel Sheet into Multiple Worksheets
- How to Split Sheet into Multiple Sheets Based on Rows in Excel
- How to Split Excel Sheet into Multiple Sheets Based on Column Value
- How to Enable Side-by-Side View with Vertical Alignments in Excel
- Excel VBA: Split Sheet into Multiple Sheets Based on Rows
- How to Split a Workbook to Separate Excel Files with VBA Code
<< Go Back to Split Excel Cell | Excel Worksheets | Learn Excel
Get FREE Advanced Excel Exercises with Solutions!

I received the error message “Run-time error ‘1004’: We couldn’t copy this sheet.
When I clicked Debug, the line Sheet.Copy was highlighted in the code.
What am I doing wrong?
Hello LINDSEY SERVE,
Sorry to hear about the problem you are facing. Have you tried it with the Practice Workbook? I tried it again and it still works. Are you trying it with your own workbook? Then, I think there could be some issues with this file. I could help you if you share it with us in the mail ID [email protected]. Thanks again.
Regards,
Shahriar Abrar Rafid
Excel & VBA Content Developer
Team ExcelDemy
I received the error message “Run-time error ‘1004’: We couldn’t copy this sheet.”
When I clicked Debug, the line “Sheet.Copy” was highlighted in the code.
What am I doing wrong?
Hello LINDSEY SERVE,
Sorry to hear about the problem you are facing. Have you tried it with the Practice Workbook? I tried it again and it still works. Are you trying it with your own workbook? Then, I think there could be some issues with this file. I could help you if you share it with us through the mail [email protected]. Thanks again.
Regards,
Shahriar Abrar Rafid
Excel & VBA Content Developer
Team ExcelDemy