Here’s an overview of using slicers to filter a table by specific value. Read on to learn more.
Split Excel Sheet into Multiple Sheets Based on Column Value: 5 Simple Ways
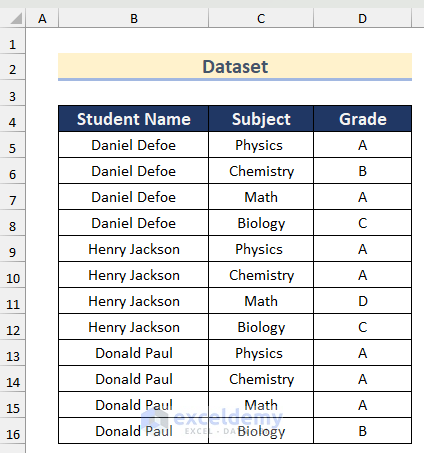
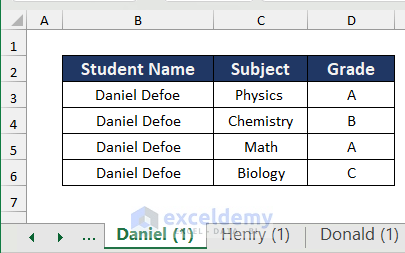
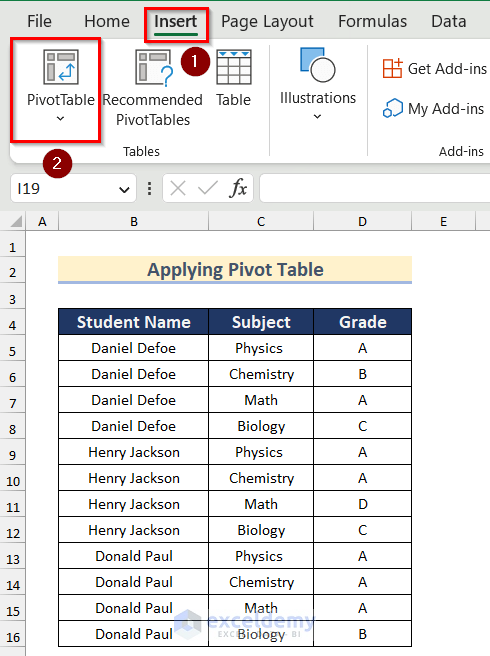
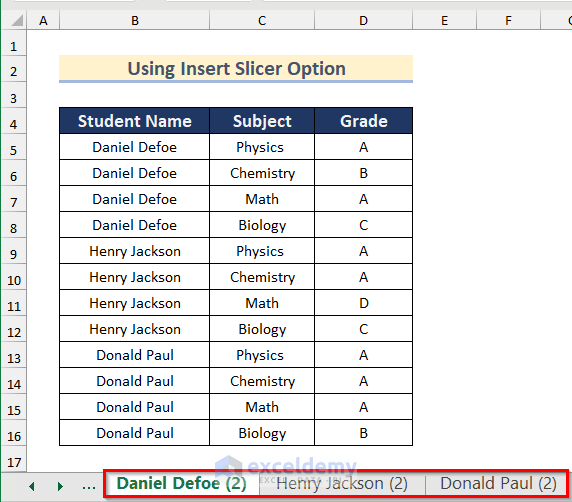
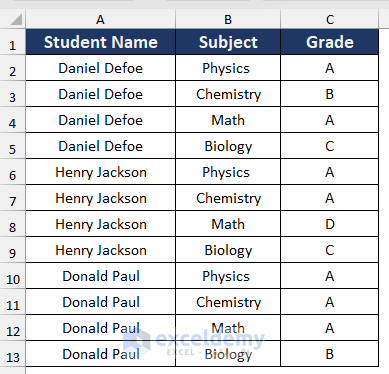
We will use the following data table which contains the grades of different students at a college. We will split this sheet into three sheets based on the Student Name column for the three students.
Method 1 – Use the FILTER Function to Split an Excel Sheet into Multiple Sheets
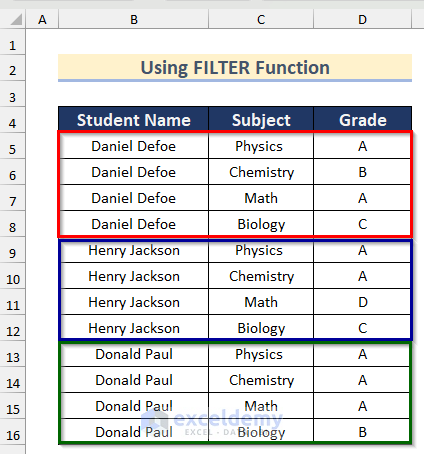
We will split the following sheet into three sheets containing the data for each student.
Steps:
- Create three sheets named after the three students’ names.
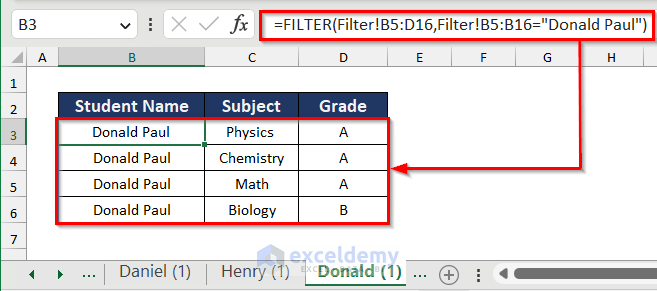
- Select a cell, like Cell B3, in the sheet for the first student.
- Use the following formula.
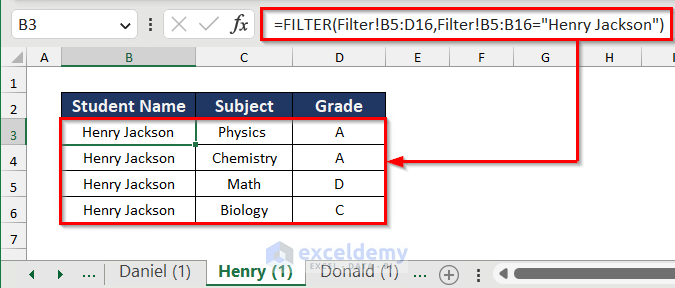
=FILTER(Filter!B5:D16,Filter!B5:B16="Daniel Defoe")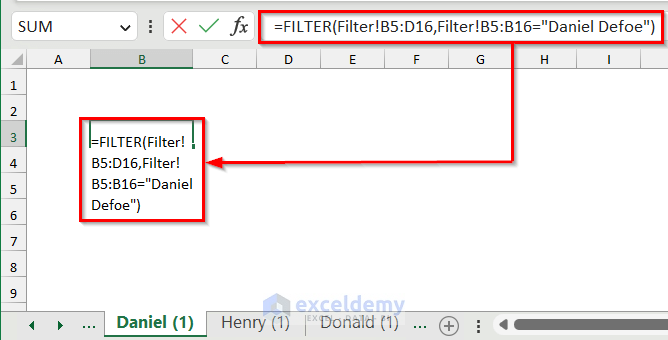
- Press Enter.
- You will get the data for the student Daniel Defoe in the sheet.
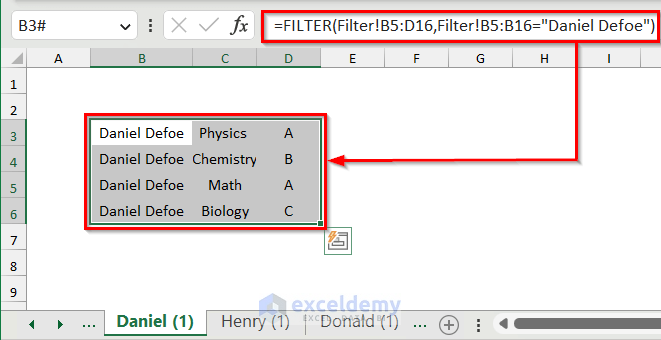
- Type the header name above all of the columns and format this data table.
- Repeat the process for the other two sheets, modifying the formula accordingly.
Method 2 – Apply a Pivot Table to Split an Excel Sheet into Multiple Sheets Based on Column Value
Steps:
- Go to Insert tab and click on the PivotTable option.
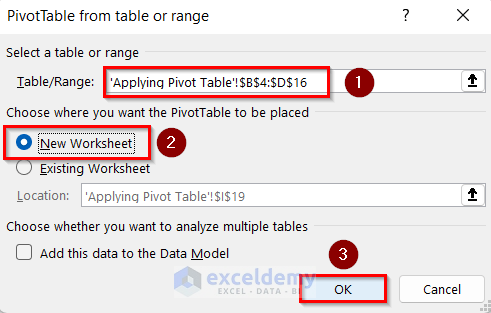
- The PivotTable from table or range dialog box will appear.
- Select the Table/Range as the original dataset.
- Click on New Worksheet.
- Press OK.
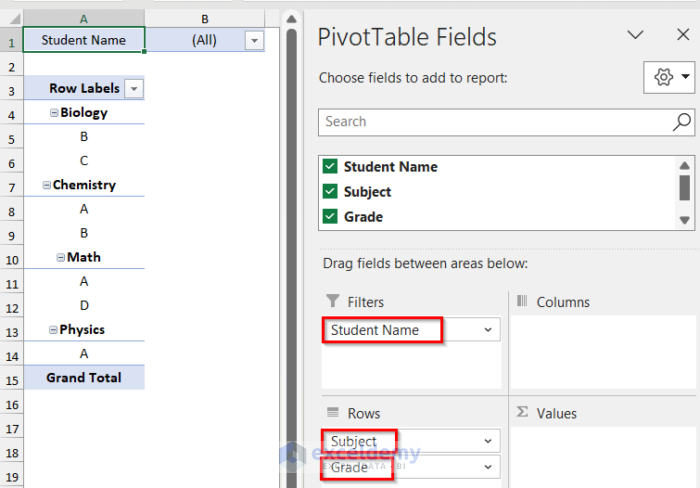
- A new sheet will open up which has two parts: PivotTable1 and PivotTable Fields.
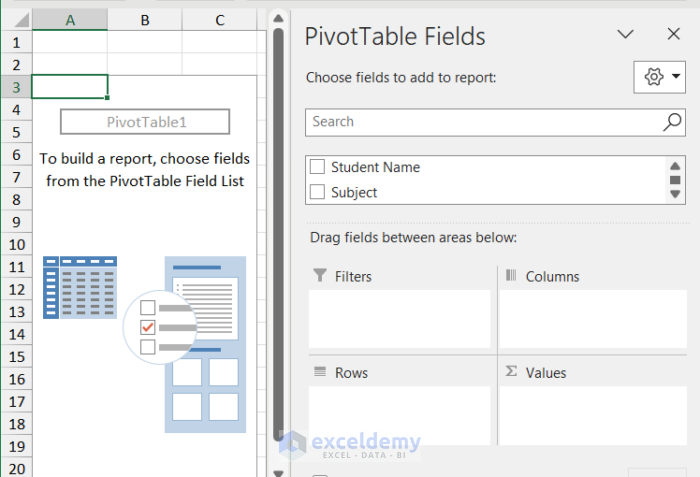
- Drag down the Student Name in the Filters area (any column on the basis of which you want to split the main sheet into multiple sheets) and Subject and Grade to the Rows area.
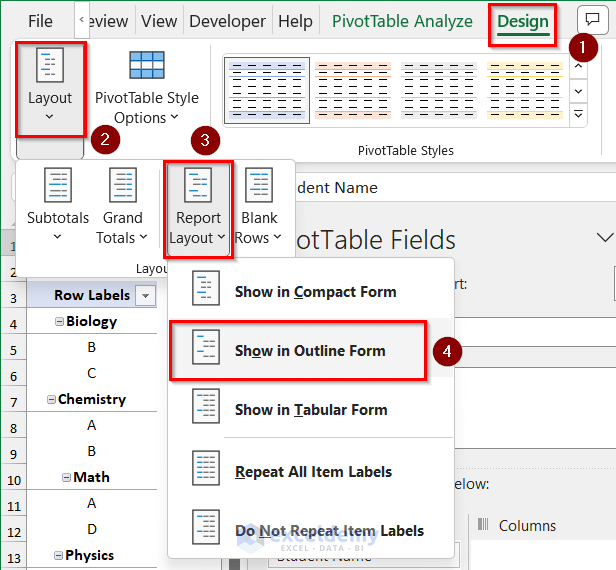
- Go to the Design tab and click to expand Layout.
- Click on Report Layout and select Show in Outline Form.
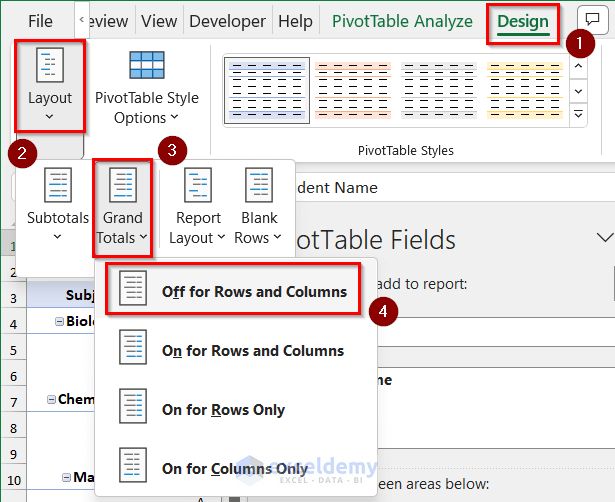
- From the Design tab, click on Layout and choose Grand Totals, then select Off for Rows and Columns.
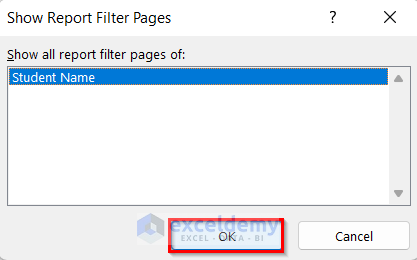
- Go to the PivotTable Analyze tab and click on the PivotTable group, then click on Options and select Show Report Filter Pages.
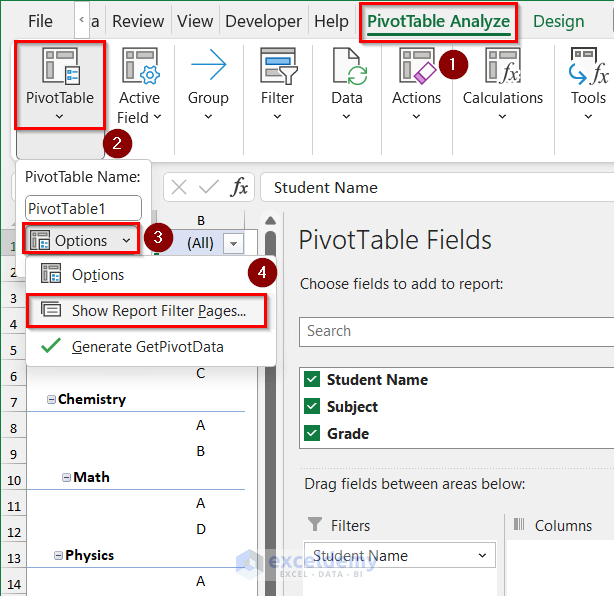
- The Show Report Filter Pages wizard will pop up.
- Select the column Student Name which was in the Filters area.
- Press OK.
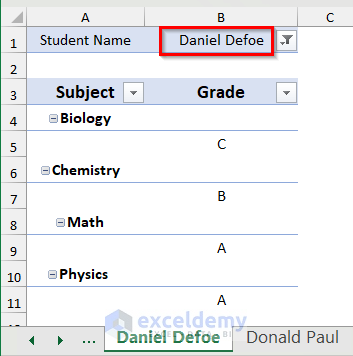
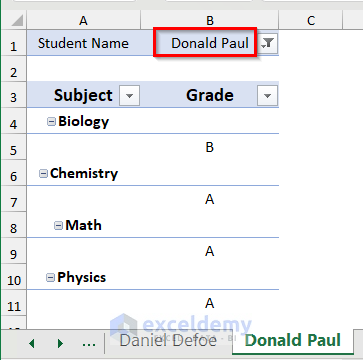
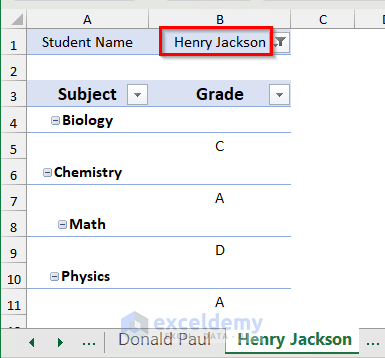
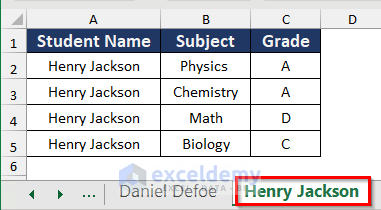
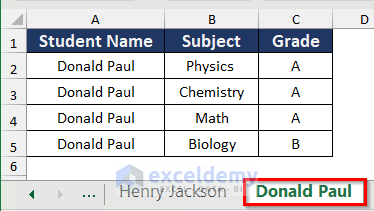
- You will get three different sheets for the three students Daniel Defoe, Henry Jackson, and Donald Paul, respectively.
Method 3 – Split an Excel Sheet into Multiple Sheets Using the Insert Slicer Option After Creating Table
Step 1 – Create Multiple Sheets
- Create a sheet for each student and name it after the student.
- Copy the data table from the main sheet and paste it into each new sheet.
Step 2 – Insert Table
- Go to the Insert tab and click on Table.
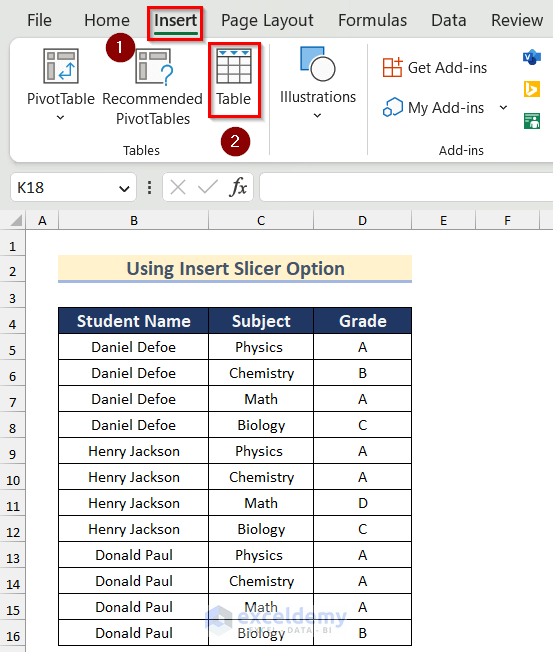
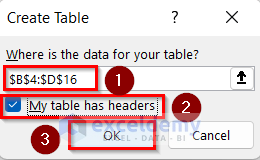
- The Create Table dialog box will appear.
- Select the data for your Table.
- Turn on My table has headers option.
- Press OK.
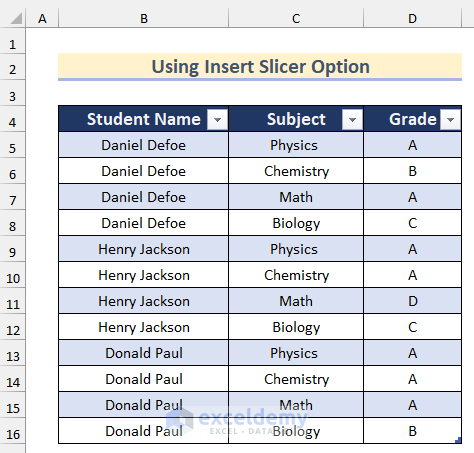
- The following table will be created.
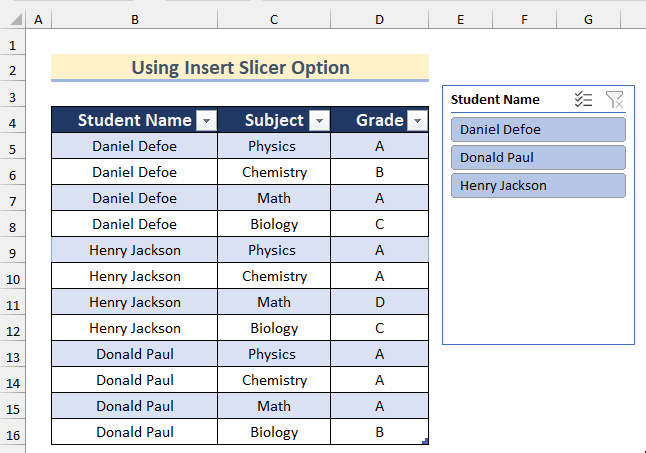
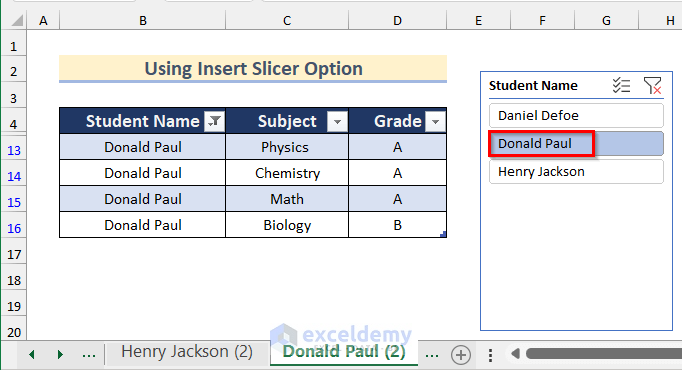
Step 3 – Use the Insert Slicer Option
- Click on any cell in the table.
- Go to the Table Design tab and click on Tools, then select Insert Slicer.
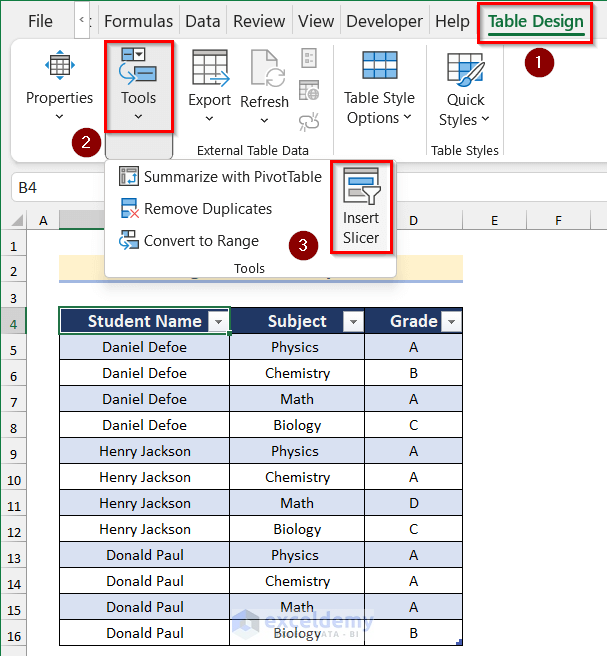
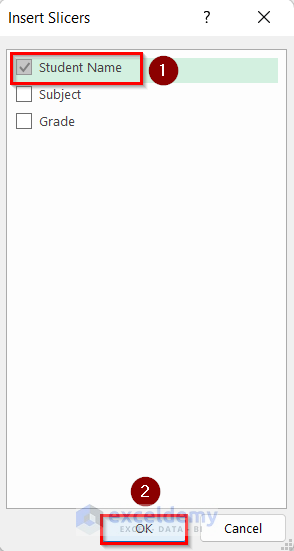
- The Insert Slicers dialog box will pop up.
- Select the Student Name column (the column based on which you want to split the sheet).
- Press OK.
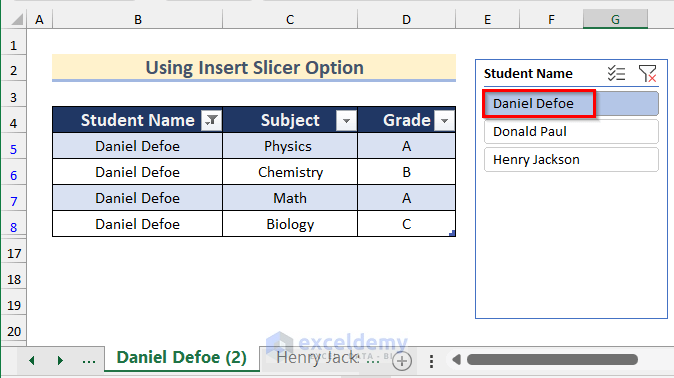
- A Student Name box will appear with an option for each student name.

- Click on Daniel Defoe for this sheet.
- You will get the data for the student Daniel Defoe.
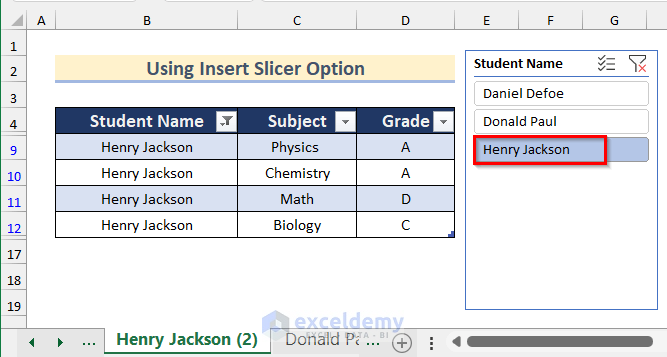
- You can create the other two sheets for Henry Jackson and Donald Paul by repeating the process.
Method 4 – Use the Filter Feature to Split an Excel Sheet into Multiple Sheets
Steps:
- Create three sheets named after the three students’ names.
- Copy the data table from the main sheet and paste it into these three different sheets.
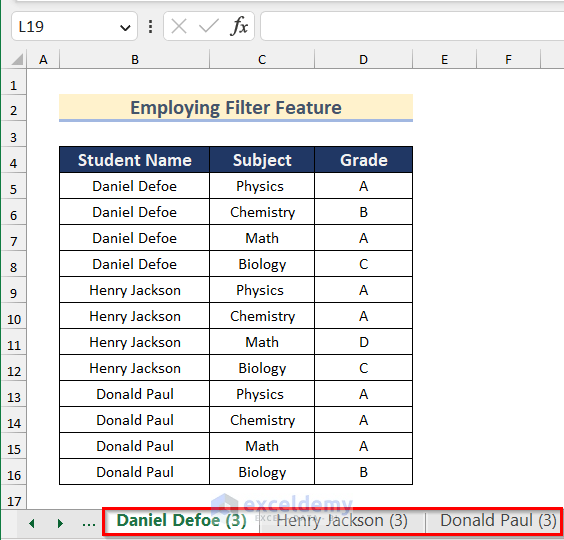
- Select the data table.
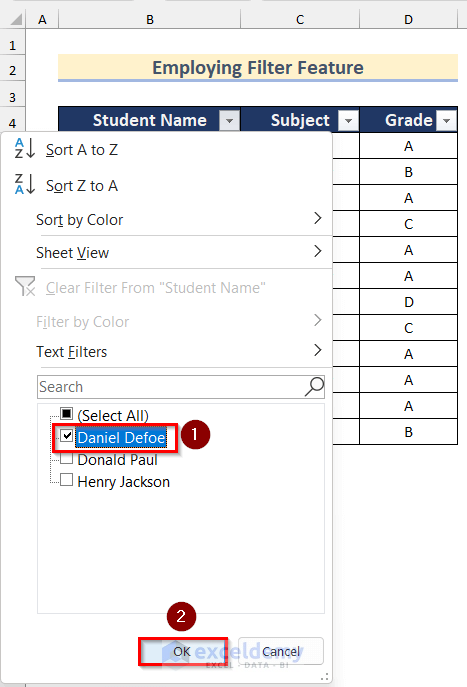
- Go to the Data tab and click on Sort & Filter, then select Filter.
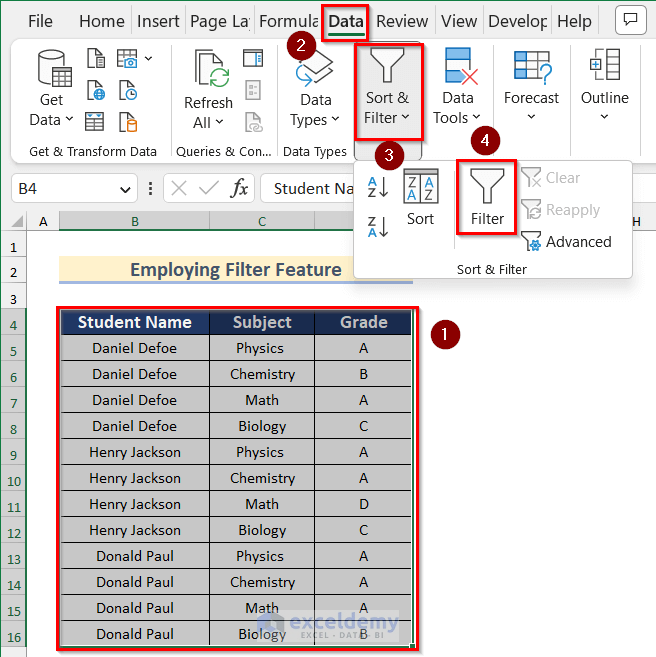
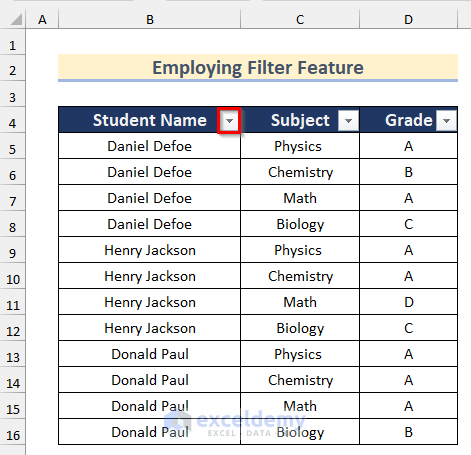
- The Filter option will be activated for this data table.
- Click on the Dropdown arrow in the Student Name column.
- Select the name Daniel Defoe for this sheet and press OK.
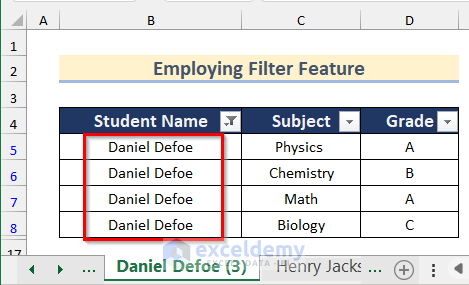
- You will get the data for the student Daniel Defoe in the sheet for this student.
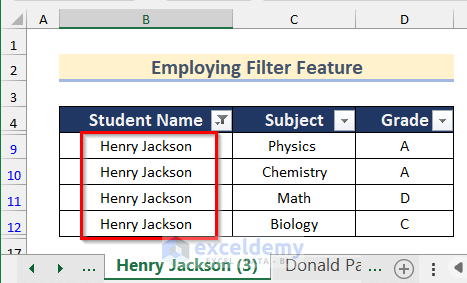
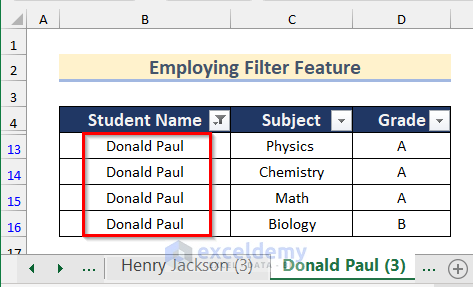
- Repeat the steps to get the other two sheets for Henry Jackson and Donald Paul as below.
Related Article: How to Split Excel Sheet into Multiple Worksheets
Method 5 – Use VBA to Split an Excel Sheet into Multiple Sheets Based on Column Value
We moved the dataset so it starts from A1.
Steps:
- Go to the Developer tab and click on Visual Basic.
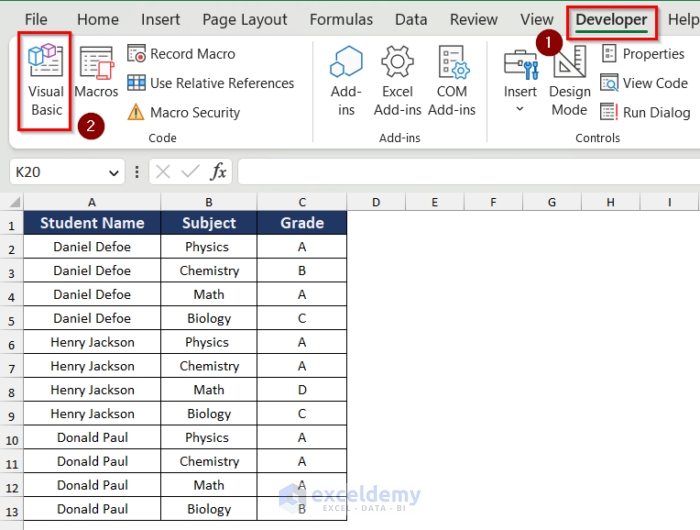
- The Visual Basic Editor will open up.
- Go to Insert and select Module.
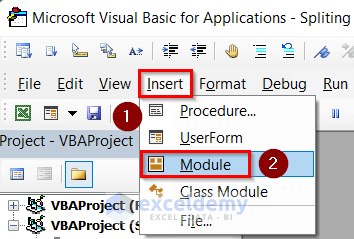
- Insert the following code in the module.
Sub Splitsheet1()
Dim lr1 As Long
Dim sheet As Worksheet
Dim verticle_colmn, i As Integer
Dim icolmn1 As Long
Dim dataset As Variant
Dim title1 As String
Dim titlerow1 As Integer
Dim title_range As Range
Dim verticle_range As Range
Dim datarange As Worksheet
On Error Resume Next
Set title_range = Application.InputBox("Select header row:", "", Type:=8)
If TypeName(title_range) = "Nothing" Then Exit Sub
Set verticle_range = Application.InputBox _
("Select the column range on the basis of which split data:", "", Type:=8)
If TypeName(verticle_range) = "Nothing" Then Exit Sub
verticle_colmn = verticle_range.Column
Set sheet = title_range.Worksheet
lr1 = sheet.Cells(sheet.Rows.Count, verticle_colmn).End(xlUp).Row
title1 = title_range.AddressLocal
titlerow1 = title_range.Cells(1).Row
icolmn1 = sheet.Columns.Count
sheet.Cells(1, icolmn1) = "Unique"
Application.DisplayAlerts = False
If Not Evaluate("=ISREF('title_rangeWs_Sheet!A1')") Then
Sheets.Add(after:=Worksheets(Worksheets.Count)).Name = "title_rangeWs_Sheet"
Else
Sheets("title_rangeWs_Sheet").Delete
Sheets.Add(after:=Worksheets(Worksheets.Count)).Name = "title_rangeWs_Sheet"
End If
Set datarange = Sheets("title_rangeWs_Sheet")
title_range.Copy
datarange.Paste Destination:=datarange.Range("A1")
sheet.Activate
For i = (titlerow1 + title_range.Rows.Count) To lr1
On Error Resume Next
If sheet.Cells(i, verticle_colmn) <> "" And Application.WorksheetFunction. _
Match(ws.Cells(i, verticle_colmn), sheet.Columns(icolmn1), 0) = 0 Then
sheet.Cells(sheet.Rows.Count, icolmn1).End(xlUp).Offset(1) = sheet.Cells(i, verticle_colmn)
End If
Next
dataset = Application.WorksheetFunction.Transpose(sheet.Columns(icolmn1). _
SpecialCells(xlCellTypeConstants))
sheet.Columns(icolmn1).Clear
For i = 2 To UBound(dataset)
sheet.Range(title1).AutoFilter field:=verticle_colmn, Criteria1:=dataset(i) & ""
If Not Evaluate("=ISREF('" & dataset(i) & "'!A1)") Then
Sheets.Add(after:=Worksheets(Worksheets.Count)).Name = dataset(i) & ""
Else
Sheets(dataset(i) & "").Move after:=Worksheets(Worksheets.Count)
End If
datarange.Range(title1).Copy
Sheets(dataset(i) & "").Paste Destination:=Sheets(dataset(i) & "").Range("A1")
sheet.Range("A" & (titlerow1 + title_range.Rows.Count) & ":A" & lr1) _
.EntireRow.Copy Sheets(dataset(i) & "").Range("A" & (titlerow1 + title_range.Rows.Count))
Sheets(dataset(i) & "").Columns.AutoFit
Next
datarange.Delete
sheet.AutoFilterMode = False
sheet.Activate
Application.DisplayAlerts = True
End Sub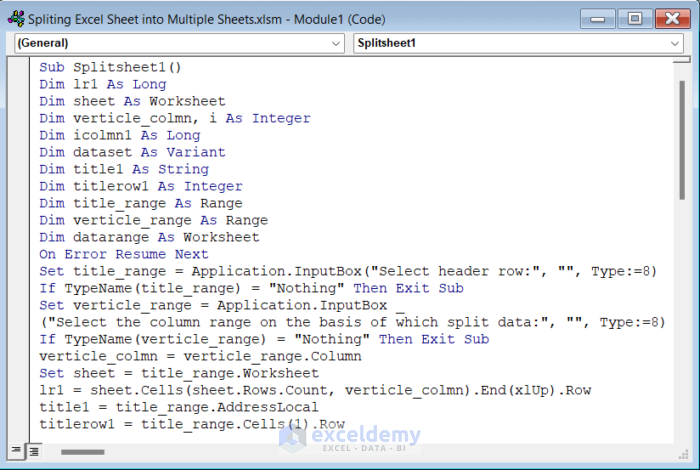
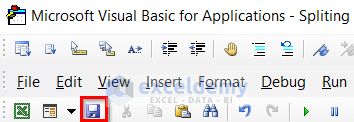
- Click on the save button to save the code and return to your worksheet.
- Go to the Developer tab and click on Macros.
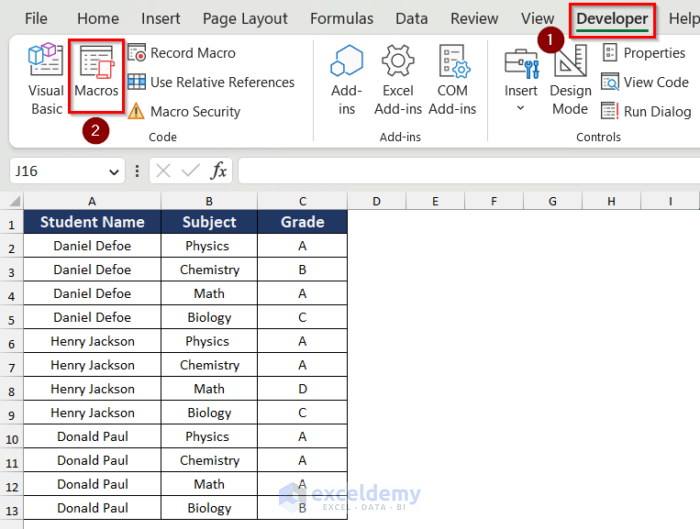
- The Macros box will appear.
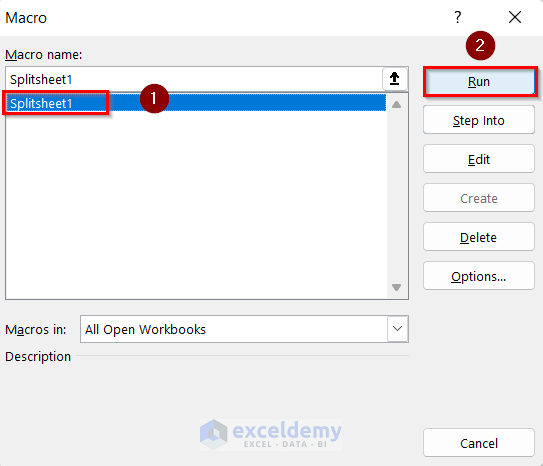
- Select Splitsheet1.
- Click on Run.
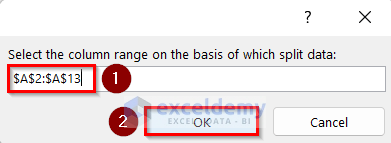
- The Select header row: dialog box will open up. Select the range of the header row and press OK.

- The Select the column on the basis of which split data: Wizard will pop up.
- Select the Student Name column and press OK.
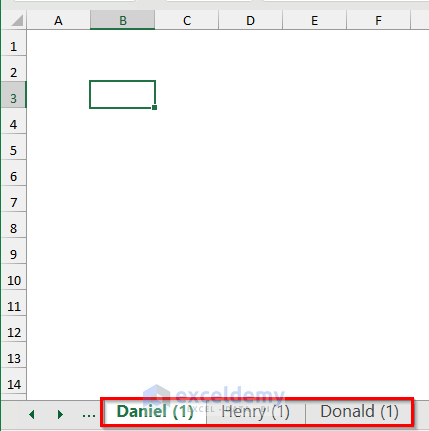
- You will get the three sheets for Daniel Defoe, Henry Jackson, and Donald Paul as below.

Read More: How to Split a Workbook to Separate Excel Files with VBA Code
Practice Section
We’ve included a practice sheet in the download file where you can test these methods.

Download the Practice Workbook
Related Articles
- How to Split Sheet into Multiple Sheets Based on Rows in Excel
- How to Split Excel Sheet into Multiple Files
- How to Enable Side-by-Side View with Vertical Alignments in Excel
- Excel VBA: Split Sheet into Multiple Sheets Based on Rows
<< Go Back to Split Excel Cell | Excel Worksheets | Learn Excel
Get FREE Advanced Excel Exercises with Solutions!

Hi
Really useful tool – is there a limit on character length for the data being used. I’m having an issue where some tabs are not being prepared and that’s the only thing I can think of.
Thanks
Hello Richard,
Thanks for your question. The maximum number of sheets in a workbook is 255. So, if you have values for more than 255 rows in a sheet on the basis of which you will create multiple sheets then you may face a problem.
Method 5 works like a charm. Very easy to use. Did not have to amend a single line.
“Hardest” part was getting Excel to show Developer Menu on the band. 😀
Hello MRA,
Thanks for your appreciation. Stay with us always.
Best Regards
Tanjima Hossain
On spreadsheets with many rows, this script seems to hang and loop. Any idea why?
Hi RICK,
The maximum number of sheets in a workbook is 255. So, if you have values in rows on basis of which you will split your sheet for more than 255 rows, then you may face a problem.
This was so useful. Thank you so much for helping us who are Excel deficient.
Dear Adam,
Thanks for your appreciation.
Shamima | Project Manager | ExcelDemy
I’ve been using the VBA code in the last section and it works very well. I’m trying to automate a very time consuming cut/paste process for a colleague and I think this will really help.
I’d like to remove the input boxes from the start of the script as the source data is always in the same place, but it’s complaining if I try to hardcode the ranges. Any pointers?
Also, I’d like to paste in to the new sheets without it auto-adjusting the row widths. This is also defeating me.
Thanks for your posts, it’s really helpful.
Hello Simon,
You are most welcome. Thanks for your appreciation and feedback. To hardcode the ranges and remove the input boxes from the script, you can directly assign the ranges in the code. Replace the lines where Application.InputBox is used with specific references like this.
To stop auto-adjusting row widths when pasting, remove the Columns.AutoFit line.
Regards
ExcelDemy
Brilliant, that worked. Thanks so much for your help.
Hello Simon Gray,
You are most welcome. Glad to hear that the solution worked. Thanks for your appreciation and feedback. Keep learning Excel with ExcelDemy!
Regards
ExcelDemy